To avoid these ads, REGISTER NOW!

Saving a Craftsman Tool Chest

Zeeman

Well-known member
Joined
Mar 21, 2016
Messages
1,185
Location
Bartow County Georgia
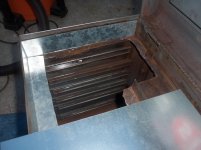
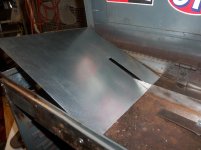
I finally found this chest that will match my lower cabinets, but it is in terrible condition. I smells like tacos (no kidding), is rusty, bent, missing the lock, has a ton of holes from the rivets that were in it, and generally hard to like. So why am I trying to fix it? Because I've been looking for one or two for several years, but they just don't seem to show up near me, or they sell before I can get there. Here are some pictures of what I started with, and I'll try to document my progress. The previous owner riveted on a lot of galvanized sheet metal to cover the big rusted out spots, and must have used it in a taco business. The more I got into the project, the worse it got. Anyway, I'm determined to make it look much better. Probably not like new, but better.
The pictures when I first got it are on my phone, and I have not tried to upload them yet.


To avoid these ads, REGISTER NOW!
OP
Z

Zeeman

Well-known member
Joined
Mar 21, 2016
Messages
1,185
Location
Bartow County Georgia
Here are some pictures of how I repaired/am repairing a few areas.
 

Attachments

  • 100_1053.jpg
    100_1053.jpg
    141.1 KB · Views: 371
  • 100_1044.jpg
    100_1044.jpg
    146.6 KB · Views: 376
  • 100_1029.jpg
    100_1029.jpg
    134.2 KB · Views: 370
  • 100_1041.jpg
    100_1041.jpg
    133.6 KB · Views: 364

someofusgotfarmingtodo

Active member
Joined
Oct 1, 2016
Messages
40
Location
PA
Wow Zeeman, you got your work cut out for you. Looks like a good project, looking forward to seeing more photos of your work on it. :thumbup:
 
OP
Z

Zeeman

Well-known member
Joined
Mar 21, 2016
Messages
1,185
Location
Bartow County Georgia
Wow Zeeman, you got your work cut out for you. Looks like a good project, looking forward to seeing more photos of your work on it. :thumbup:

Yep, a lot of work, a long row to hoe! I have next week off, so i hope to make more progress. The paint that was on it does not want to come off easily, and I've hit it with every sander, and wire brush I have. It laughs at a wire cup on my grinder. Once the paint is off, there is the rust issue.


yhprum

Well-known member
Joined
Jul 27, 2006
Messages
1,381
Location
Brisbane Australia
if you fill up a big enough garbage can with water and citric acid, and put in, it will dissolve the rust. One source is concrete paint etch.
 

thehorse13

Well-known member
Joined
Mar 15, 2015
Messages
3,477
Location
Jefferson County, WV
You really should consider dipping that entire box or media blast it if you can't find a dipping tank. Of course proper cleaning and prep is needed post blast/dip as well. I'm sure you know this already.

Getting that patch to set up cleanly will be a challenge for sure. I've taken on insane projects in the past and when looking at the condition of the rest of the top tray, it might be easier to find a donor box and weld in an entire new top tray area.
 
OP
Z

Zeeman

Well-known member
Joined
Mar 21, 2016
Messages
1,185
Location
Bartow County Georgia
Thanks for the replies. I will look into dipping, or blasting. My current compressor is not big enough to blast, but I might be able to borrow one. The sunshine red will be a while for sure!
 

Ridjobradi

Well-known member
Joined
Sep 28, 2015
Messages
70
Evaporust works amazingly well. You can soak rags in it to lay over the rusted portions and then put plastic wrap over it to keep the keep it from evaporating away. It's too expensive to buy enough to dip your entire toolbox at one time.

Sent from my SM-T330NU using Tapatalk
 

rsanter

Well-known member
Joined
Dec 22, 2007
Messages
18,492
Location
visalia ca
I recomend dipping over blasting
The blasting can warp the thin metal and it will get grit everywhere but will not derust areas you cannot see.

A garbage can full of citric or oxalic acid will eat all the rust and leave the base metal

Bob
 
OP
Z

Zeeman

Well-known member
Joined
Mar 21, 2016
Messages
1,185
Location
Bartow County Georgia
Yep I do guys. I'm pretty determined to make it well again. Hope to be able to post some progress soon. Feel free to chime in with suggestions. I don't have access to a welder at this time, so it's rivets, and sweat!
 

rsanter

Well-known member
Joined
Dec 22, 2007
Messages
18,492
Location
visalia ca
Yep I do guys. I'm pretty determined to make it well again. Hope to be able to post some progress soon. Feel free to chime in with suggestions. I don't have access to a welder at this time, so it's rivets, and sweat!

Please no rivets......

Look into silver solder. You can make the replacement pieces, use a hidden lap joint
 
To avoid these ads, REGISTER NOW!
OP
Z

Zeeman

Well-known member
Joined
Mar 21, 2016
Messages
1,185
Location
Bartow County Georgia
OK, sell me on the silver solder. I've never done that.
Thanks for all the suggestions. I'm thinking about the dipping. Here are a few more pictures.
One of the drawers.

 
OP
Z

Zeeman

Well-known member
Joined
Mar 21, 2016
Messages
1,185
Location
Bartow County Georgia
Here's the rolling cabinet that the chest will sit on. I'll have to find some better, completed pictures. This was a pretty labor intensive project too, but not like the chest.


OP
Z

Zeeman

Well-known member
Joined
Mar 21, 2016
Messages
1,185
Location
Bartow County Georgia
+1
That's not even a ball bearing model. I think you can buy a new Standard Duty chest for less than $100 nowadays...:dunno:

http://www.sears.com/craftsman-26in...SellerId=Sears&prdNo=6&blockNo=6&blockType=G6

Yes, I really want it bad. I like the old vintage stuff. It was well made, and it just makes me feel good to see it in the garage, even better to get tools out of it that I used when I was a teenager. I don't care about ball bearings in drawers one bit. If I wrenched for a living I would probably have drawers with ball bearings in my work cabinets, but still no ball bearings in my stuff at home. The new 100 dollar stuff is nowhere near the quality of the 70's and earlier stuff.
 

altersaddle

Well-known member
Joined
Jan 31, 2015
Messages
349
Location
Victoria, BC
That looks like my Triumph!

To properly repair that I think you should weld it. An oxy-acetylene kit with a 000 tip would work, with patience. A MIG or TIG would also be just fine with the right kit.

Another option would be to get new drawers made up by a competent sheet metal shop - it's not complex, but could be a bit expensive for the shop time.
 

taumac

Well-known member
Joined
Aug 30, 2011
Messages
8,104
Location
Brooksville, Fl
Yes, I really want it bad. I like the old vintage stuff. It was well made, and it just makes me feel good to see it in the garage, even better to get tools out of it that I used when I was a teenager. I don't care about ball bearings in drawers one bit. If I wrenched for a living I would probably have drawers with ball bearings in my work cabinets, but still no ball bearings in my stuff at home. The new 100 dollar stuff is nowhere near the quality of the 70's and earlier stuff.


[emoji482] I think some wouldn't understand the addiction of the G/R era vintage tool boxes. Once you get one you have to get MORE.

If your gonna be collecting more I really think you should browse CL for a small Lincoln mig unit or bite bullet and get like a Lincoln 140 or similar unit from Hobart, or Miller.
 

rsanter

Well-known member
Joined
Dec 22, 2007
Messages
18,492
Location
visalia ca
Silver solder will allow you to join the new and old pieces af material and it will appear to be seamless when done. Rivets will be temporary solution that you will want to replace later and have to undo the damage of the added holes.
Silver solder can be done with a propane torch

How about finding a local member with a welded that will help out.
If you were more local to me I have a brake and a spot welded that would make quick work of replacing whole sections of the box

Bob
 

exmaxima1

Well-known member
Joined
Jun 25, 2011
Messages
6,339
Location
Midwest
Yes, I really want it bad. I like the old vintage stuff. It was well made, and it just makes me feel good to see it in the garage, even better to get tools out of it that I used when I was a teenager. I don't care about ball bearings in drawers one bit. If I wrenched for a living I would probably have drawers with ball bearings in my work cabinets, but still no ball bearings in my stuff at home. The new 100 dollar stuff is nowhere near the quality of the 70's and earlier stuff.

I understand completely. I still have a Remline chest that I bought new in the 80's, and it works fine without ball bearings. I also have a number of vintage Waterloo-made CM cabinets, and when you get over 25 lbs in them, the drawers are a struggle. My small 1996 Matco Anniversary box (bearings) has no problem even when filled with ****. I guess my point was that if I were willing to invest the effort into a vintage tool box, I would start with something that will truly perform as well or better than what's currently available, but I appreciate that you simply like the "vibe" of the old CM chests. Good Luck.:beer:
 

WWShop

Well-known member
Joined
Aug 25, 2015
Messages
948
Location
MN
If you can pull this off this would be the most impressive restoration i have seen on GJ. I see a lot of potential in old rusted tools, but i must admit I would not have even attempted trying to restore this box. Looking forward to more pics!
 
OP
Z

Zeeman

Well-known member
Joined
Mar 21, 2016
Messages
1,185
Location
Bartow County Georgia
I don't know about that WWShop, but it will at least impress me a little. Here are some more pictures. I changed my mind on trying to piece in the top tray by overlapping some thin metal, so I cut out the funky angled piece over the center drawers, and split it along the top bracket of the drawers. This will be much cleaner fit, and easier to weld.

The part where the left drawer locking mechanism goes is now gone, and I'll just bend some 90 degree angles on my sheet metal and weld them to the sides and back.
Here is the front part where I plan to **** join the two pieces of sheet metal for the bottom. I've cut out the part to the left in the pictures, and now it's one semi-straight boo boo from the front to the back.

The screwdriver is pointing to where the **** joint will go.
 
OP
Z

Zeeman

Well-known member
Joined
Mar 21, 2016
Messages
1,185
Location
Bartow County Georgia
Oh yeah, that made one nice big rectangle. I'll have to recreate the opening for the drawer locking mechanism to go through, but it shouldn't be too bad.

Man, this is getting ugly, but it's gotta go.
 
OP
Z

Zeeman

Well-known member
Joined
Mar 21, 2016
Messages
1,185
Location
Bartow County Georgia
Hopefully tomorrow I'll be able to media blast the whole thing at a friend's house, and maybe get some metal formed up for the bottom. More to come.
 
OP
Z

Zeeman

Well-known member
Joined
Mar 21, 2016
Messages
1,185
Location
Bartow County Georgia
I would do the same just because i like the lid. Nice work!

I think the lid is cool too. I guess when you like something, you just like it. I like anything old though, and fixing stuff up keeps me out of trouble. When I stay out of trouble, I get the nice things I want from my wife.
 
OP
Z

Zeeman

Well-known member
Joined
Mar 21, 2016
Messages
1,185
Location
Bartow County Georgia
I'll see how bad it looks after blasting, but I'll probably skim it with some body filler. As much as I don't like working with that stuff, I'd be unhappy with the end result if I just primed and painted it with the pits. That would be the pits!
 
To avoid these ads, REGISTER NOW!
Top Bottom