To avoid these ads, REGISTER NOW!

Saw cutting board

OccupantRJ

Well-known member
Joined
May 15, 2009
Messages
11,561
Location
Eastern North Carolina
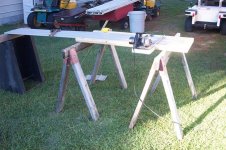
I'm starting to install vinyl on my workshop, so I knew from experience I would need something to help cut the vinyl pieces square, and to length consistantly. Had a cutting board previously some years back, but it was used so seldom that I disposed of it to save space. Took a piece of 3/4" plywood and added a couple of sheet metal slides for my 4" Craftsman saw to run on, insuring that they were square to the trough for the material. The slides are mounted with countersunk head screws to clear the saw. The countersinks were created by dimpling the sheet metal slides. The fine tooth blade is run backwards on the saw to prevent grabbing. I've had the little saw since the 70's, and it was underwater for a week once. Dried it out and fired it back up. The pictures should be self explanatory, as the board has to be made to fit your situation. If you have ever had to cut vinyl siding, you will appreciate this tool. Enjoy.

RJ
 

Attachments

  • Saw guide 001.jpg
    Saw guide 001.jpg
    112 KB · Views: 85
  • Saw guide 002.jpg
    Saw guide 002.jpg
    95.9 KB · Views: 104
  • Saw guide 003.jpg
    Saw guide 003.jpg
    85.9 KB · Views: 86
  • Saw guide 004.jpg
    Saw guide 004.jpg
    118.4 KB · Views: 91
  • Saw guide 006.jpg
    Saw guide 006.jpg
    77.2 KB · Views: 82
  • Saw guide 007.jpg
    Saw guide 007.jpg
    138.1 KB · Views: 84
To avoid these ads, REGISTER NOW!

Brad54

Well-known member
Joined
Jun 13, 2006
Messages
4,646
I have two rip boards for my circ saw: one 8 feet long, the other 4 feet.
Both are about 6 to 8 inches wide.
I glued another piece of plywood to the top of it, that is about 4 inches wide, running the full length.
Then I took my saw, set it on the board so the shoe of the saw was tight against the top piece as a guide, and ran the blade down the bottom piece. Now the outer edge of the bottom piece is perfectly aligned with the saw blade, while the top piece is aligned with the saw's shoe.
This is the saw guide, matched to the saw.
When you're cutting a piece of wood (8 feet or 4 feet), set the outer edge of the board even with the cut marks, clamp it in place, and run the saw over it.

Drill a hole through one end and hang it on the wall.

Works great for sheet goods, but wouldn't work for that siding... but thanks to you, I think I now know how I'm going to cut some metal siding!

-Brad
 
To avoid these ads, REGISTER NOW!
OP
O

OccupantRJ

Well-known member
Joined
May 15, 2009
Messages
11,561
Location
Eastern North Carolina
That's great, Brad. My dad was a woodworker by trade, so I grew up with the saw runner guide you are describing. They are the next best thing to having a table saw. They also work great for cutting a straight edge on a crooked board before running it through a table saw. Sharing ideas is what it's all about.

RJ
 

z28toz06

Well-known member
Joined
Nov 30, 2005
Messages
1,012
Location
Connecticut
That's interesting about the backward blade thing. My plumber buddy showed me to run my drill bits in reverse when drilling in to vinyl siding to prevent shattering it.
 

Bigpigdave

Well-known member
Joined
Jan 2, 2010
Messages
321
Location
Camden, IN
I used to help frame houses as a second (or third) job when I was much younger. We used a setup like you have to cut lumber to length. You could set the cutting guide right on the stack of lumber and cut several pieces at once. Actually went much faster than using a radial arm saw or power miter saw. I don't know what the standard is today but I am sure some framing crews still use this idea. It really saves on moving lumber (material) any more than needed.
Dave
 
To avoid these ads, REGISTER NOW!
Top Bottom