To avoid these ads, REGISTER NOW!

Saylor Beall 705

Chris_H

Member
Joined
Dec 8, 2014
Messages
15
Location
La Crosse, WI
New guy here. First post and it is regarding this new to me 1984 Saylor Beall compressor. I picked it up (not literally, we used a forklift) for $300, and after reading some of the other threads on these beasts, I'm feeling pretty good about it. It is already single phase, I heard it run, and it doesn't make any scary noises. It has a brand new check valve in it. It pumps to a tank pressure of about 70psi before the safety valve on the intercooler pops off.
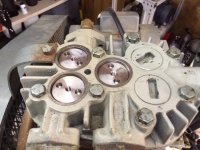
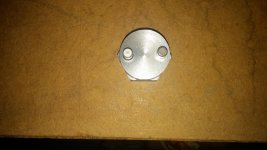
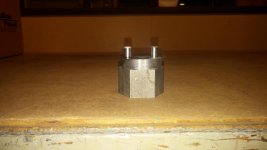
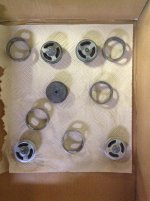
I removed the valves for inspection and cleaning. The HP Intake valve was rusted into the head and I needed to use penetrating oil and some force to remove it. I tossed them all in my ultrasonic cleaner with some Simple Green and they cleaned up pretty well and they are all functional. A local compressor guy said if it isn't the valves, it is likely the head gasket allowing air between the cylinders.
I ordered gasket set 4311 from SB so I'll have all gaskets available. Because the valves are out, I'm considering just going ahead with the head gasket replacement, and hoping I can stop there. I saw the other 30 page post and it appears the heads don't just fall off on the 705 pumps. Any helpful head gasket removal tips would be greatly appreciated!
Thanks for the insight, this site is a great resource!
 

Attachments

  • SB 735.jpg
    SB 735.jpg
    143.8 KB · Views: 352
  • SB Valves.jpg
    SB Valves.jpg
    146.6 KB · Views: 284
To avoid these ads, REGISTER NOW!

Ducs

Member
Joined
Dec 7, 2014
Messages
22
Location
Toronto, ON
Congrats on a steal of a deal and welcome to the forum. I am in the process of a rebuilt of a Kellogg 335 myself. It's actually very similar to your 705. I would recommend a combination rubber hammer, piece of soft wood, pine 2x4 works and tapping the head, going around. If that doesn't work, bigger hammer and the same tapping technique should work.
 

DekeT

Well-known member
Joined
Aug 12, 2011
Messages
2,234
Location
USA
The intercooler is before the HP intake so the only pressurized air to get into the tank must have been coming through the leaky gasket into the HP piston. And the intercooler pressure was getting really high because it was stopped by the rusted valve? Is that what you figure happened? If so, lucky for you that valve worked.

It is not that much more trouble to open it up and replace the rings, gaskets, clean the unloader, remove any crappy oil in the bottom of the block, inspect the blowoff valves, etc. . As long as you are started just refurbish it all(don't mean pistons and crank). IMHO, putting some money into a Saylor Beall maintenance is money very well spent. You won't have to open it up for another 30 years. If Kams spots this thread and comments, you will be getting the best info.

Oh yeah, you **** for getting a SB so cheap! :D
 

Tarnished

Well-known member
Joined
Feb 8, 2012
Messages
721
Location
SW Ohio
Chris: YOU ****!!!:lol_hitti

I just picked up a 705 5hp 80gal this week. Admittedly it is slightly newer than yours, (April 2013) but that was a great price for that compressor. Even if you have to do a little maintenance, you are way ahead.
What size is your tank? Looks smaller around but taller than my 80gal.
Should be the last compressor you or you kids ever need.... :rocker:
(Pay no attention to the wiring :eyecrazy: as it was only for test run, and has been replaced now)
 

Attachments

  • As found.JPG
    As found.JPG
    106.9 KB · Views: 243
  • temp wire.JPG
    temp wire.JPG
    110.4 KB · Views: 208
OP
C

Chris_H

Member
Joined
Dec 8, 2014
Messages
15
Location
La Crosse, WI
Glad I'm getting such a warm welcome:D

Mine is a 60 gallon, SB PN VT-735-60, but considering it is replacing an oil-less Craftsman 30 gallon, I think it will be just fine.

I work at a place that I could get IR compressors at cost, but based on recent reviews, I couldn't justify spending $1000+ a new IR. Cast Air was highly recommended, but they were even more money, and likely a better compressor too. I asked around a bit and came up with this Saylor-Beall, and as you've mentioned, I think it will be the last one I ever need.
 

C96

Well-known member
Joined
Nov 30, 2013
Messages
1,251
Cast Air was highly recommended, but they were even more money, and likely a better compressor too.

Lol…From what I’ve read, the Castair compressors are Saylor-Beall clones.

There have been many companies copying the S-B pumps; Eaton is another company doing this as well.

I guess if you’re going to copy something, you might as well copy the best, Saylor-Beall.

Oh and welcome to the forum, enjoy! :beer:
 

MacMcMacmac

Well-known member
Joined
Oct 21, 2014
Messages
1,578
Location
canada
If there isn't an appreciable amount of oil on the piston crowns, I wouldn't pull the head or cylinders. If it were me, I'd disassemble the valves, lap them with some light oil or WD40 on a piece of glass with some wet-dry or 800 grit paper sheets laid on it, reassemble the valves and leak test them by filling them with solvent to see if it drips through the disc/seat seal. If the valves check out, I'd reinstall and fire it up. I'd put a 100psi pressure gauge in the intercooler safety relief valve port and see what pressure you get. Should be steady around 40psi with some mild flickering of the needle. If it is bouncing from 0 to full pressure, you have bad LP valves. If the pressure climbs steadily with discharge, you still have either bad valves or a head gasket problem. Oddly enough, the only reciprocating compressor that I personally saw that blew the gasket between the cylinders was a Saylor Beall knockoff that looks like your pump. Maybe it's a quirk of this particular pump design? That pump would go up to 70psi then pump no more, which was a bit of a weird problem to diagnose.

Those knockoffs are nowhere near the quality of the original design though. They had quite a few weak points.
 
Last edited:
OP
C

Chris_H

Member
Joined
Dec 8, 2014
Messages
15
Location
La Crosse, WI
If there isn't an appreciable amount of oil on the piston crowns, I wouldn't pull the head or cylinders. If it were me, I'd disassemble the valves, lap them with some light oil or WD40 on a piece of glass with some wet-dry or 800 grit paper sheets laid on it, reassemble the valves and leak test them by filling them with solvent to see if it drips through the disc/seat seal. If the valves check out, I'd reinstall and fire it up. I'd put a 100psi pressure gauge in the intercooler safety relief valve port and see what pressure you get. Should be steady around 40psi with some mild flickering of the needle. If it is bouncing from 0 to full pressure, you have bad LP valves. If the pressure climbs steadily with discharge, you still have either bad valves or a head gasket problem. Oddly enough, the only reciprocating compressor that I personally saw that blew the gasket between the cylinders was a Saylor Beall knockoff that looks like your pump. Maybe it's a quirk of this particular pump design? That pump would go up to 70psi then pump no more, which was a bit of a weird problem to diagnose.

Those knockoffs are nowhere near the quality of the original design though. They had quite a few weak points.

Thanks! Why on glass? Lap the surface of the seats that contact the disks? That makes sense when I think about getting them to seal. The tops of the Pistons looked oil free to me.
 

Ducs

Member
Joined
Dec 7, 2014
Messages
22
Location
Toronto, ON
You can't lap the seat, there is no access to it to lap it. Lapping the valve will only lap the actual piston side surface of the valve. The seat seal critically relies on the condition of the lip in the head, copper compression gasket and the condition of the lip on the valve not forgetting about spacer and valve retainer pressing down on the whole assembly.
Internally, valve sealing relies on the spring and disc. Condition of the disc, the corresponding mating surface on the valve body and spring tension are critical.

Just clean everything nice, check for pitting on the head and valve bodies, get new discs, springs, copper gaskets and valve retainer orings.
 

MacMcMacmac

Well-known member
Joined
Oct 21, 2014
Messages
1,578
Location
canada
Thanks! Why on glass? Lap the surface of the seats that contact the disks? That makes sense when I think about getting them to seal. The tops of the Pistons looked oil free to me.

Glass supported on a firm surface will give you a nice flat lapping surface to clean up the valve seats. Hold the seat against the paper, move it in a figure 8 motion and check regularly to see that it is coming up nice and bright, with no low spots. It shouldn't take much at all. Unless there is something novel about the design of a SB valve, taking them apart should reveal a spring, a disc, and a flat surface the disc seals against. Usually, the seat is made up of two concentric sealing surfaces that the disc rides on. If there is no appreciable amount of rust or filth on the valve seat, you might just get by with a good solvent cleaning with a rag. Whatever you decide to do, once the valves are back together, fill them with solvent and check for drips before you reinstall them in the head. If the seats and discs are sealing properly, there will be no, or very little leakage. If they drain out in less than a minute, they should probably be lapped a bit more.
 
Last edited:
OP
C

Chris_H

Member
Joined
Dec 8, 2014
Messages
15
Location
La Crosse, WI
Just a quick update.
I haven't had a chance to work on lapping the valves yet, as I've been preparing my garage for the air compressor. Making sure the 220V circuit is up to the task, and trying to get things put away. A kayak on the floor takes up a lot of space!:D

I did find that somewhere along the way, a valve job was done and the spacers that are supposed to be different sizes for intake and exhaust, are all the same size. I ordered two Exhaust valve spacers, and with that in mind, if the rebuilder missed a detail like that, the chances of a spring being incorrect is probably pretty good. I ordered a full valve rebuild kit and I'll see where that gets me. I'd like to be able to stop at a proper valve job and an oil change, but I bought a gasket set for good measure.

I have enjoyed the last couple of nights working on things in my garage. The 30W LED flood lights that were recommended in another thread work very well!
 
OP
C

Chris_H

Member
Joined
Dec 8, 2014
Messages
15
Location
La Crosse, WI
I contacted SB before I ordered the 4113-E Spacers. According to their documentation, and the guy I talked to at SB, the exhaust valves get these spacers. However, on my pump, part 4093-R (Retainers) are two different thicknesses. Two are thick and one is thinner. If there are two exhaust valves that need these retainers (high pressure and low pressure), as well as the high pressure intake, I think I would need 2 of the thinner retainers and one of the thick. The thin would go with the Exhaust valves that I just ordered the 4113-E spacers for. So if I use the 4113-E spacer with the thick 4093-R, The retainer doesn't seat deep enough in the head to seal the 4083 caps. This is more than likely why I had 5ea 4113 parts in my compressor and none of the 4113-E spacers. My compressor is a VT-735-60 (60 gallon) Ser. # 5A-46-KO.
 

Attachments

  • image3.jpg
    image3.jpg
    18.1 KB · Views: 74
  • image2.jpg
    image2.jpg
    16.9 KB · Views: 75
  • image1.jpg
    image1.jpg
    17.3 KB · Views: 74
To avoid these ads, REGISTER NOW!

Ducs

Member
Joined
Dec 7, 2014
Messages
22
Location
Toronto, ON
Essentially you should have this:

SB_V.png
 
OP
C

Chris_H

Member
Joined
Dec 8, 2014
Messages
15
Location
La Crosse, WI
Yeah, I have that document too. Both of the threaded caps in the photo I posted have the threaded hole in the center like the 4093-R, but after working with Jerry at Saylor-Beall, I guess I've come to the conclusion that perhaps somebody tapped two 4091-R retainers and used the 4113 retainers instead of the 4113-E so the tapped retainers would go into the head far enough to seat the 4083 parts.
The plan is to order 2ea of the 4093-R parts, but they don't have any with the slotted top, they all have the holes in them now so I need a special tool for two retainers.
Does anyone have a source for the pin spanner or gland wrench needed for this? I see a few threads where folks have made them. I don't have that abilility.

Thanks!
 
OP
C

Chris_H

Member
Joined
Dec 8, 2014
Messages
15
Location
La Crosse, WI
IT'S ALIVE! I put all of the proper valve parts in, wired the compressor to the 220V breaker, and fired it up. It pumped right up to about 125psi, which is presumably what the pressure switch is set at. I didn't use any of the gaskets, but I'll hang onto them, in case I notice leaks as I use it. An oil change is next on the list.
What I found while I had the valves out was that there were some improper parts put in it at some point. When I discovered that the spacers were all the same 4113, and not different for the exhaust valves (4113-E) as the SB manual describes, I ordered a valve rebuild kit. I figured there was no telling what valve parts were installed if the spacers weren't even correct. It turns out that all but one of the springs also appeared to be the low pressure intake springs, and I was short 2ea 4093. As the earlier photos show, my compressor had some thicker caps that wouldn't allow them to recess into the head enough to seal. This meant I also needed the Valve removal tool 6352 from SB. I was charged what I considered a reasonable $49 for the tool. I'm not sure why the other tool is $85+, but this one worked great! At any rate, I'm a happy camper.
 

Attachments

  • IMG_4052.jpg
    IMG_4052.jpg
    137.7 KB · Views: 131
  • 1222140825.jpg
    1222140825.jpg
    146.2 KB · Views: 106
  • 1222140826.jpg
    1222140826.jpg
    136.8 KB · Views: 114

C96

Well-known member
Joined
Nov 30, 2013
Messages
1,251
Glad you got it all worked out. Saylor-Beall is top notch and virtually bullet proof. One of the last 100% American made compressors period.
 

nfk

Well-known member
Joined
May 27, 2011
Messages
124
Location
Kansas
I hate to resurrect such an old thread but I am wondering why the picture in the first post shows only one line coming out of the unloader and the picture in post #5 has two lines out of the unloader? The ones I am finding for sale are the same way, some have one line, some two.
 

nfk

Well-known member
Joined
May 27, 2011
Messages
124
Location
Kansas
I called Saylor Beall this morning and asked about the additional line out of the unloader. I was told they do not put that extra line on from the factory and it is typically on the imported clone models as a breather. Althought the picture in post #5 is not a clone and does have the breather line
 

Tarnished

Well-known member
Joined
Feb 8, 2012
Messages
721
Location
SW Ohio
I called Saylor Beall this morning and asked about the additional line out of the unloader. I was told they do not put that extra line on from the factory and it is typically on the imported clone models as a breather. Althought the picture in post #5 is not a clone and does have the breather line
NFK: The compressor in the fifth pix is mine.
I was told by the dealer that I purchased my unit from that the extra line from the unloader to the breather was installed by them (the dealer). IIRC the unloaded was causing oil to leak out and the line to the breather takes care of it. Installed by dealer as low cost solution to known SB problem. That's all I can tell you, but I have had 0 oil leaks or problems since install. And I can assure that mine is not a clone.
 

Attachments

  • Breather line.jpg
    Breather line.jpg
    94.4 KB · Views: 116

nfk

Well-known member
Joined
May 27, 2011
Messages
124
Location
Kansas
NFK: The compressor in the fifth pix is mine.
I was told by the dealer that I purchased my unit from that the extra line from the unloader to the breather was installed by them (the dealer). IIRC the unloaded was causing oil to leak out and the line to the breather takes care of it. Installed by dealer as low cost solution to known SB problem. That's all I can tell you, but I have had 0 oil leaks or problems since install. And I can assure that mine is not a clone.
Thanks for the reply. I knew there must be an explanation for the extra line.
 

On-Wheel

Well-known member
Joined
Oct 6, 2014
Messages
487
NFK: The compressor in the fifth pix is mine.
I was told by the dealer that I purchased my unit from that the extra line from the unloader to the breather was installed by them (the dealer). IIRC the unloaded was causing oil to leak out and the line to the breather takes care of it. Installed by dealer as low cost solution to known SB problem. That's all I can tell you, but I have had 0 oil leaks or problems since install. And I can assure that mine is not a clone.

Anyone know where it leaked oil before the extra line install?
I was breaking in new rings with head off and about every 10 minutes the HP piston shot out some oil.Is that normal?
 

Tarnished

Well-known member
Joined
Feb 8, 2012
Messages
721
Location
SW Ohio
On-Wheel, can't answer your oil question, as mine has never leaked since I have owned it. (Light use) Was dealer installed when I purchased machine.
 

On-Wheel

Well-known member
Joined
Oct 6, 2014
Messages
487
Hey quick reply! I've been reading about these pumps and this is the first I've read or seen that second line going to intake.
Edited:)
 
Last edited:
To avoid these ads, REGISTER NOW!
Top Bottom