To avoid these ads, REGISTER NOW!

Saylor Beall Gas Air Compressor Rebuild - 705 Pump

TL95SVT

Member
Joined
Jan 16, 2011
Messages
21
Location
Charlotte NC
Hey Guys,

For the last 10-15 years i have been fighting with air compressors... like most do. Never enough air... and the air you do have is watery/greasy. I have been sand blasting and need more air. I do all my work in my shed and have limited power... so my only option is gas. I currently have a 5hp Honda Wheelbarrow Compressor to blast with. I can blast wide open and it fluxuates from 60-80psi. I actually bought an extra 10 gallon storage tank hoping it would help... didn't. I then added a small 2hp compressor to the setup.. so a 5hp gas and 2hp electric feeding into the storage tank. Still not enough. I bought another 5hp gas compressor... Have 2 5hp gas compressors feeding into the storage tank. That helped a bit.. i can blast wide open and not drop below 90 psi. But its still not enough, i need to blast around 125psi. So the need for a 175psi compressor comes in.

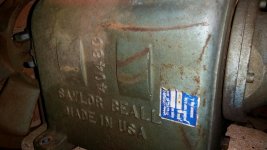
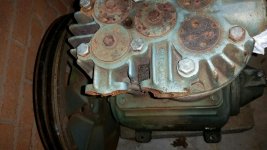
I am the type that would rather buy something older that is well built and redo it. I found a saylor beall gas air compressor not far from me for $175. It used to be mounted on the a trailer, but the trailer was hit. From what i can see, the intercooler was hit and it snapped the connecting point on the head. The mounting brackets on the tank are slightly bent and some paint missing. The previous owner took the engine off of it... so when i bought it, it was just the tank and compressor. It originally came with a kohler engine, but i am a Honda guy!

I checked over the pump and flywheel, seems to be in good shape minus the head. It has the intercooler which is not pictured, luckily it was not harmed. I would still like to take the side cover off to check everything out. With the kohler engine, the pump was originally mounted on the left. But since i plan to use a honda engine, i need it mounted on the right. So it kind of works out that the head needs to be replaced, since i need to change the side its mounted on anyways.

I did a ton of research on here about the pump. I need the valve tool... I did a lot of measuring and I found a 3/4 8pt impact socket that i plan to modify. I measured from the outer edge of one hole to the outer edge of the other hole which was 1-3/8. The OD of the socket is 1-3/8. I am hoping to cut the edges of the socket out, leaving just 2 points. There is a lot of meat in the points... i am hoping to file the triangles down to circles. Seems like it will work perfect as long as it doesn't snap... i bought an impact socket hoping it would be stronger than a regular. If it doesn't work.. it was $10 wasted and ill just buy the premade tool.
 

Attachments

  • 20170123_183519-1_1485214717690_resized.jpg
    20170123_183519-1_1485214717690_resized.jpg
    138.5 KB · Views: 74
  • 20170123_183503_1485214716073_resized.jpg
    20170123_183503_1485214716073_resized.jpg
    145.3 KB · Views: 59
  • 20170123_183444_1485214718397_resized.jpg
    20170123_183444_1485214718397_resized.jpg
    146 KB · Views: 69
  • s-l500.jpg
    s-l500.jpg
    50.1 KB · Views: 53
Last edited:
To avoid these ads, REGISTER NOW!

AJ1978

Well-known member
Joined
Apr 27, 2010
Messages
239
Location
Jamestown, PA
Save yourself the headache buy the tool through a Saylor Beall dealer! They were cheaper than the one online. It fits inside a 1-5/8 socket I will try and snap a picture of the tool they sent tonight. Its heavy duty and looks like they machine it in the house.

The plugs are in there pretty tight and the exhaust valve holder on the high side gets gaulded in place! You will need heat for that! And some penetrating oil.

As far as the head I do not have one but you should be able to source one! Do you still have the intercooler? Is it good or is it broke?
 
Last edited:
OP
T

TL95SVT

Member
Joined
Jan 16, 2011
Messages
21
Location
Charlotte NC
Luckily the intercooler did not get damaged. It probably got hit on the bottom and put a lot of stress where it connects to the head. The bolts that went into the head were bent.

The broken parts off the head are in many pieces. Plus i need the opposite head to put the intercooler on the right side of the pump instead of the left.
 
Last edited:

kams1973

ALLIANCE MEMBER
Joined
Oct 3, 2010
Messages
1,585
Location
Amarillo, TX
To swap the discharge/intercooler orientation, you'll most likely need to find a head from a SB707 or clone. If I were in your position, I'd source a head from a clone supplier.
 
OP
T

TL95SVT

Member
Joined
Jan 16, 2011
Messages
21
Location
Charlotte NC
Here is the final tool. Ended up using a 3/4 8-point Proto, 1/2 drive Impact Socket. Cut it with a ginder, and filed the rest by hand. It took a few hours to fine tune it to make sure it was all square. It cost $10 + the time. I had the time and would rather use the $40 savings to upgrade something else on the compressor.

I was able to get the 3 valves out in the back that were covered. The front 2 are badly rusted. I have been using lots of heat and PB Blaster. Guess I'm going to have to do this multiple times. It also doesn't help that the pump is not mounted on the tank... im using a breaker bar and it is moving the whole pump.

I called Saylor Beall, i am going to get the head from them. The head is actually from a 707 pump, but they tap the outlet hole for a 90* fitting... Part # is 4044 (705 Revision).
 

Attachments

  • 20170129_161927-1_resized.jpg
    20170129_161927-1_resized.jpg
    120 KB · Views: 37
Last edited:
OP
T

TL95SVT

Member
Joined
Jan 16, 2011
Messages
21
Location
Charlotte NC
Well i got about 95% of the parts ordered to put it back together... its has taken a lot of research to build it exactly how i want. I will try to post each individual project.

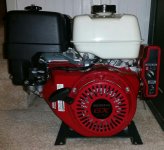
I bought it without an engine, luckily i found this brand new 11HP Honda GX340 on Craigslist for a good deal.... basically got the electric start for the price of only the manual start. Once i get it fully installed in its space, i plan to mount a battery on my wall, hooked up to a battery tender. I'm a honda man! Everything i own has a small honda engine on it. I was originally looking for a 13HP GX390.. but after some research found that Saylor Beall uses the 11hp. So it worked out for the best. I want it to be as close to stock as possible.. less variances from factory the better.
 

Attachments

  • 20170208_194227-1_1486601257853_resized.jpg
    20170208_194227-1_1486601257853_resized.jpg
    132.1 KB · Views: 28
Last edited:
OP
T

TL95SVT

Member
Joined
Jan 16, 2011
Messages
21
Location
Charlotte NC
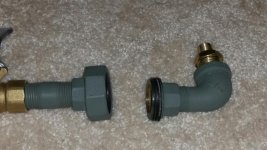
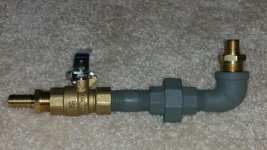
Here is the bottom drain that i designed. I have made a lot of them over the years and learned lots of lessons. I hate how its only 1/4 npt... way too small in my opinion. **** always clogs the hole (when i removed the original valve, it was completely caked behind it). I normally prefer all brass fittings... but i went with mostly iron on this one. I got a 1/4 to 1/2 brass fitting to come out of the tank. I choose the cast elbow because of the long smooth sweep, most brass elbows have a hard corner. I used a pressure union so i could disconnect the assembly in case i had to get in there to clean out a clog. I had this happen before, and there is no way to get the clog out without taking everything apart... its close to the ground and a PITA... so this solves that issue. After the union, just a regular ball valve with a barb end that i will attach a clear braided hose to.
 

Attachments

  • 20170208_194239_1486601255842_resized.jpg
    20170208_194239_1486601255842_resized.jpg
    148.9 KB · Views: 35
  • 20170208_194137_1486601258657_resized.jpg
    20170208_194137_1486601258657_resized.jpg
    148.4 KB · Views: 42
Last edited:
OP
T

TL95SVT

Member
Joined
Jan 16, 2011
Messages
21
Location
Charlotte NC
I was fortunate to get 4 brand new industrial air dryers for free. They are big units made by Pneumax. Luckily one of them had a fitting large enough that screwed right into the tank. The dryer will be at a wall, so i put a 90* elbow on it and a ball valve to shut off the air if need be. I will just put a regular hose fitting into the ball valve. I plan to build an air dryer setup that mounts on the wall.... I am going to use a small regular air hose to connect between the compressor and the dryer to make sure there is enough flex between the 2.
 

Attachments

  • 20170208_194403-1_1486601254832_resized.jpg
    20170208_194403-1_1486601254832_resized.jpg
    101.8 KB · Views: 32
Last edited:
OP
T

TL95SVT

Member
Joined
Jan 16, 2011
Messages
21
Location
Charlotte NC
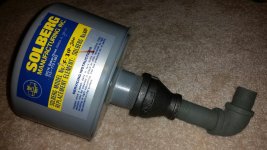
My goal is to make the compressor as quiet as possible. I did a lot of research on here and found out that a lot of the noise comes from the intake. Most threads said to use an elbow and the biggest filter you could afford. So I ended up getting a Solberg F-31P-200. It is rated at 135 scfm, which is about 100 scfm more than stock and has a 2" outlet. I had to buy a 2" to 1" reducer. This thing is HUGE. i didn't realize how big it actually would be. I am priming all the cast fittings for now so they don't rust. I ending up buying a gallon of saylor beall paint... i am going to put everything together, run it till the summer when it warms up. See if there is anything i need to change... If all is well, ill break it back down and paint everything. I am notorious for painting everything and having to change stuff, then i mess up the paint... learned my lesson finally.
 

Attachments

  • 20170210_185930_1486771274178_resized.jpg
    20170210_185930_1486771274178_resized.jpg
    150.3 KB · Views: 33
Last edited:
To avoid these ads, REGISTER NOW!
OP
T

TL95SVT

Member
Joined
Jan 16, 2011
Messages
21
Location
Charlotte NC
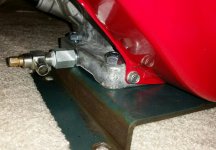
My compressor pump right now has just an oil plug. Every compressor i have had had this same issue... take the plug out an oil goes all over! I have built a few drains in the past with just an extension/elbow. This time i bought an oil drain, with a screw plug and a hose fitting built in. I like this style, seems industrial and is a factory style from a lot of major brands. I got to thinking and realized i would have the same issue with the honda engine! Of course honda uses a weird size thread for their oil drain (M12x1.5 for the GX340, its different for the smaller engines). I looked around and only Fumoto made a quick drain in metric. I like them, but was worried the flange would hit the mounting plate since the engine sits right against it. Plus i am OCD when it comes to things matching! I searched for hours trying to find a metric to standard adapter... i finally came up with a Gates Hydraulic Metric Adapter - Part #G63120-1206 (M12x1.5 to 3/8-18). The adapter is made of steel and feels high quality, it has a oring/crush washer. The inside just had a tiny hole, so i drilled it out to match the bore of the M12 side so the oil would flow and not get stuck on a lip. I spent just as much money on the adapter/drain valve as the Fumoto, but atleast they match. Here is the setup for the engine... The adapter just barely misses the plate. I installed the drain valve with a slight downward slope. The compressor pump will get the same 3/8 Oil Drain Valve minus the adapter.
 

Attachments

  • 20170210_190007_1486771272322_resized.jpg
    20170210_190007_1486771272322_resized.jpg
    149.9 KB · Views: 33
  • 20170210_201614-1_resized.jpg
    20170210_201614-1_resized.jpg
    136.7 KB · Views: 36
Last edited:

sld961

Well-known member
Joined
Oct 28, 2015
Messages
395
Looking good. Keep the pics coming. I love compressor builds.

Sent from my SM-G930V using Tapatalk
 
OP
T

TL95SVT

Member
Joined
Jan 16, 2011
Messages
21
Location
Charlotte NC
How much will silencing the intake make with the 11hp Honda puttering along?

My thoughts exactly... but I am trying everything possible. My shed is somewhat near my neighbors house, so i am trying to be courteous to them and the whole neighborhood. In the summer, i am going to build a small lean-to on my shed to house it. I bought a 2 stroke muffler to attach to the honda muffler basically as an extension. I will make a custom mounting flange and have some special gasket material that i used to use on other exhaust, i plan to use that to make a custom gasket to attach the muffler so no fumes escape. The muffler is about 11" long, I am hoping that it will quiet it down some. The ID of the 2 stroke muffler is close to the honda muffler. It should be a straight shot from the honda muffler into the 2 stroke muffler, i planned it this way.... hoping it doesn't affect the performance of the honda by choking it down. The engine will be near an outside wall of the lean-to... i plan to cut a hole in the wall and run a portion of the 2 stroke muffler outside so the fumes stay out of the lean-to. I plan to have it vented in case they don't escape 100%. I took down a drop ceiling in my basement to put up dry wall, so i have a good bit of ceiling tiles. I plan to put them on the walls of the lean-to to deaden the sound even more. I am going to try my best for it to be as quiet as possible without spending a fortune.


If this is not a mobile compressor why did you install a gas engine?

I only have a 10GA extension cord running to my shed for power. I have a lot of lights and other stuff that nearly max it out. So i don't have enough power for a big compressor. I'll be honest, i love my honda engines! They are super reliable, so i don't mind it at all.
 

Attachments

  • Screen Shot 2017-02-11 at 7.23.03 AM.jpg
    Screen Shot 2017-02-11 at 7.23.03 AM.jpg
    19.9 KB · Views: 22
Last edited:

kams1973

ALLIANCE MEMBER
Joined
Oct 3, 2010
Messages
1,585
Location
Amarillo, TX
I commend you for being considerate and thinking of your neighbors. How do you plan to unload this compressor once max pressure is achieved?
 
OP
T

TL95SVT

Member
Joined
Jan 16, 2011
Messages
21
Location
Charlotte NC
How do you plan to unload this compressor once max pressure is achieved?

It comes factory with an unloader valve/throttle control valve. Same setup that are on all my gas powered compressors. Once it hits a certain psi, the throttle control valve throttles the engine down and the excess air is let out the side of the unloader valve through a muffler.

Here is a video from saylor beall of the compressor i have, its loud! I need to quite it down as much as possible lol:
 
Last edited:

kams1973

ALLIANCE MEMBER
Joined
Oct 3, 2010
Messages
1,585
Location
Amarillo, TX
Looks like an all-in-one check valve. You should be able to purchase a muffler to quiet it down a bit.

Did your home built socket work out?
 
OP
T

TL95SVT

Member
Joined
Jan 16, 2011
Messages
21
Location
Charlotte NC
Looks like an all-in-one check valve. You should be able to purchase a muffler to quiet it down a bit.

Did your home built socket work out?

Yes, worked great so far. I have put a ton of force on it trying to break the valves loose with a breaker bar. Should be alot easier on the socket just retourqing them. You can see in the pics i actually cut too deep, there are grooves on each side of point. Thinking about it.. the grooves may actually help allowing the point to flex some instead of being 100% rigid. Not sure if that's what is actually happening, seems like a good theory lol
 
OP
T

TL95SVT

Member
Joined
Jan 16, 2011
Messages
21
Location
Charlotte NC
This is the only advantage of having to change the head... I messed with these 2 front valves for 2 weeks. Heat, many different kinds of penetrants. I was putting so much force, i was worried about breaking my socket. Figured it would be better to just cut them out, save the valves and socket before i wasted more time and money.

Going to let the valves sit in some cleaning agent for a few days. hopefully i won't have this problem again once i reinstall them, planning to use some high temp anti-seize.
 

Attachments

  • 20170212_114746-1_resized.jpg
    20170212_114746-1_resized.jpg
    130.5 KB · Views: 57
Last edited:
To avoid these ads, REGISTER NOW!
Top Bottom