To avoid these ads, REGISTER NOW!

Saylor-Beall Rebuild

trbomax

Well-known member
Joined
Mar 21, 2010
Messages
2,556
Location
starvation lake,mi.
Can't find the carb dip here in Canadeh :(

Ive used Aircraft Stripper with decent results on polaris exhaust valves as well as on 2 stroke pistons.They will still be dark colored,plastic media is all Ive found that will restore the color w/o removeing any metal or leaving gritty residue.
 
To avoid these ads, REGISTER NOW!
OP
J

jonathan75

Well-known member
Joined
Mar 27, 2013
Messages
1,451
Location
NC
I am starting to do final painting on the pump main body. I decided to do the part you won't be able to see first for more practice. Not only that but it will need more time to dry before I can put weight on it. I noticed that fresh paint does not take well to heavy weight or setting it down while the paint is not fully cured so I may need to let it dry for a few days before I can move on.

Here are pictures of the primer using the heavy method and the first coat of paint.
 

Attachments

  • IMG_8333-1.jpg
    IMG_8333-1.jpg
    66.8 KB · Views: 29
  • IMG_8336-1.jpg
    IMG_8336-1.jpg
    119.8 KB · Views: 31
  • IMG_8337-1.jpg
    IMG_8337-1.jpg
    77.5 KB · Views: 30
  • IMG_8341-1.jpg
    IMG_8341-1.jpg
    72.5 KB · Views: 27
  • IMG_8342-1.jpg
    IMG_8342-1.jpg
    116.5 KB · Views: 31
  • IMG_8345-1.jpg
    IMG_8345-1.jpg
    65.5 KB · Views: 31
OP
J

jonathan75

Well-known member
Joined
Mar 27, 2013
Messages
1,451
Location
NC
Here is the pump base after four coats of paint. I left the hot light bulb on hoping it might give me an Enamel Baked Finish or allow the paint to dry faster.
 

Attachments

  • IMG_8382-1.jpg
    IMG_8382-1.jpg
    32.2 KB · Views: 38
  • IMG_8370-1.jpg
    IMG_8370-1.jpg
    80.3 KB · Views: 25
  • IMG_8368-1.jpg
    IMG_8368-1.jpg
    47.9 KB · Views: 27
  • IMG_8365-1.jpg
    IMG_8365-1.jpg
    67.9 KB · Views: 25
  • IMG_8364-1.jpg
    IMG_8364-1.jpg
    98.8 KB · Views: 43
  • IMG_8363-1.jpg
    IMG_8363-1.jpg
    87 KB · Views: 26
  • IMG_8360-1.jpg
    IMG_8360-1.jpg
    83.4 KB · Views: 29
OP
J

jonathan75

Well-known member
Joined
Mar 27, 2013
Messages
1,451
Location
NC
I checked on the pump base before I went to work this morning. This is what I found, a lovely bottom that nobody will ever see. Well I guess I will know deep down in my heart that it looks good even though nobody will ever know.

Tonight I primed the unloader cover.
 

Attachments

  • IMG_8418-1.jpg
    IMG_8418-1.jpg
    52.1 KB · Views: 25
  • IMG_8417-1.jpg
    IMG_8417-1.jpg
    60.3 KB · Views: 26
  • IMG_8415-1.jpg
    IMG_8415-1.jpg
    62.7 KB · Views: 30
  • IMG_8413-1.jpg
    IMG_8413-1.jpg
    74.5 KB · Views: 22
  • IMG_8410-1.jpg
    IMG_8410-1.jpg
    69.7 KB · Views: 22
  • IMG_8405-1.jpg
    IMG_8405-1.jpg
    69.4 KB · Views: 28
  • IMG_8403-1.jpg
    IMG_8403-1.jpg
    79.8 KB · Views: 27
OP
J

jonathan75

Well-known member
Joined
Mar 27, 2013
Messages
1,451
Location
NC
The unloader is now painted. With only 4.5 cans of paint left I hope there is enough paint for the whole pump. I may do only two coats on the unseen side of the intercooler to save paint. The jugs will take a lot of paint and the heads. All those fins are going to be hard to cover in the crevices.

Here is a before picture as well.
 

Attachments

  • IMG_8433-1.jpg
    IMG_8433-1.jpg
    67.2 KB · Views: 40
  • IMG_8432-1.jpg
    IMG_8432-1.jpg
    65.6 KB · Views: 38
  • IMG_8431-1.jpg
    IMG_8431-1.jpg
    54.8 KB · Views: 36
  • IMG_8426-1.jpg
    IMG_8426-1.jpg
    66.2 KB · Views: 35
  • IMG_6724-1.jpg
    IMG_6724-1.jpg
    87.5 KB · Views: 37
Last edited:

Todd.Brock

Well-known member
Joined
Jul 15, 2008
Messages
4,250
Location
Cincinnati
How much of the gallon did you use for the rattle cans? I assume your painter will thin to shot the tank. Maybe you could just line up what needs sprayed next to the tank and have him shoot that as well? How did you find a painter that would come to the house to paint the tank? Or are you taking to a body shop?
 
OP
J

jonathan75

Well-known member
Joined
Mar 27, 2013
Messages
1,451
Location
NC
How much of the gallon did you use for the rattle cans? I assume your painter will thin to shot the tank. Maybe you could just line up what needs sprayed next to the tank and have him shoot that as well? How did you find a painter that would come to the house to paint the tank? Or are you taking to a body shop?

Very good questions. I didn't look inside the can and open it back up but the paint store made me six rattle cans. The gallon container from Saylor Beall currently weighs 5 pounds 15 ounces. Each rattle can is rated for 7.6 oz for Propellant and Solvent but weighs about a pound each total. It didn't really feel like a full gallon to me and based on the math I got shorted at least a pound from Saylor Beall. You would think for $50 they could fill the can up all the way. If there is enough in the end I won't complain but it is going to be close.

So here is some math.

5.9375 Current weight - 1.389 Empty Paint Can = 4.5485 of paint left which is 72.776 ounces left or the equivalent of 9.5 rattle cans. I really hope that is enough for a 120 gallon tank and the parts I may not finish with the rattle cans I have left. Any bits left over I will prep them and lay them out on the ground for the paint guy to hit for me.

I found a guy on Craigslist that will come to my house to spray it. He goes around to car dealerships and fixes bashed in fenders and such. He sent me samples of his work and it looks great. He quoted me $250 to just shoot it if I did all the prep work.

They didn't thin the paint when they put them in cans unless the propellant percentage counts as dilution. I am not sure how that works.
 
OP
J

jonathan75

Well-known member
Joined
Mar 27, 2013
Messages
1,451
Location
NC
Here is a CastAir Air Compressor (Saylor Beall 707 clone) that is for sale near me. They want $1200 for it. There seems to be a lot of confusion on what a clone Saylor Beall looks like based on how many people suggested that mine was a clone.

Here are some clues.

You can see the exhaust on the exhaust manifold faces the front.
Not Saylor Beall green.
No Saylor Beall stickers.
No Saylor Beall part numbers cast into the major components.
Tubes connected to the valves.
"Phantom Clue" split down the middle where the oil drain is.
It is sitting on a big tank that says CastAir!
 

Attachments

  • cast air 1-1.jpg
    cast air 1-1.jpg
    72.7 KB · Views: 106
  • cast air 2-1.jpg
    cast air 2-1.jpg
    66.2 KB · Views: 90

TwoInch

Well-known member
Joined
Mar 29, 2012
Messages
2,828
Location
NW INDIANA
$250 to spray the tank?? thats gonna be 500 dollar an hour job!

maybe i missed this, but why arent you going to spray the tank also yourself?
 
OP
J

jonathan75

Well-known member
Joined
Mar 27, 2013
Messages
1,451
Location
NC
$250 to spray the tank?? thats gonna be 500 dollar an hour job!

maybe i missed this, but why arent you going to spray the tank also yourself?

I got a tip for another guy that custom paints motorcycles that I will get a quote from. But out of four people I contacted so far the $250 guy was the only one that would do the job or give me a quote.

I would spray the tank myself but being that it is so large I am not sure I can get good results with just rattle cans. I also think rattle cans may use more paint, I may not have enough left.

And also thanks for all your tips TwoInch. You have been a big help! I am getting much better results now.
 
Last edited:

TwoInch

Well-known member
Joined
Mar 29, 2012
Messages
2,828
Location
NW INDIANA
confidence is key. if you are worried about running out, consider the dense foam rollers and thinning the paint down. you can get extremely great looking results with very little waste. there will be more wet sanding with this method though.

you can get incredible results with rattle cans, so good that no one would ever be able to tell that it was rattle can.

would spending $250 to have someone spray, hoping to have enough paint, be better than scoring another gallon of paint, and having at it yourself?

that kind of money for such a small and easy spray just seems out there to me. not considering the fact that i enjoy doing those types of things myself(as i bet you do too!)

just some ideas to toss around. if i was closer, id spray it for gas money and good conversation.
 
Last edited:
OP
J

jonathan75

Well-known member
Joined
Mar 27, 2013
Messages
1,451
Location
NC
confidence is key. if you are worried about running out, consider the dense foam rollers and thinning the paint down. you can get extremely great looking results with very little waste. there will be more wet sanding with this method though.

you can get incredible results with rattle cans, so good that no one would ever be able to tell that it was rattle can.

would spending $250 to have someone spray, hoping to have enough paint, be better than scoring another gallon of paint, and having at it yourself?

that kind of money for such a small and easy spray just seems out there to me. not considering the fact that i enjoy doing those types of things myself(as i bet you do too!)

just some ideas to toss around. if i was closer, id spray it for gas money and good conversation.

Yes confidence is key. I find that the older I get the more things I will do myself. I had no problem to deliver my own son at home on the bed but hesitant to paint a air compressor tank.

I am happy to see you don't treat rattle cans like it is some sick disease. Based on what I have seen so far you can get good results with a rattle can.

So if I use rattle cans for the tank how much overlap do I use per line run as I am working my way down the tank?
 

Zrexxer

Well-known member
Joined
Jan 23, 2007
Messages
5,058
Location
Pflugerville, TX
I am happy to see you don't treat rattle cans like it is some sick disease. Based on what I have seen so far you can get good results with a rattle can.
The reason that spray cans get such a bad name is that for the most part the standard variety that you would buy at WalMart or Home Depot are just filled with just cheap paint.

In a situation like yours where you've had a paint supplier fill cans that have a good spray mechanism with a quality enamel, yep, you can get some decent results. I don't know if I'd try to do a whole 120gal compressor tank with them, but... you know better than I do about how the coverage and uniformity of your paint is.

I can tell you though that S-B never put that amount of effort into painting those machines... lol. They assembled them, bolted them up to a pallet, and sprayed 'em!
 

TwoInch

Well-known member
Joined
Mar 29, 2012
Messages
2,828
Location
NW INDIANA
Yes confidence is key. I find that the older I get the more things I will do myself. I had no problem to deliver my own son at home on the bed but hesitant to paint a air compressor tank.

I am happy to see you don't treat rattle cans like it is some sick disease. Based on what I have seen so far you can get good results with a rattle can.

So if I use rattle cans for the tank how much overlap do I use per line run as I am working my way down the tank?

thats hard to say with out actually seeing how the cans are laying out paint.

essentially, you are going to play by ear(eye?). you are going to try to lay it even, with minimal overlap, just enough to evenly lay a wet pass that leaves no line. you want i wet sheen to it while its still wet, that allows it to self level, but without runs.

i have better results spraying down at the material, allowing gravity to work for me, and not against me causing sags. this would be kind of difficult on a cylindrical tank, but still possible. you could make up a rig to allow you to rotate. but you will have to spray a section(1/3?) and wait for it to set, then rotate and spray another 1/3. not necessary, just ideas.

get it on thick, and if you get a run or two, that stuff can be taken care of later with some wet sanding. i bet no matter what, it will look good in the end.

like i said, im just throwin ideas out there, and explaining what i would do personally. if you are truly worried, hire it out, and dont worry. :beer:
 
OP
J

jonathan75

Well-known member
Joined
Mar 27, 2013
Messages
1,451
Location
NC
The reason that spray cans get such a bad name is that for the most part the standard variety that you would buy at WalMart or Home Depot are just filled with just cheap paint.

In a situation like yours where you've had a paint supplier fill cans that have a good spray mechanism with a quality enamel, yep, you can get some decent results. I don't know if I'd try to do a whole 120gal compressor tank with them, but... you know better than I do about how the coverage and uniformity of your paint is.

I can tell you though that S-B never put that amount of effort into painting those machines... lol. They assembled them, bolted them up to a pallet, and sprayed 'em!

That makes sense, usually you get what you pay for. If you want quality you have to pay for it. Kish paints seem very good. When I was breaking down the pump I used a torch on the painted parts and the paint held up very well to high heat, must be some good stuff.

I can tell they painted it all assembled because on the under side of the intercooler it had a very light coat because the paint could not reach it. And when I removed the pump from the tank it had paint marks around it and left a foot print. But just like any rebuild of a car or anything that means a lot to us we will always try to do one better then the manufacture did.

When I got my Baldor motor in the mail it was sitting on a wood base. The wood base had paint all over it. They painted the motor on the same base they use for shipping. Not a very good paint job either but I plan to paint it if it won't affect the warranty.

thats hard to say with out actually seeing how the cans are laying out paint.

essentially, you are going to play by ear(eye?). you are going to try to lay it even, with minimal overlap, just enough to evenly lay a wet pass that leaves no line. you want i wet sheen to it while its still wet, that allows it to self level, but without runs.

i have better results spraying down at the material, allowing gravity to work for me, and not against me causing sags. this would be kind of difficult on a cylindrical tank, but still possible. you could make up a rig to allow you to rotate. but you will have to spray a section(1/3?) and wait for it to set, then rotate and spray another 1/3. not necessary, just ideas.

get it on thick, and if you get a run or two, that stuff can be taken care of later with some wet sanding. i bet no matter what, it will look good in the end.

like i said, im just throwin ideas out there, and explaining what i would do personally. if you are truly worried, hire it out, and dont worry. :beer:

I will get a better idea after I start to prep the tank. Since I need to fix all the scratches and such I will get a feel for how the primer lays down. But I may just hire it out and let a professional handle it after all the prep work is done. I want it to look good.

Couple of questions:

How many days or weeks to let it dry before putting on the new stickers?
Can I car wax it to help protect it from oil spills and dirt?
And if so how long do I let the paint dry before I start any waxing?
Is it okay to wax over the stickers to protect them as well or will it damage the stickers?
 

trbomax

Well-known member
Joined
Mar 21, 2010
Messages
2,556
Location
starvation lake,mi.
I use rattle cans quite a bit actually,but as was stated,a lot of them dont cut it. I use a lot of rustoleum hammertone in rattle cans on small parts, but I also have a good selection of it in quarts too. I like it for machinery because it fills very well,and if you use the correct nozzel it doesnt streak. You do know that you can get various nozzels for rattle cans? All the way from tiny airbrush spots to large fans that are as good as most hvlp touch up guns. I have a selection of various sizes that I got from my sons artist friend.I dont know where he buys them but I can call and find out.
 
OP
J

jonathan75

Well-known member
Joined
Mar 27, 2013
Messages
1,451
Location
NC
I use rattle cans quite a bit actually,but as was stated,a lot of them dont cut it. I use a lot of rustoleum hammertone in rattle cans on small parts, but I also have a good selection of it in quarts too. I like it for machinery because it fills very well,and if you use the correct nozzel it doesnt streak. You do know that you can get various nozzels for rattle cans? All the way from tiny airbrush spots to large fans that are as good as most hvlp touch up guns. I have a selection of various sizes that I got from my sons artist friend.I dont know where he buys them but I can call and find out.

The rattle cans I got from the paint store has a adjustable fanspray pattern tip. You can rotate it. But the default works good for me since it is a good parallel spray and somewhat long.
 
To avoid these ads, REGISTER NOW!

trbomax

Well-known member
Joined
Mar 21, 2010
Messages
2,556
Location
starvation lake,mi.
The rattle cans I got from the paint store has a adjustable fanspray pattern tip. You can rotate it. But the default works good for me since it is a good parallel spray and somewhat long.

When the can is empty,wash those tips in lacquer thinner and save them. Those are hard to find and can be used elsewhere.
 

TwoInch

Well-known member
Joined
Mar 29, 2012
Messages
2,828
Location
NW INDIANA
Couple of questions:

How many days or weeks to let it dry before putting on the new stickers?
Can I car wax it to help protect it from oil spills and dirt?
And if so how long do I let the paint dry before I start any waxing?
Is it okay to wax over the stickers to protect them as well or will it damage the stickers?
im not sure on that exact paint. that info should be available on the can, or from a manufacturer that makes similar product. i would say a week would be fine before applying stickers. some paints can take many months to cure properly before you should buff and polish/wax them out. it does not need to be fully cured to wet sand, but you definitely want to wait for it to harden some, a couple days should be sufficient. temperature and humidity can play huge roles in what the paint will do during cure time.

you can definitely wax it just like a car or toolbox after its cured, it will look great and protect the finish some. the wax wont damage the decals, just dont use any powered buffer.polisher over the stickers, and dont use anything like a cutting compound on them. regular wax wont hurt though.

you might want to call your paint shop, and ask them about dry time to wet sand, and cure time to cut and buff if you plan on it. they can guide you better.
 

TwoInch

Well-known member
Joined
Mar 29, 2012
Messages
2,828
Location
NW INDIANA
also, i dont think i mentioned this, but one thing many people screw up with rattle can primer and paint most importantly, is shaking those cans.

shake them for a solid two minutes(at least), vigorously in all directions(upside down, left and right), before you first start. from then on, stop every 2 minutes, and shake for 20 seconds or so, vigorously.

that first two or three minutes of solid mixing is most important.
 

Todd.Brock

Well-known member
Joined
Jul 15, 2008
Messages
4,250
Location
Cincinnati
Look up Burgies FS Curtis rebuild. If memory serves, he used Rustoleum blue and then wet sanded. It looks amazing. If you search Burgie and look at all of the topics, I think you will find some similarities. I would link them here, but there are a number of threads. The one titled After cooler finished had a large number of pics...
 
OP
J

jonathan75

Well-known member
Joined
Mar 27, 2013
Messages
1,451
Location
NC
im not sure on that exact paint. that info should be available on the can, or from a manufacturer that makes similar product. i would say a week would be fine before applying stickers. some paints can take many months to cure properly before you should buff and polish/wax them out. it does not need to be fully cured to wet sand, but you definitely want to wait for it to harden some, a couple days should be sufficient. temperature and humidity can play huge roles in what the paint will do during cure time.

you can definitely wax it just like a car or toolbox after its cured, it will look great and protect the finish some. the wax wont damage the decals, just dont use any powered buffer.polisher over the stickers, and dont use anything like a cutting compound on them. regular wax wont hurt though.

you might want to call your paint shop, and ask them about dry time to wet sand, and cure time to cut and buff if you plan on it. they can guide you better.

I will try and ask Kish. They have not been responding to any emails so I may give them a call.

also, i dont think i mentioned this, but one thing many people screw up with rattle can primer and paint most importantly, is shaking those cans.

shake them for a solid two minutes(at least), vigorously in all directions(upside down, left and right), before you first start. from then on, stop every 2 minutes, and shake for 20 seconds or so, vigorously.

that first two or three minutes of solid mixing is most important.

I shake as directed but today I had an issue at the end of the can. The color came out darker for one spot and it was not uniform. I think when you get to the bottom of the can you may have to shake very often to keep the bits that settled mixed up properly. I grabbed a new can and was able to cover up my mistake on the last coat but lesson learned.

Look up Burgies FS Curtis rebuild. If memory serves, he used Rustoleum blue and then wet sanded. It looks amazing. If you search Burgie and look at all of the topics, I think you will find some similarities. I would link them here, but there are a number of threads. The one titled After cooler finished had a large number of pics...

Thanks, I will look this up.
 

Mr onetwo

Well-known member
Joined
Apr 6, 2011
Messages
2,006
Location
Coastal Maine
also, i dont think i mentioned this, but one thing many people screw up with rattle can primer and paint most importantly, is shaking those cans.

shake them for a solid two minutes(at least), vigorously in all directions(upside down, left and right), before you first start. from then on, stop every 2 minutes, and shake for 20 seconds or so, vigorously.

that first two or three minutes of solid mixing is most important.
Plus 1 on this advise.:thumbup: 
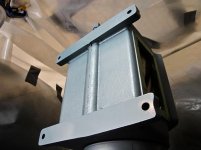
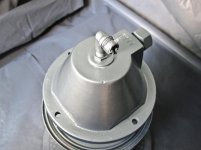
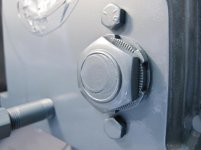
Here is a handy little device that takes the pain out of shaking rattle cans. http://mixkwik.com/about-mixkwik/
 
OP
J

jonathan75

Well-known member
Joined
Mar 27, 2013
Messages
1,451
Location
NC
Today I had a late start but I got a lot done. I took the crankshaft shim/cup off and painted it. After I took it off I can see the contact surface better and just taped up that part. There is a gap there so that is why paint could make it in and show me better where it makes contact. I only painted the edges because you won't see the front or the back of it when it is assembled.
 

Attachments

  • IMG_8449-1.jpg
    IMG_8449-1.jpg
    57.5 KB · Views: 19
  • IMG_8447-1.jpg
    IMG_8447-1.jpg
    52.8 KB · Views: 21
  • IMG_8441-1.jpg
    IMG_8441-1.jpg
    77.1 KB · Views: 21
  • IMG_8440-1.jpg
    IMG_8440-1.jpg
    74.6 KB · Views: 23
  • IMG_8439-1.jpg
    IMG_8439-1.jpg
    76.4 KB · Views: 23
  • IMG_8436-1.jpg
    IMG_8436-1.jpg
    63.9 KB · Views: 22
  • IMG_8434-1.jpg
    IMG_8434-1.jpg
    71.3 KB · Views: 24
OP
J

jonathan75

Well-known member
Joined
Mar 27, 2013
Messages
1,451
Location
NC
Today I also got the main pump body primed and painted. I sanded it one last time at 400 grit because my old method left the primer way too rough. After that I primed it and started painting. Here are the primer pictures.
 

Attachments

  • IMG_8461-1.jpg
    IMG_8461-1.jpg
    46.6 KB · Views: 18
  • IMG_8455-1.jpg
    IMG_8455-1.jpg
    59.3 KB · Views: 18
  • IMG_8454-1.jpg
    IMG_8454-1.jpg
    55.9 KB · Views: 16
  • IMG_8452-1.jpg
    IMG_8452-1.jpg
    59.5 KB · Views: 19
  • IMG_8451-1.jpg
    IMG_8451-1.jpg
    54.2 KB · Views: 18
  • IMG_8450-1.jpg
    IMG_8450-1.jpg
    59.4 KB · Views: 22
  • IMG_8449-1.jpg
    IMG_8449-1.jpg
    57.5 KB · Views: 18
OP
J

jonathan75

Well-known member
Joined
Mar 27, 2013
Messages
1,451
Location
NC
I had some problems painting around all the bits on the front sticking out. It is very hard to get a smooth job when you have to move around obstacles that need to be painted as well. I am glad I didn't paint it all together or I really would of had some trouble.
 

Attachments

  • IMG_8475-1.jpg
    IMG_8475-1.jpg
    55.3 KB · Views: 22
  • IMG_8471-1.jpg
    IMG_8471-1.jpg
    59.6 KB · Views: 14
  • IMG_8470-1.jpg
    IMG_8470-1.jpg
    65.3 KB · Views: 21
  • IMG_8469-1.jpg
    IMG_8469-1.jpg
    61.3 KB · Views: 16
  • IMG_8466-1.jpg
    IMG_8466-1.jpg
    64.6 KB · Views: 15
  • IMG_8465-1.jpg
    IMG_8465-1.jpg
    62.9 KB · Views: 15
  • IMG_8464-1.jpg
    IMG_8464-1.jpg
    64.2 KB · Views: 18
OP
J

jonathan75

Well-known member
Joined
Mar 27, 2013
Messages
1,451
Location
NC
Also during painting I got down to the bottom of the can. The color started to come out very dark at one part of the spray. When you get down low in the can you need to shake it more often to avoid the settling problem. I grabbed a new can and was able to fix the dark green area during the final coat.
 

Attachments

  • IMG_8496-1.jpg
    IMG_8496-1.jpg
    69.6 KB · Views: 37
  • IMG_8485-1.jpg
    IMG_8485-1.jpg
    50.4 KB · Views: 30
  • IMG_8484-1.jpg
    IMG_8484-1.jpg
    67.3 KB · Views: 29
  • IMG_8482-1.jpg
    IMG_8482-1.jpg
    57.3 KB · Views: 29
  • IMG_8479-1.jpg
    IMG_8479-1.jpg
    63 KB · Views: 29
  • IMG_8476-1.jpg
    IMG_8476-1.jpg
    43.6 KB · Views: 29
OP
J

jonathan75

Well-known member
Joined
Mar 27, 2013
Messages
1,451
Location
NC
I wanted to get some feedback on information for gasket scans. If someone is in need of a gasket for an emergency or cut their own I figured I should scan my new gaskets before I put them on. Any thoughts?

Here is the first one I did but I wanted some feedback before I did more. I saved the .jpg as a .pdf and printed it out and it was to scale.
 

Attachments

  • IMG-1.jpg
    IMG-1.jpg
    75.5 KB · Views: 53
OP
J

jonathan75

Well-known member
Joined
Mar 27, 2013
Messages
1,451
Location
NC
Look up Burgies FS Curtis rebuild. If memory serves, he used Rustoleum blue and then wet sanded. It looks amazing. If you search Burgie and look at all of the topics, I think you will find some similarities. I would link them here, but there are a number of threads. The one titled After cooler finished had a large number of pics...

I finally found some of the threads. It is very hard to follow the rebuild because it is broken up into mini threads. You have to keep bouncing around. But he did a very good job!
 
OP
J

jonathan75

Well-known member
Joined
Mar 27, 2013
Messages
1,451
Location
NC
What are you painting the insides of your crankcase with?

I don't plan to paint the inside of the pump. If the manufacture didn't paint it I am not sure it really needs to be done. But I will coat it with oil, lots of oil splashing around a lot. :thumbup:
 

Burgerkong

Well-known member
Joined
Apr 17, 2010
Messages
2,501
Location
Markham, Ontario, Canada
I don't plan to paint the inside of the pump. If the manufacture didn't paint it I am not sure it really needs to be done. But I will coat it with oil, lots of oil splashing around a lot. :thumbup:

Yeah, I don't have access to a hot tank, so most likely it'll be a heatgun, then degreaser, then dunk in hot water and soap and repeat. I just want to get the sludge off, it's terrible to work on because my gloves gets covered with it contaminating the other parts.
 

trbomax

Well-known member
Joined
Mar 21, 2010
Messages
2,556
Location
starvation lake,mi.
I don't plan to paint the inside of the pump. If the manufacture didn't paint it I am not sure it really needs to be done. But I will coat it with oil, lots of oil splashing around a lot. :thumbup:

You really should paint the inside.It acomplishes 2 things. One,it speeds oil flow back to the sump, alowing for better cooling, and it "nails down" any grit or remaining dirt left from machineing. I used to paint all of the interior of my blower motors after de-flashing and smoothing the castings. You can use rustoleum but the best is Glyptal,used for painting the inside of electric motors.Use a 1" brush,dont spray,and dont do the gasket surfaces.
 
OP
J

jonathan75

Well-known member
Joined
Mar 27, 2013
Messages
1,451
Location
NC
Checked on the pump this morning after drying all night. Everything seems good but the paint still feels soft. My garage is very humid so it may take some time to fully cure. I will set it aside and let it set up before I try to do anything with it.
 

Attachments

  • IMG_8513-1.jpg
    IMG_8513-1.jpg
    74.4 KB · Views: 29
  • IMG_8512-1.jpg
    IMG_8512-1.jpg
    80.8 KB · Views: 28
  • IMG_8511-1.jpg
    IMG_8511-1.jpg
    77 KB · Views: 30
  • IMG_8510-1.jpg
    IMG_8510-1.jpg
    64.7 KB · Views: 28
  • IMG_8503-1.jpg
    IMG_8503-1.jpg
    65.3 KB · Views: 32
  • IMG_8519-1.jpg
    IMG_8519-1.jpg
    64.6 KB · Views: 33
OP
J

jonathan75

Well-known member
Joined
Mar 27, 2013
Messages
1,451
Location
NC
You really should paint the inside.It acomplishes 2 things. One,it speeds oil flow back to the sump, alowing for better cooling, and it "nails down" any grit or remaining dirt left from machineing. I used to paint all of the interior of my blower motors after de-flashing and smoothing the castings. You can use rustoleum but the best is Glyptal,used for painting the inside of electric motors.Use a 1" brush,dont spray,and dont do the gasket surfaces.

The only reason I can think of doing if I do is to coat the very bottom. I was thinking of gluing down some very strong magnets and then maybe coating over those to help prevent them from coming back up and to ease cleaning of them. That way any metal shavings will get stuck to the magnets in the four corners. Once every year or so I can remove an inspection cover and clean off the magnets and check everything out. I may also experiment with putting a strong magnet on the outside of the pump on the bottom and see if that will work. I can take the magnet off when I drain the oil and the shavings may come out with the oil change if the bottom is smooth enough. Just not sure if the magnet will work though cast iron so I need to run some tests.

As far as it speeding up oil flow back to the bottom I really doubt it would help much. There is so much oil in that swimming pool bouncing around I doubt it would make a difference in operation having the sides painted.
 
Last edited:
OP
J

jonathan75

Well-known member
Joined
Mar 27, 2013
Messages
1,451
Location
NC
Yeah, I don't have access to a hot tank, so most likely it'll be a heatgun, then degreaser, then dunk in hot water and soap and repeat. I just want to get the sludge off, it's terrible to work on because my gloves gets covered with it contaminating the other parts.

Did you call any machine shops? Around here it is only around $40 to get it cleaned in their industrial parts washer.
 
To avoid these ads, REGISTER NOW!
Top Bottom