Scaling up a lamp?

DGersic

Well-known member
Joined
Mar 12, 2017
Messages
6,431
Location
DeKalb, IL
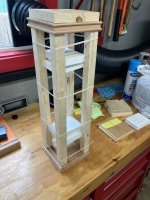
I have a table lamp that I like. I want a floor lamp, and have been thinking that I’d like the floor lamp to match, or at least be similar to, the table lamp. Mission style furniture is what we’ve done the family room with.

The table lamp:

IMG_9064.jpegIMG_9065.jpeg


I would kinda like this to be just bigger, around 60” tall (actual size TBD still). Scaling up the individual elements of the lamp may be too much, so I’m wondering if anyone has tried to do something like scaling up a lamp or similar thing without destroying the proportions.

Looking at what’s available, I found a couple that I like, may borrow some ideas from.

This Stickley is nice.

IMG_5752.jpeg

The repeating horizontal pieces look better to me than just going up with the four outside corner pieces. I don’t like the metal rod up the middle for the cord, but I’m also not sure that I can rifle drill a 5’ hole in a square post. I do like the way that my table lamp hides the cord.


These two Tiffany lamps

IMG_5753.jpegIMG_5754.jpeg

One has the horizontal piece, the other doesn’t. I think I like it better with. The second one has beefier vertical corner posts, those look a bit too heavy to me. The top detail with the stained glass inserts is kinda cool.


Finally, a pair from a guy on LumberJocks

IMG_5755.jpeg

I like his extra details on the horizontal pieces. His vertical corner posts look well proportioned to me, too,

I may have to build this first out of pine, to figure out the sizes and proportions.
 
To avoid these ads, REGISTER NOW!

PCustoms

Well-known member
Joined
Jul 23, 2011
Messages
23,684
Location
VT
Rip material for a single post and use a router to create a channel. Glue back together and finish to size. No gun drilling required.

Was going to post this.

You can also kerf/router a groove dead center in the strip, then glue in a filler part way. Do this on the inside and you'll never see the glue joint.

Used to have a friend that was really good at Mission style furniture. Which I had more pieces/pictures of his work.
 
OP
D

DGersic

Well-known member
Joined
Mar 12, 2017
Messages
6,431
Location
DeKalb, IL
I have done the cut, channel, and glue thing before. I can always see the glue joint after. I may waste some wood seeing if I can actually gun drill it, just to see if I can.

Anyway, that’s a side show. I’m mostly trying to see if there is any advice on making it look “right”. The proportions of something being made from something smaller.

The four vertical posts at the corners, if I extend them from a 2’ table lamp to a 6’ floor lamp, keeping them at 3/4” square I think they’ll look too spindly. The Stickley and the first Tiffany, to me, look like those pieces are too small. So maybe a 1” square cross section would work better. So as not to crowd them, the spacing between the posts will have to increased. A floor lamp needs a larger base than a table lamp.

The second Tiffany has a larger cross section, but looks a little bit too large. The LumberJocks lamps look well proportioned, like he really nailed the size of those posts.

Of course, this is all subjective. What I like, you may disagree with.

We’re deep cleaning the house here, so I have lots of thinking time to ponder these things.
 

The Cobbler

Super Moderator
Staff member
Joined
Oct 24, 2013
Messages
26,087
Location
Niagara Region, Ontario, Canada
I would keep the dimensions of the spindles , base & top relatively the same ( not much thicker if any at all)
Add to the height of the spindles ( maybe X 2.5 or 3) & perhaps double the width of the base and top section. the bevel pcs perhaps 50% wider.
I would run some scraps quickly to test the look before committing to expensive wood
 

LeonardY

Well-known member
Joined
Apr 16, 2011
Messages
5,146
Location
Southern California
There is a technique using a miter locking bit to make a square post. I've done it a number of times.
I snagged this picture off the internet. I can't find pictures of when I did it.
If you use a single board, you can get the grain to wrap around seamlessly. It's the way you get quartersawn on all four surfaces.
1775711953567.png
The bonus is it leaves a hollow in the center.
 
OP
D

DGersic

Well-known member
Joined
Mar 12, 2017
Messages
6,431
Location
DeKalb, IL
There is a technique using a miter locking bit to make a square post. I've done it a number of times.
I snagged this picture off the internet. I can't find pictures of when I did it.
If you use a single board, you can get the grain to wrap around seamlessly. It's the way you get quartersawn on all four surfaces.
1775711953567.png
The bonus is it leaves a hollow in the center.

Now there’s a tool I didn’t know about.

That’s an interesting idea that would get me what I want, maybe.
 

RTM

Well-known member
Joined
May 13, 2019
Messages
13,353
Location
SF Bay Area
It's called a 45° lock miter joint router bit
Once you get them dialed, they are fantastic.

Another technique w a similar result was used to make a front leg for a desk I disassembled. They offset the 45 so the seem was not on the corners, where the are more likely to splinter. Make the the top and bottom 1/4” narrower, and then leave a flat at the top and bottom of the vertical pieces. From post #7


Will see if I still have the leg in the woodpile.
 

manwithtools

ALLIANCE MEMBER
Joined
Aug 24, 2015
Messages
14,473
Location
Lebanon, TN
Now there’s a tool I didn’t know about.

That’s an interesting idea that would get me what I want, maybe.
Be aware there are different size Lock Miter bits for different thicknesses of wood. Also, they are quite tedious to setup and should only be used in a router table. Once you have it perfectly setup, save a couple of pieces of the profiled stock to use as gauges to speed up the setup next time. The router table needs a good sturdy fence.
 
OP
D

DGersic

Well-known member
Joined
Mar 12, 2017
Messages
6,431
Location
DeKalb, IL
Be aware there are different size Lock Miter bits for different thicknesses of wood. Also, they are quite tedious to setup and should only be used in a router table. Once you have it perfectly setup, save a couple of pieces of the profiled stock to use as gauges to speed up the setup next time. The router table needs a good sturdy fence.

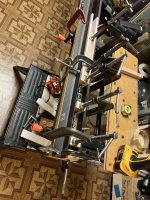
I built a router table to make some cabinet doors and drawer faces last year. I did see different sizes of this lock bit, and it does look like a PITA to set up. Given the stock size needed to construct my post, I’ll need a small bit to do it.

To get a 1” square post, with a usable hollow centre, I’m in the 1/4” to maybe 3/8” stock thickness range. And a 1” post may be too big, I may want to go smaller.

Even if not using this lock mitre bit, possibly just a four sided glue up would work to hide the joints. I don’t like splitting the post and being able to see the joint. And knowing that it’s there, I will always see the joint. I don’t need a ton of strength here, it’s a lamp. So four 1/4” thick pieces, some 45* cuts, and some glue would probably work ok for strength.
 

Higgins

Well-known member
Joined
Dec 25, 2009
Messages
1,945
Location
Shepheardsville, KY
There is a technique using a miter locking bit to make a square post. I've done it a number of times.
I snagged this picture off the internet. I can't find pictures of when I did it.
If you use a single board, you can get the grain to wrap around seamlessly. It's the way you get quartersawn on all four surfaces.
1775711953567.png
The bonus is it leaves a hollow in the center.
WoW
Now that is talent i haven't seen in years....
 
OP
D

DGersic

Well-known member
Joined
Mar 12, 2017
Messages
6,431
Location
DeKalb, IL
I would keep the dimensions of the spindles , base & top relatively the same ( not much thicker if any at all)
Add to the height of the spindles ( maybe X 2.5 or 3) & perhaps double the width of the base and top section. the bevel pcs perhaps 50% wider.
I would run some scraps quickly to test the look before committing to expensive wood

The table lamp, posts are 3/4” square. I think I want to go up to about 1” square for a taller floor lamp. Increased base and top sizes, but not sure how much bigger to go.

I was pricing available wood yesterday (Menards). There is not much difference between their clear pine and their red oak. For the posts, just to mock up in good pine, I can start with four 2x2 at $11 each. Or I can get a 5/4x6x8 in red oak for $45. With the 5/4 board being a 1” actual thickness, that board is four cuts from being 1” square posts, with enough left over to make the horizontal pieces, probably the top, and maybe even some of the base.

I have some leftover 2x3 studs. I think they’re going to get a trip through the table saw to make some cheap / free mock up posts. Won’t be anything near perfect, just enough to be able to see what that would look like. I have some other random scraps of 1x pine boards I can mock up most of the pieces with.
 

PCustoms

Well-known member
Joined
Jul 23, 2011
Messages
23,684
Location
VT
I have some leftover 2x3 studs. I think they’re going to get a trip through the table saw to make some cheap / free mock up posts. Won’t be anything near perfect, just enough to be able to see what that would look like. I have some other random scraps of 1x pine boards I can mock up most of the pieces with.

I was going to suggest that, good way to play around
 

manwithtools

ALLIANCE MEMBER
Joined
Aug 24, 2015
Messages
14,473
Location
Lebanon, TN
I built a router table to make some cabinet doors and drawer faces last year. I did see different sizes of this lock bit, and it does look like a PITA to set up. Given the stock size needed to construct my post, I’ll need a small bit to do it.

To get a 1” square post, with a usable hollow centre, I’m in the 1/4” to maybe 3/8” stock thickness range. And a 1” post may be too big, I may want to go smaller.

Even if not using this lock mitre bit, possibly just a four sided glue up would work to hide the joints. I don’t like splitting the post and being able to see the joint. And knowing that it’s there, I will always see the joint. I don’t need a ton of strength here, it’s a lamp. So four 1/4” thick pieces, some 45* cuts, and some glue would probably work ok for strength.
I don't think you will find a lock miter bit that will work with anything less than 3/8" thick material. While a plain 45 degree joint will likely have sufficient strength, it's going to a bit of a pain accurately gluing up 4 - 1/4" x 1" X 60" pieces. I'd make some test fitups of the long pieces, packing tape could be your friend...
 

PCustoms

Well-known member
Joined
Jul 23, 2011
Messages
23,684
Location
VT
All this fancy joinery to make a groove in 1" square stock is overkill IMHO
 
To avoid these ads, REGISTER NOW!

larry_g

Well-known member
Joined
Apr 28, 2007
Messages
16,907
Location
oregon
Finally, a pair from a guy on LumberJocks

IMG_5755.jpeg

I like his extra details on the horizontal pieces. His vertical corner posts look well proportioned to me, too,

I may have to build this first out of pine, to figure out the sizes and proportions.
As for gun drilling. Since the above pictured lamp has the horizontal braces that surround verticals could you splice the vertical and hide the splice in the horizontal there fore you have 2 shorter pieces to gun drill?

lg
 
OP
D

DGersic

Well-known member
Joined
Mar 12, 2017
Messages
6,431
Location
DeKalb, IL
As for gun drilling. Since the above pictured lamp has the horizontal braces that surround verticals could you splice the vertical and hide the splice in the horizontal there fore you have 2 shorter pieces to gun drill?

lg

Yes, I came to that same idea. If my posts are interrupted by the horizontals, I can make shorter ones that would be easier to drill, or to replace if the drill goes off course and destroys a piece.
 
OP
D

DGersic

Well-known member
Joined
Mar 12, 2017
Messages
6,431
Location
DeKalb, IL
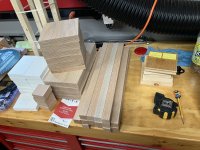
So, other than failing at simple math, I cut up some scraps today.

1” vertical posts cut from scrap 2x3 studs. Not perfectly straight, but good enough.

3” space between vertical pieces.

What should be a 5 1/2” cap for the ends, but I added 3+1+1 and got 4, so they’re undersize. Good enough for mock up here though.

IMG_9869.jpeg

I bought a bullnose router bit to use on the horizontal pieces. Need to mess with the router table to see how that’s going to work.

I have, in my head, a jig to build to drill the posts. And a long (18”) 1/2” drill bit. Yeah, I know, there are other ways. We’ll see how it works, or doesn’t.
 

RoninB4

Well-known member
Joined
Jul 22, 2020
Messages
3,652
Location
Under My House
-I've been an admirer of mission style and Stickley furniture since I saw a writing desk (Harvey Ellis) featured in Fine Woodworking in the early 80's. I have a potentially useless suggestion regarding scale. Most 3D CAD software can scale the lamp (and components) to any ratio desired once the initial dimensions of the table model have been modeled. Yes it would only allow a "cartoon" on the computer screen, which doesn't always look right in reality, but it would offer a starting point to adjust as you go. Might be a simpler/faster method than burning through a finite supply of scrap wood when you go for full size, it will also keep the proportions of the components correct (or adjustable) without all the calculations for custom scaling. Just a thought, look forward to seeing your results.
 

rvieceli

Well-known member
Joined
Nov 3, 2013
Messages
783
Location
Illinois
@DGersic resist the temptation to drill that all the way through in one shot. There is more flex than you realize in a drill rod.

It’s important to place where it comes out on the other end. So drill from both directions and have it meet in the middle.

Use a self centering doweling jig as a guide. Here is an example


You might be able to get away with a 1/4 inch hole but 3/8 will be easier to feed the lamp cord.

Ron
 
OP
D

DGersic

Well-known member
Joined
Mar 12, 2017
Messages
6,431
Location
DeKalb, IL
@DGersic resist the temptation to drill that all the way through in one shot. There is more flex than you realize in a drill rod.

It’s important to place where it comes out on the other end. So drill from both directions and have it meet in the middle.

I have a plan to manage the flex. I will probably have to drill from both ends, though.

I’m cutting some extra vertical pieces, in case my plans don’t work.
 
OP
D

DGersic

Well-known member
Joined
Mar 12, 2017
Messages
6,431
Location
DeKalb, IL
This is a project where I'd spend a week in CAD before cutting the first board.

Way easier to adjust numbers in CAD than re-cutting lumber.

I have many drawings, sketches. For me, that’s helpful, but at some point I have to see the parts in the real world. Scrap Wood Aided Design.

IMG_0172.jpeg

I'm reasonably sure that the proportions are what I want, based on the image in my head. It’s time to cut real wood.
 

Jgaz

Well-known member
Joined
Dec 16, 2016
Messages
1,738
Location
AZ
I have many drawings, sketches. For me, that’s helpful, but at some point I have to see the parts in the real world. Scrap Wood Aided Design.

IMG_0172.jpeg

I'm reasonably sure that the proportions are what I want, based on the image in my head. It’s time to cut real wood.
You just described my design process 100%

Here I’m mounting legs on my son’s live edge table.
I can measure until I’m blue in the face but sooner or later I need to mock up things with the actual pieces.
IMG_6489.jpeg

In this case it was better to allow more room for the two chairs between the legs and let the chairs on the ends stick out a little.
IMG_6490.jpeg
 
Last edited:
OP
D

DGersic

Well-known member
Joined
Mar 12, 2017
Messages
6,431
Location
DeKalb, IL
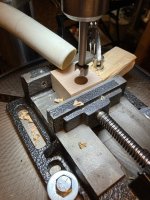
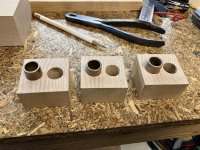
I cut some blocks from a scrap chunk of maple, then drilled 5/8” holes.

IMG_0178.jpeg


1/2” ID x 5/8” OD bushings are a tight fit.

IMG_0179.jpeg


Long 1/2” drill bit.

IMG_0180.jpeg


With a bunch of clamps, I can drill ~10” of 1/2” hole down the middle of a 1” x 1” piece. My vertical pieces are 17” long, so drilling fro both ends should work.

IMG_0186.jpeg


The bit does wander, even with this much restraint on it.
 

RoninB4

Well-known member
Joined
Jul 22, 2020
Messages
3,652
Location
Under My House
-Chip evacuation becomes more critical the deeper in the hole you go. Chips pack against the sides and encourage the wander. Frequently removing the drill for chip evacuation may help. Deep hole drilling/boring in metal uses a similar approach with guide blocks. Looking forward to your project progress.
 

manwithtools

ALLIANCE MEMBER
Joined
Aug 24, 2015
Messages
14,473
Location
Lebanon, TN
The bit does wander, even with this much restraint on it.
I would recommend a non self-feed bit for that application, it would be less apt to wander and it would make it far easier to "peck drill", which is what you want to do for deep drilling like this to frequently clear the chips like @RoninB4 recommended. I'd also likely do 3/8" as that is plenty for lamp cord. Here's a link to long brad points which are ideal for drilling in wood.


Brad Point Drill Bits Set, 15pcs 12 Inch Long Wood Drill Bits
 
OP
D

DGersic

Well-known member
Joined
Mar 12, 2017
Messages
6,431
Location
DeKalb, IL
-Chip evacuation becomes more critical the deeper in the hole you go. Chips pack against the sides and encourage the wander. Frequently removing the drill for chip evacuation may help. Deep hole drilling/boring in metal uses a similar approach with guide blocks. Looking forward to your project progress.

I ran another ~10” scrap test piece through, removing As much award as possible every inch or so, and really picking at it instead of letting the bit feed. That got me much less deflection.

Entrance:

IMG_0192.jpeg


Exit:

IMG_0193.jpeg

I think that’s about as good as I can reasonably expect for this setup, and is certainly good enough for the project. This will be hidden inside when it’s done.
 

Firstram

Well-known member
Joined
May 16, 2017
Messages
1,403
I ran another ~10” scrap test piece through, removing As much award as possible every inch or so, and really picking at it instead of letting the bit feed. That got me much less deflection.

Entrance:

IMG_0192.jpeg


Exit:

IMG_0193.jpeg

I think that’s about as good as I can reasonably expect for this setup, and is certainly good enough for the project. This will be hidden inside when it’s done.
That looks grea!
If you do want to go smaller, drill the hole in oversized stock then cut it down concentric to the hole. You can safely get it as small as possible!
 
To avoid these ads, REGISTER NOW!
Top Bottom