To avoid these ads, REGISTER NOW!

School me on vinyl siding

DGersic

Well-known member
Joined
Mar 12, 2017
Messages
6,288
Location
DeKalb, IL
And how do I fix this correctly?

Got a call today from Dad. He had the house done in vinyl siding about a year ago, and a piece has come off. It’s on the 2nd story, above the garage roof. So today was spent trying to understand how this was installed, and trying to figure out how it should be so that it won’t fall off again.

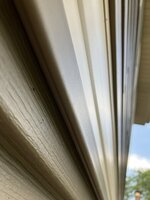
I’ll start with how it should look:

IMG_5158.jpeg

The darker brown siding is split at the soffit line with a yellow flat-ish band. That’s the problem area.

Here is a drawing, not to scale, showing what I can see of how it was installed.

IMG_4962.jpeg

Working down from the yellow band, there is a channel nailed to the wall. This hides the bottom edge of the yellow band, and has a layer of caulk / adhesive holding the channel to the yellow piece above it. This seems fine.

In to the J opening at the bottom of this channel, about 1” of the bottom of a siding piece has been cut off. The hook from this cut piece is being used to anchor the next almost full piece of siding. This almost full piece has no nail strip at the top, so is supported only by the hook the the 1” piece above it.

Below, there is a full siding piece with nail strip.

The 1” strip piece was nailed, from the bottom, at a shallow angle with 1 1/4” trim nails. I’m estimating that about 1/4” of nail actually hit the wood wall, if that much. The weight of the siding, hanging from these tiny nails, eventually pulled the nails out, and the siding row came off.

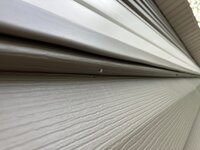
Here‘s what I found:


IMG_5154.jpegIMG_5155.jpeg

For now, I nailed it back up like it was, but I don’t expect this to last:

IMG_5159.jpeg

I’m pretty sure that this isn’t right, but I have never worked with vinyl siding and don’t know enough to say how it should have been done. Certainly not enough to re-work the house side on a Saturday afternoon with no planning. Dad wants to contact the installer and ask them about fixing it, which sounded good to me, so I also didn’t want to change anything about it until after they’ve had a chance to look at it.

On a different wall, where there is a similar feature, it appears to have been done a different way, which also makes me suspicious. What I see there at the top of the brown, in the J channel, appears to be another piece:

IMG_5162.jpeg

So, with all that, is this how the siding should be done? If not, how should it be? Having only some tiny nails can’t be right.
 

Attachments

  • IMG_5163.jpeg
    IMG_5163.jpeg
    414.9 KB · Views: 9
  • IMG_5160.jpeg
    IMG_5160.jpeg
    421.3 KB · Views: 7
To avoid these ads, REGISTER NOW!

nmk_61802

Well-known member
Joined
Mar 6, 2008
Messages
965
Location
Central IL
Is that Brown J trim under the white band with the white caulked to it? If so, IMO, proper way is to put combo utility trim in place of J. You then punch snap locks in your cut piece of siding which lock into the utility trim. You could also just slip std utility trim into the J, but that always looks like a band-aid to me.
 

sands2500

Member
Joined
Feb 15, 2017
Messages
20
Location
Seaside, NJ
As one that has put up countless boxes of siding. I have always used clear silicone on any piece of siding that is to small to fit into sill trim. To this day I or the company that I work for has yet to have a call back for any siding coming off or sliding down.
 
OP
D

DGersic

Well-known member
Joined
Mar 12, 2017
Messages
6,288
Location
DeKalb, IL
Is that Brown J trim under the white band with the white caulked to it? If so, IMO, proper way is to put combo utility trim in place of J. You then punch snap locks in your cut piece of siding which lock into the utility trim. You could also just slip std utility trim into the J, but that always looks like a band-aid to me.

I am not sure, but yes, I think so. It looks to me like the yellow band is sitting on top of a J channel. There are trim nails through the yellow piece, and brown caulk sealing the yellow to the brown channel.

What profile is “combo utility trim”? This and snap locks sounds a lot more like what I would want here instead of a few trim nails trying to hold this up.

Could “std utility trim” be what I’m seeing, in the J on the other part of the house (last picture)?
 
OP
D

DGersic

Well-known member
Joined
Mar 12, 2017
Messages
6,288
Location
DeKalb, IL
As one that has put up countless boxes of siding. I have always used clear silicone on any piece of siding that is to small to fit into sill trim. To this day I or the company that I work for has yet to have a call back for any siding coming off or sliding down.

There seems to be a few dabs of brown caulk used to attempt to provide a bit of this, but nowhere near enough IMHO to do anything useful.

Maybe a continuous bead of it would work. Whats there is more like 6” of caulk over a 20’ long surface.
 

nmk_61802

Well-known member
Joined
Mar 6, 2008
Messages
965
Location
Central IL
I am not sure, but yes, I think so. It looks to me like the yellow band is sitting on top of a J channel. There are trim nails through the yellow piece, and brown caulk sealing the yellow to the brown channel.

What profile is “combo utility trim”? This and snap locks sounds a lot more like what I would want here instead of a few trim nails trying to hold this up.

Could “std utility trim” be what I’m seeing, in the J on the other part of the house (last picture)?


Combo Utility is also called Dual Utility depending on MFG. It is used when you are too close to the lap for it to lock properly into Std Utility (or Undersill)

1722177724959.png

STD Utility:

1722177808646.png
 

bwringer

Well-known member
Joined
Jan 1, 2013
Messages
10,255
Location
Indianapolis
Is that Brown J trim under the white band with the white caulked to it? If so, IMO, proper way is to put combo utility trim in place of J. You then punch snap locks in your cut piece of siding which lock into the utility trim. You could also just slip std utility trim into the J, but that always looks like a band-aid to me.
This right here.

Standard utility in the J would work fine; combo isn't always available.

In any case, the installer tried to cut corners here... maybe they were out of utility that day or something.
 
OP
D

DGersic

Well-known member
Joined
Mar 12, 2017
Messages
6,288
Location
DeKalb, IL
Combo Utility is also called Dual Utility depending on MFG. It is used when you are too close to the lap for it to lock properly into Std Utility (or Undersill)

1722177724959.png

STD Utility:

1722177808646.png

Ah. Got it. Thanks. That looks like what it needs.
 

walta

Well-known member
Joined
Jan 13, 2017
Messages
2,309
Location
Dutzow Missouri
NMK’s photos is perfect.

But understand it is no accident that the siding fell out in the summer. The vinyl gets soft in the summer heat and the fact that is a darker color and I am guessing on the west side of the building are contributing factors.

You nail repair should be removed as soon as possible because the vinyl siding and the wood you nailed it to expand at different rates. When it gets warm the vinyl will get longer the wood not so much. Your nails will prevent the vinyl from moving left and right and it will be forced to bow outward and distort its shape. After a few days the distortions will be permanent and replacement will be the only option.


Walta
 

jack stand

Well-known member
Joined
Feb 29, 2012
Messages
3,324
Location
Lakes Region Maine
Have you called the installer? He probably won't be surprised about this at all. These "decorative" interruptions of the wall (stopping, flashing and restarting) bring out the worst of any vinyl job.
I had a big condo project where they wanted a "band board" look at each floor level. After convincing the architect and builder to allow me to simply run 1 course of "single 8" white siding at this location that it would be much cheaper, watertight and no more prone to issues than the rest of the wall, they agreed over the menagerie of additional parts and costs.
 
To avoid these ads, REGISTER NOW!

CraigStu

Well-known member
Joined
May 22, 2014
Messages
4,023
Location
Blacksburg, Va
Jack stand that sure sounds like a good plan. Is 'single 8' uncommon enough that the OP's installers wouldn't do it that way? I can't imagine why one would go through the other setups w/ an extra 2-3 pieces that need to be paid for and installed.
 
OP
D

DGersic

Well-known member
Joined
Mar 12, 2017
Messages
6,288
Location
DeKalb, IL
NMK’s photos is perfect.

But understand it is no accident that the siding fell out in the summer. The vinyl gets soft in the summer heat and the fact that is a darker color and I am guessing on the west side of the building are contributing factors.

You nail repair should be removed as soon as possible because the vinyl siding and the wood you nailed it to expand at different rates. When it gets warm the vinyl will get longer the wood not so much. Your nails will prevent the vinyl from moving left and right and it will be forced to bow outward and distort its shape. After a few days the distortions will be permanent and replacement will be the only option.


Walta

Yes, the repair nailing I did is only intended to be temporary. It’s better than letting the pieces hang bent over. This is on a north facing wall that gets no sun.
 
OP
D

DGersic

Well-known member
Joined
Mar 12, 2017
Messages
6,288
Location
DeKalb, IL
Have you called the installer? He probably won't be surprised about this at all. These "decorative" interruptions of the wall (stopping, flashing and restarting) bring out the worst of any vinyl job.
I had a big condo project where they wanted a "band board" look at each floor level. After convincing the architect and builder to allow me to simply run 1 course of "single 8" white siding at this location that it would be much cheaper, watertight and no more prone to issues than the rest of the wall, they agreed over the menagerie of additional parts and costs.

I’m not calling. Dad is. I’ll talk to the installer if he wants me to, since I’m the one that was on the roof and nailed it back up. I don’t expect that will be needed.

Knowing nothing of vinyl siding, I can now see why this kind of decorative feature would be problematic. It seems popular enough that I’m surprised that the manufacturers haven’t come up,with better ways to make them happen.
 

jack stand

Well-known member
Joined
Feb 29, 2012
Messages
3,324
Location
Lakes Region Maine
The "single 8" is an old style, like the 70's and back and probably a special order. I bought a lot of material and they'd get it for me a box or two at a time.
In order for this to work you'll need 8" from the lower panels "top lock" to the bottom lock of the next panel.
This was Certainteed material and 15+ years ago for that project.
 

alwaysFlOoReD

Well-known member
Joined
Sep 24, 2013
Messages
2,389
Location
Airdrie, Alberta, Canada
I put about a 4-6" bead of clear silicon in the "hook" about every 20". Even on 2 pieces like has been shown. Never had a piece fall out. On repairs I've sometime had to use a screw to hold up one end when the original install wasn't perfectly straight. Only one screw or nail per piece so that siding can expand or contract. Don't use other caulks, they can actually stick too well to the siding and create one long siding piece that will have not enough room to expand into the end trim causing the siding to oilcan (warp or warble).
 
OP
D

DGersic

Well-known member
Joined
Mar 12, 2017
Messages
6,288
Location
DeKalb, IL
This isn’t going well. Dad called the installer but never heard anything back, until this morning when he found a guy on his roof “fixing” the siding. Guy brought a box of trim nails and a hammer. After what I’m sure was a calm and rational discussion, the guy left.

I expect that I’m going to eventually be the guy on the roof fixing this. There may be some more rounds with the installer, but the history suggests that those won’t end well.

The siding is Alside. I don’t know the colour code yet, but I think this is the trim pieces I need.

IMG_4984.jpeg

Along with some snap lock pliers, nails, and a hammer.

@nmk_61802 is there anything else I need on this?
 

nmk_61802

Well-known member
Joined
Mar 6, 2008
Messages
965
Location
Central IL
The siding is Alside. I don’t know the colour code yet, but I think this is the trim pieces I need.


Along with some snap lock pliers, nails, and a hammer.

@nmk_61802 is there anything else I need on this?


That looks to be the correct trim. You are going to needs aviators as well.... I like to trim out a portion of the body of the trim and lap them at least an 1 1/2", matching the lap direction on the siding (this assumes the lapped it correctly, according to line of site). I generally like to tight nail one side or the other, usually at the joint (or middle). This allows me to control the direction of expansion.

I see a lot of caulk on the top of the trim. I generally don't like to caulk anywhere, but suspect it was done due to a large gap between the J and the decorative band. Fortunately the dual utility trim doesn't warp as bad as J and should hold tighter to the decorative band.

Again, personnel preference, but I would have used a vinyl trim board for the band. I think it gives a better shadow line, and is similar thickness to the j or utility trim to die into.
 
Last edited:
OP
D

DGersic

Well-known member
Joined
Mar 12, 2017
Messages
6,288
Location
DeKalb, IL
That looks to be the correct trim. You are going to needs aviators as well.... I like to trim out a portion of the body of the trim and lap them at least and 1 1/2", matching the lap direction on the siding (this assumes the lapped it correctly, according to line of site). I generally like to tight nail one side or the other, usually at the joint (or middle). This allows me to control the direction of expansion.

I see a lot of caulk on the top of the trim. I generally don't like to caulk anywhere, but suspect it was done due to a large gap between the J and the decorative band. Fortunately the dual utility trim doesn't warp as bad as J and should hold tighter to the decorative band.

Again, personnel preference, but I would have used a vinyl trim board for the band. I think it gives a better shadow line, and is similar thickness to the j or utility trim to die into.

Aviators =?= tin snips, right?

Are you cutting out part of the trim body to make siding insertion easier? Or is this for lap joint the pieces of trim together? I‘m not understanding why you would do this.

The siding piece is about 2” high maybe. Not much to work with.

The caulk on top of the J trim seems is sealing whatever that trim board is to the J. The board is held with nails, so the caulk is not structual at least. I think I’m leaving the J channel and the band in place, not touching those, just adding the dual utility trim inserted in to the J from below. Right?
 

nmk_61802

Well-known member
Joined
Mar 6, 2008
Messages
965
Location
Central IL
Aviators =?= tin snips, right?

Are you cutting out part of the trim body to make siding insertion easier? Or is this for lap joint the pieces of trim together? I‘m not understanding why you would do this.

The siding piece is about 2” high maybe. Not much to work with.

The caulk on top of the J trim seems is sealing whatever that trim board is to the J. The board is held with nails, so the caulk is not structual at least. I think I’m leaving the J channel and the band in place, not touching those, just adding the dual utility trim inserted in to the J from below. Right?

Aviators = Aviation Tin Snips..... Sorry, I assumed most would know what that meant.

I had assumed the removal of the existing J, hence lapping the new dual utility trim to itself to avoid gaps with movement. I usually do this will all exposed final trim as it makes the job look good. If you are successful in getting the dual utility into the J, you don't need to lap it. The brand of siding and the size of J I can easily get, the dual utility and J are about the same size. Last time I installed it it was at the top of a wall, and just easier to omit the J.

Again I am not a professional installer, but have done a few full houses, and many repairs for friends and family.
 
OP
D

DGersic

Well-known member
Joined
Mar 12, 2017
Messages
6,288
Location
DeKalb, IL
Aviators = Aviation Tin Snips..... Sorry, I assumed most would know what that meant.

I had assumed the removal of the existing J, hence lapping the new dual utility trim to itself to avoid gaps with movement. I usually do this will all exposed final trim as it makes the job look good. If you are successful in getting the dual utility into the J, you don't need to lap it. The brand of siding and the size of J I can easily get, the dual utility and J are about the same size. Last time I installed it it was at the top of a wall, and just easier to omit the J.

Again I am not a professional installer, but have done a few full houses, and many repairs for friends and family.

Just making sure I had the term right. I just normally hear them called snips or tin snips. No worries.

I’m hoping to be able to stuff the utility trim in to the J so as to avoid disturbing the band and everything above it. So if that works, I don’t need to lap the utility trim, just nail it on and leave room for expansion movement.

Here’s another shot of the band, showing how it is nailed on.

IMG_5156.jpeg

I was talking to an actual professional today. Neighbor’s cousin owns a siding company. As soon as I described what’s here, his first question was why there isn’t utility trim in the J. I dunno, I didn’t do it. Either the guy that did was incompetent or ran out of material and decided that nails were “good enough“.
 
To avoid these ads, REGISTER NOW!
Top Bottom