To avoid these ads, REGISTER NOW!

Screaming **** Garage

Jettback50

Well-known member
Joined
Feb 28, 2010
Messages
55
Location
Olympia, WA
Welcome to the Screaming **** Garage!

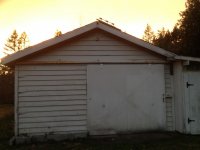
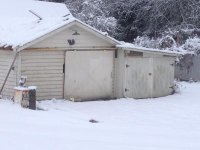
This charming little building is a 26' x 16', that works out to about a 1-1/2 car garage that I am guessing was built in the 30's or 40's. She has had lived some hard years, fell in with the wrong kind of critters, and added more years of general neglect and disinterest.

That is all about to change...

IMG_0129_zps46ef7f9f.jpg

IMG_0133_zps60bcada0.jpg
 

Attachments

  • IMG_0129 2.jpg
    IMG_0129 2.jpg
    129.9 KB · Views: 23
  • IMG_0131 2.jpg
    IMG_0131 2.jpg
    100.9 KB · Views: 21
  • IMG_0132 2.JPG
    IMG_0132 2.JPG
    67.7 KB · Views: 28
  • IMG_0133 2.jpg
    IMG_0133 2.jpg
    60.6 KB · Views: 24
To avoid these ads, REGISTER NOW!
OP
J

Jettback50

Well-known member
Joined
Feb 28, 2010
Messages
55
Location
Olympia, WA
This ol' girl might have some issues, there is a sag around the window on the south side wall, rough-looking paint, and roof well past it's service-life, but a wise man once told me that 'sometimes you have put on some of the shiny stuff to keep you wanting to get the project finished.'

Wanted to get up a neat old enamel shade light with a twillight switch. Knew where I wanted to put the light and the switch and as I got into the electrical, turned out not to be a simple case of hooking up a few wires.

The outlet on the side of the building was powered by romex run up the side of the building and into a plug near an outlet under the fuse box. The glass fuse panel looked OK but it was soon clear that there was not enough room for the new circuit. As with most things, a quick project turned into something much more.

IMG_0142_zpsac6be3df.jpg
 

Attachments

  • IMG_0142 2.jpg
    IMG_0142 2.jpg
    65 KB · Views: 19
OP
J

Jettback50

Well-known member
Joined
Feb 28, 2010
Messages
55
Location
Olympia, WA
So we get to the name of the garage. Last winter, while at the old family home, I found this casting under snow, some discarded car parts and a potbelly stove, frozen into the ground. It may have come from the wood stove but I just thought is was too neat to let it sit there. At the time I have no place for it and no out buildings. As soon as we closed on the property, it was clear where it's new home would be.

IMG_0151_zpsb35f57c1.jpg
 

Attachments

  • IMG_0151.jpg
    IMG_0151.jpg
    149.1 KB · Views: 20
OP
J

Jettback50

Well-known member
Joined
Feb 28, 2010
Messages
55
Location
Olympia, WA
The first test of the the light and the switch. Found the light just a few miles away from the old garage and thought the straight arm would fit the styling perfectly. I was thinking of a red shade but didn't find one and could not bring myself to paint this one after cleaning and re-wiring this one.

On the south wall I mounted a dual gang outdoor switch box with a twillight sensor a switch and an outlet. The switch also controls the light but is still conditional on the sensor for the light to come on. I did this so that during the longer dark months I could turn the light out if I wanted, as it faces the bedrooms on the house and might keep some awake.

IMG_0149_zps64b789a2.jpg
 

Attachments

  • IMG_0149 2.jpg
    IMG_0149 2.jpg
    53.7 KB · Views: 19

HSpencer

ALLIANCE MEMBER
Joined
Nov 28, 2010
Messages
2,854
Location
South Central US
I really have a lot of respect for people doing restorations. This garage is a perfect example. There is history and charm in the building. It would almost be "retro" to be able to keep the glass fuse panel, but I know you need to upgrade for several reasons. So what is the floor like in the garage? I think this will be a great project to watch, and I hope you keep it posted as you go along. I love the old rooster and can't wait to see him proudly redone and posted on the garage. Good Luck on it all!!
 

buiboy

Member
Joined
Jan 8, 2013
Messages
24
Location
New Hampshire
Looks like a great project to rejuvenate. Even with all those years of neglect, you have to stop and think that one day some time ago it was somebodies new garage. Keep us posted.
 
OP
J

Jettback50

Well-known member
Joined
Feb 28, 2010
Messages
55
Location
Olympia, WA
So here we are. Didn't realize how long it has been since the last post. Been busy all around the property and trying to make money to keep this whole thing alive!
Last year, had the old roof pulled off and disposed of because we thought there might be asbestos shingles. Turns out there was one course of cedar all around the edge and the rest was 50 year old asphalt. Wrapped the roof in tarp until the structure was completely addressed.
First up was the rotten sill. Completely gone on the south side. It did not look too bad until you got into it...post beetles, termites, and carpenter ants. There were some ants still active so after I got rid of a lot of rotten wood sitting around the building, had the whole thing, actually the whole property treated to get rid of the last of them.


Attachments

  • Screaming **** Garage (6).jpg
    Screaming **** Garage (6).jpg
    142.7 KB · Views: 10
  • Screaming **** Garage (7).jpg
    Screaming **** Garage (7).jpg
    145.1 KB · Views: 10
To avoid these ads, REGISTER NOW!
OP
J

Jettback50

Well-known member
Joined
Feb 28, 2010
Messages
55
Location
Olympia, WA
Someone had nailed a finish board across the sill all the way down. It was a little rotten but it was hiding the lumber that had turned into dirt.

So as a catch up on this thread, here is what she looked like last winter...earlier this year.


Attachments

  • Screaming **** Garage (5).jpg
    Screaming **** Garage (5).jpg
    138.9 KB · Views: 20
  • Screaming **** Garage (4).jpg
    Screaming **** Garage (4).jpg
    146.4 KB · Views: 19
  • Screaming **** Garage (1).jpg
    Screaming **** Garage (1).jpg
    148.3 KB · Views: 38
  • Screaming **** Garage (3).jpg
    Screaming **** Garage (3).jpg
    136.7 KB · Views: 19
OP
J

Jettback50

Well-known member
Joined
Feb 28, 2010
Messages
55
Location
Olympia, WA
Next on the plate is to jack this thing up! Get the weight off the crumbling south wall and cut out the rot. To do this a top plate is mounted about 4ft inboard of the wall so there is room to work on the wall to be removed and then use a pair of beam jacks. Steel tubes with a sleeve at one end that is adjusted with bolts and a threaded plate adjusted with a wrench to move the whole building. The importing thing to be aware of is to only lift a bit at a time and if you can't jack them both at the same time, then work them in tandem to try to keep things even. It is a little bit less of a concern for a garage like this one but always work best practices.

After the lift we have the "Floating Garage" ooooh. Looks so cool at night. Plan at this point is to put down a concrete block stem wall, put on a new treated plate, extend the wall down to it's new home, and drop it into position. Then work my way around the building.


Attachments

  • Screaming **** Garage (8).jpg
    Screaming **** Garage (8).jpg
    148.5 KB · Views: 10
  • Screaming **** Garage (9).jpg
    Screaming **** Garage (9).jpg
    147.8 KB · Views: 11
  • Screaming **** Garage (10).jpg
    Screaming **** Garage (10).jpg
    147.1 KB · Views: 10
  • Screaming **** Garage (11).jpg
    Screaming **** Garage (11).jpg
    152.8 KB · Views: 9
  • Screaming **** Garage (12).jpg
    Screaming **** Garage (12).jpg
    164.2 KB · Views: 8

Ned Kelly

Member
Joined
Mar 4, 2008
Messages
11
Location
Dana Point, CA
Those glass fuses brought back some memories. Right outta high school moved into an old house in Pasadena with some friends. Every time the amplifiers and PA got plugged in, we'd lose a fuse. Simple fix was a penny in the hole and then screw the blown fuse back in. Was a wonder we didn't burn the place down.

Good to see another old garage brought back to life!
 
OP
J

Jettback50

Well-known member
Joined
Feb 28, 2010
Messages
55
Location
Olympia, WA
Those glass fuses brought back some memories. Right outta high school moved into an old house in Pasadena with some friends. Every time the amplifiers and PA got plugged in, we'd lose a fuse. Simple fix was a penny in the hole and then screw the blown fuse back in. Was a wonder we didn't burn the place down.

Good to see another old garage brought back to life!

Thanks. I am trying. Saved the old fuse box for some sort of art project, maybe a light, cause the penny thing is really playing with fate.


Here is the part where I started to get help. Found a contractor because he was a car guy and happened to sell him a vintage shop press. After more than a day of set up, measuring, and bracing we got to start laying block! Yeah!


After this put down a new treated plate and extended the wall back down before putting the weight onto the new foundation stem wall. Next, wanted to get the place "dried in" and repaired the rot at the rafter tails. About 5 boards worth on the south side (exposed road side) and 3 on the north side. That was about it, just one or two boards in the main roof area but the whole thing was mostly in good shape. All new material, went with an Architectural shingle for the longevity. On part of the north side ran a few courses of roll roofing because we do not know the tie in of the neighboring structures yet.

The day after the roof was finished there was a pretty good wind storm followed by days of heavy rains, she held dry. Noice.

 
OP
J

Jettback50

Well-known member
Joined
Feb 28, 2010
Messages
55
Location
Olympia, WA
After a bit of drying out prepped the new fascia board for paint and spent almost the whole day until after sundown sanding down the gable end and patching to save it. Know I saved money but not sure it was worth it. Looks good at this point but will still need to be prepped and sanded at least two more times before the 'show side' is ready.


Stapled up a few chips to help decide on color. Want a red, not too bright, nut not a barn red, which is what everyone else is wanting for this garage.


OP
J

Jettback50

Well-known member
Joined
Feb 28, 2010
Messages
55
Location
Olympia, WA
I'm following this one. Great work so far. What's the deal with the building behind it?

Thanks. The building behind is a very rickety RV stall that Dallas doesn't think will last the winter. On the side is a lean-to that was attached to the rotting fascia. That is held now with a few salvage measures.

The plan is to build the building in the back into the roofline of the garage so it fits much better. Still working out the plans for the two other buildings.
 
To avoid these ads, REGISTER NOW!
Top Bottom