

seal killer
Member
All--
After devouring this forum, I launched my garage remodel project. My goal is to gain storage efficiency to free up enough room in my two car garage for a lathe alongside my mill and still have enough room for my wife's Grand Cherokee, my Crossfire, and bling-bling Sportster.
The project is not complete, as the Gladiator cabinets are laying in my foyer, the kick plates are not installed and the lathe is still at Grizzly. However, I think I have enough of the project completed to report. I will add to this thread as the project progresses.
Here is where I started. These are my DIY cabinets. Obviously, I can't even spell would, much less do wouldwurk.

It took me several days to get down to this point. Moving the mill to the driveway presented a big problem.

There are two versions of the color scheme shown in the picture above. I decided to use the far one. (Not that you can see the difference in this picture.)
My wife really liked this floor sample. That "influenced" my decision.")

The mill is still sitting there, well wrapped, ready to go on the driveway. Of course, I had to unwrap it to move it, but at least it was protected from the painters. And, now I have paint on the walls!

Some more paint; I am liking the color scheme. I am still working on figuring out how to move 1400 pounds of machine, though.

Are you familiar with "Hilman rollers?" They sure make moving heavy equipment a breeze! Of course, a friend on the end of that two by four was a tremendous amount of help, too!

There is a trick to use something like Hilman rollers to move a rigid-based structure like the mill shown above. I learned this from BadDog on The Home Machinist forum. It was a very valuable lesson.
The natural tendency is to place a roller under each of the four corners of the mill. However, using four rollers will allow one to roll free the moment a dip is encountered in the floor. I thought I could prevent this by placing two rollers at the corners in the back and two rollers side by side in the middle at the front. The mill only moved inches before one of the front rollers rolled free! I immediately levered the mill back up (using wooden blocks and the two by four) and placed a single Hilman roller in front. I had to retard the mill as gravity pulled it down the slope of the garage floor.
The mill was slowly and carefully raised using a two by four lever and wooden blocks until it was just high enough to slip the rollers under the base.

Rollers were placed near the mill's corners in back.

The mill is finally on the driveway! The helpers are officially happy!

I had waited for, worried about, and contemplated the scene below for a couple of weeks!

(I am going to post the project at this point since I am unfamiliar with the limits of this forum and don't want to lose the elegant prose I've created! I'll edit it into existence from here.)
Jim Bjorgo, owner of Armor Construction and Epoxy Floors (a great one man band!), installed my floor. Here he is with the diamond grinder. He used a hand grinder around the periphery.

Cracks were patched!

The stem walls get the full epoxy treatment, too.

I read so much about cleats on this forum that I was eager to see them put to use! It would be impossible to walk very far for very long across the epoxy without cleats.

Finally, epoxy meets floor! I chose Tennant Eco-MPE. A search on this site yielded one other user of this brand. It is an industrial covering and I expect it to wear well in my garage.

The next day, Jim knocked the loose chips off and vacuumed them up.

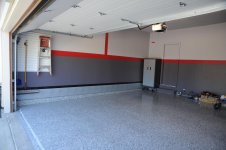
The picture below is the current state of affairs. The floor is finished. I can walk on it tomorrow. I can drive on it in five days. I will wait seven days to roll the mill over some quarter-inch plywood to its new resting place which you see as the recess in the right rear corner of the garage. To the left of the mill will go the new Grizzly lathe.

I will use Gladiator flooring in the tread plate style of the Gladiator boxes as kick panels (and, conveniently, trim) around the garage on top of the stem walls. I have not quite figured out how I am going to affix the flooring to the walls as they are 12" square. Maybe one screw into a stud every 4 feet? I'll also use the Gladiator trim pieces to bring the panels nicely to the walls.
You have given me a tremendous amount of help via the body of this forum. Dare I ask more? Please give me suggestions, criticisms, and any other help you see fit.
Almost forgot: $3.75 per square foot, installed.
--Bill
After devouring this forum, I launched my garage remodel project. My goal is to gain storage efficiency to free up enough room in my two car garage for a lathe alongside my mill and still have enough room for my wife's Grand Cherokee, my Crossfire, and bling-bling Sportster.
The project is not complete, as the Gladiator cabinets are laying in my foyer, the kick plates are not installed and the lathe is still at Grizzly. However, I think I have enough of the project completed to report. I will add to this thread as the project progresses.
Here is where I started. These are my DIY cabinets. Obviously, I can't even spell would, much less do wouldwurk.
It took me several days to get down to this point. Moving the mill to the driveway presented a big problem.
There are two versions of the color scheme shown in the picture above. I decided to use the far one. (Not that you can see the difference in this picture.)
My wife really liked this floor sample. That "influenced" my decision.
The mill is still sitting there, well wrapped, ready to go on the driveway. Of course, I had to unwrap it to move it, but at least it was protected from the painters. And, now I have paint on the walls!
Some more paint; I am liking the color scheme. I am still working on figuring out how to move 1400 pounds of machine, though.
Are you familiar with "Hilman rollers?" They sure make moving heavy equipment a breeze! Of course, a friend on the end of that two by four was a tremendous amount of help, too!
There is a trick to use something like Hilman rollers to move a rigid-based structure like the mill shown above. I learned this from BadDog on The Home Machinist forum. It was a very valuable lesson.
The natural tendency is to place a roller under each of the four corners of the mill. However, using four rollers will allow one to roll free the moment a dip is encountered in the floor. I thought I could prevent this by placing two rollers at the corners in the back and two rollers side by side in the middle at the front. The mill only moved inches before one of the front rollers rolled free! I immediately levered the mill back up (using wooden blocks and the two by four) and placed a single Hilman roller in front. I had to retard the mill as gravity pulled it down the slope of the garage floor.
The mill was slowly and carefully raised using a two by four lever and wooden blocks until it was just high enough to slip the rollers under the base.
Rollers were placed near the mill's corners in back.
The mill is finally on the driveway! The helpers are officially happy!
I had waited for, worried about, and contemplated the scene below for a couple of weeks!
(I am going to post the project at this point since I am unfamiliar with the limits of this forum and don't want to lose the elegant prose I've created! I'll edit it into existence from here.)
Jim Bjorgo, owner of Armor Construction and Epoxy Floors (a great one man band!), installed my floor. Here he is with the diamond grinder. He used a hand grinder around the periphery.
Cracks were patched!
The stem walls get the full epoxy treatment, too.
I read so much about cleats on this forum that I was eager to see them put to use! It would be impossible to walk very far for very long across the epoxy without cleats.
Finally, epoxy meets floor! I chose Tennant Eco-MPE. A search on this site yielded one other user of this brand. It is an industrial covering and I expect it to wear well in my garage.
The next day, Jim knocked the loose chips off and vacuumed them up.
The picture below is the current state of affairs. The floor is finished. I can walk on it tomorrow. I can drive on it in five days. I will wait seven days to roll the mill over some quarter-inch plywood to its new resting place which you see as the recess in the right rear corner of the garage. To the left of the mill will go the new Grizzly lathe.
I will use Gladiator flooring in the tread plate style of the Gladiator boxes as kick panels (and, conveniently, trim) around the garage on top of the stem walls. I have not quite figured out how I am going to affix the flooring to the walls as they are 12" square. Maybe one screw into a stud every 4 feet? I'll also use the Gladiator trim pieces to bring the panels nicely to the walls.
You have given me a tremendous amount of help via the body of this forum. Dare I ask more? Please give me suggestions, criticisms, and any other help you see fit.
Almost forgot: $3.75 per square foot, installed.
--Bill
Last edited:


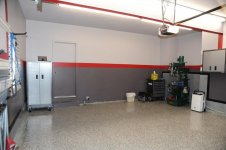
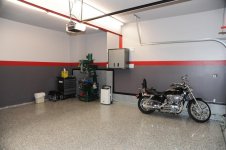

 Like Briggs said, that red line alignment is nice.

