To avoid these ads, REGISTER NOW!

sears 328-12001

BadBehavior

Member
Joined
Apr 3, 2010
Messages
9
Location
Sunny FLA
I have it torn down and have the Norco kit #NO215500. Apprehensive to guess what goes where. I need to be "spoonfed" Not enough info let me know. Forgot to thank HIBALL for the help last time on what kit to buy.:thumbup:
Larry
 

Attachments

  • OringDeep.jpg
    OringDeep.jpg
    138.8 KB · Views: 36
  • ORthisSide.jpg
    ORthisSide.jpg
    130.3 KB · Views: 38
  • thisSideUp.jpg
    thisSideUp.jpg
    121 KB · Views: 37
  • WhereGo.jpg
    WhereGo.jpg
    99.1 KB · Views: 32
To avoid these ads, REGISTER NOW!

Hiball

Well-known member
Joined
Apr 30, 2009
Messages
14,027
Location
Missery
I believe #1, #2 and #5 are Pump Piston components, #5 looks like a Wavy washer but I think its the camera flash and its really a backup.

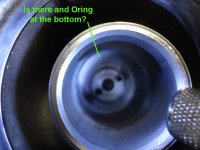
1# Is a Seal/Wiper that Presses into the Recessed portion on top of the block where the Pump Piston is. It is essentially the same type of seal that you have in the Tank nut, Where you where asking if the orientation was correct. In both cases that should be the correct way to press them in, The bottom portion should be Open. (I can confirm if you snap a picture of the underside, but im about 99% sure that's right where you see the sizing up top) Install this AFTER you assemble the Oring/Backup into the appropriate groove.

#2 and #5 is the Pump Piston Oring and Backup, If you look at #5 it should be flat on one side and beveled to accept the oring on the Other. The Oring will fit in the pump Piston Galley inside a groove and the Backup will mate to the Oring in the same groove "ON TOP" of the Oring.

(If for some reason #5 isn't soft and pliable or doesn't match my description, don't install it in the piston galley)

#3 and #4 appear to be the Same size Oring, I suspect one is for the release (up inside where the Rod seals) and the other one maybe seals the working valve. <-- Right next to the Pump Piston.

#6 ? Well it doesn't appear to appropriate sized to backup either of the 2 orings, Maybe a seal to fit Overload Plug?


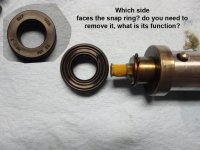
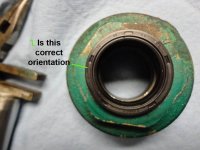
Now for the Main Ram Seal, Yes you will need to remove the snap ring. What you have is a loaded Ucup (A little surprised at that) The side with the Writing SKF 22mm USA etc will go on first and will ride against the "Flat" side of the Guide. The other end is the business, and will be outwards against the pressure.
 
Last edited:
To avoid these ads, REGISTER NOW!
OP
B

BadBehavior

Member
Joined
Apr 3, 2010
Messages
9
Location
Sunny FLA
Thanks HIBALL and EOC_Jason for responding, HiBall here is the pic requested.
Also the "FLAT" washers are a neoprene type and have a slight concavity on 1 side. You're both GOOD men, Damn few of US left!!:rocker:
 

Attachments

  • Sealjack.jpg
    Sealjack.jpg
    113.5 KB · Views: 16

Hiball

Well-known member
Joined
Apr 30, 2009
Messages
14,027
Location
Missery
Thanks HIBALL and EOC_Jason for responding, HiBall here is the pic requested.
Also the "FLAT" washers are a neoprene type and have a slight concavity on 1 side. You're both GOOD men, Damn few of US left!!:rocker:

That's the Bottom side of the Press in Seal, Install them with the Numbers UP and remember install the oring/backup on the Pump Piston Prior to pressing the seal in. Its Easier to see what your doing this way, and when I say "Press" you don't need a press, Just make sure the groove is free of debris/Old Seal and use a flat surface to "Gently" Drive it down.

If that other flat piece is a backup, Im assuming its 6-11 based off the above linked diagram. Although it doesn't look like it corresponds to the Oring size to me.
 
Last edited:
To avoid these ads, REGISTER NOW!
Top Bottom