To avoid these ads, REGISTER NOW!

Sears Dunlap Drill Press Restoration

vertguy

Well-known member
Joined
Apr 6, 2010
Messages
1,261
Location
SE WI
I have been scanning CL for a couple months now trying to find the right deal on a vintage drill press. This one popped up early yesterday and made a "trunk" deal on it today during work. The seller claimed all was well except the spindle was not staying in place. For $50, I figured even if it was worse than described, this was worth the minimal investment.

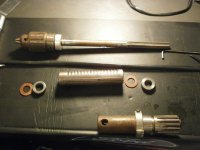
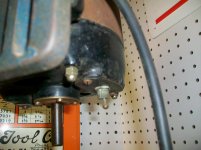
The good news is the motor runs great and everything moves. It definitely needs a thorough cleaning as the vertical motion is pretty gunked up from dirt and the spindle is indeed not locked into place. I already found a manual on vintage machinery and identified what is causing the spindle to not stay in place.

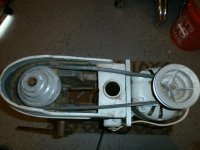
This is my first vintage tool, but the weight and simplicity of this drill press re-enforces that I made the right choice. A little rust clean up on the bare metal, paint, clean up, etc. and this will be a great addition to the garage. It is a little bigger than I thought, so I will need to build a separate bench/cart.

This is a Sears Dunlap 103.23621
 

Attachments

  • Sears Dunlap Drill press 001.jpg
    Sears Dunlap Drill press 001.jpg
    81.4 KB · Views: 234
  • Sears Dunlap Drill press 007.jpg
    Sears Dunlap Drill press 007.jpg
    31.6 KB · Views: 190
  • Sears Dunlap Drill press 006.jpg
    Sears Dunlap Drill press 006.jpg
    56.6 KB · Views: 203
  • Sears Dunlap Drill press 005.jpg
    Sears Dunlap Drill press 005.jpg
    59.4 KB · Views: 217
  • Sears Dunlap Drill press 004.jpg
    Sears Dunlap Drill press 004.jpg
    35.3 KB · Views: 284
  • Sears Dunlap Drill press 002.jpg
    Sears Dunlap Drill press 002.jpg
    61.3 KB · Views: 225
Last edited:
To avoid these ads, REGISTER NOW!

gilbo

Well-known member
Joined
Feb 1, 2010
Messages
716
good find there, should be a breeze of a resto, and no arc of shame on it either
 
OP
V

vertguy

Well-known member
Joined
Apr 6, 2010
Messages
1,261
Location
SE WI
In looking through the manual, I am fairly sure the spindle is missing the "spindle collar and set screw" (item 26180). Any suggestions on where to find one is appreciated. The spindle measures right at 5/8 inch.

I am also not fond of the open motor/wiring, but the opening does have 2 screw holes... so worse case I can fab a sheet metal cover. The add on switch box is also in the way of the handle, but I think it would easily be moved to the other side.
 

Attachments

  • Spindle collar.JPG
    Spindle collar.JPG
    82.5 KB · Views: 175
OP
V

vertguy

Well-known member
Joined
Apr 6, 2010
Messages
1,261
Location
SE WI
Ok... just a matter of describing the collar correctly as a search for "5/8 inch set screw collar" turned up tons of options. A quick trip to the hardware store tomorrow should get me in business.

And after further review of the drawings, I am missing several parts including 2 fiber washers (26716), 1 rubber washer (26812) and the upper locking collar (26130). Still should make for an easy fix.
 
Last edited:
OP
V

vertguy

Well-known member
Joined
Apr 6, 2010
Messages
1,261
Location
SE WI
Thanks for the link! Definitely interested in that collar if you have it... PM inbound.
 

1930artdeco

Well-known member
Joined
Dec 28, 2010
Messages
1,104
Location
Lynden, Wa
You may want to check 'old wood working machines'. That is where I go all the info and spare parts for my DP.

Mike
 

rusty65

Well-known member
Joined
Mar 20, 2012
Messages
2,279
Location
Pekin,IL
I recently just replaced the bushings in my Dunlap DP and they measure 1 1/2 length 13/16 OD and 5/8 ID.


Sent directly from the Snap On Kool Aid factory.
 

rusty65

Well-known member
Joined
Mar 20, 2012
Messages
2,279
Location
Pekin,IL
Good info! Do you have a source or are these generally available? Part number?

Edit: I want to clarify my spindle was .0005 oversized from 5/8 that's why I needed to use the 5/8 reamer.

These are the ones I bought I did have to run a 5/8 reamer in them to slip them on because the fit was to tight at first to go on the spindle. But after I got them on the fit was great and zero play.
http://www.bronzebushings.com/root-...841-sleeve-5-8-id-x-13-16-od-x-1-1-2-oal.html


Sent directly from the Snap On Kool Aid factory.
 
Last edited:
OP
V

vertguy

Well-known member
Joined
Apr 6, 2010
Messages
1,261
Location
SE WI
Any tricks/advice for removing the pinion? Looks like there is a retaining screw (26614) and maybe the feed return spring (18915) as looks to hook into the pinion?
 
Last edited:
OP
V

vertguy

Well-known member
Joined
Apr 6, 2010
Messages
1,261
Location
SE WI
Finding out how simple these are to disassemble as the pinion and quill popped right out after removing the locking bolt and releasing the tension on the feed return spring. Also pulled the spindle pulley and all the smaller rusty parts are soaking in a bath of Evapo-Rust.

Also found an early Christmas present as the missing the top locking collar and one of the fiber washers were laying in the lower front of the head assembly. They must have came off during a previous tear down and left for lost. I think the current belt is a little long, so I am picking up a new one at AutoZone tomorrow that I crossed referenced to the Sears Parts site (1/2x37).

Any good tips on dealing with that fuzzy dirt/grease as the inside of the main casting has a think layer and the Simple Green I was using on the other parts did not seem to cut it well??
 
OP
V

vertguy

Well-known member
Joined
Apr 6, 2010
Messages
1,261
Location
SE WI
Good 'ole brake cleaner... that stuff cuts through just about any crud you can throw at it. Thanks for the reminder! I grabbed a couple cans tonight while picking up the new belt at AZ. 2/$7


The rust removal worked great as everything came out clean as new! All the depth markings on the pinion are visible (needs a little polishing), p/n and specs showing up on the chuck (which also easily adjusts now) and the handle freely slides into the pinion.


Here's a before and after:
 

Attachments

  • Drill tear down 001.jpg
    Drill tear down 001.jpg
    104.5 KB · Views: 176
  • Drill restore day 2 001.jpg
    Drill restore day 2 001.jpg
    70.3 KB · Views: 175
Last edited:
OP
V

vertguy

Well-known member
Joined
Apr 6, 2010
Messages
1,261
Location
SE WI
Wrapped up tear down and continued with the rust removal as I soaked the support pipe and a bunch small items overnight... the pipe came out great! I had to get creative for the pipe as I needed something that held just enough liquid volume of rust remover, without requiring a huge container. So I picked up a piece of 2 inch ID PVC cut just longer than the pipe, glued on a cap and it work perfect as the pipe OD is ~1-7/8.

Also fabricated a cover for the motor electrical connections. Think I may just drill a hole in the center attaching a wire clamp.

Drillrestoreday2009_zpsa45e1e26.jpg


Drillsupportpipe001_zps86b5553f.jpg


Drillsupportpipe002_zpseffbf107.jpg
 
Last edited:

jakemac

Well-known member
Joined
May 21, 2013
Messages
9,035
Location
New England
On the wire cover on my Cman DP, a previous owner drilled a hole and installed a switch to reverse the motor. Not that I need a reversing switch, but it's nice to know it's there if I ever do need it.

The power cord goes to an on/off switch on the motor base, and then there is a wire from the switch to the motor studs behind the cover plate.

Good work so far. Keep going. :thumbup:
 

Attachments

  • 100_1565.jpg
    100_1565.jpg
    140.7 KB · Views: 94
OP
V

vertguy

Well-known member
Joined
Apr 6, 2010
Messages
1,261
Location
SE WI
Yep, that romex is already in the trash!

Spent the whole day in the garage with the heat cranked up and although it does not seem like much progress, it is slowly getting closer for paint.

The big accomplishment was tearing down, cleaning and stripping the motor. Still need to do the winding housing, but the ends with all the slots are paint free and clean. After seeing the nice black finish under the ugly bluish gray, thinking I will go black with motor for some contrast to the rest of the drill in gray. Also built the frame for an "add-on" bench where the drill will reside. Need to get some 3/4 plywood tomorrow so I can wrap that up.

motorcleanup_zpscd7ccb03.jpg
 

Outlawmws

Well-known member
Joined
Aug 9, 2011
Messages
39,265
Location
The Badlands
The tag was probably made onto the cover, which was common. Without it, not a clue. but it worked for the PO, so hook it up and see how it works!
 

jakemac

Well-known member
Joined
May 21, 2013
Messages
9,035
Location
New England
Most likely, it was a 1725/50 rpm motor at 1/3hp. That's what most manuals recommended. Since the motors were sold as an option of choice, most buyers opted for the least expensive motor that would do the job. If they wanted the "better" motor they would buy the Craftsman labeled one. If they wanted to go as cheap as possible, they would go for the Dunlap labeled motor (still a good motor by today's standards). Some would opt to buy just the DP and use a motor they had at home.
 
Last edited:
OP
V

vertguy

Well-known member
Joined
Apr 6, 2010
Messages
1,261
Location
SE WI
I kind of assumed with no tag it was next to impossible to determine the specs. No biggie as the motor seemed to work fine (before the tear down) and as long it works once I put into use, not a huge deal.

Coated the main casting last night with stripper, so hoping to have that process wrapped up today. With the holidays approaching, I probably will not finish the final metal prep and paint until Friday.
 
OP
V

vertguy

Well-known member
Joined
Apr 6, 2010
Messages
1,261
Location
SE WI
I do have a question on lubrication when reassembling...

The manual calls out some specifics on lubing the quill, spindle, pinion, etc with 30 weight motor oil. How about the spindle ball bearing (item 18221)... does that get lubed with something more heavy like wheel bearing grease?
 
To avoid these ads, REGISTER NOW!
OP
V

vertguy

Well-known member
Joined
Apr 6, 2010
Messages
1,261
Location
SE WI
And yet more details uncovered after stripping the motor winding case... instead of having a tag, this motor has all the specs stamped into it.

Here's what I found:
Maytag
A-8372 1/3HP 115v AC
60CY. 1PH 1725RPM
6.1AMPS 50C CONT.
S.F.-1 CODE-P A-52
DELCO PRODUCTS DIV.
GENERAL MOTORS CORP.
DAYTON, OH

Is this motor out of a washing machine??

Motorspecs002_zps0000855a.jpg


Finally wrapped up all the stripping, so ready for final prep and paint after Christmas:rocker:

Motorspecs004_zps892eaa14.jpg
 
Last edited:

Outlawmws

Well-known member
Joined
Aug 9, 2011
Messages
39,265
Location
The Badlands
It was clearly made for Maytag by Delco, who made motors for many companies, including Sears. Very possible that Maytag was a larger customer, and maybe had an overrun and they may have put a paper tag over the stamped info for another customer, or it may have been re-purposed. :dunno:

I would guess that "A-52" was a date code, so 1952? If so, Id say 5 or so years would have been an incredibly short lifespan for a Maytag appliance of the era... It would be far more likely to have sat in a Sears warehouse or store for 5 years before finally getting sold and mated with the DP. (Or it could have been a later replacement much later in both the motor and the DP's lives...)

Even if a re-purpose, the motor was designed for a vertical mount use, if made for a washer, so that is a good thing.

What was the original paint schema?
 
Last edited:

Outlawmws

Well-known member
Joined
Aug 9, 2011
Messages
39,265
Location
The Badlands
FYI: Some of the electric motor history tied to Sears/Craftsman:

For Model No prefix 115:

Packard Electric (Division of General Motors) Purchased by Delco in 1932.


Sunlight Electrical Manufacturing Co. Purchased by Delco in 1932 Sunlight Sm Motor production consolidated w/Packard Electric (Division of General Motors) in 1943

For Model No. Prefix 397

Delco Products Corp. (Motors and grinders)
 
OP
V

vertguy

Well-known member
Joined
Apr 6, 2010
Messages
1,261
Location
SE WI
Outlaw: Thanks for the great information!!

From what I can tell during the paint stripping, it appears the whole motor was black... which is the same color I plan to repaint it. My thought was to use a semi-gloss. We will see how it comes out as I can always repaint to a gloss or satin if it does not look right.
 
Last edited:
OP
V

vertguy

Well-known member
Joined
Apr 6, 2010
Messages
1,261
Location
SE WI
With all the holiday craziness settling down, spent some time yesterday afternoon doing the final prep/paint... except the adjustable drilling table as I forgot about some underside stripping that was not quite complete. Prepped and painted that piece this morning and moved the rest to the basement for a few days in the utility room to cure.

Go figure... all the motor specs are easily legible with only 1 coat of paint. Nothing like waiting for "paint to dry" as I can't wait to get this things assembled. But I still have some other clean-up/polishing I want to do with on some of the smaller parts like pulleys, badges, etc. But that can always get done later.

DPpaint_zps58f42cf9.jpg
 
Last edited:
OP
V

vertguy

Well-known member
Joined
Apr 6, 2010
Messages
1,261
Location
SE WI
Its alive!!! And looks as good as new:thumbup:

Finished assembly and testing today. Seems to work much better than when it first arrived, but I do have a slight bind during the first couple inches of quill travel. It is loosening up as I did more testing, but I may dig back into that later.

I still need to add a switch, but I wanted to get it running and have several different ideas... so I am going leave it alone for a while. Initially, this little project seemed like it would be a piece of cake. But it took a lot more time than I anticipated. However, I could not think of a better way to spend some extended time off than tinkering in the garage and ending up with a great little tool.

In addition to wiring a switch, I still need to do some more clean-up to the pulleys and badges along with a couple other little things.

DPcomplete001_zpsd016cc1a.jpg


DPcomplete002_zps11c739c5.jpg


DPcomplete003_zps07978132.jpg


DPcomplete004_zps14eb8783.jpg


DPcomplete005_zps1ce8500c.jpg


DPcomplete006_zps360de930.jpg
 
OP
V

vertguy

Well-known member
Joined
Apr 6, 2010
Messages
1,261
Location
SE WI
Thanks for all the feedback!! I need a break before starting my vise.

I also noticed the chuck was pretty tight and required the key to adjust it. I assume it is just gunked up as I did soak it in Evapo-Rust and don't recall it being like this before hand. Any easy way to lube it?
 

jakemac

Well-known member
Joined
May 21, 2013
Messages
9,035
Location
New England
Dip the chuck in ATF overnight and dry it out good in the morning.
(just the chuck, not the tapered shaft)
 
OP
V

vertguy

Well-known member
Joined
Apr 6, 2010
Messages
1,261
Location
SE WI
Dip the chuck in ATF overnight and dry it out good in the morning.
(just the chuck, not the tapered shaft)

You are a genius Jake!! Worked like a champ as the chuck spins freely now and can easily be adjusted by hand :rocker:
 

camposdesignco

New member
Joined
Mar 11, 2012
Messages
4
You are a genius Jake!! Worked like a champ as the chuck spins freely now and can easily be adjusted by hand :rocker:
Hey sorry to ask this so late but does the bearing get press fit anywhere or does it just go on the shaft? I'm restoring the same drill press and am just a little uncertain on where it's supposed to sit. Any help would be greatly appreciated
 
OP
V

vertguy

Well-known member
Joined
Apr 6, 2010
Messages
1,261
Location
SE WI
Hey sorry to ask this so late but does the bearing get press fit anywhere or does it just go on the shaft? I'm restoring the same drill press and am just a little uncertain on where it's supposed to sit. Any help would be greatly appreciated

No bearing required press fitting on mine, but some more detail might help. Do you have the manual? I found a copy on another site and could post it or send via email as the parts diagram is very helpful.
 

camposdesignco

New member
Joined
Mar 11, 2012
Messages
4
Ok yea I have the manual as well it's just I wasn't sure what was the purpose of the bearing #18221 I'm changing it regardless but I appreciate your help
 

gibbon_guy

Well-known member
Joined
Apr 11, 2008
Messages
435
Location
Redmond, WA
Kind of a thread hijack here. I have this exact DP and the chuck gets out of alignment when I push the feed handle down. I assume the bushing or something has play in it. Anyone run into this?
 
OP
V

vertguy

Well-known member
Joined
Apr 6, 2010
Messages
1,261
Location
SE WI
I finally decided to dig into some drag on the quill that popped up after reassembly and after a quick disassembly, realized it was self induced. It is amazing what a little paint overspray in the wrong places with moving parts affects things as there was paint in quill slide holes in the frame. A few minutes with some sand paper solved the issue.

But I also have a small amount of wobble in the motor shaft. Is this easily fixed? I may just look around for a reasonably priced replacement.
 
OP
V

vertguy

Well-known member
Joined
Apr 6, 2010
Messages
1,261
Location
SE WI
I borrowed JZiggy speed pulley design and had my brother machine out the column piece for my Dunlap. It took 2 iterations as I made a measurement error on the smaller column ID and with him not being local, it was easier to just have him crank out a new one (started with a 12 inch 1-5/8 shaft from ebay). Surprisingly enough, it actually runs smoother with the speed pulley installed. I do need to make a new bracket to allow the motor to raise a bit more so I can use the largest pulley (motor bracket is narrower than the DP mount holes), but even with this one the speed calculated in the low 400 RPM range.

I am very happy with the outcome and stoked to have a more versatile DP... thanks to the great ideas on GJ :rocker:

DP%20speed%20pulley%20003_zpseuoaffjg.jpg


DP%20speed%20pulley%20004_zps7nkhlrje.jpg


DP%20speed%20pulley%20005_zpszyqwyegz.jpg


DP%20speed%20pulley%20006_zps4fblmimi.jpg
 
To avoid these ads, REGISTER NOW!
Top Bottom