I picked up a Shinn Fu Sears floor jack, model 214.12000 (2 ton). Has anyone been through the rebuilding process with one of these? I'm interested in what seals I need, whether just O-rings or a seal cup too. It appears to be low on oil, but from what I've read that's an indication that the seals are bad. I've looked at the sticky from hiball, but it doesn't appear to address this Shinn Fu brand. Doesn't look too difficult, but I want to make sure I can get parts. Thanks.

You are using an out of date browser. It may not display this or other websites correctly.
You should upgrade or use an alternative browser.
You should upgrade or use an alternative browser.
Sears/Shinn Fu jack
- Thread starter jacked_72
- Start date
Elvenhome21
Well-known member
Just call shinn fu. I ordered a universal thru them (for a craftsman racing jack) and it was super easy. just have the model number when you call.
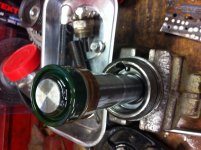
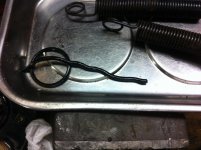
Here's the ram of my jack. It has some variety of cup seal, a white teflon backup ring and then some sort of a copper seal. Since the jack was peeing oil, I removed the ram to look at the sealing oring built into the big ram nut that requires the pipe wrench to remove. The results, a broken and twisted oring. I can only figure that it got pinched somewhere along the line and twisted until it broke and then caused the leaking oil problem.
I've got it back together and it holds pressure and doesn't seem to leak. How many times do you have to cycle the ram and loosen the filler screw in order to fully bleed one of these? I've done it a number of times and I still get a small amount of air being expelled each time.
I've got it back together and it holds pressure and doesn't seem to leak. How many times do you have to cycle the ram and loosen the filler screw in order to fully bleed one of these? I've done it a number of times and I still get a small amount of air being expelled each time.
Attachments
Last edited:
You really don't need to close the oil tank filler plug, or screw, to bleed the pump. Just open the release valve and pump a few times. You are just priming the pump, which only involves removing any air from the oil galleries, not from the oil tank. The air that comes out when you open the plug, or filler screw, is not necessarily the air in the oil galleries, it is air pressure trapped in the oil tank and it is generated by the pumping action itself. That air pressure also builds up in the pump after you have used the jack a couple of times and sometimes even after one use. If a jack has worn O-rings, this air pressure can push the oil past these O-rings making a leaky pump.
Some jacks, like old Lincolns, Hein Werners and some Omegas, have breathers in the oil tank to prevent this air pressure build up. Sometimes this air pressure build up affects the performance of the pump so it is better to have it ventilated.
All jacks suffer more or less from this trapped air. The ideal situation would be to have breathers in all jacks, but manufacturers shy away from this because it would be an added cost since they would need to install a solid plug for the shipping of the jack from the manufacturer plant to its final destination, which would be the dealer selling it. They would also have to include the breather plug with the jack to be installed by the owner of the jack. And since many people never read the instructions, the breather plug would probably never get installed. So, a waste of money.
For anyone interested, a breather like the one shown below can be installed in the pump to ventilate it. The Yasui based and Torin pumps can't use this, or any other, tall breather plug in the actual place of the original plug since the handle yoke rests on top of the plug when the handle is in the vertical position. In this case, a new hole has to be drilled and tapped about an inch or inch and a half away from the actual oil fill hole. Jacks with universal joints don't have this problem as the handle yoke is asually away from the oil fill hole.
Some jacks, like old Lincolns, Hein Werners and some Omegas, have breathers in the oil tank to prevent this air pressure build up. Sometimes this air pressure build up affects the performance of the pump so it is better to have it ventilated.
All jacks suffer more or less from this trapped air. The ideal situation would be to have breathers in all jacks, but manufacturers shy away from this because it would be an added cost since they would need to install a solid plug for the shipping of the jack from the manufacturer plant to its final destination, which would be the dealer selling it. They would also have to include the breather plug with the jack to be installed by the owner of the jack. And since many people never read the instructions, the breather plug would probably never get installed. So, a waste of money.
For anyone interested, a breather like the one shown below can be installed in the pump to ventilate it. The Yasui based and Torin pumps can't use this, or any other, tall breather plug in the actual place of the original plug since the handle yoke rests on top of the plug when the handle is in the vertical position. In this case, a new hole has to be drilled and tapped about an inch or inch and a half away from the actual oil fill hole. Jacks with universal joints don't have this problem as the handle yoke is asually away from the oil fill hole.
Attachments

Last edited:
Thanks guys. All is well for the time being. Good to know that I dont' have to keep bleeding the cylinder. My arm was getting tired. Shinn Fu responded to my email about parts availablity and they says that since the jack is more than 20 years old, they have nothing. So when the time comes, I'll be measuring seals, I suppose.
I found one earlier post on this model jack from another Garage Journal member. His was the same model and one month later in production. I suppose his had all of the sticker because he said it was made in China. (On mine, the part of the label showing the COO was missing.) Funny, when I removed the power unit, it used all SAE bolts. I wonder if they were just "close enough" to my wrenches to work or whether early Chinese imports like this used SAE fasteners becasue they were going into an SAE market. I also found it interesting that that this jack was only labled "Sears" and not "Craftsman." I'm guessing that at that time (1988) Sears was using the Craftsman badge on the higher quality domestic stuff.
I found one earlier post on this model jack from another Garage Journal member. His was the same model and one month later in production. I suppose his had all of the sticker because he said it was made in China. (On mine, the part of the label showing the COO was missing.) Funny, when I removed the power unit, it used all SAE bolts. I wonder if they were just "close enough" to my wrenches to work or whether early Chinese imports like this used SAE fasteners becasue they were going into an SAE market. I also found it interesting that that this jack was only labled "Sears" and not "Craftsman." I'm guessing that at that time (1988) Sears was using the Craftsman badge on the higher quality domestic stuff.
jfon101231
Member
- Joined
- Jul 29, 2010
- Messages
- 17
Wonder what they sold to Elvenhome21 as "universal"? - i reached out because my 50239 aluminum jack has given up the ghost after about 8 years, and would like to rebuild it because its great to throw into the truck. They told me they had nothing available...
Found this page - would it have everything i need? I guess I'll be doing it by myself because by the time I pay a hydraulic shop it'll cost me more than a new crappy one from HF...
http://www.hcrcnow.com/shop/seal-kits/sears-craftsman/3171
Found this page - would it have everything i need? I guess I'll be doing it by myself because by the time I pay a hydraulic shop it'll cost me more than a new crappy one from HF...
http://www.hcrcnow.com/shop/seal-kits/sears-craftsman/3171
Shinn Fu seems to be moving away from selling repair kits and instead wants to sell only the whole pump. I say this because many of the old parts breakdowns where the pump internal parts were shown have been replaced with updated parts breakdowns where they only show the pumps, but not the internal parts. There are still some parts breakdowns showing the pump internal parts, but the internal parts are not identified nor these have a parts number. Also, when they stop selling a model, they remove the parts breakdown from the web site so there is no way to check for missing parts or their right position.
Anyway, if you have the time and a caliper to measure the seals, you could save some money by buying the seals at you local hydraulic shop or online. The prices of HCRCnow are quite steep for some items. You should be able to find that u-cup for less than $10 in any good hydraulic shop or online in a site like THEORINGSTORE.COM. This place is also good for many sizes of metric O-rings.
On the other hand, if any of the O-rings is in the 2.0mm, 3.0mm or 4.0mm cross section (thickness) you might not be able find these at your local hydraulic store as many of shops don't want to carry metric o-rings seals as these are more expensive that SAE orings (wholesale and retail) but also, they may not be able to sell many of these, thereby having money ******* in products that don't sell.
When measuring the orings cross section, it is better to measure the top and bottom sides of the o-ring, as the inside and outside diameter might be worn out (flattened) enough to give a wrong size reading. You can measure the inside diameter of the o-ring by measuring the groove diameter of the ram. If it is an o-ring used as a rod seal, just measure the ram external diameter to get the inside diameter of the o-ring.
The u-cup is measured at the bottom side of the u-cup, which is the side without the flared lips. For the inside diameter you can measure the part of the ram where the u-cup is mounted and the outside diameter can be obtained by measuring the metal part of the ram that is right behind the u-cup, which should almost have the same external diameter as the u-cup. For clearances purposes, the size is slightly less so there is no metal to metal contact between this part and the cylinder. There is usually a nylon backup between the u-cup and the u-cup metal support part of the ram.
If you don't have the time to run around chasing the seals or are not sure about the measurements, then buy the kit, it should have everything you need.
The parts breakdown shown below does not show the internal parts of the pump. So no way to really know what parts you need until you open the pump.
http://www.hcrcnow.com/uploads/drawings/sears_50239_g620_floor_jack_2_ton.pdf
Anyway, if you have the time and a caliper to measure the seals, you could save some money by buying the seals at you local hydraulic shop or online. The prices of HCRCnow are quite steep for some items. You should be able to find that u-cup for less than $10 in any good hydraulic shop or online in a site like THEORINGSTORE.COM. This place is also good for many sizes of metric O-rings.
On the other hand, if any of the O-rings is in the 2.0mm, 3.0mm or 4.0mm cross section (thickness) you might not be able find these at your local hydraulic store as many of shops don't want to carry metric o-rings seals as these are more expensive that SAE orings (wholesale and retail) but also, they may not be able to sell many of these, thereby having money ******* in products that don't sell.
When measuring the orings cross section, it is better to measure the top and bottom sides of the o-ring, as the inside and outside diameter might be worn out (flattened) enough to give a wrong size reading. You can measure the inside diameter of the o-ring by measuring the groove diameter of the ram. If it is an o-ring used as a rod seal, just measure the ram external diameter to get the inside diameter of the o-ring.
The u-cup is measured at the bottom side of the u-cup, which is the side without the flared lips. For the inside diameter you can measure the part of the ram where the u-cup is mounted and the outside diameter can be obtained by measuring the metal part of the ram that is right behind the u-cup, which should almost have the same external diameter as the u-cup. For clearances purposes, the size is slightly less so there is no metal to metal contact between this part and the cylinder. There is usually a nylon backup between the u-cup and the u-cup metal support part of the ram.
If you don't have the time to run around chasing the seals or are not sure about the measurements, then buy the kit, it should have everything you need.
The parts breakdown shown below does not show the internal parts of the pump. So no way to really know what parts you need until you open the pump.
http://www.hcrcnow.com/uploads/drawings/sears_50239_g620_floor_jack_2_ton.pdf
jfon101231
Member
- Joined
- Jul 29, 2010
- Messages
- 17
I ended up buying the kit from HCRCnow - was $50 shipped for everything and i don't need to run around chasing stuff down or measure something wrong. Oring store and another i don't remember offhand were $60, not sure if they charged shipping or not. I ordered the socket from amazon and found a few pretty good writeups online, so i'm cautiously optimistic I can get this going again.
I'll say i was one of the lucky ones, as its lasted me a good 8-9 years, and has been left in the rain a few times in back of truck bed and probably overloaded too a few times. I do a lot of work with plows, and its nice to be able to jack one up with something this light/small. If I somehow fail, i'll probably go buy a cheapy HF 1.5 ton, which I'd prefer not to do. Will let you all know how it works out once i get the kit and start pulling it apart.
I'll say i was one of the lucky ones, as its lasted me a good 8-9 years, and has been left in the rain a few times in back of truck bed and probably overloaded too a few times. I do a lot of work with plows, and its nice to be able to jack one up with something this light/small. If I somehow fail, i'll probably go buy a cheapy HF 1.5 ton, which I'd prefer not to do. Will let you all know how it works out once i get the kit and start pulling it apart.
jfon101231
Member
- Joined
- Jul 29, 2010
- Messages
- 17
So I finally took everything apart, replaced seals, and reassembled. Nothing looked noticably torn etc, but it never had a fluid change so perhaps just wear over time. I may have forgotten to change the seal that stays in the body of the jack when you remove the plunger assembly, argh. Not positive either way.
Any way I forget where exactly it was leaking before, but I have a leak from one of the pressure relief screws - if looking at jack from the back, it is the one on the far right. Pretty sure it was leaking from there before, and though its slower, its still there. Also seems lift action is still a little spongy. Can I remove that screw as long as I put it back in same position, and if so, does the kit includes seals for it? I have a handful left over but hard to tell if they're the same until its already out but not sure if thats a no no.
Hoping I can fix this and not just threw away $50 Thanks!
Any way I forget where exactly it was leaking before, but I have a leak from one of the pressure relief screws - if looking at jack from the back, it is the one on the far right. Pretty sure it was leaking from there before, and though its slower, its still there. Also seems lift action is still a little spongy. Can I remove that screw as long as I put it back in same position, and if so, does the kit includes seals for it? I have a handful left over but hard to tell if they're the same until its already out but not sure if thats a no no.
Hoping I can fix this and not just threw away $50
Thanks!So I finally took everything apart, replaced seals, and reassembled. Nothing looked noticably torn etc, but it never had a fluid change so perhaps just wear over time. I may have forgotten to change the seal that stays in the body of the jack when you remove the plunger assembly, argh. Not positive either way.
Any way I forget where exactly it was leaking before, but I have a leak from one of the pressure relief screws - if looking at jack from the back, it is the one on the far right. Pretty sure it was leaking from there before, and though its slower, its still there. Also seems lift action is still a little spongy. Can I remove that screw as long as I put it back in same position, and if so, does the kit includes seals for it? I have a handful left over but hard to tell if they're the same until its already out but not sure if thats a no no.
Hoping I can fix this and not just threw away $50
Well Unfortunately you're the only one that knows if in the left over parts there is a seal to replace on leaking valve plug, based off the picture off of lazzars website, there appears to be quite a few smaller orings in the kit. Do you have any left? Of course you can remove the screw, the plug more than likely has a groove, that should house a Oring, and it's possible to damage these Orings upon installation if you don't use some sort of lube when screwing them down.
jfon101231
Member
- Joined
- Jul 29, 2010
- Messages
- 17
Sorry, I was more just seeing whether someone who had already done this w/ the Lazaars kit knew whether there was a seal in there for it or not. The wording everywhere is not to touch these, so I also wasn't sure if there was some special procedure to follow if I took them out, or I just need to make sure I run them back down to the spot they were in.
Sorry, I was more just seeing whether someone who had already done this w/ the Lazaars kit knew whether there was a seal in there for it or not. The wording everywhere is not to touch these, so I also wasn't sure if there was some special procedure to follow if I took them out, or I just need to make sure I run them back down to the spot they were in.
The Procedure is fairly simple... You need to first determine if the plug that is leaking is "plug cap" or a actual "adjusting plug" the way to do this is to simply attempt to turn the plug "clockwise" if it turns, it is adjusting plug and is turning against a spring/ball/cone/seat. If this is the case you simply count the amount of turns it takes from its factory position to completely compressed, once you have this information you can completely remove the valve plug, replace the leaking Oring and re-set to factory setting. If the Valve cap doesn't budge who you try and turn it clockwise, it's simply a cap or someone has already messed with the plug. I also recommend elevating the rear of the Jack to sway oil away from the valve system, this can reduce the amount of oil that escapes while servicing the plug, normally you would Replace these seals when you have the jack tore down, this way you could make sure there wasn't any funk in the valve system.
The above procedure will work for any valve system that has a adjustment, whether it's the quick lift side or the overload side.