To avoid these ads, REGISTER NOW!

Securing 4x4 post w/o digging

paulsomlo

Well-known member
Joined
Jul 16, 2013
Messages
3,913
Location
Northern Colorado
A woman friend who's an artist, took some 4x4 posts and decorated them with paint for xmas presents. Since the posts feature decoration from top to bottom, they can't be sunk into the ground in the usual way. Her suggestion was to drill a hole in the end grain 8-12" long for a piece of rebar and then sink the rebar 18-24" in the ground, to hold the post up. Firstly, I'm not sure about drilling a 1/2" dia hole that deep and keeping it straight, secondly not sure if the rebar will keep it upright. I know about these landscape spikes https://www.zoro.com/hinkley-landscape-accessory-ground-spike-0013-jbbz/i/G7212507/feature-product?utm_source=google&utm_medium=surfaces&utm_campaign=shopping%20feed&utm_content=free%20google%20shopping%20clicks&gclid=CjwKCAiAt9z-BRBCEiwA_bWv-BAiYhtuaN2x5HwPd-9CX7JnJzle_S7vMQO0SW93hS5Lrevl5EHKsRoCREgQAvD_BwE but she's not sure if she wants to spend the money for several of those, and they also cover the artwork near the bottom.

Anybody have any wisdom here - maybe there's a way to do this that I'm not seeing.
 
To avoid these ads, REGISTER NOW!

Shiftless

Well-known member
Joined
Mar 9, 2014
Messages
14,591
Location
East Bay SFO
Just sink a short piece of treated 4x4 into the ground and glue on the decorative post with epoxy.

It might look nicer if you installed a concrete base to keep it a bit above the ground level.
Sink a short sonotube, fill with concrete, smooth off the top. When cured, use epoxy putty to attach decorative post. Put in a steel pin if you want some extra strength.
 
Last edited:

ace10

Well-known member
Joined
Dec 17, 2017
Messages
1,490
Location
Rural NoVA
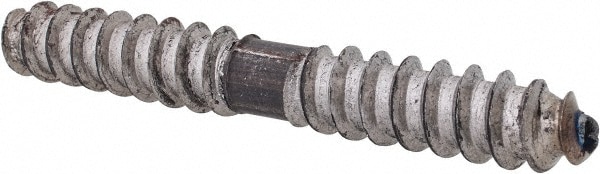
6730160-24.jpg


Use one of these to attach a proper piece of PT 4X4.
 

LJZ

Well-known member
Joined
Sep 3, 2012
Messages
94
Location
Rochester NY
Paul:
Some sort of a helical screw post would give you most stable handshake on the earth next to pouring a concrete footer as mentioned ^ ^ Plus no waiting to cure and can remove.
Time and money always our enemy.
https://www.amazon.com/dp/B088W632B8/?tag=atomicindus08-20

Could maybe modify something like this with own top plate, , 3 nice lags or them nice structural deck screws. (in example not size relative )

https://www.homedepot.com/p/GRK-Fas...arch-_-n/a-_-n/a-_-n/a&ITC=AUC-68893-23-12020
 

Jacko264

Well-known member
Joined
Mar 27, 2016
Messages
947
Location
Kingston upon Hull uk
Cut a slot up at the bottom about 250mm and 6 or 8mm wide then make a steel plate to fit in the slot that’s welded to a base plate and bolt the baseplate to concrete
Graham
 

Dustball

Well-known member
Joined
Jun 25, 2011
Messages
2,081
Location
Hudson, WI
If these are temporary seasonal decorations, bolt them to a wood base or even wheels laid on their side. I've used a wheel for a temporary mailbox post base and it worked fine.
 
OP
P

paulsomlo

Well-known member
Joined
Jul 16, 2013
Messages
3,913
Location
Northern Colorado
How tall is the 4x4?
3 to 4 feet
Are the posts tied together?
nope, single.
You could also hang it suspended from an eye bolt depending on how big it is.
going to be out on a front lawn, probably nothing overhead.
Just sink a short piece of treated 4x4 into the ground and glue on the decorative post with epoxy.

It might look nicer if you installed a concrete base to keep it a bit above the ground level.
Sink a short sonotube, fill with concrete, smooth off the top. When cured, use epoxy putty to attach decorative post. Put in a steel pin if you want some extra strength.
These are going to be at three different houses - and for concrete to happen, I would probably be the one doing the work, which I'd like to minimize.
Paul:
Some sort of a helical screw post would give you most stable handshake on the earth next to pouring a concrete footer as mentioned ^ ^ Plus no waiting to cure and can remove.
Time and money always our enemy.
https://www.amazon.com/dp/B088W632B8/?tag=atomicindus08-20

Could maybe modify something like this with own top plate, , 3 nice lags or them nice structural deck screws. (in example not size relative )

https://www.homedepot.com/p/GRK-Fas...arch-_-n/a-_-n/a-_-n/a&ITC=AUC-68893-23-12020
Didn't know about those spirals - that looks promising. And I think that top plate is removable. And the manufacturer says: "HAPPINESS OF LIFE: The silver spiral anchor stakes can bring a lot of relief and convenience to your life." Who can argue with that?
If these are temporary seasonal decorations, bolt them to a wood base or even wheels laid on their side. I've used a wheel for a temporary mailbox post base and it worked fine.
I think they're going to be permanent.

Lots of good suggestions - I knew you guys would have ideas!
 

MoonRise

Well-known member
Joined
Nov 5, 2010
Messages
4,031
Location
NJ
1/2" rebar 'spike'? Nope.

Your friend is an 'artist'. She doesn't understand construction or structural loading. No dis against her, it's just not in her wheelhouse.

A 1/2" piece of rebar pegged into a 4' long 4x4 post will probably bend from some squirrels jumping off the top. :lol_hitti

It would definitely bend from someone leaning up against the post with the rebar 'pin'.

Also, if the 4x4 posts are plain wood and aren't ground-contact rated pressure treated 4x4s then they WILL rot from the bottom rather quickly if in contact with the ground. Or insects and bugs will eat into them or bore into them.

And if the artist didn't use outdoor 'rated' paints, then the paint will not hold up to weathering.

In which case the decorative posts might actually be more of an indoor decoration.

This type of anchor for a 4x4 sort of works for things not subject to much loading:

https://www.lowes.com/pd/Simpson-Strong-Tie-4-in-x-4-in-Powder-Coated-Wood-to-Wood-Base/1002708416

Ah, pretty much the same as the ones in the amazon link above.

Another possibility is that you can dig a hole to the desired depth (for a 'permanent' install, you want that depth to be BELOW the frost line so that you don't have frost heave problems), put some 3/4" gravel in the bottom of the hole for drainage, install a BURIAL-RATED pressure treated 4x4 post, plumb the post and then backfill with tamped gravel, cut the 'ground' post slightly above ground level, and then install the decorative post on top of the anchor post with something like these brackets:

https://www.lowes.com/pd/Simpson-Strong-Tie-4-in-x-4-in-G90-Galvanized-Wood-to-Wood-Cap/1002707316

Or pour a concrete pier (aka sonotube) and then install a post base anchor to the concrete and then install the decorative post to the post base anchor:

https://www.lowes.com/pd/Simpson-Strong-Tie-Steel-Painted-Post-Base-Common-4-in-Actual-3-in/3030292

https://www.lowes.com/pd/Simpson-Strong-Tie-Steel-G185-Post-Base-Common-4-in-Actual-4-in/1002624556

https://www.lowes.com/pd/Simpson-St...ood-to-Concrete-Cast-in-Place-Base/1002708370

https://www.lowes.com/pd/Simpson-St...inc-Wood-to-Concrete-Retrofit-Base/1002708508

https://www.lowes.com/pd/Simpson-St...ood-to-Concrete-Cast-in-Place-Base/1002713588
 

mike93lx

ALLIANCE MEMBER
Joined
Dec 9, 2013
Messages
37,920
Location
Richmond, VA
1/2" rebar 'spike'? Nope.

Your friend is an 'artist'. She doesn't understand construction or structural loading. No dis against her, it's just not in her wheelhouse.

A 1/2" piece of rebar pegged into a 4' long 4x4 post will probably bend from some squirrels jumping off the top. :lol_hitti

It would definitely bend from someone leaning up against the post with the rebar 'pin'.

Also, if the 4x4 posts are plain wood and aren't ground-contact rated pressure treated 4x4s then they WILL rot from the bottom rather quickly if in contact with the ground. Or insects and bugs will eat into them or bore into them.

And if the artist didn't use outdoor 'rated' paints, then the paint will not hold up to weathering.

In which case the decorative posts might actually be more of an indoor decoration.

This type of anchor for a 4x4 sort of works for things not subject to much loading:

https://www.lowes.com/pd/Simpson-Strong-Tie-4-in-x-4-in-Powder-Coated-Wood-to-Wood-Base/1002708416

Ah, pretty much the same as the ones in the amazon link above.

Another possibility is that you can dig a hole to the desired depth (for a 'permanent' install, you want that depth to be BELOW the frost line so that you don't have frost heave problems), put some 3/4" gravel in the bottom of the hole for drainage, install a BURIAL-RATED pressure treated 4x4 post, plumb the post and then backfill with tamped gravel, cut the 'ground' post slightly above ground level, and then install the decorative post on top of the anchor post with something like these brackets:

https://www.lowes.com/pd/Simpson-Strong-Tie-4-in-x-4-in-G90-Galvanized-Wood-to-Wood-Cap/1002707316

Or pour a concrete pier (aka sonotube) and then install a post base anchor to the concrete and then install the decorative post to the post base anchor:

https://www.lowes.com/pd/Simpson-Strong-Tie-Steel-Painted-Post-Base-Common-4-in-Actual-3-in/3030292

https://www.lowes.com/pd/Simpson-Strong-Tie-Steel-G185-Post-Base-Common-4-in-Actual-4-in/1002624556

https://www.lowes.com/pd/Simpson-St...ood-to-Concrete-Cast-in-Place-Base/1002708370

https://www.lowes.com/pd/Simpson-St...inc-Wood-to-Concrete-Retrofit-Base/1002708508

https://www.lowes.com/pd/Simpson-St...ood-to-Concrete-Cast-in-Place-Base/1002713588

Frost heave for a decorative post? Come on
 
To avoid these ads, REGISTER NOW!

MoonRise

Well-known member
Joined
Nov 5, 2010
Messages
4,031
Location
NJ
Frost heave for a decorative post? Come on

You want a decorative post to end up all tilted and wonky? :dunno:

Unless it's an artist's interpretation of some Italian tower from Pisa. :pimpflash

(BTDT with frost heave or ground settling for various outdoor things. Rarely do they heave 'evenly', usually they end up crooked in multiple directions.)
 

The Cobbler

Super Moderator
Staff member
Joined
Oct 24, 2013
Messages
25,992
Location
Niagara Region, Ontario, Canada
drive a 1/2" pipe into the ground. drill the center of the 4x4 to accept the pipe . leave the post off the ground so it doesn't absorb moisture/water from the ground. tweak the pipe to fit the 4x4 plumb
6" into the 4x4 would probably be sufficient
 

CTyankee

Well-known member
Joined
Jan 13, 2013
Messages
3,803
Location
CT
Rebar my bend a bit easy. Same idea but with pipe (1 1/2"?) would be stiffer.

I like the pipe idea, but would only use maybe 3/4". Drill a hole deep as possible into the post and epoxy it in. Then drive a pipe with an ID slightly bigger than the OD of the post pipe and drop it into the ground.

Have to agree about how long the painted post is going to hold up exposed to the elements though.:dunno:
 

mike93lx

ALLIANCE MEMBER
Joined
Dec 9, 2013
Messages
37,920
Location
Richmond, VA
You want a decorative post to end up all tilted and wonky? :dunno:

Unless it's an artist's interpretation of some Italian tower from Pisa. :pimpflash

(BTDT with frost heave or ground settling for various outdoor things. Rarely do they heave 'evenly', usually they end up crooked in multiple directions.)

I have three 16' 6x6's about 2 ft deep in my backyard for a sunshade. Amazingly, they are plumb years after installing them. It's almost like not everything will heave all over the place in the winter
 

wssix99

Well-known member
Joined
Mar 2, 2011
Messages
5,162
Location
Chicago, IL
Titan post anchors install like you want, but they need to bolt to a solid base, will cost you for each one, and are a ***** to install. But... You can drill down the middle and install them blind on the bottom.
 

no704

Well-known member
Joined
Apr 27, 2016
Messages
5,231
Just get some of the pyrmid shaped blocks at hd and have her paint those too.
 

Dumber than lumber

Well-known member
Joined
Dec 19, 2015
Messages
1,956
Artist? Heh, heh, heh. :lol_hitti
Drill a hole in the top and hang it up like a windchime. It will probably go absolutely viral in the artist community. :shocking:
 
OP
P

paulsomlo

Well-known member
Joined
Jul 16, 2013
Messages
3,913
Location
Northern Colorado
I like the idea of pipe and a hole saw - that gives a fair amount of bearing surface, both in the ground and in the post, which means the hole in the post wouldn't have to be as deep. The only load is going to be from wind.
 

Skiff Builder

Well-known member
Joined
Jun 7, 2016
Messages
1,783
Location
Southern NJ Coast
5 minute install for each unit:

1" x 16" galv iron pipe ****** driven into ground, with threads AGL.
1" galv floor flange fastened to lower end of deco post.
Screw post assembly on ******.
Enjoy
 

Bogie1632

Well-known member
Joined
Feb 18, 2018
Messages
1,303
Location
Southeastern Wisconsin
Keep it simple.

If it wobbles than some small rods put through the feet, into the ground, will keep it in place.

V/R
Bogie
 

Attachments

  • Screenshot_20201215-163128_Chrome.jpg
    Screenshot_20201215-163128_Chrome.jpg
    76.5 KB · Views: 10

38Chevy454

Well-known member
Joined
Dec 26, 2006
Messages
4,038
Location
Cincinnati, OH
5 minute install for each unit:

1" x 16" galv iron pipe ****** driven into ground, with threads AGL.
1" galv floor flange fastened to lower end of deco post.
Screw post assembly on ******.
Enjoy

This seems a good easy no digging idea. The threads will keep it straight, and slightly off the ground so the 4x4 doesn't **** up moisture.
 
OP
P

paulsomlo

Well-known member
Joined
Jul 16, 2013
Messages
3,913
Location
Northern Colorado
5 minute install for each unit:

1" x 16" galv iron pipe ****** driven into ground, with threads AGL.
1" galv floor flange fastened to lower end of deco post.
Screw post assembly on ******.
Enjoy

Not a bad idea - I'm just a bit leary of the screws that hold the flange going into end grain. Would work for a while, but I don't know about long term.
 

Stuart in MN

Well-known member
Joined
Sep 8, 2005
Messages
23,178
Location
Minneapolis
To avoid these ads, REGISTER NOW!
Top Bottom