To avoid these ads, REGISTER NOW!

Seeking Advice on Painting Open Stud Garage

endofwed

Member
Joined
Jun 1, 2024
Messages
10
Hi everyone,

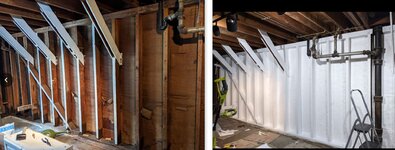
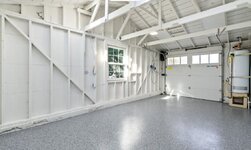
I recently saw a photo of a painted open stud garage and I'd like to achieve a similar look with mine. Before starting, I wanted to get some advice to make sure my plan makes sense.

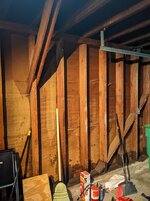
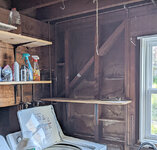
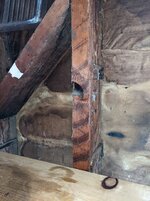
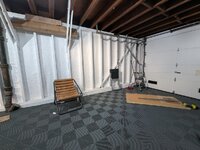
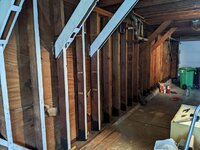
1) Some of the wood studs are very textured and splintered. Would it make sense to skim a thin layer of plaster over these pieces to smooth them out? Not looking for perfection but just wanting to make it a bit smoother. Picture 1,Picture 2

2) I've cleaned the wood as best as I can, but there's still a lot of grime and dirt. I found a bottle of "Old English Furniture Polish," so the previous owner may have used this oil. Do you think there will be any adhesion issues when priming and painting? I plan to use Zinsser BIN primer and Sherwin-Williams Emerald Paint. Would this be a good combination?

3) The original vapor barrier (waxed paper) between the studs gets wet/moist during heavy rains. Instead of painting over it, I was thinking of cutting sheets of Tyvek or poly material from Home Depot and stapling them between the studs. My idea is that it would match the painted studs and allow breathability and vapor escape when wet.

Does this plan make sense? My biggest concern is creating vapor/moisture/mold issues. The house was built in the 1950's and water does get past through the exterior wood shiplap siding during heavy rains. Since there are so many gaps, the wood has been allowed to air dry and I have not seen any evidence of wood rot.

I know this is kind of a hack job, but I just dont have the money or skills to do drywall. I'm hoping it can look somewhat decent than its current dingy state.
 

Attachments

  • whitegarage.JPG
    whitegarage.JPG
    100.8 KB · Views: 194
  • PXL_20240528_211906341.MP.jpg
    PXL_20240528_211906341.MP.jpg
    149.6 KB · Views: 185
  • ripped paper.jpg
    ripped paper.jpg
    829.8 KB · Views: 176
  • PXL_20230903_221328418 (1).jpg
    PXL_20230903_221328418 (1).jpg
    175.4 KB · Views: 170
  • PXL_20240528_213731184.jpg
    PXL_20240528_213731184.jpg
    198.6 KB · Views: 168
  • PXL_20240528_211852676.jpg
    PXL_20240528_211852676.jpg
    176.9 KB · Views: 183
To avoid these ads, REGISTER NOW!

phred

Well-known member
Joined
Apr 23, 2009
Messages
527
Location
NC
I would be more concerned about the amount of water getting in.
I would strip the paper as it is no longer acting as a vapor barrier. Spray or brush PVA primer on everyone. It is thicker primer and will help “smooth out” some of the rough stuff. Then paint with your choice of paint. Go to a real paint store, not one of the big box places, and talk to the paint guys and get compatible primer and paint.
 

tmp

Active member
Joined
Sep 12, 2023
Messages
41
Echoing above, you should put some attention outside first.

Right now your walls have the opportunity to dry to the inside when they get wet, and based on the staining they have definitely gotten wet.

Paint itself will act as a vapor retarder, and will at the very least diminish the ability for your walls to dry to the inside. Sealing the inside up any more without fixing your bulk water issues on the exterior is asking for more issues. At best, your paint will fail, at worst your walls will rot. Probably a little of both.

All of that said - I’m a big fan of the painted open stud look, and I think for the most part you’re overthinking the execution. A good primer and paint will go a long way to blending things together. It will still look rough, because it is, but you will never achieve a perfect finish without a prohibitive amount of prep work.

I would fix the water issues, cut the old vapor barrier down and spray or roll primer and paint.
 

y'sguy

Well-known member
Joined
May 1, 2010
Messages
1,333
Location
Tulsa, Oklahoma
It can look good. I've done it just as you thought about. To get by for a while. It will really brighten the place up. Use a pro-style airless sprayer from a rental if you can. Also, you will be amazed at how much material it takes. You may be better off just using a good sealer type like Kilz and leave it at that. Depends on how long you are going to live with it. I would also use a flat so it will help hide the small stuff.
Good luck, let us know and show your results.
 

Dig Doug

Well-known member
Joined
Apr 16, 2018
Messages
1,121
What material is used on the outside ? stucco, siding sheeting

what about the roof?
where is the water coming from?


you could run a sander around the studs and the stud bay to kill the edges/ splinters

Rent an airless get a 4 ft extension for the ceilings - Protect the floor and garage door electrical plumbing etc anything you don’t want painted

use thin coats of primer apply 3 or 4 coats, about an hour or so in between each coat ( start at the same location on the ceiling and walls, do the ceiling 1st ) by the time your done with a coat get a cold drink and start it again. Wear a head sock and an old hat w/ a bill to keep paint from getting in your eyes face

the wood will soak it up then a good top coat

a semi gloss is more reflective and will give you more light and doesn’t scuff, get dirty like a flat - depends on the look you want.
if you have a lot of dust maybe go w/ a tan ish white it will kinda hide it.

Prep-
Use a leaf blower & then take a broom to each stud bay brush anywhere that gets paint, wear a mask and remove all loose cob webs dirt dust grit. Then leaf blower again As a final clean. Primer & Paint doesn’t stick to dust / dirt

Last thing

post up pics of the finished product…
 
OP
E

endofwed

Member
Joined
Jun 1, 2024
Messages
10
Thank you for everyone's comment. Wanted to share my progress so far. Still a lot of work to do on the rest of the walls.
I know this is not everyones cub of tea, but like I said, I dont have any skills to dry wall but I have a lot of patience to prep and paint. Fairly happy so far since it finally feels clean.

wallupdate.JPG
 
Last edited:

pcmeiners

Well-known member
Joined
Aug 13, 2009
Messages
7,946
Location
In the only town in Pennsylvania, Bloomsburg.
As to just the actual painting method..... This is what an airless sprayer was made do. In the time you spent so far you could have covered >15 times the square foot area of your painted area with a rented pro airless unit. Personally, I would commit myself for observation before hand painting an open stud area. ;)
 
Last edited:

Stelzer

Well-known member
Joined
Mar 14, 2022
Messages
448
Location
Portland, OR
I would be more concerned about the amount of water getting in.
I would strip the paper as it is no longer acting as a vapor barrier. Spray or brush PVA primer on everyone. It is thicker primer and will help “smooth out” some of the rough stuff. Then paint with your choice of paint. Go to a real paint store, not one of the big box places, and talk to the paint guys and get compatible primer and paint.
I agree about the chief concern of addressing the water before it enters.
PVA wouldn't be a good choice for a primer in this application, since it's designed for new drywall surfaces and not wood. OP would be better off using a tannin blocking primer followed by a few coats of their paint of choice.
 

Ak Jim

Well-known member
Joined
Jan 5, 2012
Messages
532
Location
Interior AK
Got a new shed. Decided to paint the inside. Used Sherwin Williams high reflective white in semi gloss. It looks great. Nice and bright and clean looking. Thing is it took a LOT of paint. Shed is 8’x12’ and I think I used 3 gallons. The wood just kept soaking up the paint. I think I sprayed 4 coats. Used Sherwin Williams floor paint in a medium gray on the floor. It was well worth the time and $ to do it.
I think if you get the water problem fixed you’ll be glad you did the work.
 
To avoid these ads, REGISTER NOW!
OP
E

endofwed

Member
Joined
Jun 1, 2024
Messages
10
My last update, its finally done! I know, its nothing impressive but it feels (85%) clean. I forgot to mention this in my main post, but the previous owner had a rat problem in the garage so the wood reeked of urine. The zinsser BIN primer really helped mask a lot of the smell.

WQb0FV7[1].jpeg5GrPgK0[1].jpegG74CXCK[1].jpegI89cLha[1].jpeg
 
Last edited:
OP
E

endofwed

Member
Joined
Jun 1, 2024
Messages
10
Another update. Ended up installing swisstrax flooring in slate grey. Kinda bummed because the slate grey really darkened the garage. Should have tried their pearl grey instead. but overall, pretty satisfied with the garage now. Doesn't feel as grimy as before.


PXL_20250305_062602450.jpgPXL_20240602_222812221.NIGHT.jpg
 
Last edited:
OP
E

endofwed

Member
Joined
Jun 1, 2024
Messages
10
No, after extensive research, I found that the only way to truly prevent water intrusion would be to remove the siding and install a proper vapor barrier.


In areas where I noticed water coming through, I removed the torn waxed paper that originally lined the house. It was badly damaged and became soggy after heavy rain, so it didn’t seem useful anymore. I installed an Intello smart membrane on the interior side, stapling it to the wall. My goal was to maintain breathability in the walls, allowing any moisture that gets in to dry out properly while cutting down on all the air leaks.

Additionally, I run a basement dehumidifier when it rains to help control moisture levels.


It’s not the ideal solution, but I don’t have the budget to redo the siding right now.

intello.JPG
 

rzims

Well-known member
Joined
Oct 25, 2006
Messages
459
Location
Grass Valley, CA
Paint really brightened things up! Looks good. Are you doing the ceiling as well?
I think with the ceiling done, you'll get even more reflection from the lights which will continue to brighten it up....
 

Bert_

Well-known member
Joined
Dec 24, 2016
Messages
9,765
Location
NW Iowa
If the wood gets wet regularly there's a good chance the paint will peel what the water trys to dry out. After all your work I hope it doesn't happen
 

racecougar

Well-known member
Joined
Jan 26, 2021
Messages
5,158
Location
Missouri
No, after extensive research, I found that the only way to truly prevent water intrusion would be to remove the siding and install a proper vapor barrier.


In areas where I noticed water coming through, I removed the torn waxed paper that originally lined the house. It was badly damaged and became soggy after heavy rain, so it didn’t seem useful anymore. I installed an Intello smart membrane on the interior side, stapling it to the wall. My goal was to maintain breathability in the walls, allowing any moisture that gets in to dry out properly while cutting down on all the air leaks.

Additionally, I run a basement dehumidifier when it rains to help control moisture levels.


It’s not the ideal solution, but I don’t have the budget to redo the siding right now.

intello.JPG

Did you paint over the vapor retarder?

1741354252096.png
 
OP
E

endofwed

Member
Joined
Jun 1, 2024
Messages
10
Did you paint over the vapor retarder?
No, I didn’t paint over the vapor retarder. Just the wood joist. I live in a townhouse where the homes are attached. For this particular wall, which does not have any water intrusion issues, I cut and stapled sheets of Tyvek between the joists.


For the areas that do experience water intrusion—the rear wall and the side with the garage door—I used a smart vapor retarder (Intello Plus) to allow for greater breathability
 
To avoid these ads, REGISTER NOW!
Top Bottom