To avoid these ads, REGISTER NOW!

Separating spot welds non-destructively?

paredown

Well-known member
Joined
Jan 12, 2012
Messages
544
Location
Pomona, NY
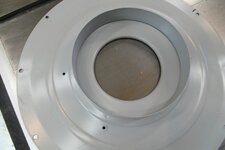
I'm working on upgrading my old Delta dust collector, and have been reading about removing the constrictor plate on the intake. (Apparently Delta added these to the second gen versions to throttle the input, since people were running theirs without bags on them and burning out motors.)

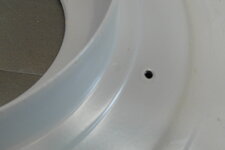
It is a little hard to see, but the inner plate is set into the flange piece, and spot-welded (6 welds).

Since I need the outside plate to remain flat and undamaged, I can't just drill out the spot-welds (or if I did so, I would have no way to fill the holes...)

Any ideas from the metal guys about tools/procedure that would work? (I thought if I had a die grinder I could work from the side of the constrictor piece I want to get rid of and grind carefully--but I don't have one--just a 4" which seems a little big for the job.
 

Attachments

  • SAM_3764.JPG
    SAM_3764.JPG
    156.9 KB · Views: 68
  • SAM_3765.JPG
    SAM_3765.JPG
    111.6 KB · Views: 54
  • SAM_3767.JPG
    SAM_3767.JPG
    90.9 KB · Views: 60
To avoid these ads, REGISTER NOW!

yatg

Well-known member
Joined
Aug 16, 2019
Messages
2,827
Location
Southern Oregon
If this was my project, I'd try a Dremel with a metal cutoff wheel.
 

Attachments

  • SAM_3767.JPG
    SAM_3767.JPG
    85.3 KB · Views: 66

Ole Slewfoot

Well-known member
Joined
Feb 22, 2016
Messages
5,098
Location
Freedom, CA
Spot weld bits are a little expensive, but made for the job...used carefully one of the DeWalt bits that are flat face with a centering point will do that job.
 

PCustoms

Well-known member
Joined
Jul 23, 2011
Messages
23,097
Location
VT
Small grinder. Do it away from the sawdust

Drill just the weld.

Drill through and silicone the hole.

Many options.
 
To avoid these ads, REGISTER NOW!
OP
P

paredown

Well-known member
Joined
Jan 12, 2012
Messages
544
Location
Pomona, NY
Thanks guys--didn't know about annular cutters or spot weld cutters--I'll probably stop by our new Harbor Freight and use the 10% coupon!
 

240sxguy

Well-known member
Joined
Jan 6, 2009
Messages
1,158
Location
Madison, wi
Would you mind explaining what you mean by "people running without a bag installed"?

I have one of these dust collectors too, and I don't recall seeing that baffle.
 
OP
P

paredown

Well-known member
Joined
Jan 12, 2012
Messages
544
Location
Pomona, NY
Would you mind explaining what you mean by "people running without a bag installed"?

I have one of these dust collectors too, and I don't recall seeing that baffle.
I picked up the story from one of the woodworking forums--probably Lumberjocks--and apparently people were setting up these Delta 50-850 collectors outside without the catch bags (top and/or bottom?--not clear from the stories) and with no back pressure on the system, the motors would run at too high rpm, and were burning out. Second generation like mine had that restrictor plate installed, just behind the 4" Y connectors for the intake to throttle the intake just in case. Third generation--they reduced the size of the impeller instead, since people were removing the restrictor plate.

You can't really tell if it is there or not unless you take off the Y connector plate (although I suppose you may be able to get your hand into one of the 4" inlets and feel for its presence).
 

240sxguy

Well-known member
Joined
Jan 6, 2009
Messages
1,158
Location
Madison, wi
I picked up the story from one of the woodworking forums--probably Lumberjocks--and apparently people were setting up these Delta 50-850 collectors outside without the catch bags (top and/or bottom?--not clear from the stories) and with no back pressure on the system, the motors would run at too high rpm, and were burning out. Second generation like mine had that restrictor plate installed, just behind the 4" Y connectors for the intake to throttle the intake just in case. Third generation--they reduced the size of the impeller instead, since people were removing the restrictor plate.

You can't really tell if it is there or not unless you take off the Y connector plate (although I suppose you may be able to get your hand into one of the 4" inlets and feel for its presence).

Thank you for the heads up, I had considered running mine like this (outside, no bags) but if it's risking damage I will plan on utilizing the bags!
 
OP
P

paredown

Well-known member
Joined
Jan 12, 2012
Messages
544
Location
Pomona, NY
Got it apart--could not find the spot weld drills at Harbor Freight, so I *****- punched (as best I could) to give me a center for a drill, and used a large-ish standard drill in my baby drill press (just went by feel, looking for one that still had a decent point; drilled nice dimples from the back side so as not to damage the piece I want to reuse).

Then I was able to start separating the two pieces with a cold chisel--broke the first weld and worked my way around. I had a scrap wood block with a slot cut in it that made a nice holder for the whole thing so I could bang away with it standing on edge.. Not quick, but it worked. I touched up the bumps with a file--good enough. I have to say--those were good welds!

Definite improvement in suction--now onto the next phase--adding a baffle and canister filter...
 

MBfreak

MEMBER EMERITUS
Joined
Dec 10, 2010
Messages
2,301
Location
Linkoping , Sweden
Here is my take. I rebuilt a MB230 SL 1961 some 30 years ago. All welded steel body. Hood , doors, trunk lid, tonneau cover aluminum. These were the only parts not rusted out.
Family heirloom, very badly cared for. Had to replace wings, wheel arches, sills and lots of beams in the front and rear.
Cut parts of so that only a 15 mm strip with spot welds remained. Sandblasted to see exactly where the spot welds were, there was one every 25 mm in most places. Thank MB ! Bought a bunch of spot weld drills with a spring loaded centering pin. The trick for me was to drill out around the spot weld, and leaning the drill a bit for the last 0,1 mm and then stop. When all welds were done I used a hefty plier to roll off the strip , and breaking the last 0,1 mm around the welds in the process. That gave enough meat to rip off the dia 8 mm remaining "washer", the spot is only 1 mm in diameter. No distorsion in the flange. A ligt grinding gave an absolutely clean and straight surface when spotwelding on the new parts.
Took me around three months of evenings to replace front and rear wheel arches. Had access to a factory made body jig, so reasembly was fairly straightforward. And at the time MB body parts had not been priced out by the bean counters in Stuttgart.

Ola
 

Attachments

  • Namnlöst-128.jpg
    Namnlöst-128.jpg
    242.2 KB · Views: 18
  • Namnlöst-56.jpg
    Namnlöst-56.jpg
    310 KB · Views: 16
  • Namnlöst-47.jpg
    Namnlöst-47.jpg
    302.1 KB · Views: 16
  • Namnlöst-26.jpg
    Namnlöst-26.jpg
    188 KB · Views: 19
To avoid these ads, REGISTER NOW!
Top Bottom