To avoid these ads, REGISTER NOW!

SG's Garage

SouperGrover

Well-known member
Joined
Aug 12, 2015
Messages
195
Location
Chatsworth, CA
SG's 2 Car "Still Needs To Be A Garage" Woodshop

Hey all,

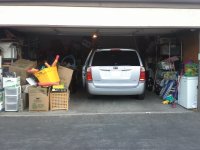
Recently I decided to turn my two car 21x18 garage from a hoarder's haven into a modest woodworking shop.

The Goals

Park The Car IN The Garage! - this may sound like a no brainer, but we haven't had the car in the garage in a few years. The HOA (I live in a townhouse complex) is not happy. Neither is The Wife when we have to search for a parking spot.

Modest Woodworking Shop - after a 20 year hiatus I am highly motivated to get back into woodworking. My Dad had a shop, so I used to piddle around with his gear. Never had to put one together myself. Plan to start out small with hand power tools. First big purchase will be the table saw, followed by a drill press, router table, band saw, grinder, miter box, and a belt sander. Later down the road a planar and joiner.

Some Household Storage - planning on building a loft for most of this stuff. Also, my wife is a teacher and has to store some of her classroom stuff in our garage if she changes grades. Some other stuff, too. The point is it can't be a dedicated garage to just me. But most of it can ;P

Crafting Area For My Daughter - she loves to paint and draw on all manner of materials. Which I love. Unfortunately, she hates to clean up the mess afterwards. Which I hate. I'd love to let her paint some of the stuff I build for her, but I'm tired of cleaning the paint off my patio :D I'd love to make an area for her to work in.

Electronics Work Area - nothing big. Just a small piece. I'm in IT after all. Working on technology is what I do to pay for my hobbies

Lego Work Area - this one is a "would be nice to have". My son and I have a massive Lego collection and this seems like a logical area to work on models

The Challenges

The biggest challenge I see is power. All of our garages are attached together in a row. Every 2-3 garages share a 20 amp circuit. Most tablesaws I've seen are 15 amps. Shouldn't be a problem, but it's a limitation I have to keep in mind.

Can't make the space bigger. I'm land locked so I have to make due with the space I have. The good thing is, as long as we have our car in the garage, the HOA doesn't care what I do to the inside.

Calling this a "detached" garage is an understatement. Up the sidewalk, make a right, pass the pool, make a left and you're at the house. So I can't run anything from the house to the garage.

The first step is getting the garage cleared out. After that I will build the loft for storage. Once I see what's left that has to stay on the ground level (hopefully not much more than lawn chairs and a few classroom supplies) then I can lay out where the tools will go and the flow of the shop. We only have one car, so I will have enough room for stuff to be sticking out and projects to be laid out and still get the car in. The good news is when I told The Wife I wanted to build a shop she said "I don't care what you do as long as I can get my car in there". Wait 'til she sees how much my gear is gonna cost MWAHAHAHAHA! Seriously though, once she figured out how much stuff I could make her for her classroom she was more than happy to let me have at it.

I'll post some pics tomorrow of the current status of the garage and as things progress
 
Last edited:
To avoid these ads, REGISTER NOW!

matt_i

Well-known member
Joined
Mar 14, 2008
Messages
10,725
Location
SE Michigan
I would see what has to be done to get some 220vac circuits. If you have run a tablesaw on 120vac and then reconfigured it for the higher voltage its fairly amazing. My old tablesaw on 120vac used to dim the lights and take about 3-4 seconds to spool up to top speed. Rewired for 220vac it seemed like 0.1 second to top speed. New tablesaw was no question, really no other option for the 3hp motor.

Surface mounted conduit isn't a bad thing in my view, you can always take it out later if you ever decide to sell, etc.
 

bczygan

Well-known member
Joined
Nov 4, 2009
Messages
22,002
Location
DETROIT! Arsenal of Scrappers
My first thought is that all these functions won't fit in that space.

Second thought is that some of those functions are better done in the residence, especially since there is a distance between the house and garage. Can you expect the children to travel that far to do their crafts and hobbies?

Do you have a basement or attic for storage or work areas?

Can you get more electrical capacity for the garage? That is a limiting factor.

It sounds like there is some space available in the garage, as long as it is well organized.

Leggos and electronics can go in the house. Build workbenches that work as finished furniture, so they can go in bedrooms. Roll top desk type solutions. That way you can close things up.

Painting on the patio? How far does she fling paint?

Convert a closet into a work space with bench and storage above and below and a work surface that folds out of the space.

Then you will have more space in the garage for your woodworking.

Looking forward to your photos.

Bill
 
OP
S

SouperGrover

Well-known member
Joined
Aug 12, 2015
Messages
195
Location
Chatsworth, CA
I would see what has to be done to get some 220vac circuits. If you have run a tablesaw on 120vac and then reconfigured it for the higher voltage its fairly amazing. My old tablesaw on 120vac used to dim the lights and take about 3-4 seconds to spool up to top speed. Rewired for 220vac it seemed like 0.1 second to top speed. New tablesaw was no question, really no other option for the 3hp motor.

My electrical skills are a little weak admittedly. If I wanted to get 220vac wouldn't that have to come from the breaker box? If so it's not going to happen. The HOA would never let me.

Surface mounted conduit isn't a bad thing in my view, you can always take it out later if you ever decide to sell, etc.

That's the plan. I have no problems with that idea. I also like that if I decide I need another box or light or something somewhere I don't have to put holes in the wall again to do it.
 
OP
S

SouperGrover

Well-known member
Joined
Aug 12, 2015
Messages
195
Location
Chatsworth, CA
@bczygan Yeah it's gonna be a tight fit. One thing I forgot to mention is the garage has 15' high open ceiling at the back that tapers down to 8' (I think). I have a lot of wasted overhead space so that will be good for the storage.

It's no too far that they won't walk out. Takes less than 45 seconds to get out there.

My neighbor is an Electrical Engineer for the local megapower company. I've been picking his brain on how to get more juice and he doesn't seem to think I can.

Honestly, the Lego will probably go up in the storage loft. My son is almost 14 and builds with them less and less. Just thought it would be cool to put in a work area if I could.

Our townhouse is 1350 sq ft. 3 bedroom 2 1/2 bath. As it is space is at a premium. I'm trying to move as much of my work stuff out to the garage as I can because my wife doesn't have much room to work. And she needs to spread out when she is grading and organizing papers and class projects. I'm not like most computer guys and have a big bonepile of parts. All of my spare stuff fits nicely into a big plastic storage box. I don't have things like a soldering iron or other gear (my neighbor does though). I was just saying I need a small area for it (not dedicated to it) to keep it in my head as a design consideration.

Here is an example of my daughter's work. She wanted to paint a small cardboard box as something she could use to play with her dolls (I forget it's purpose). Which was awesome. I love her creativity and her love of reusing things. She uses acrylic paints. The box was maybe 5"x7". I laid down a 4'x6' piece of cardboard. Should be plenty of room. There are spots of paint all around one edge of the box. I gave her all that space and she decided to skoot the box as close to the edge as she could lol. And she decided it would be a good idea to paint the bottom of her foot and use that to paint with "because it was more creative that way". So there was a nice big green footprint on my patio. She's almost 8.

The paint came up easy enough. The patio is just concrete. And it's not that she flung it around all over the fence and furniture. But there's a lot of times she wants to "get creative" and we tell her no because we know the mess it will make. I'd love to come up with a small area or place or way in the garage where she can get creative and it would be easy cleanup.

Closet space is hard to come by. Nothing can be re purposed. I have an idea in my head for a portable workbench that I can setup on the patio when I am doing small repairs or projects around the house. Right now my outside "worktable" is our patio table. It's one of those metal/glass octagonal deals. It doesn't hold clamps well and vibrates like a BEAST when I cut things with the jigsaw

I'm heading out now to get to work. Told the wife and kids if they don't hear from me in an hour send in the reinforcements. Pictures coming
 

HSpencer

ALLIANCE MEMBER
Joined
Nov 28, 2010
Messages
2,854
Location
South Central US
Greetings! I would look on Garage Journal and find some one car garages. There have been some amazing changes and shops done in them. Also, you can get some great inspiration from some of the folks sheds that have been converted to workshops. You have a lot of needs to fill, and sometimes it makes you "downsize" shop wise like finding tools that can be used/stored and used/stored. A good portable cart on casters can be both tool bench and work bench. Just scope out the site and I know you will find millions of ideas to help you accomplish your needs!!
Thanks for posting and we will be rooting for your success.

Best Regards
Herb Spencer
 

drivesitfar

Well-known member
Joined
Oct 23, 2013
Messages
36,007
Location
Pacific Northwest
SG: nice looking thread. i'll read more and give comments later as i have time an wanted to mark it so to speak with a post. good luck and i'm sure you'll figure out how to make your garage close to what you are hoping.

cheers
 
OP
S

SouperGrover

Well-known member
Joined
Aug 12, 2015
Messages
195
Location
Chatsworth, CA
Greetings! I would look on Garage Journal and find some one car garages. There have been some amazing changes and shops done in them. Also, you can get some great inspiration from some of the folks sheds that have been converted to workshops. You have a lot of needs to fill, and sometimes it makes you "downsize" shop wise like finding tools that can be used/stored and used/stored. A good portable cart on casters can be both tool bench and work bench. Just scope out the site and I know you will find millions of ideas to help you accomplish your needs!!
Thanks for posting and we will be rooting for your success.

Best Regards
Herb Spencer

I'm pulling a lot of inspiration from these two builds:

One Car Garage Converted http://www.startwoodworking.com/post/smart-shop-one-car-garage

Roll Away Storage Workshop https://www.startwoodworking.com/post/roll-away-workshop

If you look at the One Car Garage build, that guy built a multipurpose workstation that he swaps and stores his Miter box, drill press and grinder on. The other guy made a lot of roll around workstations that fit nicely under a workbench, have lots of storage and are sized right for in/out feed uses.

I've also been inspired a lot by the Tiny House movement. I could never fit my family in one, and would go stir crazy after a few days, but the way they multipurpose stuff and make it fold up/disappear gets the engineering side of me all giddy. If none of you have seen any shows, they have a couple series on FYI and HGTV you should check out.
 
OP
S

SouperGrover

Well-known member
Joined
Aug 12, 2015
Messages
195
Location
Chatsworth, CA
Starting Photos

As promised, here are some photos. It's a little mebarassing, but I think it will feel better knowing how far I've come once it's done

I took a pic from the driveway so you can see the opening and how it is connected with other units. The other pic is of the mess I'm organizing. And the third pic is the left wall. You can see the slope of the roof and that the wall is open. I didn't take a pick of the other wall but it is "finished" with plywood. Back wall has drywall on it. That horizontal 2x4 on the wall is about 9' up and looks like a previous owner started to build a loft.
 

Attachments

  • Garage_from_drive.jpg
    Garage_from_drive.jpg
    55 KB · Views: 150
  • This_Could_Be_Trouble.jpg
    This_Could_Be_Trouble.jpg
    79.4 KB · Views: 152
  • left_wall.jpg
    left_wall.jpg
    128.8 KB · Views: 139

bczygan

Well-known member
Joined
Nov 4, 2009
Messages
22,002
Location
DETROIT! Arsenal of Scrappers
Re: Starting Photos

As promised, here are some photos. It's a little mebarassing, but I think it will feel better knowing how far I've come once it's done

I took a pic from the driveway so you can see the opening and how it is connected with other units. The other pic is of the mess I'm organizing. And the third pic is the left wall. You can see the slope of the roof and that the wall is open. I didn't take a pick of the other wall but it is "finished" with plywood. Back wall has drywall on it. That horizontal 2x4 on the wall is about 9' up and looks like a previous owner started to build a loft.

Is there another garage behind yours?

Either way, Here is how I would build the loft.

Attach a ledger across the entire back wall, lag bolted into the studs at a maximum of 4'o.c.

Come out from the wall 6', and install a beam made of 2 LVL's, across the entire width of the garage. This will clear span the 21'. Set this beam at a height that allows good access under it and still gives you access to the loft. If you make it deeper than 6', your headroom in the loft will decrease and calculations for the joists and beam will have to be redone.

Based on 50#LL and 10#DL and L/360, 2x6 hem-fir joists will span the 6' and up to 8'-5". Based on this calculator:

http://www.awc.org/codes-standards/calculators-software/spancalc

For a 6' deep loft, the contributing area for each LF (Lineal Foot) of beam will be 3SF. 3SF x 60#/SF = 180#/LF of load on the beam.

Using 2.0E LVL's, 2 11 1/4"x1 3/4" LVL's attached properly together as a beam and supported at each end by 2 2x4's as a column, will support the load. Chart here:

https://www.google.com/url?sa=t&rct=j&q=&esrc=s&source=web&cd=1&ved=0CB8QFjAAahUKEwjf3efT0anHAhXIfJIKHZBJAc8&url=http%3A%2F%2Fwww.buildgp.com%2FDocumentViewer.aspx%3Felementid%3D9548&ei=xW3OVZ_nGsj5yQSQk4X4DA&usg=AFQjCNGHjjU-IrveHMBzRARbMFillE8pOg&sig2=kHUxnisGGdZV6MP1LfRSwQ

Different calculations will result from different loads. At higher loads a steel beam will make the beam shallower depth and give more headroom.

Note that if you can stand having a column somewhere under the beam, it will cut the span and the beam can be less deep.

Access by ladder.

Bill
 
Last edited:
OP
S

SouperGrover

Well-known member
Joined
Aug 12, 2015
Messages
195
Location
Chatsworth, CA
@Bill Thank you so much for your instructions! It's a lot for me to digest and I may need some further explanation later. But I appreciate the detail you gave.

There are no garages behind me. It's the service entrance for the grocery store (prime pallet hunting ground :) ).

I've been poking my head in some of my neighbors' garages to see what they've done. I have seen a few who run 2x4s up to the rafter and attach it that way for additional support. I did a good sized purge this morning and I think there might be less weight up there than I thought originally. still, I want to plan for future growth. Next weekend I'll start measuring to figure out exactly how much material I'm going to need and how much it's going to cost me. As in most things, the cost will determine when I'm able to get started.
 

bczygan

Well-known member
Joined
Nov 4, 2009
Messages
22,002
Location
DETROIT! Arsenal of Scrappers
@Bill Thank you so much for your instructions! It's a lot for me to digest and I may need some further explanation later. But I appreciate the detail you gave.

There are no garages behind me. It's the service entrance for the grocery store (prime pallet hunting ground :) ).

I've been poking my head in some of my neighbors' garages to see what they've done. I have seen a few who run 2x4s up to the rafter and attach it that way for additional support. I did a good sized purge this morning and I think there might be less weight up there than I thought originally. still, I want to plan for future growth. Next weekend I'll start measuring to figure out exactly how much material I'm going to need and how much it's going to cost me. As in most things, the cost will determine when I'm able to get started.

You don't want to be doing that, period. The rafters aren't designed to support ANY additional loads.

Either design it for less load capacity than I cited above, to reduce the beam size, or cut the beam span with a column. That is actually what I would do. I would allow enough space to pull the car in and open the doors, and then place a column to define the car parking area from the shop area. This could reduce the maximum span for the beam to 12', and reduce it's size.

Bill
 
OP
S

SouperGrover

Well-known member
Joined
Aug 12, 2015
Messages
195
Location
Chatsworth, CA
Thanks for sharing, don't be too embarrassed and you are right in saying that it is great to look back on your progress at times.:thumbup:

Regards

The somewhat comforting feeling I got was looking at hte picture and thinking "man, I've seen WAY worse!" Still no excuse, but it helps :D
 

bczygan

Well-known member
Joined
Nov 4, 2009
Messages
22,002
Location
DETROIT! Arsenal of Scrappers
This is a good chance to show how things can be adjusted.

Since you won't be putting a finished ceiling under the loft, you can use L/240 instead of L/360. Using the lighter 40#/SF LL and 10#/SF DL, you can space the 2x6 joists at 24"o.c. and span up to 8'0".

If you place a column 12' from one side wall, the beam with a 6' deep loft can be one 9 1/4" x 1 3/4" 2.0E LVL.

Bill
 
Last edited:
OP
S

SouperGrover

Well-known member
Joined
Aug 12, 2015
Messages
195
Location
Chatsworth, CA
You don't want to be doing that, period. The rafters aren't designed to support ANY additional loads.

Either design it for less load capacity than I cited above, to reduce the beam size, or cut the beam span with a column. That is actually what I would do. I would allow enough space to pull the car in and open the doors, and then place a column to define the car parking area from the shop area. This could reduce the maximum span for the beam to 12', and reduce it's size.

Bill

Just for curiosity, why would you not tie to the rafters? Do you think it may put too much strain on the roof?

Once I have a better picture of the load I might take a pic or do some actual calculations so you can help me make sure it's designed right. I want to avoid the support column as much as possible. When I need to work in the shop I can just pull the car out and park it in the parking spaces the complex has. I think using the column would greatly limit me in being able to move things around in unforseen ways
 

bczygan

Well-known member
Joined
Nov 4, 2009
Messages
22,002
Location
DETROIT! Arsenal of Scrappers
Just for curiosity, why would you not tie to the rafters? Do you think it may put too much strain on the roof?

Once I have a better picture of the load I might take a pic or do some actual calculations so you can help me make sure it's designed right. I want to avoid the support column as much as possible. When I need to work in the shop I can just pull the car out and park it in the parking spaces the complex has. I think using the column would greatly limit me in being able to move things around in unforseen ways

The rafters are designed to support the roof loads, and nothing else. You could get away with attaching a light structure and light loads, as some have, because there is a safety factor built in. But in doing so, you are using up that factor and maybe more. When critical wind and or snow loads occur, you have less room for error. I just would not do it, period.

Your only other options are lower loads, more deflection and stronger, stiffer beams. Let's explore that a little.

Let's start with the 6' deep loft and figure the 40#/SF LL and 10#/SF DL as described above with L/240. So the same joists and joist spacing.

The load on the beam is now 150#/LF. To clear span instead of having a column will require one 14" deep, or 2 11 1/4" deep x 1 3/4" LVL's for a beam. Problem solved.

Realize that this is designed so you can get up there to move things around. As strong as a residential floor, plenty strong to walk on. The total live load capacity of the loft is 40# x 6' x 21' = 5,040 pounds uniformly distributed.

Let's now look at some lighter options. Take a look at the table 3.4 in this document:
http://www.huduser.org/Publications/pdf/res2000_2.pdf

It shows 20#/SF LL for an attic with storage and concentrated load not over 250#.

Using the joist calculator with 25#/SF LL and 10#/SF DL we can span 7'3" with 2x4's at 16"o.c.

The contributing load for a 6' deep loft is then #105/LF. To clear span, one 11 7/8" LVL, or 2 9 1/2" ones will adequately support the loft loads.

For what you seem to be doing, this is what I would do. Just store the wife's boxes of books near the walls and ends of the loft, and spread them out a little. And locate your ladder near the wall too. 3,150# total live load.

LVL's are the only realistic solution for a beam that spans this distance. Easy to attach wood member to it as compared to steel, and can span longer distances, and support larger loads than dimensional lumber, if you could even get dimensional lumber of adequate size.

Just a note. I have redone my calculations above because I made a mistake of doubling the contributing areas. Beam sizes are reduced accordingly.

The above is the lightest I would go for a loft I could get up into.

Material List:
16 2x4x7's - $35
2 2x6x12's ledgers - $15
2 9 1/2x21 LVL's - About $80 each.
6 sheets of 5/8" ply - $110
4 2x4x8's or 9's for columns - Under $10
Nails, lag bolts joist hangers and construction adhesive. - $60+-

About $400

Bill
 
Last edited:

HSpencer

ALLIANCE MEMBER
Joined
Nov 28, 2010
Messages
2,854
Location
South Central US
After the photos, space looks pretty good from what I was imagining. Is it really true 2 or 3 garages share one 20 amp circuit? Who gets to access the breaker box? What were the builders thinking? I wonder who has a freezer, tools, etc? One swell proof and three garages in the dark?

Best Regards
Herb
 

bczygan

Well-known member
Joined
Nov 4, 2009
Messages
22,002
Location
DETROIT! Arsenal of Scrappers
After the photos, space looks pretty good from what I was imagining. Is it really true 2 or 3 garages share one 20 amp circuit? Who gets to access the breaker box? What were the builders thinking? I wonder who has a freezer, tools, etc? One swell proof and three garages in the dark?

Best Regards
Herb

I've got a hangar like that. After I install adequate lighting and a beer fridge, if I operate any tools, we could all be in the dark.

The OP has a problem here too. He needs adequate lighting, but may be reduced to one light for general illumination, so he doesn't bump into things. Then individually switched task lights at each work position, that he switches on and off as he moves from machine to machine, or location to location.

He really needs more power.

Bill
 

HSpencer

ALLIANCE MEMBER
Joined
Nov 28, 2010
Messages
2,854
Location
South Central US
I've got a hangar like that. After I install adequate lighting and a beer fridge, if I operate any tools, we could all be in the dark.

The OP has a problem here too. He needs adequate lighting, but may be reduced to one light for general illumination, so he doesn't bump into things. Then individually switched task lights at each work position, that he switches on and off as he moves from machine to machine, or location to location.

He really needs more power.

Bill

Bill
SG

I know there are some freaky things done over a medium priced bottle of Jack Daniels as a "gift", but this to me is downright dangerous. Code must have been on the back burner.

If I move in SG's complex, I am going to bring my chest freezer, my small table saw (12 amp), a boat load of hand held tools, router, sabre saw, sanders, my small air compressor (10 amp) a shop light and my radio, my coffee pot and my shop computer for starters. 20 or even 30 amps is NOT going to get me jumping. Just me alone would **** up 20 amps on a slow day. I also see that there are garage door openers, and add the overhead light and surely there is at least one or two receps.

No way here that would pass code unless they dropped a breaker box and the 20 amps into EACH garage.

Actually, I think this should be reported. But that is another story right?

Best Regards
Herb
 
To avoid these ads, REGISTER NOW!
OP
S

SouperGrover

Well-known member
Joined
Aug 12, 2015
Messages
195
Location
Chatsworth, CA
The rafters are designed to support the roof loads, and nothing else. You could get away with attaching a light structure and light loads, as some have, because there is a safety factor built in. But in doing so, you are using up that factor and maybe more. When critical wind and or snow loads occur, you have less room for error. I just would not do it, period.

Bill,

In Los Angeles the heaviest load on the roof is pigeons when they land on it :D

Seriously though I get your point. I can't tell you how much I appreciate your advice on this. I think once I have the garage emptied I'm going to stage all of the stuff on the floor to give me an idea of how much space I will need and what the load will be. At this point, I'm still purging.
 
OP
S

SouperGrover

Well-known member
Joined
Aug 12, 2015
Messages
195
Location
Chatsworth, CA
After the photos, space looks pretty good from what I was imagining. Is it really true 2 or 3 garages share one 20 amp circuit? Who gets to access the breaker box? What were the builders thinking? I wonder who has a freezer, tools, etc? One swell proof and three garages in the dark?

Best Regards
Herb

Hey Herb,

Yes. They are true 2 car garages. People fit two cars in them and maybe a storage rack on the sides. We only have one car, so it gives me breathing room for the tools and work area
 
OP
S

SouperGrover

Well-known member
Joined
Aug 12, 2015
Messages
195
Location
Chatsworth, CA
Bill
SG

I know there are some freaky things done over a medium priced bottle of Jack Daniels as a "gift", but this to me is downright dangerous. Code must have been on the back burner.

If I move in SG's complex, I am going to bring my chest freezer, my small table saw (12 amp), a boat load of hand held tools, router, sabre saw, sanders, my small air compressor (10 amp) a shop light and my radio, my coffee pot and my shop computer for starters. 20 or even 30 amps is NOT going to get me jumping. Just me alone would **** up 20 amps on a slow day. I also see that there are garage door openers, and add the overhead light and surely there is at least one or two receps.

No way here that would pass code unless they dropped a breaker box and the 20 amps into EACH garage.

Actually, I think this should be reported. But that is another story right?

Best Regards
Herb

I am a little curious how this is all going to work as well. Like Bill suggested, I will probably only have one main light on and light in the workstation as needed. I've heard one neighbor turned on a small air compressor, someone opened a garage and he flipped a breaker. One guy uses a small welder (not sure how big or what type) and doesn't have any issues. And yet another guy supposedly can't charge his Chevy Volt in his garage. So not sure what is going to happen until I spin up the tablesaw for the firshe people connected to me are rarely in their garages, so they won't be pulling power the same time I am at least. I have to admit, the thought has crossed my mind as to why I haven't seen more guys with shops setup in our complex...

If you think it's not up to code I have no problem talking the HOA president and getting it done right.
 

Bib Overalls

Well-known member
Joined
Dec 4, 2006
Messages
3,318
Location
Jonesboro, Arkansas
Most likely the single circuit in your garage comes off a panel owned by the HOA and fed from a meter that is billed to the HOA. This is a common arrangement in condos for garage, walkway, landscape and other communal lighting and power needs.

It is also quite possible that your garage shares a 20 amp circuit with one or two others based on the assumption that very rarely will two openers be operating at the same time.

If the panel is nearby you may be able to feed a sub in your garage through a meter and pay for what you use. HOAs are not known here for that kind of flexibility but you never know unless you ask.

I do know that if the HOA's electric bill spikes they will want to know why and that could lead to a new rule or enforcement of an existing rule that will shut your little shop down.

Procede with caution.
 
OP
S

SouperGrover

Well-known member
Joined
Aug 12, 2015
Messages
195
Location
Chatsworth, CA
Most likely the single circuit in your garage comes off a panel owned by the HOA and fed from a meter that is billed to the HOA. This is a common arrangement in condos for garage, walkway, landscape and other communal lighting and power needs.

It is also quite possible that your garage shares a 20 amp circuit with one or two others based on the assumption that very rarely will two openers be operating at the same time.

If the panel is nearby you may be able to feed a sub in your garage through a meter and pay for what you use. HOAs are not known here for that kind of flexibility but you never know unless you ask.

I do know that if the HOA's electric bill spikes they will want to know why and that could lead to a new rule or enforcement of an existing rule that will shut your little shop down.

Procede with caution.

Yeah I'm not going to push my luck. I'll ask about it. We have one guy on the board who is a total d-bag and likes to tape notes to people's windows if they are parked in the fire lane for too long. The last thing I need is trouble b/c I tapped into the house power like I shouldn't have
 
OP
S

SouperGrover

Well-known member
Joined
Aug 12, 2015
Messages
195
Location
Chatsworth, CA
I've been looking through the Garage Gallery and see a lot of GREAT auto and machinist builds. Can anyone point me to some (or has one of their own) woodshop builds?
 
OP
S

SouperGrover

Well-known member
Joined
Aug 12, 2015
Messages
195
Location
Chatsworth, CA
As of noon today the car is IN the GARAGE! A full day and a half ahead of the goal. The 5'x5' section of stuff in the front left is all donate, too. So come Monday there will be even MORE space. The wife is VERY happy. And the happier she is, the more I get to put in here :rocker: My son and I celebrated by going to one of the local big box stores and checking out power tools
 

Attachments

  • Parked.jpg
    Parked.jpg
    141.6 KB · Views: 66
Last edited:

tjpavlov

Well-known member
Joined
May 18, 2012
Messages
1,277
Location
Providence, RI
Is there any way to determine whether your immediate garage neighbors are on a different circuit than you? Perhaps you could run a plug into each other's garage, thereby doubling your capacity.
 

bczygan

Well-known member
Joined
Nov 4, 2009
Messages
22,002
Location
DETROIT! Arsenal of Scrappers
It's exciting to be setting up a work space for the first time, isn't it?

Your layout will evolve as your tool list expands.

Look to having machines and work tables that move or fold up on the wall, or even drop down from above.

Plan a flow of materials from the entrance, through different processes and back out the front.

Segregate, even if just temporarily, the finishing area from the rest.

Material storage above.

Wood shops work from sheet goods on the table saw and boards on the jointer and planer. So you rough cut, joint and plane and then cut to size and then make joints like mortises and dovetails and laps.

So work flows from jointer and planer and table saw to bandsaw and mortiser and back to table saw and then everything goes to the assembly table and then to finishing.

A table saw with extension tables can be rigged as an assembly table. It could even be used for finishing.

Bill
 

Fueler

Well-known member
Joined
Jun 22, 2006
Messages
1,620
Location
Urbana, IL
Re: Starting Photos

As promised, here are some photos. It's a little mebarassing, but I think it will feel better knowing how far I've come once it's done

I took a pic from the driveway so you can see the opening and how it is connected with other units. The other pic is of the mess I'm organizing. And the third pic is the left wall. You can see the slope of the roof and that the wall is open. I didn't take a pick of the other wall but it is "finished" with plywood. Back wall has drywall on it. That horizontal 2x4 on the wall is about 9' up and looks like a previous owner started to build a loft.
Step 1. Goodwill and the trash man will be your friends.
 
OP
S

SouperGrover

Well-known member
Joined
Aug 12, 2015
Messages
195
Location
Chatsworth, CA
Is there any way to determine whether your immediate garage neighbors are on a different circuit than you? Perhaps you could run a plug into each other's garage, thereby doubling your capacity.

I might try that depending on what happens when I start turning stuff on :D
 
OP
S

SouperGrover

Well-known member
Joined
Aug 12, 2015
Messages
195
Location
Chatsworth, CA
It's exciting to be setting up a work space for the first time, isn't it?

Your layout will evolve as your tool list expands.

Look to having machines and work tables that move or fold up on the wall, or even drop down from above.

Plan a flow of materials from the entrance, through different processes and back out the front.

Segregate, even if just temporarily, the finishing area from the rest.

Material storage above.

Wood shops work from sheet goods on the table saw and boards on the jointer and planer. So you rough cut, joint and plane and then cut to size and then make joints like mortises and dovetails and laps.

So work flows from jointer and planer and table saw to bandsaw and mortiser and back to table saw and then everything goes to the assembly table and then to finishing.

A table saw with extension tables can be rigged as an assembly table. It could even be used for finishing.

Bill

I was planning on putting some of bigger stuff on casters once I get it so I can wheel it around into position and then store it against the wall when not in use. I saw one guy build a workstation that stored his drill press and grinder underneath while the miter box was on top and he just switched them out as needed. It had two small sides (maybe 6"-8") that acted as in/outfeed and an adjustable top so the devices could use the in/outfeed better. He also put his router table in the extended left side of his table saw.

Also planning on building a little shelf in the open area above the garage door to hold materials

Jointer and planar will come later or until we find a project that we absolutely have to do and it will require us to get one. For now I will just be at the mercy of pre milled standard stock sizes from the big box stores or paying the lumber yard to do it for me.
 
Last edited:
OP
S

SouperGrover

Well-known member
Joined
Aug 12, 2015
Messages
195
Location
Chatsworth, CA
Re: Starting Photos

Step 1. Goodwill and the trash man will be your friends.

Yessir! Filled up lots of trash. You can't see it in the pic because it's towards the back. Also there is a big chunk in the front that will be gone by tomorrow morning. We tend to donate to Veterans of America because 1. my Dad is a vet and 2. they tend to take whatever I give them and some other places do not.
 
OP
S

SouperGrover

Well-known member
Joined
Aug 12, 2015
Messages
195
Location
Chatsworth, CA
Things are falling into place. One neighbor donated a bunch of old power tools to me and another gave me some florescent lights he didn't want to hang up in my shop. Lights will probably be the next thing to go up
 
OP
S

SouperGrover

Well-known member
Joined
Aug 12, 2015
Messages
195
Location
Chatsworth, CA
Decided the Lego work area is not important enough to give it a space. Lego usage has become less and less over the years so they are going up in the loft.
 

HSpencer

ALLIANCE MEMBER
Joined
Nov 28, 2010
Messages
2,854
Location
South Central US
SG

Just to give us a vision of how that place is set up, could we have a photo or two of the complex, showing the garages and how they line up with the homes. I am having a hard time visualizing the arrangement of your "home-to-garage". BTW, thanks again for your visit to my place and your many kind comments.

Best Regards
Herb
 
OP
S

SouperGrover

Well-known member
Joined
Aug 12, 2015
Messages
195
Location
Chatsworth, CA
SG

Just to give us a vision of how that place is set up, could we have a photo or two of the complex, showing the garages and how they line up with the homes. I am having a hard time visualizing the arrangement of your "home-to-garage". BTW, thanks again for your visit to my place and your many kind comments.

Best Regards
Herb

I'll snap some pics in the morning, but for now, this highly detailed artistic rendition of our complex layout will have to do.

Units are typically grouped in 4s. Like one big box cut into quarters. Each unit is 2 stories and approximately 1350 sq ft with a nice sized patio area. Mine is about 10'x10'. As a point of reference I counted the steps from my house to the gar--- shop(!) and it took my towering 5'6" frame 100 paces.

Herb, the honor is all mine.
 

Attachments

  • 20150825_235007.jpg
    20150825_235007.jpg
    140.1 KB · Views: 49
OP
S

SouperGrover

Well-known member
Joined
Aug 12, 2015
Messages
195
Location
Chatsworth, CA
View attachment 472406
SG

Just to give us a vision of how that place is set up, could we have a photo or two of the complex, showing the garages and how they line up with the homes. I am having a hard time visualizing the arrangement of your "home-to-garage".

The first pic is from inside my garage. My townhouse is directly behind the one you see (see my professional grade map for reference). The other two pics show you the rows of garages along the drive. As stated before, directly behind me is the service alley to the local grocery store.
 

Attachments

  • 20150826_072928.jpg
    20150826_072928.jpg
    144.6 KB · Views: 47
  • 20150826_072944.jpg
    20150826_072944.jpg
    144.1 KB · Views: 44
  • 20150826_072954.jpg
    20150826_072954.jpg
    144.6 KB · Views: 44

HSpencer

ALLIANCE MEMBER
Joined
Nov 28, 2010
Messages
2,854
Location
South Central US
SG

Thanks for the quick response on the photos. It clearly shows the set up and I am familiar as I lived in a very close match to that when I was stationed at Fort Sill, OK.
The good news is that every place that has a roof is a potential woodworking shop.
Be it hand or power tools, wood dust can be made in it. From all I can see, the only thing may be something on the electrical power shortage, but most everyone only uses one power tool at a time anyway. The space looks good.
I don't know if your renting, leasing, or buying, but possibly you can get a little upgraded power somehow in there. Otherwise, I think your good to go on a shop, and unless someone complains about the "music" made by your tools, it should all be good. Just tell them "I love the scream of a Router in the morning" LOL.
Thanks again for the photos.

Best Regards
Herb
 
To avoid these ads, REGISTER NOW!
Top Bottom