To avoid these ads, REGISTER NOW!

Shed build

MikeF2316

Well-known member
Joined
Dec 29, 2012
Messages
9,605
Location
Thornhill, ON
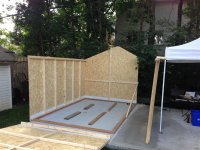
I'm finally getting around to document my shed build - something I started planning back in March (2017). First delay was the concrete guys - they were supposed to be here in mid June or mid July, but didn't show up until the second week in August. That's another story. In addition they were to redo the paver walkway to the shop door, which cuts the corner off the new concrete pad. The pictures will explain.

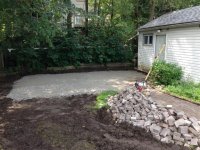
I wanted an outside workspace between the back end of my garage and this shed. Now there's a 14'x13' work area outside my shop door. My inside area is only 11'x11½', so I need to go outside for big stuff. Here's what I started with: Grass & weeds.

attachment.php


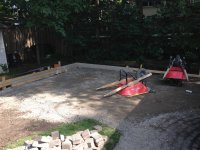
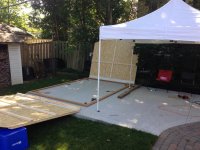
Grass and soil removed, base put down.
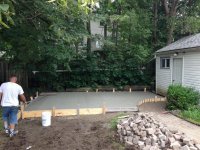
attachment.php


attachment.php


Forms for concrete.

attachment.php


attachment.php


And concrete

attachment.php


attachment.php
 

Attachments

  • 01Grass.jpg
    01Grass.jpg
    145.5 KB · Views: 1,402
  • 08concrete.jpg
    08concrete.jpg
    143.2 KB · Views: 1,383
  • 07concrete.jpg
    07concrete.jpg
    146.4 KB · Views: 1,392
  • 06forms.jpg
    06forms.jpg
    148.7 KB · Views: 1,390
  • 05forms.JPG
    05forms.JPG
    144.9 KB · Views: 1,387
  • 03pad.jpg
    03pad.jpg
    146.8 KB · Views: 1,385
  • 02pad.jpg
    02pad.jpg
    145.5 KB · Views: 1,389
To avoid these ads, REGISTER NOW!
OP
M

MikeF2316

Well-known member
Joined
Dec 29, 2012
Messages
9,605
Location
Thornhill, ON
The shed is a Heartland Home Products Stratford model, 12'x8'. Normally $1500 at Lowes, early in the season it was $500 off, and at the same time Lowes had a "no sales tax if ordered on line" sale too. (Combined sales tax, provincial and federal is 13% here, so a sizable savings on $1000.)

https://www.lowes.ca/storage-sheds/heartland-stratford-12-ft-x-8-ft-wood-storage-shed_g1501201.html

I had to store this in my garage from May when I bought it till the end of August when I could finally assemble it.

So I made some walls. Note the base in this pic. The kit came in a 4'x8' box, so anything that was the full 12 foot dimension had to be made up of 2 pieces. I bought some 12' 2x4s to make the long pieces out of one continuous piece.

attachment.php


And on the the 12' walls, what was included in the kit for the top plates were replaced by a 12' piece.

attachment.php


attachment.php


And putting them up

attachment.php


attachment.php


attachment.php


attachment.php
 

Attachments

  • 15assembly.jpg
    15assembly.jpg
    125.3 KB · Views: 1,378
  • 14assembly.JPG
    14assembly.JPG
    116 KB · Views: 1,373
  • 13assembly.JPG
    13assembly.JPG
    145.2 KB · Views: 1,458
  • 12assembly.JPG
    12assembly.JPG
    125.9 KB · Views: 1,381
  • 11walls.JPG
    11walls.JPG
    136.8 KB · Views: 1,370
  • 10walls.JPG
    10walls.JPG
    120.8 KB · Views: 1,370
  • 09walls.JPG
    09walls.JPG
    136.1 KB · Views: 1,372
OP
M

MikeF2316

Well-known member
Joined
Dec 29, 2012
Messages
9,605
Location
Thornhill, ON
Adding roof rafters, sheathing and the doors. The doors were pre made.

attachment.php


attachment.php


attachment.php


And then some white paint on the trim, the window and drip edge on the roof.

attachment.php


attachment.php


Because rain was expected, I opted to cover the roof in ice and water shield.

attachment.php


I painted the inside of the doors, as the sun was going down. The mosquitoes were out in full force as I was finishing. I got the last laugh on one of them, she landed in the wet paint and couldn't take off again. She's still there today. :lol:

attachment.php
 

Attachments

  • 23mosq.JPG
    23mosq.JPG
    138.9 KB · Views: 1,375
  • 22roofing.JPG
    22roofing.JPG
    81.9 KB · Views: 1,377
  • 21paint.JPG
    21paint.JPG
    83.8 KB · Views: 1,367
  • 20paint.JPG
    20paint.JPG
    96.9 KB · Views: 1,373
  • 19doors.JPG
    19doors.JPG
    107.1 KB · Views: 1,374
  • 18roof.JPG
    18roof.JPG
    132 KB · Views: 1,375
  • 17Rafters.JPG
    17Rafters.JPG
    144.2 KB · Views: 1,376
OP
M

MikeF2316

Well-known member
Joined
Dec 29, 2012
Messages
9,605
Location
Thornhill, ON
And some paint on the door trim.

attachment.php


Barn Red!

attachment.php


attachment.php


Shingles finally. It went through several rainstorms with only the ice and water shield on it with no problems.

attachment.php


attachment.php


attachment.php


attachment.php
 

Attachments

  • 31shingle.JPG
    31shingle.JPG
    146.1 KB · Views: 1,363
  • 30shingle.jpg
    30shingle.jpg
    129.2 KB · Views: 1,357
  • 29shingle.jpg
    29shingle.jpg
    145.6 KB · Views: 1,361
  • 28shingle.JPG
    28shingle.JPG
    140.3 KB · Views: 1,362
  • 27paint.JPG
    27paint.JPG
    97 KB · Views: 1,364
  • 25paint.JPG
    25paint.JPG
    96.9 KB · Views: 1,359
  • 24paint.JPG
    24paint.JPG
    95.8 KB · Views: 1,359
OP
M

MikeF2316

Well-known member
Joined
Dec 29, 2012
Messages
9,605
Location
Thornhill, ON
And my wife's idea, yellow for the doors. I wasn't sure, but she painted them. The first picture is after one coat. The last 2 are after two coats. I like the yellow now that I see it. Everything barn red is also two coats.

attachment.php


And window trim added:

attachment.php


attachment.php
 

Attachments

  • 35paint.JPG
    35paint.JPG
    135.9 KB · Views: 1,365
  • 33paint.JPG
    33paint.JPG
    145 KB · Views: 2,936
  • 32paint.JPG
    32paint.JPG
    106.2 KB · Views: 1,361
Last edited:

driftpin

Well-known member
Joined
Dec 22, 2016
Messages
11,178
Location
Miami-Dade/Broward Co. Florida
Looks like it's better-finished by you than most of the kits get done, I imagine. Are you going to do any shear-bracing with diagonal members at the corners? It would make it stronger. What are the dimensions of the lumber plates at the tops of the walls? Are there metal plates to tie the rafters to the top header plates?

Any reason you didn't just eliminate the raised wood floor, and leave the slab?

The yellow doors do add to the appearance, I think. Looks like you will have some good storage now.

Since it's in the backyard, and probably out of sight, I don't think the red/yellow would clash too-much with the house.
 
To avoid these ads, REGISTER NOW!
OP
M

MikeF2316

Well-known member
Joined
Dec 29, 2012
Messages
9,605
Location
Thornhill, ON
There is no wood floor. The shed's bottom plate sits on that 2x4 frame. I though of eliminating the frame, but then there would be 2 issues. The sheathing is 1" taller than the walls, it hangs down over the frame. And with doors close tight against that frame, making a good seal. (This was how the instructions said to build it on a slab too.) So I have to step / roll things over the 2x4 flat on the slab. They do provide an aluminum angle to protect the corner of the 2x4.

The front and back wall framing is only 2x3 on 24" centers. The roof "trusses" a 2x4 with the plates glued on both sides, you can see them in the one picture. The side walls have almost no framing! The white trim you see on the side is 2x3 and acts like framing. There are horizontal 2x3s inside that have a shelf at the door end, and a shelf and a workbench at the window end. These have another 2x3 supporting the front and so kind of act like I beams stiffening the walls.

The top plates were a 8' and 4' 2x3 spliced over a stud as designed. There were no 12' 2x3s at any big box stores around here, so I replaced them with a 12' 2x4 as mentioned. The roof rafters / trusses sit on these 2x4s and are glued and screw in from underneath. The truss over the door has an additional tie member on it.

Note that the barnboard look is fake, they're 4x8 sheets of OSB with a fake coating... I put silicone caulking around the perimeter of each sheet, both for sheer strength as well as weather proofing. There is no diagonal bracing of any kind, and the only metal are nails, screws, door hardware and the aluminum angle in the doorway. It should be OK, it's got bid trees on one side, my garage in front, the neighbour's garage behind.

As far as the colours go, hey it's the best looking building on the site. The garage is white vinyl, the house is gray stucco, but all 3 have the same gray shingle roof. But you can't really see the house and shed in the same view.

Only problem, the damn thing is full already...
 
OP
M

MikeF2316

Well-known member
Joined
Dec 29, 2012
Messages
9,605
Location
Thornhill, ON
First modification! Snow melting and dripping off the roof has been refreezing as it hits the concrete pad. The door is very close to the ground and freezes shut. Not a good place for the snowblower.

So obviously, a rain gutter is needed. But between the top of the door and the roof surface is only a 1x3, so only that and the thickness of roof sheathing is all the height I have. If it hangs down any more than that, the doors will hit it! Factor in a slope of more than a half inch needed for the 12 foot width of the shed, so there's only about 2" available, including drip edge.

So after the door freezing shut a couple of weeks ago, I put some thought to how I was going to do it. So what I came up with was some 2x3 downspout. It's cut lengthwise, a parallel surface on front, sloped to tuck behind the drip edge on the back. Stiffening the front edge is accomplished by a 1/4" lag screw every 24" (every rafter tail) and a piece of 1/2" plastic tube inside the gutter as a bushing.

For ends I used 45° elbows cut to match the downspout/gutter, pointed up at the high end, down at the outlet end.

Upper end

attachment.php


attachment.php


The lower side. Now that it's proven in the rain I can connect it to the 4" pipe that takes water from my garage roof to the low spot behind the shed. The small piece of plywood was a temporary support for when I was marking and drilling the holes.

attachment.php


attachment.php


And a dry spot up against the front of the shed under the new gutter!

attachment.php
 

Attachments

  • gutllow.jpg
    gutllow.jpg
    67.1 KB · Views: 776
  • gutlup.jpg
    gutlup.jpg
    79 KB · Views: 779
  • gutrlow.jpg
    gutrlow.jpg
    144.1 KB · Views: 780
  • gutrup.jpg
    gutrup.jpg
    103.9 KB · Views: 777
  • gutdry.jpg
    gutdry.jpg
    150.8 KB · Views: 779

cdestuck

Well-known member
Joined
Nov 13, 2013
Messages
1,462
Location
Altoona, Pa
Nice shed. Not sure how you fastened down the bottom plate to the concrete but without a doubt I’d be jacking up that shed a getting two courses of pressure treated lumber under the shed. I see you posted that the shed is full but if you plan on your shed lasting, empty it out and lift it several inches. You ARE going to be facing rot and deterioration around the bottoms of your siding. Your choice. A days works not or a ton of work later. Of the two courses, where your door is, I’d leave one course uncut across your door opening.
 

captain14

Well-known member
Joined
Dec 19, 2012
Messages
7,014
Location
Near College Park Maryland 20740
Agreed with cdestuck. Every shed or garage I’ve seen the rain splash back will
Eventually rot the siding. I elevated my shed on concrete deck piers and no rot after 27 years.

Mike.

Did you ever install a downspout on the gutter? You solution was a good idea.
 
OP
M

MikeF2316

Well-known member
Joined
Dec 29, 2012
Messages
9,605
Location
Thornhill, ON
Nice shed. Not sure how you fastened down the bottom plate to the concrete but without a doubt I’d be jacking up that shed a getting two courses of pressure treated lumber under the shed. I see you posted that the shed is full but if you plan on your shed lasting, empty it out and lift it several inches. You ARE going to be facing rot and deterioration around the bottoms of your siding. Your choice. A days works not or a ton of work later. Of the two courses, where your door is, I’d leave one course uncut across your door opening.

If you look in post #2 you can see the pressure treated 2x4s that are sitting on the concrete. (Actually sitting on the sill gasket.) I didn't know until I bought those 2x4s that pressure treated was now available in a dark brown colour. The shed kit came with untreated 2x4s for this job, and the base for the 12' walls would have been made up of an 8' and 4' piece.

I did protect the bottom of the siding with 2 coats of primer. And also visible in post #2 is a layer of aluminum flashing to stop critters from chewing their way in. So far the siding does not show any damage, but if worse comes to worse, I'll cut the bottom off and replace it with a PVC trim boards.

A pic of the doorway:

attachment.php


Agreed with cdestuck. Every shed or garage I’ve seen the rain splash back will
Eventually rot the siding. I elevated my shed on concrete deck piers and no rot after 27 years.

Mike.

Did you ever install a downspout on the gutter? You solution was a good idea.


I've been meaning to add the "downspout" to this thread. The 4" pipe on the fence takes the water from the gutters on my garage - which is uphill from the shed to the grass behind the shed. I put a T in that and sent the water from this gutter into it:

attachment.php


Note that the pipe has a slight pitch down as it moves away from the camera which is not clear in the pic.
 

Attachments

  • Doorway.jpg
    Doorway.jpg
    147.2 KB · Views: 520
  • Downspout.jpg
    Downspout.jpg
    98.4 KB · Views: 520
OP
M

MikeF2316

Well-known member
Joined
Dec 29, 2012
Messages
9,605
Location
Thornhill, ON
It's been very stuffy in the shed these days with all the hot weather. I added a vent on each gable end today. Plastic 6" round from Amazon.ca. My hole saw jumped on the side facing the house (pictured) so it's about 3 cm lower than I was aiming for and slightly off the peak centerline. Of course the side nobody will see was perfect.

attachment.php


attachment.php
 

Attachments

  • Vent1.jpg
    Vent1.jpg
    114.4 KB · Views: 368
  • Vent2.jpg
    Vent2.jpg
    149.5 KB · Views: 368
To avoid these ads, REGISTER NOW!
Top Bottom