
You are using an out of date browser. It may not display this or other websites correctly.
You should upgrade or use an alternative browser.
You should upgrade or use an alternative browser.
Sheetmetal **** welding gap?
- Thread starter wazzabie
- Start date
Legion Prime
Well-known member
You might have better luck posting this over in Fabrication & Techniques
readhead
Well-known member
The width of the wire is a good start. After a while you will get a sense of what works with your machine and your skill.
...or aluminumBack the gap w/ copper to control the heat
works for me
OP:
lots of vids on utube
I like this guy:
His page have a lot of info and you might find a vid that better answers your question.
And they sell these clamps to use if you have access to behind the panel:
https://www.harborfreight.com/****-welding-clamps-8-pc-60545.html
Looks like these maintain an 0.040" gap.Here's some more:
https://www.amazon.com/s?k=****+Welding+Clamps&ref=nb_sb_noss
just sayin'
Last edited:
^^ Goodole boy from East Coats Canada
Before you do anything with the panel your fixing, practice on a worthless fender. You will NOT be able to make it work the first 100 times and will likely destroy the panel..welding sheet metal with minimum distortion is tricky. Put the sheet metal patch over and attach with cleco clips or small screws. Then cut it out with a thin angle grinder blade. Hold it in place with sheet metal **** welding clamps. Tack weld one side, then the opposite side, moving back and forth giving it time to cool. Eventually you will have the whole panel completely welded one tack at a time. Dont try to run bead or you will over heat and destroy the panel.
Last edited:
Al Borland
Well-known member
- Joined
- Jan 20, 2016
- Messages
- 1,599
Fusion weld? Jeweller's torch and zero gap...
toolenthusiast
Well-known member
- Joined
- Jan 21, 2017
- Messages
- 723
Dude… what? It’s a little tricky to pick up GMAW, but it’s not rocket surgery.You will NOT be able to make it work the first 100 times
does anyone have the link to the YT vid a member put up in the last couple of months about fabricating and welding patch panels and the considerations for shrink and draw not only in the patch panel but in the adjacent area.
I wish I had book marked it as it was brilliantly done
I wish I had book marked it as it was brilliantly done
Slednut
Well-known member
Go here
 www.garagejournal.com
Welding in patch panels
I've got an upcoming project,I have a 1968 Chevy truck that I bought a few years back,my 14 year old son has had a fit for it ever since I got it,and I plan to restore it for his first ride. I have rebuilt the engine,and now I have to take care of some cancer spots here and there. I have a good...
www.garagejournal.com
On sheet metal it's trickier. That may be hyperbole, but the point is, don't try on anything you care about until you can weld sheet metal perfectly every try. If you get it the first try awesome, if it takes 100, then so be it.Dude… what? It’s a little tricky to pick up GMAW, but it’s not rocket surgery.
You CAN teach a monkey to mig weld. I've seen the results. I cut apart an exhaust to rework to fit my truck and how bad it looked from the outside was only rivaled by haw bad it looked INSIDE, crisscrossed by peices of mig wire. Its the only possible explanation.While it probably is possible to teach a monkey to MIG, more practice will make him a better welder.
The goal is minimum grinding and minimum mud.
And some of us are pickier than others.
That's why I suggest getting some old 60s or 70s fenders. Look for some free ones from somewhere. (As I mentioned, modern panels are not the same, and don't lend themselves well to welding on.) Try welding in patches. It will take you about 10 minutes to see what zero gapped patches look like vs a 1/32" gap from screwing the patch over, cutting it out with an angle grinder and then holding it with **** weld clamps. Play around with it. Read everyone's advise and try different things. Learn what works and what doesn't. Don't take out word for it, then jump into the real thing and destroy the part. The only thing that REALLY matters is, does it work.I have the two panels with zero gap. I thought a gap is needed to prevent warpage from heating. I was going to create a gap.
Keep in mind what happens when you weld and why panels warp. Consider for instance a piece of sheet metal weld a spot In the middle. The metal gets hot and wants to expand in the plane of the metal. It can't, but it's now soft because it's red hot. So it expands normal to the plane, it gets thicker. When it cools, it not only cc interacts, it gets harder so it can't just stretch back. That pulls the metal in around it and may warp the panel. From that, you can imagine what happens when you weld a seam. If there's a gap, it may help as the metal can expand I to that gap, and then contract without shrinking or thickening the metal. But warpage is often nearly unavoidable and the only answer is to get the hammer and dolly out and push the metal back where it goes.
Last edited:
mrjaw14
Well-known member
The other thing that should be mentioned is you probably won't' be welding solid beads as much as doing a lot of tack welds where you hop around a bit to limit the heat you put into the panels.
Last edited:
mrjaw14
Well-known member
crank it up!
Try it. Then file it down and get it to where you like the look. Honestly, if you get a technique down, that gets you from a panel with a hole and a patch, to a finished panel ready to paint without a hold, then your technique is "correct". If your worried about it cracking or breaking, but a section out and fold it over in a vise. If it doesn't crack your good. Most especially, auto body panels are usually not structural elements. If your doing something structural, you need to stick to known processes and techniques. It should be don't by something known to work, and has to look "correct" because if it doesn't LOOK correct, the process was not done right. With something cosmetic like a body panel, it's very much results oriented.On a test I'm finding that I'm not getting penetration to the back side. Is it ok to weld both sides?
toolenthusiast
Well-known member
- Joined
- Jan 21, 2017
- Messages
- 723
Stop spreading FUD. It’s not hard to GMAW on 20 gauge steel or aluminum body panels. You just need the right settings.modern panels are not the same, and don't lend themselves well to welding on
Can you do it? Maybe. Is it a good idea? Maybe. Does it "Lend itself well too it" I have a hard time justifying that statement. Its a ugly maze of gotchas and qualified statements.
When the first thing you have to do is ask a bunch questions about what exact sort of auto ody panel he's welding, and where on the car it is and what kind of steel it is, before you can even determine not if it CAN be welders but if it SHOULD be welded, I don't think you can say with any degree of credibility that it lends itself well. I guess your right to a point, if it's a modern panel that your fixing I guess maybe you need to practice on modern panel that's similar to what your fixing. But honestly, most modern panels can simply be swapped out unless your doing some sort of custom fabrication.
I do have to say, "with the right settings is a bit vauge. Perhaps some pictures showing how it's done and some more specific guidelines on exactly what he should set his welder to for modern 24 ga panels would be of help to him.

 www.fenderbender.com
When the first thing you have to do is ask a bunch questions about what exact sort of auto ody panel he's welding, and where on the car it is and what kind of steel it is, before you can even determine not if it CAN be welders but if it SHOULD be welded, I don't think you can say with any degree of credibility that it lends itself well. I guess your right to a point, if it's a modern panel that your fixing I guess maybe you need to practice on modern panel that's similar to what your fixing. But honestly, most modern panels can simply be swapped out unless your doing some sort of custom fabrication.
I do have to say, "with the right settings is a bit vauge. Perhaps some pictures showing how it's done and some more specific guidelines on exactly what he should set his welder to for modern 24 ga panels would be of help to him.
What You Need to Know about High-Strength Metals
Super-tough and lighter than ever, high-strength metals have been making their way into vehicles since 2006. Here’s what you need to know.
www.fenderbender.com
evintho
Well-known member
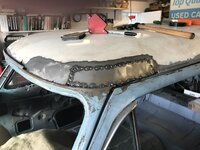
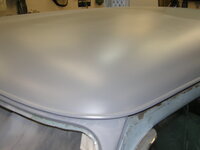
I always leave about 1/8" gap. It's never a perfect gap but a good rule of thumb. Any wider and you'll concentrate too much heat trying to weld the wider gap. After a few tacks, cool the metal down with compressed air. Initial tacks are 1" apart then the second round would be every 1/2" (always jumping around to control heat) then the 3rd & 4th rounds would be connecting the 1/2" gaps. I grind down the majority of the welds with a 3" die grinder then follow with a 36 grit disc on a 5" air sander. I'll complete the repair with a thin coat of Rage filler followed by epoxy primer. I repaired many rusted panels on my current '54 Ford project. Here's the tricky roof section.......


Last edited: