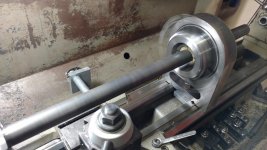
I figured you got it close then machined the bearing hole in perfect alignment by locking your steady rest body to the bed and putting a boring head in the chuck and slowly making the first 0.020” or so of the hole bigger and bigger until you had a perfectly placed circle to index on your mill. Or you could use a sensitive drilling attachment in the chuck and use a small center drill to put a small center mark on it.
A good idea but how do you "feed" with the boring head in the chuck and the part locked to the ways? The boring heads I'm familiar with can feed in the direction of increasing the bore diameter but the Z-feed is done with the quill or dovetail-way table.
The precision would matter to me if trying to place a center-hole in the stock mounted in the steady (for example if the bar can't be chucked thru the spindle and needs to be setup for turning between centers. If the height of the bearing is off (low or high) then the tailstock will drill a hole that's not concentric with the stock's OD. Granted its going to be finished between centers, removing this material, but many times you need the speed of "3 jaw" class of work, sort of preserving the original stock's OD.
I'm not trying to poke you here, I personally don't know a rock solid way and am always trying to see if someone else has figured out a better way.
I think one could bore an initial hole in the best place that could be laid out with a scribe, etc, and then use a test indicator mounted in the chuck to determine where the bore is "off" by comparing the 4 readings of a test indicator and adjusting the center position of the boring head in another machine by the same amount as the bore is then increased to final size. But that doesn't address placing the steady up next to the chuck vs. placing it 2-3 feet down the ways.