Here is a pictorial on how to shorten your driveshaft. You may need to shorten your driveshaft because of a ****** change, rear end change, or in my case because I had no driveshaft at all for the '65 Mustang I am working on. This may be one of those projects people shy away from because they think that there are special procedure, tools or black magic involved. I am here to tell you that I have shortened dozens of driveshafts this very way, and very very few have needed to be balanced.
The car I am working on had no driveshaft at all, so I went to the driveshaft vault and found a suitable core. In this case it was a Ford driveshaft out of an un-known vehicle, but it was a 3" O.D. shaft that had 3 1/4 yokes that would accept 1 1/16" U-joint cups, which is what I would be using. I inspected it for dents and rust or any other damage and deemed it suitable for shortening.
The first step is to measure for the new driveshaft. The procedure I use is to push the slip yoke all the way into the ******, and pull it out 1 1/4":
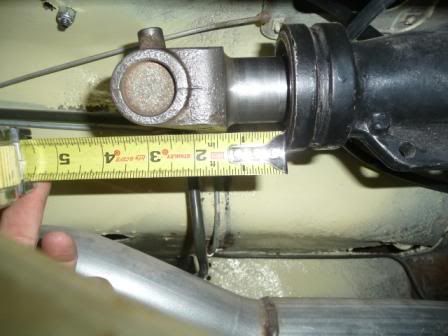
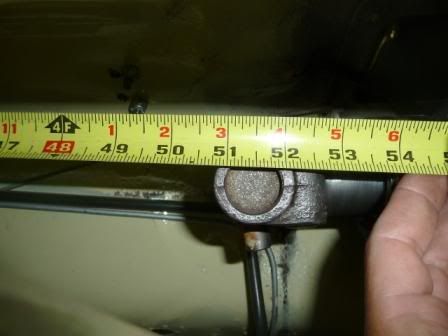
With the weight of the vehicle on the springs, I measure from the flat of the rear end yoke:

.......to the center of the front U-joint. In this case the measurement was 51 1/2":
We now need to cut one of the yokes off. I try to cut opposite of the balance weights if I can. I grab my 4 1/2" angle grinder with a thin cut off wheel and cut the edge of the weld towards the center of the shaft. You need to cut only as deep as the tubing is thick so in our case, slightly more that 1/16". It is better to cut a smaller amount than needed than to go too deep:


With the cutting done, the yoke should come right out with a couple of taps of the hammer. If it does not come out, you need to cut a little deeper:

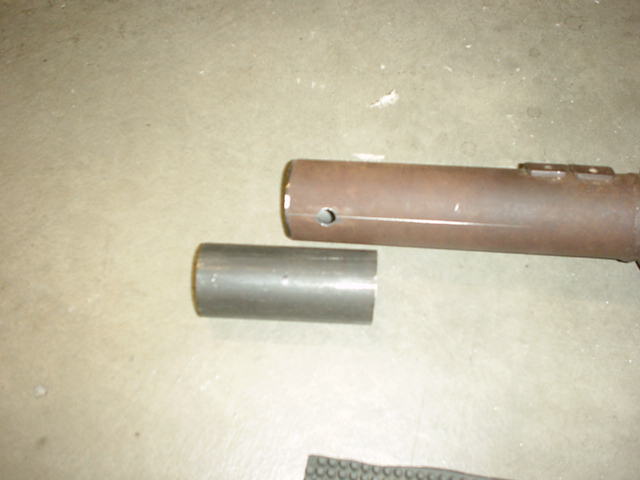
This is the yoke after is is out of the shaft:

We now need to shorten the tube. The shaft I was cutting was 56 " center to center, so 4 1/2" would need to be cut off. I use a thin wall tubing cutter because it cuts perfectly straight. You could use a cut off saw, but make sure that the cut is perfectly square:

Here is the tube after the cut and after de-burring with a file:

The yoke can now be tapped in to the tube and the center to center measurement adjusted. I like to leave about 3 /32" of a gap for welding into. I also place both flats of the end yoke on a flat surface to make sure that they are both in the same plane. You can adjust the yoke wherever you want it with a couple of hammer taps:

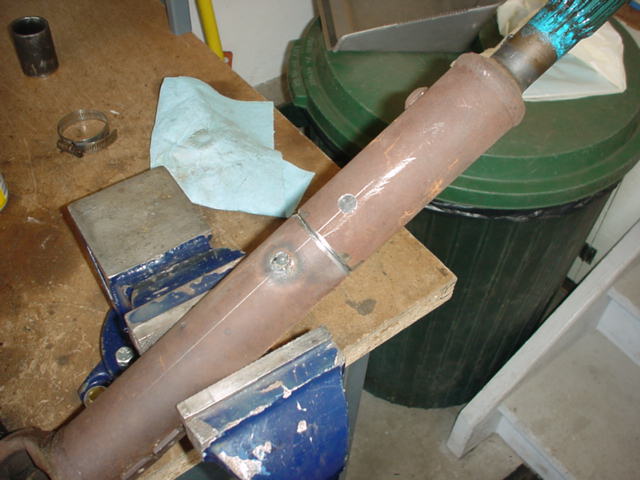
The front U-joint and yoke can now be installed, as well as the back U-joint. The driveshaft can now be bolted into the vehicle. At this point you might be thinking,"He forgot to weld the yoke on." I didn't forget, I do this so I can check the run out with a dial indicator. I mount a dial indicator on the rear end, and set it against the drive shaft tube to measure the run out. You can now adjust the run out with a few well placed hammer taps. I try to achieve the smallest amount of run out possible, in this case about .004" which is pretty good. With the driveshaft still bolted in the car, I tack weld it in four places:


The driveshaft can now be removed from the car in order to be welded. I would strongly suggest that you have at least a 185 amp MIG welder for the next step. If you are not comfortable with your welding skills, take it to someone who is qualified to weld it:


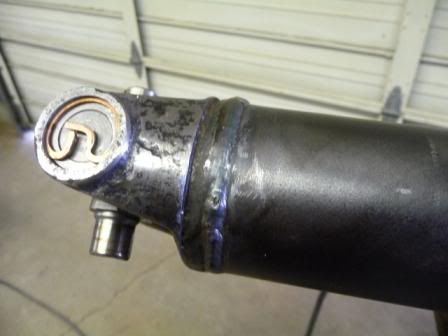
A little paint, and we now have a finished driveshaft. As I said before, I have shortened dozens of driveshafts just like I describe, and only a few have needed to be balanced, but even if you need one to be balanced, you have saved a considerable amount of money shortening it yourself:

The car I am working on had no driveshaft at all, so I went to the driveshaft vault and found a suitable core. In this case it was a Ford driveshaft out of an un-known vehicle, but it was a 3" O.D. shaft that had 3 1/4 yokes that would accept 1 1/16" U-joint cups, which is what I would be using. I inspected it for dents and rust or any other damage and deemed it suitable for shortening.
The first step is to measure for the new driveshaft. The procedure I use is to push the slip yoke all the way into the ******, and pull it out 1 1/4":
With the weight of the vehicle on the springs, I measure from the flat of the rear end yoke:
.......to the center of the front U-joint. In this case the measurement was 51 1/2":
We now need to cut one of the yokes off. I try to cut opposite of the balance weights if I can. I grab my 4 1/2" angle grinder with a thin cut off wheel and cut the edge of the weld towards the center of the shaft. You need to cut only as deep as the tubing is thick so in our case, slightly more that 1/16". It is better to cut a smaller amount than needed than to go too deep:
With the cutting done, the yoke should come right out with a couple of taps of the hammer. If it does not come out, you need to cut a little deeper:
This is the yoke after is is out of the shaft:
We now need to shorten the tube. The shaft I was cutting was 56 " center to center, so 4 1/2" would need to be cut off. I use a thin wall tubing cutter because it cuts perfectly straight. You could use a cut off saw, but make sure that the cut is perfectly square:
Here is the tube after the cut and after de-burring with a file:
The yoke can now be tapped in to the tube and the center to center measurement adjusted. I like to leave about 3 /32" of a gap for welding into. I also place both flats of the end yoke on a flat surface to make sure that they are both in the same plane. You can adjust the yoke wherever you want it with a couple of hammer taps:
The front U-joint and yoke can now be installed, as well as the back U-joint. The driveshaft can now be bolted into the vehicle. At this point you might be thinking,"He forgot to weld the yoke on." I didn't forget, I do this so I can check the run out with a dial indicator. I mount a dial indicator on the rear end, and set it against the drive shaft tube to measure the run out. You can now adjust the run out with a few well placed hammer taps. I try to achieve the smallest amount of run out possible, in this case about .004" which is pretty good. With the driveshaft still bolted in the car, I tack weld it in four places:
The driveshaft can now be removed from the car in order to be welded. I would strongly suggest that you have at least a 185 amp MIG welder for the next step. If you are not comfortable with your welding skills, take it to someone who is qualified to weld it:
A little paint, and we now have a finished driveshaft. As I said before, I have shortened dozens of driveshafts just like I describe, and only a few have needed to be balanced, but even if you need one to be balanced, you have saved a considerable amount of money shortening it yourself:
Last edited: