I think it's really cool the trim is mostly thick and wide and came from the property the house sits on . When the house is sold I bet the buyer will not even give a hoot about the trim.Now that's some cool history!

You are using an out of date browser. It may not display this or other websites correctly.
You should upgrade or use an alternative browser.
You should upgrade or use an alternative browser.
Show off your woodworking
- Thread starter LeonardY
- Start date
Bodj Built
Well-known member
I think it's really cool the trim is mostly thick and wide and came from the property the house sits on . When the house is sold I bet the buyer will not even give a hoot about the trim.
Unfortunately you're right. At least we know and can appreciate it. I'm a big fan of made in America. Made in your own yard is even cooler!
Was a labor of love. Would probably not do that again, way too much work. Trees get cut into firewood these days.Unfortunately you're right. At least we know and can appreciate it. I'm a big fan of made in America. Made in your own yard is even cooler!
willy3486
Well-known member
I am a hobbyist as well. But here are some items I made. Some I think I have posted in the past but since we have this thread I thought I would put here as well. Here is project I did a while back. After my dad passed I cleaned up his barn to help my mom out. She wanted it all gone but I saved these springs. I thought they looked like a set of springs from a horse drawn wagon seat. I had them over 20 years and finally go to where I could make a seat. I made a tray to slide out to store shoes.

When we set up our hobby building we wanted to set it up to look similar to a old country store. I wanted one of the old screen door that slaps shut many stores had. So I made one and got repo coke items from someone connected with the local coke distributor. I saved dozens of pictures I found of old screen doors and came up with this look. The door pushes with coke were all repos. The handle I made from scratch to look like a old door pull. I cut out a flat piece to make the back. Then I took a stainless steel rod I had and bent it like the handle. I then tapped each end and made holes on the dlat piece that it fit in. It is held in place with nuts on both sides of the metal plate.


The last piece is a porch swing. My wife and I had a room at a ship that was converted to a hotel. It had a swing that was so nice I wanted to make one. I took pictures from all angles and traced the curved bottom. I started to make one but really need some measurements. So the next year we went there again and took the pictures so we could write the measurements on the photos. I changed it to meet our needs and made a couple, one for the back porch and one for the front. I also made one for our daughter.

When we set up our hobby building we wanted to set it up to look similar to a old country store. I wanted one of the old screen door that slaps shut many stores had. So I made one and got repo coke items from someone connected with the local coke distributor. I saved dozens of pictures I found of old screen doors and came up with this look. The door pushes with coke were all repos. The handle I made from scratch to look like a old door pull. I cut out a flat piece to make the back. Then I took a stainless steel rod I had and bent it like the handle. I then tapped each end and made holes on the dlat piece that it fit in. It is held in place with nuts on both sides of the metal plate.
The last piece is a porch swing. My wife and I had a room at a ship that was converted to a hotel. It had a swing that was so nice I wanted to make one. I took pictures from all angles and traced the curved bottom. I started to make one but really need some measurements. So the next year we went there again and took the pictures so we could write the measurements on the photos. I changed it to meet our needs and made a couple, one for the back porch and one for the front. I also made one for our daughter.

LiveWire64
Well-known member
Here's some solid panel quarter sawn White oak doors I built. Ready for finishing now.

It was just a small project, but it turned out well and I'm very happy with it. I prefer large tables for computer desks, and the table needs to be adjustable for height. So I bought this table without a drawer as that was the best I could find at the time. But I wanted a drawer, so:

My BiL when he moved left me some nice walnut planks that were milled for flooring. So I planed them down to 1/2" and removed the mill marks. I thought about ebonizing the walnut, but instead I decided to go with a dark stain that I think turned out well. It is dark, but not so dark you don't see much of the grain. And the brown gives a nice contrast. The finish is several coats of lacquer sprayed over the walnut. Here is the drawer with its bling:

I'll grant you that the pen/pencil racks are too OCD, but they keep it organized and stop stuff from rolling around.
The next pic is the pieces before I assembled the drawer. This was the first time that I used an integrated front panel and sliding dovetails, and I quite liked it. I expect to make most of my drawers like this in the future.

Since the drawer just hangs off the table, I used side pieces that have through countersunk holes to mount to the table. Countersink depth was critical as I didn't want the screws to go too deep and screw up the table top. This required clamping the board to the table so it wouldn't climb up the countersink drill. The drawer front extends to cover the side pieces so you don't see their end grain.

And yes, my desk is a mess. And no, it's not possible to have too many HP calculators.")
My BiL when he moved left me some nice walnut planks that were milled for flooring. So I planed them down to 1/2" and removed the mill marks. I thought about ebonizing the walnut, but instead I decided to go with a dark stain that I think turned out well. It is dark, but not so dark you don't see much of the grain. And the brown gives a nice contrast. The finish is several coats of lacquer sprayed over the walnut. Here is the drawer with its bling:
I'll grant you that the pen/pencil racks are too OCD, but they keep it organized and stop stuff from rolling around.
The next pic is the pieces before I assembled the drawer. This was the first time that I used an integrated front panel and sliding dovetails, and I quite liked it. I expect to make most of my drawers like this in the future.
Since the drawer just hangs off the table, I used side pieces that have through countersunk holes to mount to the table. Countersink depth was critical as I didn't want the screws to go too deep and screw up the table top. This required clamping the board to the table so it wouldn't climb up the countersink drill. The drawer front extends to cover the side pieces so you don't see their end grain.
And yes, my desk is a mess. And no, it's not possible to have too many HP calculators.
snorvet
Well-known member
A couple of tool totes. Walnut and mahogany.

PirateTurner
Well-known member
Finished this one Monday. 10.5" dia. X 5" deep. Spalted and curled maple. Popcorned and flared lip. The more I worked on this the more happy I was with the grain patterns. Yorkshire and Briwax finish. C&C welcome.


Thank you for looking.
Thank you for looking.
I did much of the finished carpentry in the 2800 sq ft house I had built in 1996. I made all the trim and 2 stair cases from the rough cut oak harvested off the building site. I cut the oak trees down then hauIed the logs to a 100+ year old saw mill that was powered by a 250hp diesel. I was able to save some money by assisting the saw mill owner taking the boards off the mill as he sawed the logs. Per the Sawyer’s instructions on how to remove the boards from the mill, he explained that it was similar to a table saw except if you screw up, instead of losing a finger, the saw will cut you right in half!!!
Jerry Reed working at the sawmill.
zimman
Well-known member
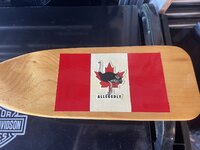
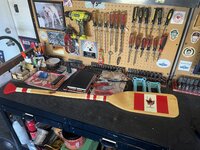
First try on the flag project. Had a stencil issue but this will be the prototype and I'll give it to a friend.
Zim


Zim
Who is Jerry Reed ?Jerry Reed working at the sawmill.
Not the guy working at this old saw mill.
Who is Jerry Reed ?
Not the guy working at this old saw mill.
He’s an American Actor and Country Musician.


Modagger
Well-known member
I thought this would be good way to start off.
Here are a few of mine.
Candle sticks
Craftsman style desk and hutch (Commission)
Jewelry box for my niece.
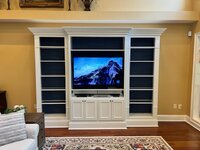
Built in for my brother and his wife.
Under bed storage (Commission)
Changing table for my niece.
Looking forward to seeing everyone's Woodworking.


Well LeonardYI thought this would be good way to start off.
Here are a few of mine.
Candle sticks
Craftsman style desk and hutch (Commission)
Jewelry box for my niece.
Built in for my brother and his wife.
Under bed storage (Commission)
Changing table for my niece.
Looking forward to seeing everyone's Woodworking.
You’ve gone and done it. Looking at your work, I have the same reaction that I had to guitar instruction videos on YouTube. Only then I was able to burn my guitars and turn my attention to woodworking. Problem now is that most of my tools won’t burn. “Scrapper!”.
My wife asked for a Mission style footrest and here is my pedestrian effort.
Beautiful work you do!
Be well
Jeff
Attachments


Well done.Well LeonardY
You’ve gone and done it. Looking at your work, I have the same reaction that I had to guitar instruction videos on YouTube. Only then I was able to burn my guitars and turn my attention to woodworking. Problem now is that most of my tools won’t burn. “Scrapper!”.
My wife asked for a Mission style footrest and here is my pedestrian effort.
Beautiful work you do!
Be well
Jeff
Thanks for the compliment.
My parents told me you can't get a degree in shop.
I proved them wrong and did. Along with a couple other degrees.
I didn't finish my PHD in Fine Art. But I was only doing that so my mom would have to introduce to her friends. "This is my son, the Doctor."
Bodj Built
Well-known member
Not necessarily fine woodworking, but using up the scraps from the built in project. Wife wanted a rocket ship bookshelf for the nursery. Baby’s coming soon, so knocked out out quick. Painting it was the hardest part. I used a black paint pen and RAM board templates for the borders between colors


Awesome!Not necessarily fine woodworking, but using up the scraps from the built in project. Wife wanted a rocket ship bookshelf for the nursery. Baby’s coming soon, so knocked out out quick. Painting it was the hardest part. I used a black paint pen and RAM board templates for the borders between colors
It's fine woodworking because you put your heart into it.
Congratulations on the new addition to your family

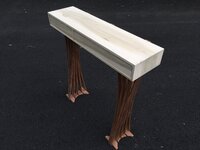

Poplar or maple top? I really like the design of the legs.Here’s a console table I made a couple years ago for my wife’s ”zen room.”
Jim C.
Modagger
Well-known member
Very nice!


Bulldog13
Well-known member
I like to make canoe paddles…I’d like to think my grandkids will be using them after I’m gone …knives and machetes are fun too…
Attachments


Modagger
Well-known member
To quote Artie Johnson: “very interesting”Tried something different on the lathe this week....

Perhaps I’ve led too sheltered of a life. What is it?
zimman
Well-known member
Needed some more closet space. Mini wardrobe.
First wood project for the house so learned a lot. Like a whole lot. LOL
You can't stain glue. LMAO
Zim
.jpg")

First wood project for the house so learned a lot. Like a whole lot. LOL
You can't stain glue. LMAO
Zim
Last edited:
Meursault74
Well-known member
Not a critique, just an FYI if you weren't aware. Edge banding can be used for a more refined look if so desired on plywood.Needed some more closet space. Mini wardrobe.
First wood project for the house so learned a lot. Like a whole lot. LOL
You can't stain glue. LMAO
Zim
And yes glue won't take a stain, been there done that.
zimman
Well-known member
I was thinking about the edge banding but you can't put a dress on a pig and expect great results. LMAONot a critique, just an FYI if you weren't aware. Edge banding can be used for a more refined look if so desired on plywood.
And yes glue won't take a stain, been there done that.
Next project coming up I will. Thanks for that.
Zim
To quote Artie Johnson: “very interesting”
Perhaps I’ve led too sheltered of a life. What is it?
It's called and emerging bowl. So I guess it can be used as a bowl.
GrayFlattop
Well-known member
Fired up the way-back machine to the Summer of 1979 when I took an intersession class "Workshop in Hand Woodworking Craftsmanship". I was on my way to becoming an Industrial Arts (shop) teacher back when that was such a thing. I finished my B.S. that year, but, well life happened and my career took some twists and turns, but I digress.
This was not a blow-off class at all. I think it was 3 weeks in length and started at 7:00 AM and ended at 4:00 PM. That said, there was no way to complete the assignment in the allotted time and I was frequently in the shop most evenings and Saturdays. To say it was immersive was an understatement.
Simple assignments - first, you had to make your own tools: Two chisels (we could purchase the metal component for the chisels in advance), one scratch awl, one marking knife, one mallet and one try square. We could use the wood lathe, but all else was done with hand tools. The other item we could purchase in advance was a dovetail saw and a scraper.

The chisels (above) I still use today from time to time. The only glue we could use was hide glue to fasten the hand cut leather "washers" to the top of the chisels.

Our squares were checked against the "Master's" machining square. The brass stock was cut with hand saws and finished with files. Also, a brass template for butterfly joints and dovetails was needed.
Once we had an approved compliment of tools it was on to the "final project - a toolbox.

It's a bit beat-up 46 years later and several moves, but here it is in all its glory. No glue was allowed. All the rabbets and dados were cut with the appropriate plane (you had to prove your "worthiness" to use the Master's tools by sharpening the plane irons to his satisfaction). The dovetails and butterfly joints were all hand-cut. Not intended to be a piece of fine woodworking, but rather a functional piece.

The tool box was also required to have an inset shelf:
One other fun fact, a minimum of HALF the boards had to be finished with hand planes. No sandpaper was allowed - just a plane and a scraper. The remaining boards had to have one face flattened by hand and we were allowed to use the thickness planer for the rest.
Out of a class of 12 or so, only three of us completed all the tasks in the time allotted. Our professor, er, "Master" was a superb task master. Also a disciplinarian - if he heard anyone swearing your punishment would be an hour of "holystoning" - meaning you were given several sharpening stones, a can of water and sent out to flatten said stones on the sidewalk in front of the building.
Honestly one of the best classes I ever took, obviously this is something that is unlikely to be duplicated. Sadly, our professor passed in 2017 - well into his 90's. I used to meet him at the Elks Club for drinks after the 3-week class was concluded. Great sense of humor and he liked a G & T at the end of the day.
If anyone is interested, I'll find and post the class "rules".
This was not a blow-off class at all. I think it was 3 weeks in length and started at 7:00 AM and ended at 4:00 PM. That said, there was no way to complete the assignment in the allotted time and I was frequently in the shop most evenings and Saturdays. To say it was immersive was an understatement.
Simple assignments - first, you had to make your own tools: Two chisels (we could purchase the metal component for the chisels in advance), one scratch awl, one marking knife, one mallet and one try square. We could use the wood lathe, but all else was done with hand tools. The other item we could purchase in advance was a dovetail saw and a scraper.
The chisels (above) I still use today from time to time. The only glue we could use was hide glue to fasten the hand cut leather "washers" to the top of the chisels.
Our squares were checked against the "Master's" machining square. The brass stock was cut with hand saws and finished with files. Also, a brass template for butterfly joints and dovetails was needed.
Once we had an approved compliment of tools it was on to the "final project - a toolbox.
It's a bit beat-up 46 years later and several moves, but here it is in all its glory. No glue was allowed. All the rabbets and dados were cut with the appropriate plane (you had to prove your "worthiness" to use the Master's tools by sharpening the plane irons to his satisfaction). The dovetails and butterfly joints were all hand-cut. Not intended to be a piece of fine woodworking, but rather a functional piece.
The tool box was also required to have an inset shelf:
One other fun fact, a minimum of HALF the boards had to be finished with hand planes. No sandpaper was allowed - just a plane and a scraper. The remaining boards had to have one face flattened by hand and we were allowed to use the thickness planer for the rest.
Out of a class of 12 or so, only three of us completed all the tasks in the time allotted. Our professor, er, "Master" was a superb task master. Also a disciplinarian - if he heard anyone swearing your punishment would be an hour of "holystoning" - meaning you were given several sharpening stones, a can of water and sent out to flatten said stones on the sidewalk in front of the building.
Honestly one of the best classes I ever took, obviously this is something that is unlikely to be duplicated. Sadly, our professor passed in 2017 - well into his 90's. I used to meet him at the Elks Club for drinks after the 3-week class was concluded. Great sense of humor and he liked a G & T at the end of the day.
If anyone is interested, I'll find and post the class "rules".
GrayFlattop
Well-known member
Here's some shop furniture that I built several years ago.
Side workbench and wall cabinet - mainly for sharpening and supplies:


Birch plywood - standard hot-melt edge banding on the upper cabinet. Solid Maple edge banding on the lower cabinet and bench top (1-1/8" MDF).
Here's a tool storage cabinet I built in the 80's:

Built (mostly) from offcuts from work at the time. Lumber-core birch plywood for the case and doors. Cuts were made to highlight the book-matching of the plywood. Solid Maple edgebanding on the doors.

Way too crowded / cluttered - I'm hoping to address that this winter. We had a ton of 19mm Baltic Birch drops, so I used that for the shelves. Overkill, but that part was essentially "free". More routers, belt sanders, etc. are stored below.
Side workbench and wall cabinet - mainly for sharpening and supplies:
Birch plywood - standard hot-melt edge banding on the upper cabinet. Solid Maple edge banding on the lower cabinet and bench top (1-1/8" MDF).
Here's a tool storage cabinet I built in the 80's:
Built (mostly) from offcuts from work at the time. Lumber-core birch plywood for the case and doors. Cuts were made to highlight the book-matching of the plywood. Solid Maple edgebanding on the doors.
Way too crowded / cluttered - I'm hoping to address that this winter. We had a ton of 19mm Baltic Birch drops, so I used that for the shelves. Overkill, but that part was essentially "free". More routers, belt sanders, etc. are stored below.
Meursault74
Well-known member
@GrayFlattop
Your posts reminded me of some shop storage drawers I made with dovetail joints to add to a previously made bench without drawers that I made several years ago. I used a dovetail jig and bit with a router, but had to hand finish with a sharp chisel to get some to fit just right. The drawers have no metal. The pulls I made and glued with dowels and the "slides" are wood (1x2 s) that ride in dado joints.
I remember when I took Woodshop in high school we had to make several joints with hand tools satisfactorily before we could start making anything. Oh, and before that we had to pass the written safety test with a score of 100%. That kept the knuckleheads out of the shop.
Firebrick43
Well-known member
12 year old son was awarded 4H grand champion in his age division and sweepstakes winner.
At state fair he received a blue and orange ribbon and had a perfect score at state
Son spent a lot of time block sanding it and the judges were astounded by the finish which was rattle can Watco lacquer. For several nights he stated his arm was going to fall off

At state fair he received a blue and orange ribbon and had a perfect score at state
Son spent a lot of time block sanding it and the judges were astounded by the finish which was rattle can Watco lacquer. For several nights he stated his arm was going to fall off
Modagger
Well-known member
Great job!
We need more 12 year olds working with their hands. The saying, “recession proof” has been replaced lately with, “A.I. proof”. Let’s see if A.I. can sand that.
Jeff
We need more 12 year olds working with their hands. The saying, “recession proof” has been replaced lately with, “A.I. proof”. Let’s see if A.I. can sand that.
Jeff
Firebrick43
Well-known member
Right now he wants to be a video game designer and we have been having very deep discussions on AI and outsourcing, and the related implications so he isn’t blind sided with reality in 6 years.Great job!
We need more 12 year olds working with their hands. The saying, “recession proof” has been replaced lately with, “A.I. proof”. Let’s see if A.I. can sand that.
Jeff
PirateTurner
Well-known member
Some recent turnings between green bowl rough outs. Two cherry bowls and one FISY wood:


Bowl 1: This bowl is about 8" od X 3 high, flared and curled (popcorn) rim. This cherry has some prominent grain structure. This is a crotch piece, but this cherry doesn't like to show off a flame. Compared to Carolina Black cherry which turns "crunchy", this wood turns smoothly across sap and heart. Satin lacquer, Beal buffed and Brazillian carnauba auto wax.


Bowl 2: Cherry bowl same wood, OD, and height as above. Flat rim is ~2.5" wide. The fam says this reminds them of a communion tray. I'm not seeing it. Shaped the bowl this way to save wood and cut out the grub trails and rot that damaged the tree. Same finish as above.
Vase 1, FISY wood vase:


FISY you ask? Yes, found-in-somebody's-yard. It's Helene wood. I don't know what species. First guess is maple but the grain has too much color and the yard is not known for maple. Approx 11" tall and 4.5" od at the mouth. The id is around 3.5". Satin lacquer finish.
C&C welcomed.
Thanks for taking a look.
Bowl 1: This bowl is about 8" od X 3 high, flared and curled (popcorn) rim. This cherry has some prominent grain structure. This is a crotch piece, but this cherry doesn't like to show off a flame. Compared to Carolina Black cherry which turns "crunchy", this wood turns smoothly across sap and heart. Satin lacquer, Beal buffed and Brazillian carnauba auto wax.
Bowl 2: Cherry bowl same wood, OD, and height as above. Flat rim is ~2.5" wide. The fam says this reminds them of a communion tray. I'm not seeing it. Shaped the bowl this way to save wood and cut out the grub trails and rot that damaged the tree. Same finish as above.
Vase 1, FISY wood vase:
FISY you ask? Yes, found-in-somebody's-yard. It's Helene wood. I don't know what species. First guess is maple but the grain has too much color and the yard is not known for maple. Approx 11" tall and 4.5" od at the mouth. The id is around 3.5". Satin lacquer finish.
C&C welcomed.
Thanks for taking a look.
Beautiful work!Some recent turnings between green bowl rough outs. Two cherry bowls and one FISY wood:
Bowl 1: This bowl is about 8" od X 3 high, flared and curled (popcorn) rim. This cherry has some prominent grain structure. This is a crotch piece, but this cherry doesn't like to show off a flame. Compared to Carolina Black cherry which turns "crunchy", this wood turns smoothly across sap and heart. Satin lacquer, Beal buffed and Brazillian carnauba auto wax.
Bowl 2: Cherry bowl same wood, OD, and height as above. Flat rim is ~2.5" wide. The fam says this reminds them of a communion tray. I'm not seeing it. Shaped the bowl this way to save wood and cut out the grub trails and rot that damaged the tree. Same finish as above.
Vase 1, FISY wood vase:
FISY you ask? Yes, found-in-somebody's-yard. It's Helene wood. I don't know what species. First guess is maple but the grain has too much color and the yard is not known for maple. Approx 11" tall and 4.5" od at the mouth. The id is around 3.5". Satin lacquer finish.
C&C welcomed.
Thanks for taking a look.
BigMike782
Well-known member
Very nice bowl.Popcorned and flared lip.
Thank you for looking.
What is popcorned and flare lipped?
PirateTurner
Well-known member
Curved in and out. Flared and cupped like a non-slip ridge on the outside and a curl on the inside so the popcorn goes in your hand and not on the floor.Very nice bowl.
What is popcorned and flare lipped?
RonnieC
Well-known member
Our woodturning club makes wig stands for women undergoing chemotherapy. Finished up two today. Cherry with wipe on poly finish.

PirateTurner
Well-known member
Really been roughing out billets and bowl blanks (once turned) lately and ruined most of them - another story about drying. But during some chill time, I turned these three. As always, C&C welcomed.
All three of these have the same finish: brown (black jar) Yorkshire grit, white Yorkshire grit, and Briwax


More FISY wood (found-in-somebody's-yard), post Helene. 8" dia. X 2" tall crotch piece. The flame looked burnt until the Yorshire grit pulled out the colors. Wood smells like pecan/hickory when turning but much smoother maple-like grain texture. The colors are all in the brown range so not a lot of excitement to me. Rim is curled (popcorn) and stepped.


Sycamore crotch, 7.5" dia. X 1.5" tall. More Helene wood. This one was much greener than I thought. Finished this Saurday. It's been twisting since I brought it inside.


Alabama walnut from SIL. This was part of a 38" dia. X 13" tall cookie. Full of shakes, cracks and rot. I cut the cookie in half and pulled three pieces from one half. This one is pretty bad and probably should have not been put on the lathe. The bowl is 7.5" dia. X 3.5" tall. Nice color but it won't hold water due to cracks. Rim is curled (popcorned) and flared.
Another billet is laying by the lathe and is now in the shape of a cookie. I'm trying to decide if I want to invest a half-gallon of epoxy into stabilizing it. A third one was stabilized with cactus juice in a vacuum chamber. I'm waiting for management to take a trip before I "cook" it in the oven to cure the juice. FWIW, it is 10.5" by 3" cookie and absorbed ~3/4 of a gallon of cactus juice. That means I've got ~$60-$70 invested in it and it will still need epoxy for the cracks. It was John K. Jordan who said, "Life is too short to turn crappy wood." I'm a slow learner. BUT, it's walnut.
Thanks for looking
All three of these have the same finish: brown (black jar) Yorkshire grit, white Yorkshire grit, and Briwax
More FISY wood (found-in-somebody's-yard), post Helene. 8" dia. X 2" tall crotch piece. The flame looked burnt until the Yorshire grit pulled out the colors. Wood smells like pecan/hickory when turning but much smoother maple-like grain texture. The colors are all in the brown range so not a lot of excitement to me. Rim is curled (popcorn) and stepped.
Sycamore crotch, 7.5" dia. X 1.5" tall. More Helene wood. This one was much greener than I thought. Finished this Saurday. It's been twisting since I brought it inside.
Alabama walnut from SIL. This was part of a 38" dia. X 13" tall cookie. Full of shakes, cracks and rot. I cut the cookie in half and pulled three pieces from one half. This one is pretty bad and probably should have not been put on the lathe. The bowl is 7.5" dia. X 3.5" tall. Nice color but it won't hold water due to cracks. Rim is curled (popcorned) and flared.
Another billet is laying by the lathe and is now in the shape of a cookie. I'm trying to decide if I want to invest a half-gallon of epoxy into stabilizing it. A third one was stabilized with cactus juice in a vacuum chamber. I'm waiting for management to take a trip before I "cook" it in the oven to cure the juice. FWIW, it is 10.5" by 3" cookie and absorbed ~3/4 of a gallon of cactus juice. That means I've got ~$60-$70 invested in it and it will still need epoxy for the cracks. It was John K. Jordan who said, "Life is too short to turn crappy wood." I'm a slow learner. BUT, it's walnut.
Thanks for looking