FrankLee
Well-known member
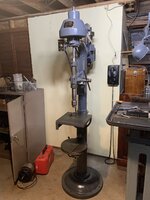
Nope. The feed stop bracket is resting against the head casting with the thrust nut just below it.By “extension”, it looks like the quill is down. As CRguy noted, is the handle locking it down?


Nope. The feed stop bracket is resting against the head casting with the thrust nut just below it.By “extension”, it looks like the quill is down. As CRguy noted, is the handle locking it down?
This is what I'm looking at.Is that lever on the left side a quill lock, it looks like one? I'd loosen that all the way, then see if you can get a wedge in the split of the head casting and try to spread it just a little so penetrating oil can get in there. Also, clean the rust off the exposed part of the quill before trying to get it to move up. It's also possible the gear spline on the handle is jammed where it fits in the teeth on the back of the quill. You should be able to pull the handle & shaft out to make sure that isn't the problem.
What the reason for an extension is beyond me.By “extension”, it looks like the quill is down. As CRguy noted, is the handle locking it down?
OK, that picture helps clarify things. The piece below the knurled ring (with the chuck below) appears to be some sort of add on. The quill is all the way up it appears. So - it won't move down? Did you check the lock handle on the other side?Nope. The feed stop bracket is resting against the head casting with the thrust nut just below it.
That Canedy Otto looks great. I have a Buffalo 16 with the sliding head and really like using it. It's so much easier to move the head rather than cranking the table up/down.Here's two of mine that I haven't included here.
The first I've had at least 20 years, a high speed sensitive drill made by the Muelhmatt Division of Hamilton Tool Co. patented in 1924. Hamilton made several different models of D/P for small hole drilling, the speed range of this one is about 800-8000 RPM. Chuck capacity is from drill size "80" to 1/4". This drill needed nothing other than replacement of some Gits oil cups and refinish in its original black wrinkle paint.
The second was given to me by a friend who was retiring and closing down his welding shop about 10 years ago. It sat unused in a corner of his shop for many years and then continued sitting unused in mine until recently. This is a Candy-Otto sliding head floor drill, probably 1920-30's vintage. It needed 4 new bearings, japanning was flaking off so I removed the remnants with a needle scaler, then polishing of machined surfaces and repaint. Its a good drill, one I don't really need but a remembrance of my friend who died about 2 years ago.
Tom B.


That is a beautiful restorationHere is my recently finished Atlas 63 Drill Press.
I detailed the full restoration in by build thread, but figured it was worth showing the final product in this thread as well.
Cross Post - Build Thread:
https://www.garagejournal.com/forum...ess-restoration-resto-mod.489265/post-9603494
Before and After:


You didn't tell us how much, but regardless that's a great score. I've become a big fan of Rockwell Delta machinery and I am extremely jealous of the drill press.Well, auction score... I didn't really need this but the auction was close and this has been on my want list as an ideal drill press.
It's dusty and dirty but digging through the piles of junk I found the roller extension supports that go with the white bracket on the base of the column.
I think the paper drill next to it kept some from bidding as they were the same lot. I dropped the paper drill off at the local habitat Restore on the way home...
These are the auction pictures, I got it home, blew some of the dust off and plugged it in and it ran really smooth.
Speed adjustment works, but didn't go all the way to the slower settings, after oiling and cleaning I'll try again.
I also got this guy at the same sale, worried with the motor just sitting there, but that is the original Rockwell, with a replacement installed and running fine. Plan is to fix the original motor and get it back in place.
Those 6 x 48 belt/disc sanders are great. I use mine frequently.Well, auction score... I didn't really need this but the auction was close and this has been on my want list as an ideal drill press.
It's dusty and dirty but digging through the piles of junk I found the roller extension supports that go with the white bracket on the base of the column.
I think the paper drill next to it kept some from bidding as they were the same lot. I dropped the paper drill off at the local habitat Restore on the way home...
These are the auction pictures, I got it home, blew some of the dust off and plugged it in and it ran really smooth.
Speed adjustment works, but didn't go all the way to the slower settings, after oiling and cleaning I'll try again.
I also got this guy at the same sale, worried with the motor just sitting there, but that is the original Rockwell, with a replacement installed and running fine. Plan is to fix the original motor and get it back in place.
How or how well? It uses a variable pitch pulley that is changed by the hand wheel. How well? They beat changing belts on a step pulley if you change speeds a lot.Nice DP! I wonder how the speed control works, and why they want you to run through all of the speeds daily?
Mike
Well.... it was really cheap:You didn't tell us how much, but regardless that's a great score. I've become a big fan of Rockwell Delta machinery and I am extremely jealous of the drill press.


Duro Metal Products made these for Montgomery Wards.Full length view, didn't come through on the first post
I actually have a Duro/Wards dp undergoing restoration right now. Special one with the speed reduction pulleys. I was super impressed by the quality of it. I would rate it right up with my Atlas daily user.Duro Metal Products made these for Montgomery Wards.
Wow. - I have never seen that version. You should post photos when you are done on vintagemachinery.orgI actually have a Duro/Wards dp undergoing restoration right now. Special one with the speed reduction pulleys. I was super impressed by the quality of it. I would rate it right up with my Atlas daily user.
I used .030 Superarc with 75-25 gas Lincoln Le 31 MP welder set on F and 5. I had an old cracked and messed up Delta table to experiment on. I have threaded bigger !/2’’ through holes and filled with cut bolts before welding on some repairs, others like this i welded up in layers. I also hit every other hole or so and let cool then hit the ones between them. Grind and repeat till full not letting it get too hot. Actually works well and so far no worries. Finish sanding with fine/fine 3M sanding blocks and wd40.That's not bad! What wire did you use?
I'm surprised that casting didn't break.I picked up a Craftsman 150 which came with a bent motor pulley. Pictures speak for themselves As to how i fixed that.

I have found them to be fairly malleable if not too stretched. You certainly have to work slow and take small taps if using a flat punch. With the bearing spitter you are capturing the rim in the bowl of the splitter and slowly working it back. The pressure is evenly distributed which must help. This has worked for me but i may make a steel disc of the appropriate size to go on the top side if its bent worse. I certainly shared your concern on the first one but thought, if they bend like that then there must be some softness there. The rule is slow and softly and no pliers!I'm surprised that casting didn't break.