To avoid these ads, REGISTER NOW!

Show us your sewing projects!

Whiskeymike

Well-known member
Joined
Oct 31, 2013
Messages
775
Location
Austin, TX
Take one of the range rover seats cover completely off and leave the other one on the seat, use the one you took off as a pattern and the one that's on the seat as a reference of where each panel should go and fit. They are usually mirror opposites so you will have to flip the pattern over for one set of covers.

There is a pretty decent walk through of making a pattern on Truck Tech. I just watched it a couple weeks ago, so it might be on demand for your cable provider or you can get it on the web.

https://www.powernationtv.com/episode/TT2016-17/project-basket-case-custom-interior

I specifically liked how he made the alignment lines and numbered them as I recall and then you transfer that to your cut outs for alignment. Being a newb to this, I wouldn't have considered that before I tore it apart.
 
To avoid these ads, REGISTER NOW!

Empty Pockets

Well-known member
Joined
Sep 21, 2015
Messages
4,942
Location
Rural New York
It's not much, but my 1st attempt at sewing, 2 wrench rolls for my CM USA Stubby wrenches
 

Attachments

  • Box 4, Drawer 6, Stubby Wrenches.jpg
    Box 4, Drawer 6, Stubby Wrenches.jpg
    146.8 KB · Views: 117

bczygan

Well-known member
Joined
Nov 4, 2009
Messages
22,002
Location
DETROIT! Arsenal of Scrappers
There are some mad skills on this sewing thread!

I'm just thankful to be able to repair things for a change.

I have a favorite wool overshirt I have been wearing when a winter coat would be overkill.

It lost a button, and then a couple more came off, which I was able to catch. It had a spare sewed into the tail, so I took all 3 and just sewed them on this morning. Then I noticed that all the other buttons were literally hanging on by a thread (Sewing pun intended), so resewed them too!

20161213_063326_zpsfphrpgmu.jpg~original


Bill
 

bczygan

Well-known member
Joined
Nov 4, 2009
Messages
22,002
Location
DETROIT! Arsenal of Scrappers
It's like anything else, practice makes perfect. When I first looked into sewing ripstop / silnylon, I found a ton of light/fast hikers messing with it and spreading a lot of FUD about how difficult it was to work with. Coincidentally most of that was from folks selling products they'd sewn with that material, to other hikers.

Id does have a tendency not to feed correctly. The foot pulls the lower layer but the top layer doesn't stay aligned well. I learned to hold the fabric before and after the needle under some light tension, then feed it thru at the machine's pace. After that it was easy.

And I also spent a lot of time at the beginning just sewing seam after seam in some fabric scraps. Most of a spool of thread just running practice. One piece looked like a gaudy pinstriped suitcloth.

stitchery06_zps58612397.jpg


The bit above about holding purses reminds me of one of the more amusing aspects of sewing. It's walking into a fabric or craft store for something and surprising the sales staff again and again by knowing what I'm after and where it is located in the store. They look at you like you are an alien. Or an invader. I take extra delight in dragging my knuckles as much as possible on such visits. Really confuses people. 'No, I'm not looking for my wife, I'm looking for some canvas duck cloth in a green shade.' was a favorite. Then there was the time I went in around halloween with some very specific fabrics in mind, had the bolts under my arm and was standing at the wall of zippers and buttons, looking for something particular. The staff were actually whispering about me.

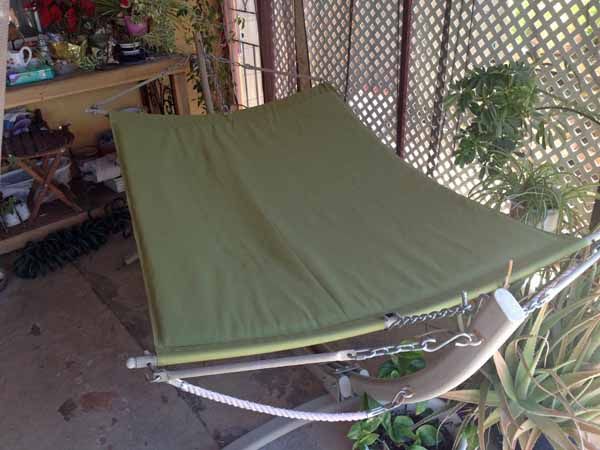
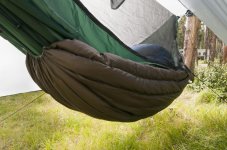
[can't seem to find my hammock pix]
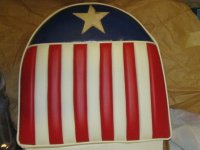
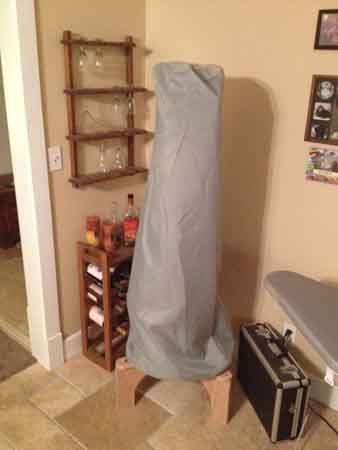
found'em

hammock01_zpswlhtbpyp.jpg
hammock02_zpscblyyw2p.jpg
hammock03_zpserz9veje.jpg
hammock09_zpsajwvtkp9.jpg


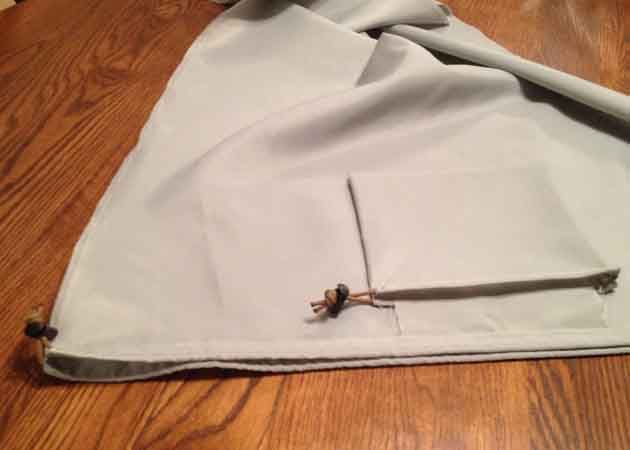
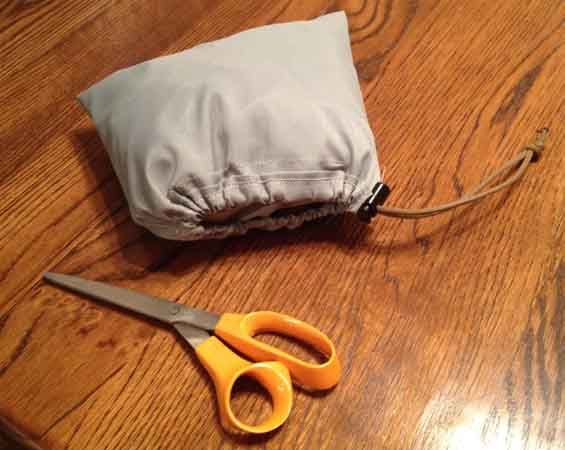
8" dobsonian telescope cover, with integral stuff-sack. The money I saved on this alone paid for the sewing machine.

cover10_zps124920dd.jpg
cover08_zpscf69c0f6.jpg
cover09_zps9823c3dc.jpg

I enjoyed educating the staff at JoAnn Fabrics, about a couple of things.

"Yes, you do carry automotive foam backed headliner material in 3 colors, as well as the proper spray adhesive." "And thread IS measured by weights, it's noted right here on the end of the spool." Had 3 clerks confused with that one. Just don't get me started on needles.....!

Bill
 

Keyblazer

Well-known member
Joined
Jul 30, 2009
Messages
1,471
Location
Irvine, CA
I'm enjoying this thread!
Buttons, hammocks... its all good!

My Motorhome retrim project took a step forward today, with the main materials arriving.
I need to get over to the MH, and get some solid dimensions, to confirm my material needs, but I have:
1/ 3 x whole skins of Dark Brown... its like "Expresso" in artificial light, but I will take some more pics tomorrow in daylight. They measure 53.2sqft, 57.6sqft, and 60.1sqft, so thats almost 160sqft total.


2/ 1x Pecan/Creme whole skin. Approx 59sqft.(Background brown, is my home sofa, so ignore that.)


Together, the two colors look good to me, with a nice contrast.


My plan is to do the 2 Range Rover seats with brown bolsters/sides, and the Pecan as a center color... kinda like this...


I am concerned about how much material I ordered... I made a rough estimate of 42sqft for the sofa, 40sqft for the 2 Rover seats, and 48sqft for the dinette. But I need to check.
Can anyone chime in on how to be sure I have enough?
 

Murphy'sSidekic

Well-known member
Joined
Aug 6, 2012
Messages
80
Location
Wilmington, MA
Here's a modest contribution of mine. I bought a Husqvarna sewing machine at a flea market over the summer for $20 to make beanbags for ********. I enjoyed the project and have dabbled on a few other items since then (pouch to hold my micrometers, etc.). For Christmas I decided I would challenge myself to make a nice waxed canvas pouch to go along with the wireless earbuds I'm getting my brother. He's always out welding in his garage, so I thought a rough-and-tumble pouch that was water resistant would be a good choice.

I made the pouch using two colors of canvas. I sewed on the velcro first to hide the seams, and then sewed the two pieces together inside out and reversed them to make a clean edge. Then topsewed the two sides. I finished it with Otter Wax fabric wax. It's drying now so I'm not sure how the wax will come out. I think the pouch came out pretty good for like my third sewing project, especially because I have no idea what I'm doing. Anyone else use the Otter wax and what were your results?

IMG_2885.jpg

IMG_2886.jpg

IMG_2887.jpg

IMG_2888.jpg

IMG_2889.jpg
 

CatSplat

Well-known member
Joined
Aug 4, 2014
Messages
127
Location
Alberta
I usually sew on a '51 Singer 301 shortbed I snagged at a thrift store, it's an amazing and smooth machine, although nowhere near some of the industrial units you guys are running. I've also got a Necchi BU Nova of about the same vintage for when I need a zigzag.

I primarily make hammock-related items as I do a fair amount of backcountry hiking and a hammock & tarp is my shelter of choice.

I got started making silnylon tarps and inline stuff sacks (aka Bishop bags) and then moved on to making insulation gear. The big brown thing is a down-filled, differential-cut underquilt, they keep your backside warm in a hammock as a sleeping bag just gets squashed beneath you and doesn't do much insulating. Hence, the underquilt goes outside of the hammock and maintains its full loft, thus keeping your **** from freezing!

I'm still very much a beginner but I'm slooooowly getting better, haha.
 

Attachments

  • D3C_8688.jpg
    D3C_8688.jpg
    102 KB · Views: 92
  • D3C_8766.jpg
    D3C_8766.jpg
    94 KB · Views: 92
  • D3C_8251.jpg
    D3C_8251.jpg
    103.6 KB · Views: 78
  • D3C_8304b.jpg
    D3C_8304b.jpg
    135.6 KB · Views: 84
  • D8C_6230.jpg
    D8C_6230.jpg
    140.6 KB · Views: 91
Last edited:

Keyblazer

Well-known member
Joined
Jul 30, 2009
Messages
1,471
Location
Irvine, CA
I have a Sewquiet 6000 like the link below, it is adjustable from 1 stitch per minute up to 3300 or so.

http://www.ebay.com/itm/Reliable-Co...486465?hash=item210b1ec441:g:ayQAAOSwImRYLb72

Hey,
In reference to your motor...
So, as stated, I dialed mine down to Low on the speed pot...
It still does not seem right.
It makes a humming noise as it starts moving and the differnce between moving slow and too fast is like 1/8" of pedal travel.

Maybe its the motor, maybe its an adjustment thing, or maybe its me... I dont know!

I want my machine to sew sloooow like this guy on Youtube!
 
OP
N

nine4gmc

Well-known member
Joined
Mar 24, 2012
Messages
14,357
Location
Dallas
I'm not familiar with your setup so it may be the motor. Can you get a clear pic of the pedal and rod connecting to the motor, along with the motor? Also, you may want to try turning the speed pot up just a tiny bit and try again. Keep turning it up slowly until the humming stops and the machine starts to creep. You will still need to be sensitive on the pedal but it should sew sloooooooow. Mine just humms when it is completely all the way down too.
 

Carroll B

Active member
Joined
Dec 19, 2016
Messages
33
Location
Baltimore, MD
Nothing fancy but now I always know where the remotes are and have a place to hold the snacks I seem to need while watching TV. I "sandwiched" the cloth between two pieces of 3/8" plywood that make up the base.
 

Attachments

  • organizer FB.jpg
    organizer FB.jpg
    95.9 KB · Views: 128

Forever Fixin

Well-known member
Joined
Jun 1, 2014
Messages
138
Location
MN
Picked up my first machine due to excess "mule strap" that was too good to throw away from work. 1 1/2" nylon webbing with no ends on it. Using a Singer Heavy Duty 4432. Wasn't sure it would hold up, but it's been GREAT. Probably have more than a 1000 yards of Coats outdoor T90 thread thru it. Make various lifting slings and tie downs for around home. They sure do hold up. Here is my tractor lifting a ford explorer off of a strap I've sewn up. Only limitation was the tractor's hydraulics. Anyone have any tips for structural sewing?

0712151440-00 by archaboo2, on Flickr
 
OP
N

nine4gmc

Well-known member
Joined
Mar 24, 2012
Messages
14,357
Location
Dallas
I haven't done any real structural sewing, just the occasional seat belt but I sew them to factory specs. I do know there is a ratio of threads per inch(stitch length) for particular jobs and materials, I do not know where to look it up though.
 

Keyblazer

Well-known member
Joined
Jul 30, 2009
Messages
1,471
Location
Irvine, CA
Little Saturday job I decided to do.
One of the Kids has a 2000 Subaru Outback, that has seen better days.
The sun visors are falling apart with crumbling dust and strings of material hanging off them...


Pulled them off, and retrimmed them with some roof liner material I had from doing the GF's Range Rover last year.
Not a perfect color match, but OK for now.
I made some mistakes, and learned a lot from them, but it was a fun project and the Boy is happy that they look better!

Split them along the seam... they are glued together I think.


Stripped off the crumbling original material.


Cut new material to size.


Sprayed glue on both sides, and put them together.


Folded the edges over...


Glued the 2 halves together with hot glue.


Stitched....


Like I said, it ain't perfect, but it was my first time on this... and the kid is pleased that foam crumbs dont drop on his dates...:)


I might redo them in vinyl next time.
 
Last edited:

Outlawmws

Well-known member
Joined
Aug 9, 2011
Messages
39,131
Location
The Badlands
Picked up my first machine due to excess "mule strap" that was too good to throw away from work. 1 1/2" nylon webbing with no ends on it. Using a Singer Heavy Duty 4432. Wasn't sure it would hold up, but it's been GREAT. Probably have more than a 1000 yards of Coats outdoor T90 thread thru it. Make various lifting slings and tie downs for around home. They sure do hold up. Here is my tractor lifting a ford explorer off of a strap I've sewn up. Only limitation was the tractor's hydraulics. Anyone have any tips for structural sewing?

0712151440-00 by archaboo2, on Flickr

I haven't done any real structural sewing, just the occasional seat belt but I sew them to factory specs. I do know there is a ratio of threads per inch(stitch length) for particular jobs and materials, I do not know where to look it up though.

Man there is a dearth of info on the "Box X" pattern typically used!

A couple of standards on the webbing and the testing requirements, and ONE comment about a MINIMUMof 6 stitches per inch ,

The most useful (and most thoroughly disclaimered" site was here: http://electricant.net/projects/testing/testing.htm
 
To avoid these ads, REGISTER NOW!

Keyblazer

Well-known member
Joined
Jul 30, 2009
Messages
1,471
Location
Irvine, CA
I hope I never need to sew anything structural!

A quick update on my Airstream retrim project...
More leather arrived this week, and now I have 5 matching full hides, smallest is 53sqft, and largest is over 60sqft!
I think it works out at 280sqft of this Dark Brown leather...
Here is one..


Here they all are lined up...


Trying to figure out how I want it to look...
So, here are some test pieces...

The Brown leather with contrast double stitching..


Tried it in place on our home sofa to get a better idea of how it would look in reality on a joint/seam..


Then tried the Brown/Pecan leather with a single sided contrast stitch as I would do if it was a center panel..


Then tried some upholstery material I bought a while back..


:)
 

CatSplat

Well-known member
Joined
Aug 4, 2014
Messages
127
Location
Alberta
This is what I've found on my search for structural sewing. I figure it's like a knot. If you can't tie a knot, tie a lot! Hence the 1000+ yards of thread and lots of stitches per inch.

Pretty much! The fancy designs just let you get maximum strength using smaller amounts of time and thread. For structural webbing I use the lengthwise zigzag, but for attaching thinner webbing to fabrics I generally use a loose bar-tack, mainly because I like the look of it.
 

MadMoose

New member
Joined
Jun 2, 2011
Messages
1
Here are some holsters that I made recently. The are completely handmade and hand sewn. I started by making a pattern from scratch, cutting the leather, staining, glueing, stitching and then molding. After completely dry they were sealed.IMG_0192.JPGIMG_0194.JPG


Sent from my iPad using Tapatalk
 

rockettgpw

Well-known member
Joined
Jun 20, 2013
Messages
1,500
Location
Sunshine Coast Qld down under
What a great thread, there is some very nice work here and I hope that there is more to come.
I was taught to sew by my Mum as a little bloke, It never seamed ( see what i did there?) girly to me it was just another way to build and fix things. mainly fiddling around in childhood but in high school I chose textiles and design and made my first piece of clothing, a hooded jacket from drill cotton, I got good marks for it, and still have it.
When I started with the recent ex I made pyjamas and a Roman blind for her and some fancy dress outfits. And yes even a PURSE to go with one outfit.

As my avatar suggests, I'm into army jeeps and not being happy with the locally supplied seat cushions, I had a brain fart and found some heavy U.S. army surplus canvas and jagged a walking foot Seiko nearby for $200
Still haven't got to the jeep seats but the Seiko, although well worn, has helped me knock out a bit of work, including fitted tarps for my trailer and ute, beds for the dogs, tool rolls, garden tool sheaths even little pouches to hold the dog poo bag rolls on their leads.
Of course you need to have some stock, I managed to score 70+ end rolls of various grades of Australian military camo in nylon and canvas, shortest about 10 metres.
I have planned a sleeping bag with A/C duct insulation for padding but the thickness is a challenge to fit through the machine, need to nut this one out.
One one my favourite results have been covers for my hercus (think southbend) machines made from a solid type of shade-cloth. Its nicely stiff enough to hold its self up as you position it over the bit and bobs of the machines.
Some jobs work out almost professionally but others.. well I'm just glad the dogs are not judgemental.
I know it didn't happen without pics, Ill try to get some one day....
 

cgrutt

Well-known member
Joined
Mar 4, 2016
Messages
8,188
Here are some holsters that I made recently. The are completely handmade and hand sewn. I started by making a pattern from scratch, cutting the leather, staining, glueing, stitching and then molding. After completely dry they were sealed.IMG_0192.JPGIMG_0194.JPG


Sent from my iPad using Tapatalk

Very nice! I want to make a "cowboy" holster & belt for my son for the CO2 Peacemaker Santa left for him under the xMas tree this past December...
 

gahrajmahal

Well-known member
Joined
Dec 12, 2008
Messages
2,520
Location
Cincinnati, Ohio
Nine4gmc, excellent thread. Thanks for starting it! It has been an excellent read and brings a bit of nostalgia to me as I got my automotive start in high school auto body. My first job was for a local car dealer that decided to get into the lucrative van customizing business. I started in the paint shop but spent plenty of time in the upholstery shop too. I didn't sew any for the customers, but the women of the shop did help me to sew some of my own projects like motorcycle seat covers and adding folding arm rests to my jeep. I installed hundreds of door panels, stuffed foam into bench covers and installed and trimmed vinyl tops, tonneau covers, and other trim items using vinyl, leather and fabrics. We worked on cars, trucks, motor homes, boats and a helicopter or two. I even built my own sofa in my van using barn beams for side frames, hand tied springs and button tufted cushions.
I've been out of the car business for many years but installed ready made seat covers in the Chrysler in my avitar after rescuing it from upholstery jail where the joker I hired to do the interior made off with my $$ without doing the work.
I'm going to have to look into these Craigslist deals you all have mentioned. It never hurts to polish off rusty skills.
 

Keyblazer

Well-known member
Joined
Jul 30, 2009
Messages
1,471
Location
Irvine, CA
This is the original Motorhome seat on the left and the Range Rover seat I intend to put in its place.


So, this will be my first ever attempt at a seat cover...

Original Range Rover seat base cover stripped and parted ready to pattern.


Pieces patterned, cut to size and glued to foam.


Center and sides stitched.


Side panels added, and test fit on foam.


Rear panel added and a decorative/reinforcement stitch added.


Hog rings in place, but not fully stretched, its looking good... I think.


Lines not perfect around the corners, but I will try to do better with the next one...


Also will use a dark brown thread for the joint so it doesnt show!
 

K13

Well-known member
Joined
Oct 24, 2007
Messages
2,223
Location
St. Albert, AB Canada
This is the original Motorhome seat on the left and the Range Rover seat I intend to put in its place.


So, this will be my first ever attempt at a seat cover...

Hog rings in place, but not fully stretched, its looking good... I think.


Lines not perfect around the corners, but I will try to do better with the next one...


Also will use a dark brown thread for the joint so it doesnt show!

If you use a shorter stitch length for the inner stitch it won't pull apart as much as it is on some of your seams. Then go back to the longer stitch length for the decorative stitching.
 

Lhorn

Well-known member
Joined
Sep 17, 2008
Messages
1,487
Looks great to me. Upholstery seems like painting your own car. Anyone can do a disc brake conversion or new exhaust but sewing your own seat covers or painting your own car is "next level" stuff. Good work. Gotta admit I've fooled around on my daughters beginner sewing machine to see if I could sew a straight line. Not yet.
 

Lhorn

Well-known member
Joined
Sep 17, 2008
Messages
1,487
Is that type of seat material (or vinyl, leather etc) forgiving of mistakes? In other words with fabric if you make a mistake you can rip apart the seam seam and the resew it and you would never know the difference. With that type of material would the holes from having sewn it before show up?
 

Keyblazer

Well-known member
Joined
Jul 30, 2009
Messages
1,471
Location
Irvine, CA
Its leather, so, yes, I would assume the holes would show if your mistake made them visible.

Anyone thinking about this, I suggest watching this guy...

The dark brown thread arrived today, so I will be pushing on...
 

MichaelBikel

Well-known member
Joined
Apr 11, 2015
Messages
379
Location
CT
This is more leather working but I thought I would contribute too. My first real leather project was the watch band. The sheath for my folding saw was wet moulded and saddle stitched together. The work in progress is a purse for my girlfriends birthday, which has been wet moulded and will be saddle stitched as well.

IMG_6314 by MichaelBikel, on Flickr
IMG_6448 by MichaelBikel, on Flickr
IMG_6432 by MichaelBikel, on Flickr
purse by MichaelBikel, on Flickr
 

bgarrett

Well-known member
Joined
Feb 11, 2006
Messages
4,393
I made a seat for my Goulding sidecar. This is the seat back, the seat cushion is red/white stripes only.
 

Attachments

  • sidecarseat.jpg
    sidecarseat.jpg
    50.7 KB · Views: 61
Last edited:

ndnchf

Well-known member
Joined
Jan 9, 2012
Messages
1,556
Location
Fredericksburg, Virginia
I haven't done it yet, but I need to make two bags to hang on the exhaust ports of a Baldor grinder to catch the grindings. I ordered pair of fire retardant Nomex long johns off Ebay. When they arrive, I'll cut them up and sew into two bags.
 

bgarrett

Well-known member
Joined
Feb 11, 2006
Messages
4,393
^^^ What yr is yer ndn chf? :) Mine is a 1934
 

Attachments

  • indianchief.jpg
    indianchief.jpg
    140.7 KB · Views: 104

ndnchf

Well-known member
Joined
Jan 9, 2012
Messages
1,556
Location
Fredericksburg, Virginia
^^^ What yr is yer ndn chf? :) Mine is a 1934

I've had a lot of indians over the years; 1916 Powerplus, 1928 Chief, 1929 Scout, 1930 Four cylinder, 1937 Sport scout, 1939 Four cylinder, 1949 Scout, 1947 chief, 1948 chief. Maybe a couple more I can't recall at the moment. They are all in other hands except the 28 Chief. That one is in pieces for restoration.
 

slodat

ALLIANCE MEMBER
Joined
Feb 6, 2010
Messages
3,679
Location
Central-ish, WA
I am concerned about how much material I ordered... I made a rough estimate of 42sqft for the sofa, 40sqft for the 2 Rover seats, and 48sqft for the dinette. But I need to check.
Can anyone chime in on how to be sure I have enough?

A good rule of thumb, when using high quality hides is 18 sqft = 1 lineal yard of typical roll goods which are 54" wide. This is what I use. The last thing I want is to run out of material in the middle of a project.
 
To avoid these ads, REGISTER NOW!
Top Bottom