Chaz
Well-known member
Here's a crappy video of the pond down back.. 20,000 gallons altogether.
Last edited:

Progress:
Bill
 .
.


Chaz, the skull is way cuul and I’m always blown away with your property.
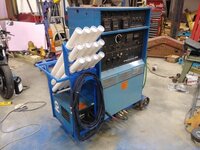
Soooo you guys ever seen an air compressor with a roll cage?.....ya me neither.
I’ve got a project underway that requires a little bit of air plus I needed to make it fairly idiot proof for moving around the project. This is a 80gl 7.5hp unit that’s 100% duty cycle rated and 24cfm, just enough to do what I needed done.
I kinda tossed this together in a day so I didn’t take any progress pictures. But I figured just how much detail is needed for a big rectangle anyhow. The 2” tubing is .120 wall and the 1” is .090. All the regulators are 3/8” and so far it’s doing everything I needed done.
Well you are certainly full of hot air... no wait that’s not is... you are a blow hard... nope... that’s a big .... no can’t say that either...
Nice compressor! [emoji51]
Sent from my iPad using Tapatalk Pro
Tanks!
Looks like your getting the hang of it...another 2000+ hours of practice will pay off in the long run
Nice work. I am interested in seeing the completed project.
ford 8.8 axle swap on the jeep
Chaz, the skull is way cuul and I’m always blown away with your property.
Soooo you guys ever seen an air compressor with a roll cage?.....ya me neither.
I’ve got a project underway that requires a little bit of air plus I needed to make it fairly idiot proof for moving around the project. This is a 80gl 7.5hp unit that’s 100% duty cycle rated and 24cfm, just enough to do what I needed done.
I kinda tossed this together in a day so I didn’t take any progress pictures. But I figured just how much detail is needed for a big rectangle anyhow. The 2” tubing is .120 wall and the 1” is .090. All the regulators are 3/8” and so far it’s doing

Nice. Looking forward to seeing it finished up.
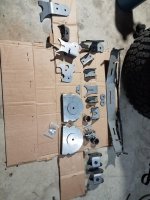
What brackets are you using? Ballistic Fab, Artec, Iron Rock, A to Z, Rusty's or some other shop's brackets?
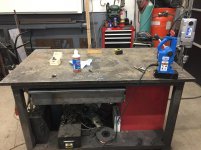
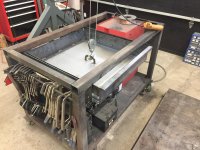
With not much on the go in the shop I finally have time to do the small odds and ends that I've been wanting to do for a while. I bent up a 30" x 30" x 6" deep drawer made from 11 ga. steel with 400lb ball bearing slides so I can hide away the clutter from the bottom shelf of my welding table. Also 4 years after building the table I'm finally getting around to bolting the 1.25" plate to the frame.
With not much on the go in the shop I finally have time to do the small odds and ends that I've been wanting to do for a while. I bent up a 30" x 30" x 6" deep drawer made from 11 ga. steel with 400lb ball bearing slides so I can hide away the clutter from the bottom shelf of my welding table. Also 4 years after building the table I'm finally getting around to bolting the 1.25" plate to the frame.
Nice work on the drawer. How do you like the Hougen 904 mag drill?
How is your liner?

It sits in the yard as yard art. My whole place is kinda weird. I live in a barnlike building with a stone silo, I have a pond and waterwheel down back. The pumphouse is disguised as an outhouse, Theres an imaginary dog in the doghouse and so on.... Here's some pics...........
Your place is AWESOME!
I always liked wrought iron fences, so I decided to put one around the new property.
Shitodear what a huge project it was. I cant even remember how many spools of welding wire, and how many deliveries the steel company made over that year and a half.. Boring, life sucking work. But what a great fence it turned out to be... well over 1000 feet of fence. Here's a few photos.
My biggest obstacle for me to getting better weld quality had nothing to do with wire or the machine, but light; or lack of it. If you can't see your work piece, your weld quality will suffer. As we age, our eyesight diminishes, so I use a magnetic worklight on the piece, which helps see the piece better prior to striking an arc. I also practiced alot with sheetmetal, mainly because it is fairly affordable and I had alot of it. Welding thin stuff helps you think about heat control and warpage, and the more practice you can do, the better chance you have of producing better welds.

This was last nights welding project completed.

")
Looks good, that machine brings back some memories...


I have the same crane. I made a receiver hitch adapter. What's your plan here? Something that bolts to the frame under the bed and through the bed into the crane?
On a side note, those RHC's sure are handy aren't they? I have one for my 330A/BP on a 50 ft cord. It's saved my bacon a few times.
Brandon that crane looks handy. Is the crank easy to reach from the top of the bed?
Shorty Korte
Always remember quality in QST
Sent from my iPhone using Garage Journal