To avoid these ads, REGISTER NOW!

Show us your welding projects

Ultradog MN

Well-known member
Joined
Jan 20, 2024
Messages
744
Location
Twin Cities
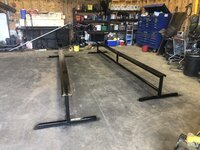
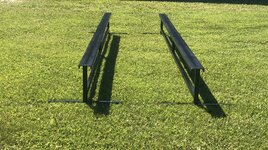
I finished my vise stand between rain showers this weekend. Have been getting rid of some of my junk and was loathe to just sell it for scrap. So I built this. As an afterthought I found a place to put the anvil.
Don't have to have the vise on my welding table now which was always in the way.
Guessing it weighs at least 800 with the vise, etc mounted. The pallet jack moves it easily. I added a bunch of extra scrap for ballast under the center of the base for extra stability.
 

Attachments

  • 652024173935.jpg
    652024173935.jpg
    863.8 KB · Views: 509
  • 66202423516.jpg
    66202423516.jpg
    1.1 MB · Views: 347
  • 662024103136.jpg
    662024103136.jpg
    1.1 MB · Views: 246
Last edited:
To avoid these ads, REGISTER NOW!

kyrbz

Well-known member
Joined
Jan 30, 2012
Messages
1,297
Location
midwest US
Needed to make a mount for an outdoor wifi extender for a property I'm renovating. I wanted to get the wifi extender up a little higher than the buildings and I didn't want it facing the south sun where it comes out of the building. Thats why the mount/bracket extends out enough from the building that I could attach a panel that allows it to face north and shield it from the sun, plus I needed it to be out of the way when the roof on the left side of the last pic is redone. All said and done, I'm amazed how much better signal my security cameras around the property get than before

wifi1.jpeg

wifi2.jpeg

wifi3.jpeg
 

kctgb

Well-known member
Joined
Jul 7, 2024
Messages
305
I started welding 48 years ago, I have a bucket of welding bend certifications. For some reason I can't open the photos with my tablet. I want to comment on things I've seen over the last 48 years with home/beginner welders. Fluxcored welding requires a longer stick out than mig welding(hard wire with shielding gas). Mig stickout is generally 3/8 of and inch, fluxcored without shielding gas requires a 3/4 stickout to pre heat the wire. Most home shops don't do dual shielded fluxcored. DS fluxcored is usually more for industrial use. When welding focus on the weld puddle, not the arc. I often see new/hobby welders focus on the arc and completely ignore what's happening with the weld puddle. Way to often I see new weldors buy a 110 volt welder and try to weld/fabricate something beyond its capability. Buy a welder bigger than you need, its easy to turn down the amps, you can't increase power if you don't have it. Last, don't weld something beyond your capabilities. A local guy welded up a utility trailer with a 110 welder. While driving down the highway the hitch came unglued and went hurrling across the divide hitting a local college girl driving the opposite direction. The trailer decapitated the 19 year girl, the weldor was sentence to prison for 10 year for negligence.
 

Nortonscustom

Well-known member
Joined
Jun 5, 2008
Messages
375
Actually had a little free time today so decided I'd tinker with my harbor freight cart.

Keep my M12 mechanic tools in this cart so made a M12 battery rack.

battery rack 1.jpg

While I was at it made a spray can rack for the side.

can rack 1.jpg

Some IH red spray paint.

battery rack 2.jpg

can rack 2.jpg

Think I'll make a prybar rack for the other side next week if time allows.
 

mv213

Well-known member
Joined
Sep 29, 2014
Messages
660
Location
Dallas, OR (the OTHER "Big D")
Actually had a little free time today so decided I'd tinker with my harbor freight cart.

Keep my M12 mechanic tools in this cart so made a M12 battery rack.

battery rack 1.jpg

While I was at it made a spray can rack for the side.

can rack 1.jpg

Some IH red spray paint.

battery rack 2.jpg

can rack 2.jpg

Think I'll make a prybar rack for the other side next week if time allows.

CNC Plasma cutter?
 

NUTTSGT

Super Moderator
Staff member
Joined
Sep 14, 2009
Messages
50,863
Location
Northern Central Ohio
I've spent enough hours under a dash like that to recognize it as a Foxbody. Why the need for the stop on the clutch pedal?
Putting in a ClutchTamer and their advise to use one.

Prevents pushing the pedal in too far unnecessarily and for the ClutchTamer, a "standard" to base settings off of.
 

iagsxr

Well-known member
Joined
Jan 10, 2010
Messages
1,499
Location
Vinton, Iowa
Putting in a ClutchTamer and their advise to use one.

Prevents pushing the pedal in too far unnecessarily and for the ClutchTamer, a "standard" to base settings off of.

Be sure to let us know how that works for you.

I had a short conversation with the ClutchTamer guy on another forum. Learned a lot.
 

Bob Heine

ALLIANCE MEMBER
Joined
Oct 24, 2009
Messages
10,703
Location
Boca Raton, Florida
Actually had a little free time today so decided I'd tinker with my harbor freight cart.

Keep my M12 mechanic tools in this cart so made a M12 battery rack.

battery rack 1.jpg

While I was at it made a spray can rack for the side.

can rack 1.jpg

Some IH red spray paint.

battery rack 2.jpg

can rack 2.jpg

Think I'll make a prybar rack for the other side next week if time allows.
@Nortonscustom, I have a soft spot for that single drawer HF cart. Mine is for paint and body work tools and supplies. I may have gotten carried away....
Tool Cart 11.jpg Swiss Army Cart.jpg
 
To avoid these ads, REGISTER NOW!

Terra Nova

Well-known member
Joined
Feb 26, 2012
Messages
4,181
Location
Michigan
Sort of a welding project. This is the ball from a Waterball game that firefighters play. It's suspended by a cable and they use hose lines to try and push it past the opposing teams, sort of a reverse tug of war. Ours had seen some better days, with a couple nasty dents and the inside was full of rust. Tried a couple things on the dents but finally ended up cutting it apart to bang the dents out from the inside.

Knocked the dents out, added a little POR15 on the inside, welded and ground smooth, little more POR15 inside to cover any that burned off in the weld zone. Some fresh paint and new hardware on the outside and the Craig's List rebuild was complete
 

Attachments

  • wb9.jpg
    wb9.jpg
    631.4 KB · Views: 113
  • wb8.jpg
    wb8.jpg
    655.2 KB · Views: 102
  • wb7.jpg
    wb7.jpg
    662.8 KB · Views: 94
  • wb5.jpg
    wb5.jpg
    824.9 KB · Views: 92
  • wb4.jpg
    wb4.jpg
    711.9 KB · Views: 91
  • wb3.jpg
    wb3.jpg
    1 MB · Views: 91
  • wb2.jpg
    wb2.jpg
    926.6 KB · Views: 90
  • wb1.jpg
    wb1.jpg
    896 KB · Views: 91
Last edited:

Nortonscustom

Well-known member
Joined
Jun 5, 2008
Messages
375
Made the pry bar rack for my cart. Was asked what kind of press brake I used on the spray can rack. I don't have a press brake so thought I'd show how I do stuff like this.

First cut out the part. This will hold five pry bars, two 3/8" extensions and two 1/2" extensions.
prybar rack1.jpg

Then clamp it to my welding table with a chunk of angle iron. While keeping constant pressure with one hand, work it over with a big deadblow hammer. Once bent over I tighten up the bend with a block of wood and big hammer. Makes nice crisp bends. The steel sheet is 1/8" thick and each bend point is 1-1/4" wide.

prybar rack2.jpg

Repeat for the other side.

prybar rack3.jpg


Some red paint and the cart is good to go.


prybar rack4.jpg

Bob Heine's idea of mounting lights to the cart is pure genius. So that's my next step for this very handy little cart.
 

kyrbz

Well-known member
Joined
Jan 30, 2012
Messages
1,297
Location
midwest US
An outdoor ping pong table I made/designed for a former NBA player. Unfortunately I forgot to snap some pics of while I was making it. The base is various sizes/shapes of powder coated tubular steel. The underneath storage drawer is sheet steel and accommodates the net, paddles and balls when not in use. The top, net and drawer front are a phenolic material called richlite. The whole thing disassembled flat for transportation

pp1.JPG

pp2.JPG

I guess the only thing I took a pic of while making it was the method for attaching the top to the base, Richlite doesn't hold screws well, so I made some steel pucks with a threaded stud welded to them. The puck was then epoxied into the bottom of the richlite

pp3.JPG
 
Last edited:

Nortonscustom

Well-known member
Joined
Jun 5, 2008
Messages
375
Got an O/A torch setup together and thought I would give it a whirl. There are a few mig welds at the base so I think it counts ;)

Lid lifter for a Dutch oven. Made from two pieces of bar stock.

7DCC4184-B446-4D0B-BA26-0F240C17254E.jpegD0A66551-8163-4C6B-A12D-1B442769CE01.jpeg0022B6D6-43F2-4B1D-A9EB-256FAC9547E2.jpeg
Nice job! Funny story, when I first learned to make that braid I decided to make a fire poker. Finished the braid handle and excitedly put the other side into the forge to start on the hook. I relearned that day steel doesn't have to be glowing to still be blazing hot. Melted that pattern into the palm of my hand. Was a daily reminder for nearly a year. :D
 

Terra Nova

Well-known member
Joined
Feb 26, 2012
Messages
4,181
Location
Michigan
Nice job! Funny story, when I first learned to make that braid I decided to make a fire poker. Finished the braid handle and excitedly put the other side into the forge to start on the hook. I relearned that day steel doesn't have to be glowing to still be blazing hot. Melted that pattern into the palm of my hand. Was a daily reminder for nearly a year.
Wow! that'll leave a, uhh, mark... :lol:

Fortunately I've been welding and torching long enough to mostly remember when stuff is hot. Was a fun little project and think I'll start shopping for a cheap forge and anvil to try some blacksmithing stuff.
 

GeoBruin

Well-known member
Joined
May 5, 2018
Messages
3,733
Quick weekend project. I picked up this handy little dolly/stacker for moving stuff around in my shop and loading stuff in my pickup. My issue is that it doesn't turn, and when it's loaded up you certainly can't nudge the front end around. I found some low profile castors that allowed the overall height to remain unchanged, and cut/bent some strap to mount the castsers.

I have room for some gussets on the mounting plates, but I maxed out the load on the forks and there's no visable flex. I might just go with this for now and add gussets later if I see any deflection overtime.

Sorry for the bad pics.
 

Attachments

  • 20240911_154703.jpg
    20240911_154703.jpg
    929.8 KB · Views: 83
  • 20240911_201504.jpg
    20240911_201504.jpg
    983.1 KB · Views: 83
  • 20240910_214117.jpg
    20240910_214117.jpg
    429.3 KB · Views: 86
  • 20240912_100925.jpg
    20240912_100925.jpg
    737.5 KB · Views: 108
  • 20240912_100956.jpg
    20240912_100956.jpg
    1.3 MB · Views: 145
To avoid these ads, REGISTER NOW!
Top Bottom