To avoid these ads, REGISTER NOW!

Show us your welding projects

Robert Haas

Well-known member
Joined
Sep 30, 2010
Messages
1,749
I saw another member build a welding cart that held his MIG and his plasma cutter, thought to myself what a fantastic build it was so decided to copy the living **** out of it.

So with no shame what so ever here is my version

2.jpg

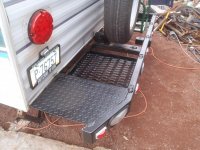
water separator/purifier caged for protection
3.jpg

4.jpg
Side table designed to carry a load
5.jpg

6.jpg

7.jpg
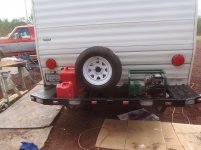
place for the Spool Gun to sit
8.jpg

The shelf is mandatory for me, I always need to toss my helmet and clamps onto something, not to mention it serves as a small fab area if needed so it will support quite a bit (note the 2" x 2" diagonal brace)
 
Last edited:
To avoid these ads, REGISTER NOW!

nine4gmc

Well-known member
Joined
Mar 24, 2012
Messages
14,357
Location
Dallas
Damn Robert, first one was fine, now I've seen two and I'm looking for scrap metal to build me one :lol_hitti :thumbup:
 

alpinewhite

Well-known member
Joined
Aug 4, 2012
Messages
1,315
Location
Orange County, California, USA
At home next to its big brother
attachment.php
What is that red box doing in this sea of blue equipment? :lol_hitti
 
Last edited:

F-117HWK

Well-known member
Joined
Apr 17, 2012
Messages
283
Location
Virginia
First one was toomanytoys, but I switched internet providers, lost my email addy and forgot my password. My current one is toomanytoyzz, and has been active since 2004. I wish I could get the first username password sent, but the mods will not budge. I had a REALLY low member number in 2001.

Ah man that *****. I dont really post much as I am still gathering as much info as my brain can hold for a build down the road.
 

metalhead212121

Well-known member
Joined
Mar 21, 2010
Messages
2,897
DesertSparky57- That tubing bender looks AWSOME! Do you have any pics of it bending pipes? I'd love to see it in action! I don't know why but I have a goal of one day bending steel pipes in my garage. Why do I want to do it? I have no clue... One guess I have is because I watched to much American Chopper over the years....

"If you build it... they will come... If you want somebody to build it for you... Press one." Anybody remember what TV sitcom that was from? It was only on ONE episode of this particular sitcom.
 
Last edited:

DesertSparky57

Well-known member
Joined
Apr 12, 2013
Messages
92
Location
Las Vegas
Metalhead212121, so far I have only bent one small piece on it. I have tube dies, 1.75x5.5 and 1.5x4.5, they are amazingly machined and should be for what they cost, but I only had a small piece of 1 1/4" pipe, I couldn't resist and popped it in and put a small kick on it. Even with no air just using the painfully slow manual handle the bender moved like there was nothing in it.

I've got a short vacation but after that I'll be picking up a compressor to run the air/hydraulic jack. I'd be happy to put a video up, it would be of my first test bends on 1.75x.120 seamless :) I will admit, I've bent lots for my day job, but never have I seen a bender that will do 210*!! Thank you for the compliment, my fab skills are painstakingly slooooowwwww, but so far have seemed to be worth the time I put in.

Again, thanks for the compliment :beer:
 

2manytoyz

Well-known member
Joined
Sep 20, 2011
Messages
419
Location
Central FL
What kind of paint are you guys using on your welded shop equipment? Looks like enamel. If so, are you spraying it?

I've tried spray bombs, and brushing on enamel paint. Not getting the nice results that some of you are...
 

PCO6

Well-known member
Joined
Dec 25, 2008
Messages
4,573
Location
Newmarket, Ontario
This hydraulic lift table came with a chrome handle for maneuvering it. The lift release was hand operated and attached to the handle. The handle was in the way for most of the things I needed the table for so I removed it. I welded up new lift and release mechanisms that are now foot operated and out of the way. It works a lot better now. :D


C.I.TR3

Member
Joined
Jun 28, 2012
Messages
12
Location
Pacific Northwest
I have been lurking on this site and on this thread in particular for quite a while and can finally post my very first welding project. In addition to wanting to learn to work with metal via welding I am wanting to learn to forge steel. So I figured what better way to start than to build my own forge. I have finished the shell and am waiting on the liner material and a few parts for the burner. Really had a great time putting it together and can't wait to build more projects. Its amazing what a lot of grinding and a coat of black paint can do to cover up all my beginner mistakes.

Forge 1.jpg

Forge 2.jpg
 
OP
N

neonnblack

Well-known member
Joined
Jun 7, 2010
Messages
4,913
Location
Reno, NV
What could i possibly be welding up?

The jig is for 45* cuts. I bought a 7 1/4 diablo steel demon blade for the worm drive, much easier and quicker then setting up the 4x6 band saw and WAAAAAAY easier to do 45's.

Sheet is 18ga 4x10. Tube is 1 inch .060


Dimension is around 20x31x13. frame is not complete yet.
 

metal tech

Member
Joined
Oct 13, 2009
Messages
21
I had bought a set of ****** 2462 headers and wasn't really happy with them. I got some new flanges with port shapes that match the heads and were thicker, along with new collectors.
 

Attachments

  • Collector side by side.jpg
    Collector side by side.jpg
    143.8 KB · Views: 158
  • Collector Spike.jpg
    Collector Spike.jpg
    131.3 KB · Views: 153
  • Collector overhead.jpg
    Collector overhead.jpg
    143.7 KB · Views: 168
  • Flange Thickness.jpg
    Flange Thickness.jpg
    151.2 KB · Views: 174
  • Flange Port entry2.jpg
    Flange Port entry2.jpg
    139.7 KB · Views: 178
To avoid these ads, REGISTER NOW!

Bobhdus

Well-known member
Joined
Oct 20, 2012
Messages
262
Location
Missouri
Making some decorative stuff for some customers. Used some old copper pipe, annealed cut and flattened, and tig welding it to stainless fork with silver braze. Used propane torch to heat tines for bending. Polished up real nice!

u8uqy2up.jpg
e9avyzab.jpg
aquqydu8.jpg
5aduqery.jpg
 

Dirtybird103

Well-known member
Joined
Jul 13, 2013
Messages
47
Here are a couple things I built. First a baby gate and then a removable table for my horizontal/vertical metal bandsaw.

85943BF0-B007-4F50-8B69-850080647997-43670-00002D443A124A78_zpsf92f1ef8.jpg


222E5897-1C04-40AD-9DA5-766A3D817606-43670-00002D44B5E4AFA2_zps61ec34a9.jpg


EA777C85-D4F9-4050-B27A-338FDAD4ED65-43670-00002D44D793F442_zps8489953f.jpg


0FAB8D7C-43F7-4DF7-BCA5-3B3C2EE56375-43670-00002D44F5E0487A_zpsada38f41.jpg


Here is the bandsaw table. It will have a metal top I just haven't made it to metalmart to get some plate.

EFE38821-7558-4D6B-A178-5874788B9809-43670-00002D46ADC8F451_zpsebae7ee5.jpg


EBDDBF47-035B-45C5-B7E9-9832EE9475FF-43670-00002D46D02D9928_zps9e16bdf9.jpg


FB2705B1-9A85-4986-B332-726455E53B8A-43670-00002D46E4C63CA9_zpsdc382ecf.jpg


Almost forgot this. Modified a friends gaming setup so it's more stable.

CABA6D16-A646-4150-B4D1-91CF21DE154C-43670-00002D45FC86244C_zps1c6bfc3e.jpg


9DF7A975-9AE8-4B89-ADBB-2343B452A0CE-43670-00002D462266C2B8_zpsf51162e6.jpg


2DF3D7F2-48CA-49F3-8C61-C9239DDF2A62-43670-00002D46439BE593_zpsd030235f.jpg
 

kyrbz

Well-known member
Joined
Jan 30, 2012
Messages
1,297
Location
midwest US
I notice in a lot of the "in action" welding pics of newcomers to the MIG welding world that they are quite far away from the work and only using one hand. I always use two hands (if possible). . .one on the trigger and the other lightly supporting the nozzle in the gooseneck area. This allows more precise control of the gun for a consistent weld bead.

I also shove my helmet as close to the work as possible and still be able to focus my eyes so I can see exactly where the joint is and what the puddle is doing. We have to wear safety glasses at all times on the shop floor, and I've found that a good pair of clear/semi-mirrored safety glasses worn under the helmet will allow me to turn the shade down on my adjustable helmet and not get flash burn.

Keep up the welding! It is a great skill to have.

I feel handicapped if I have to do a weld where I can't support the torch with my second hand. Makes for a much cleaner and consistent weld bead.
 

Attachments

  • bzweld.jpg
    bzweld.jpg
    111.5 KB · Views: 267
  • brac12.jpg
    brac12.jpg
    79.8 KB · Views: 283
Last edited:

exophyusical

Well-known member
Joined
Aug 11, 2013
Messages
100
Probably the coolest project I ever worked on was rebuilding a "Comander" that had tracks on it. If your not from northern Alberta you probably don't know what a commander is, picture an industrial grade monster truck that moves drilling rigs. Heres a few pictures of comanders, like I said the one I helped rebuild was on tracks and not tires, I used to have a picture of my welding truck parked under the thing.

http://www.google.ca/imgres?imgurl=...U0UoDKCYGCiwLr9oHgAg&ved=0CE0Q9QEwBA&dur=5099


http://www.google.ca/imgres?imgurl=...U0UoDKCYGCiwLr9oHgAg&ved=0CFAQ9QEwBQ&dur=1733

http://www.google.ca/imgres?imgurl=...U0UoDKCYGCiwLr9oHgAg&ved=0CFYQ9QEwBw&dur=1000
 

toomanytoyzz

Well-known member
Joined
May 11, 2012
Messages
1,571
Location
Malvern, PA
Probably the coolest project I ever worked on was rebuilding a "Comander" that had tracks on it. If your not from northern Alberta you probably don't know what a commander is, picture an industrial grade monster truck that moves drilling rigs. Heres a few pictures of comanders, like I said the one I helped rebuild was on tracks and not tires, I used to have a picture of my welding truck parked under the thing.

http://www.google.ca/imgres?imgurl=...U0UoDKCYGCiwLr9oHgAg&ved=0CE0Q9QEwBA&dur=5099


http://www.google.ca/imgres?imgurl=...U0UoDKCYGCiwLr9oHgAg&ved=0CFAQ9QEwBQ&dur=1733

http://www.google.ca/imgres?imgurl=...U0UoDKCYGCiwLr9oHgAg&ved=0CFYQ9QEwBw&dur=1000
They are some serious vehicles:shocking:!! Imagine what a set (obviously more than 4 would be a set) of tires would cost.

I'd like to see the pic of your welding rig under it for scale.
 

exophyusical

Well-known member
Joined
Aug 11, 2013
Messages
100
They are some serious vehicles:shocking:!! Imagine what a set (obviously more than 4 would be a set) of tires would cost.

I'd like to see the pic of your welding rig under it for scale.

The company that I worked on the Commander for also had a bed truck that wasn't quite the size of a Commander but it was the biggest bed truck I have ever seen, they called it "Gravedigger". I watched them rotate tires on it one time, they had to use a good sized bobcat and the tires were actualy taller than the bobcat. Another really cool thing I worked on was a Nabors well servicing rig that could be broken down and moved by helicopter into remote wells in pieces.

I spent my second year building regular Well servicing rigs, It should have been a sweet job but it was very frustrating. I never saw a print or drawing the whole time, and even the riggers that work on them will tell you that there are not two identical service rigs in all of Alberta. Nevertheless they are impressive machines and I do take pride when I see one that I worked on in action.

http://www.google.ca/imgres?imgurl=...c1UvqKIsm9iwKLu4GgCQ&ved=0CG4Q9QEwDQ&dur=1186

http://www.google.ca/imgres?imgurl=...c1UvqKIsm9iwKLu4GgCQ&ved=0CFsQ9QEwBw&dur=1309
 
Last edited:

SatisTraction

Well-known member
Joined
May 28, 2013
Messages
122
Put a few final touches on the bender/notcher cart. I am happy with how it turned out. Still have a few more small things like the air line, a small chip tray under the hole saw area, a holster for the drill when it's not in use and maybe even a small magnetic mount tray for a tape measure and sharpie or soapstone for when I'm in the driveway bending and notching.
null_zps85b39504.jpg


The return springs work excellent. Picked up from McMaster.
null_zps68159890.jpg


The upright for the notcher is bolted on, if a wacky piece of tube hits it I can make it go away for a bend if needed.
null_zpse76b1e70.jpg

:rocker: Rock On GJ. One step closer...

I have the same bender and notcher. do you have plans for that stand or did you fab it on the fly? I would like to do that. I have my bender on a horizontal stand right now.
 

DesertSparky57

Well-known member
Joined
Apr 12, 2013
Messages
92
Location
Las Vegas
SatisTraction, I had plans for the stand but they were quite vague. The only aspect of it that I sketched out was the geometry of the ram vs. the bender arm, it is a fairly conservative angle I ended up at and in hindsight I sort of wish I would have set up a more aggressive push angle for more overall degrees of forming die rotation per full stroke.

I have yet to really use it, life outside the garage is constantly stealing my shop time from me :dunno:

My favorite part of the whole stand is that I set it up so it can be moved but it is very stable once you set it down. You use the flat handle on the front side to lift and the whole thing rocks back on to the wheels. The balance point is set so that the plates for the casters are parallel to the floor when you stand it up. It looks bulky but it is actually very easy to roll it around. It sits on four rubber feet once you lay the front back down. It's just one of those things that came together real nice and was really quite fun to build. Here's a shot of the bottom.

null_zps656d78d4.jpg
 

zmotorsports

ALLIANCE MEMBER
Joined
Oct 20, 2009
Messages
21,312
Location
Northern Utah
Been working on my buggy for about 2.5 years! I hope to have it finished early next year.

Started with this.


Most recent.


Absolutely awesome looking buggy.:thumbup: However, you can't just throw up before and after pictures on something like that. You have to include ALL of the during pictures along with the closeups and descriptions. I am just sayin.

Mike.
 

vogelj

Member
Joined
Jul 20, 2005
Messages
6
Location
Indianapolis Indiana
Absolutely awesome looking buggy.:thumbup: However, you can't just throw up before and after pictures on something like that. You have to include ALL of the during pictures along with the closeups and descriptions. I am just sayin.

Mike.

I hear ya! If you have some free time I have a build on pirate.

http://www.pirate4x4.com/forum/jeep-********-tech/1059102-project-cant-make-up-my-mind.html
 

vogelj

Member
Joined
Jul 20, 2005
Messages
6
Location
Indianapolis Indiana
Sweet looking rig! I wish I would have cut more of my body out like you did. Now I have floors in the front and nothing in the back and its hard to tie them together and make them look nice.
 

s_blaylock

Well-known member
Joined
Nov 27, 2007
Messages
76
Location
Montgomery, TX
careful what you wish for. I cut all the floors out and wish i had kept most of the factory floor. Because I had to have something, I had to build a floor from scratch. Oh and thanks! I really like yours too! Looks like we have similar tubework in the rear


Zebedeewesty

Well-known member
Joined
May 31, 2013
Messages
4,072
Location
Wales, UK
Finally got my trailer finished. Just need to screw on some buttons for the shock cord on the tarp. Cost £150 (about $300) in total.
 

64Trvlr

Well-known member
Joined
Sep 7, 2012
Messages
420
Location
Northern AZ
Here are some pics of the rear bumper I built for my camper. I also junked the cheap coupler on the tongue and battery spot. I put different battery boxes and a Bulldog couple on.
 

Attachments

  • start of camper bumper 8:13.jpg
    start of camper bumper 8:13.jpg
    148.4 KB · Views: 210
  • camper bumper construction shot 8:13.jpg
    camper bumper construction shot 8:13.jpg
    148.1 KB · Views: 238
  • camper rear bumper 9:13.jpg
    camper rear bumper 9:13.jpg
    139.7 KB · Views: 234
  • camper bumper dr side 9:13.jpg
    camper bumper dr side 9:13.jpg
    137.6 KB · Views: 211
  • camper bumper pass side 9:13.jpg
    camper bumper pass side 9:13.jpg
    146.6 KB · Views: 226
To avoid these ads, REGISTER NOW!
Top Bottom