To avoid these ads, REGISTER NOW!

Show us your welding projects

E12-535iTurbo

Well-known member
Joined
Feb 27, 2014
Messages
492
Location
The Netherlands
I've made some axle stands to gain better access to the underneith of my BMW E12. I wanted them to be moveable and adjustable in height. Instead of buying them I made them with cheaply sourced materials. I've spend about 10 euro's :). Anyway this is about welding so here are some welds (obviously not cleaned and taken directly after welding):

8lvd.jpg


m1b8.jpg


Any input is greatly appreciated!
 
To avoid these ads, REGISTER NOW!

NASTYZEN

Well-known member
Joined
Jun 11, 2010
Messages
2,823
Location
St-Colomban,Que. Canada
I've made some axle stands to gain better access to the underneith of my BMW E12. I wanted them to be moveable and adjustable in height. Instead of buying them I made them with cheaply sourced materials. I've spend about 10 euro's :). Anyway this is about welding so here are some welds (obviously not cleaned and taken directly after welding):

8lvd.jpg


m1b8.jpg


Any input is greatly appreciated!

Those are just perfect welds!:thumbup:
Do you weld on a regular basis? If not, any welding place would hire you on the spot.
 

bggrnchvy

Well-known member
Joined
Nov 14, 2011
Messages
579
Location
Pleasant Hill, CA
I built a mobile base for my vertical bandsaw I'm refinishing.


I nuked the stainless a bit. My dinosaur Dialarc doesn't have a pulse module like the newer inverter machines and just pumping the pedal didn't cool my arc puddle off quite enough not to build a thick layer of oxide. In the end it doesn't matter as it all gets wire wheeled off anyways, but it looks nicer to get the rainbow coloring.


great white tj

Well-known member
Joined
Apr 12, 2009
Messages
545
Location
Ocala Fl.
I added some casters to a Vise stand. The casters are old and I am not sure how long they will last so I just hit them with some tacks.
 

Attachments

  • P4010002.jpg
    P4010002.jpg
    32.6 KB · Views: 211

ndr1968

Well-known member
Joined
Apr 18, 2012
Messages
207
Location
Oklahoma
I guess you get that question a bit as well?

I've been wanting to build one, and I don't even have kids.

If I had more room for such things I'd build one too! I'd even figure out how to put a small engine or electric motor in it so it would do, Oh say 15 mph?....and a go cart and a bar stool racer and a minibike chopper and a.....
 

MonoxieChild

Well-known member
Joined
Feb 15, 2014
Messages
250
Location
Rockford, IL
I go to alot of car shows, and wanted something a bit cooler then the new wagon i usually tow my 3y.o son around in. Been on the hunt for a clean old wagon with 'Patina' for like 2 years with plans to do one of these.

Here's how the handle turned out.

IMG_20140326_212250_376_zps2af8fe5f.jpg


IMG_20140326_212222_410_zpsa8be21d1.jpg
 

MonoxieChild

Well-known member
Joined
Feb 15, 2014
Messages
250
Location
Rockford, IL
It's a big thing out here at the swaps. All kinds of rodded wagons. Monkey see, monkey do.

Ive actually never seen one of these in person. But have seen pics online of some builds which is where i got my inspiration. There's even a forum dedicated to ratrod bikes and wagons.

The go cart slicks are already planned, but the local gocart track isnt open for the season yet, so i have to wait. I got a lead they sell there bald tires for $5 a piece so waiting. The ones on the wagon now are some $3.99 HF tires meant for a dolly. Figured they would tide me over till the gocart shop opened.
 

1grnlwn

Well-known member
Joined
Jan 19, 2012
Messages
186
Location
Central Illinois
I took it as him being facetious... considering his avatar.
I couldn't resist. It is funny because that was built to tow my son around Street Machine Nats. That "little boy" is now 20 years old and is a tractor mechanic. I don't have a pic but the front tires were smaller push mower tires. GoCart tires would look great. In that time "rat Rod " was a primered Camero. Pro street was the shiznit. You had to have a blower! Back then I didn't have the equipment I have now so the construction looks hurried , maybe I should go ahead and start one for future grandchildren.
 

Attachments

  • Blownwgnred.jpg
    Blownwgnred.jpg
    47.7 KB · Views: 325
To avoid these ads, REGISTER NOW!

MonoxieChild

Well-known member
Joined
Feb 15, 2014
Messages
250
Location
Rockford, IL
I never even noticed the avatar pic. haha. This is actually the first real project ive even used my welder on that wasnt an exhaust job/fix. Been wanting to find more uses for it so i could get better at it. And this was a perfect project.

I think one of these for me is next on the list of projects.
 
Last edited:

Robert Hall

Well-known member
Joined
Jan 17, 2011
Messages
414
Location
Utah
Welding welds on the welding table. HF $45 strong bad... uh strong breath, no... stonghand knockoff. Now with reinforced welding top.

asarehyh.jpg


ageve2uh.jpg


Now back to the Scotch.
 

Robert Hall

Well-known member
Joined
Jan 17, 2011
Messages
414
Location
Utah
Ok. Before I can load the gear on I need to give it a week to cure.

This will hold my welder, chop saw, plasma cutter, and yet to be built torch cooler.

u9umu6er.jpg


The little pocket is for the pedal.

qytupuje.jpg


These will hold the TIG wire

3y4u7uqe.jpg


Let's not forget the cup holder...

vyqe8yby.jpg
 

Hot Chop shop

Well-known member
Joined
Apr 12, 2013
Messages
628
Location
Las Vegas
Ok. Before I can load the gear on I need to give it a week to cure.

This will hold my welder, chop saw, plasma cutter, and yet to be built torch cooler.


This cart looks awesome! I have 4 cans of miller blue paint waiting to make a similar project.... Make sure to post pics with it all loaded up!

Sent from my iPad using Tapatalk HD
 

Robert Hall

Well-known member
Joined
Jan 17, 2011
Messages
414
Location
Utah
Thanks! I used 4 cans of primer, 3 cans of black, 2 cans of Ford blue Engine enamel. I couldn't bring myself to pay miller blue prices.
 

Hot Chop shop

Well-known member
Joined
Apr 12, 2013
Messages
628
Location
Las Vegas
Thanks! I used 4 cans of primer, 3 cans of black, 2 cans of Ford blue Engine enamel. I couldn't bring myself to pay miller blue prices.

Sorry I should correct myself... 4 cans of miller"ish" blue paint... The Rustoleum safety blue is what I have stock piled for the future cart.
udaru3aj.jpg


Sent from my iPad using Tapatalk HD
 

E12-535iTurbo

Well-known member
Joined
Feb 27, 2014
Messages
492
Location
The Netherlands
Those are just perfect welds!:thumbup:
Do you weld on a regular basis? If not, any welding place would hire you on the spot.

Thanks NASTYZEN, I really appreciate that especially from you. I don't really weld that often. I'm a car enthousiast but don't have much time to work on it. I bought the welder about seven years ago and replaced the 10L bottle two times now. That should give you an idea of the amount of time I shared with the welder. :)

Very nice wish I could see more are they adjustable?

They are adjustable. Actually I made quite some pictures to share but my image shack registration has expired and I need to pay to get new pictures online. Since I'm not making money with these pictures I'm not paying for them to be available online. It's a shame as I really got a spark from this forum and remodeled my garage based on what I've read/seen here. I took some pictures along the way too, and I've done other projects most of you would like to see here.

Anyway, I made them adjustable with M24x2 theaded ends. Should be plenty strong to keep the car up.

BR. Jan
 

Robert Hall

Well-known member
Joined
Jan 17, 2011
Messages
414
Location
Utah
Sorry I should correct myself... 4 cans of miller"ish" blue paint... The Rustoleum safety blue is what I have stock piled for the future cart.
udaru3aj.jpg


Sent from my iPad using Tapatalk HD

I used that too. I like the enamel from the OREILLY a bit better.

5ygu7ute.jpg


5e9aru7e.jpg


I am no expert at paint, however.
 

johndeereman

Well-known member
Joined
Mar 28, 2014
Messages
441
Location
WILL COUNTY IL
I have to say that is an awesome looking cart looks very useful and well built
Nice job maybe one day i will get around to something like that but first i have to finish the shop build at the farm.
 

aka Larry

Well-known member
Joined
May 2, 2012
Messages
8,013
Location
Eastern, NC
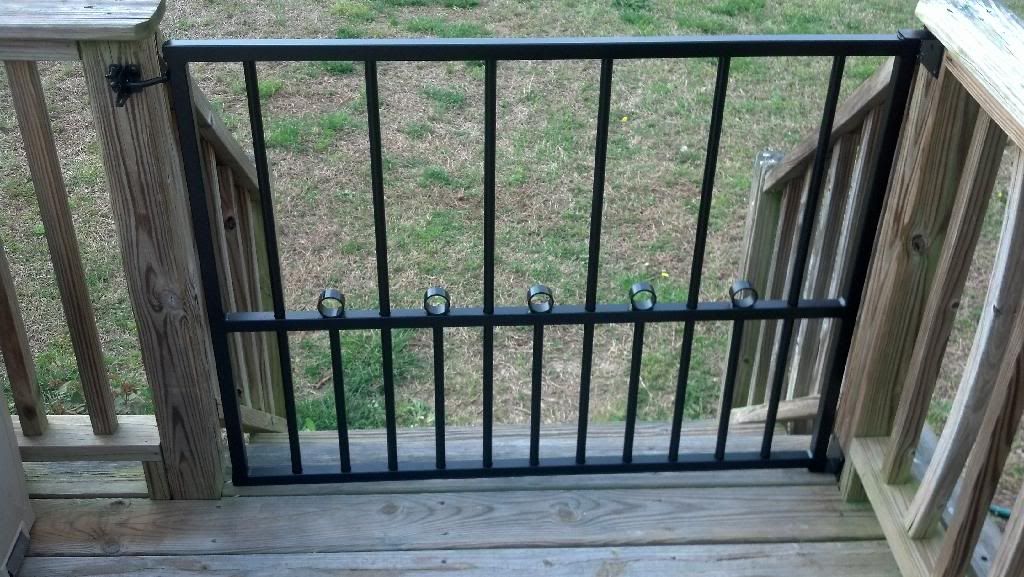
Saturday I started work on a gate to keep my miniature dachshund Katie on the deck and my neighbor's dog off of it.

As always I started with a drawing. The plan was to use 1" square tubing for the main frame and 1/2" EMT for the spindles. The lower portion would have spindles closer together because of Katie's small stature. The upper portion would have half the number of spindles, thus twice the spacing.

I started by cutting all the components to length using the bandsaw. Components cut:


IMG_20140412_104000_225_zps6rpmweaa.jpg


Marking the holes for the spindles:


IMG_20140412_110834_781_zpsmqgauzvb.jpg


Drilling the pilot holes for the spindles:


IMG_20140412_112126_018_zpsuiqlhvq6.jpg


Here I've started cutting the 9/16" holes using Rotabroaches. I love these things and they are made in the good 'ole USA.


IMG_20140412_115507_451_zpsureekamk.jpg


I decided to build my own hinges using some 1/8" plate. As you can see I countersuck the holes so the screw heads would sit flush:


IMG_20140412_130653_897_zps875hdbfw.jpg


Components for the hinges welded together:


IMG_20140412_134733_696_zpswvgahpud.jpg


Once the hinge pin is welded in place the hinge assembly is done:


IMG_20140413_102354_001_zps0fovbdie.jpg


I didn't take pics of the assembly, but I welded the frame together with the EMT spindles slid into the holes. I added a little detail using some 1.5" DOM I had laying around also. Next I welded a pair of stainless steel washers to each hinge point to act as a bearing surface. I added a off-the-shelf latch to the gate and deck post, did a test fit to get all the holes drilled, and final adjustment done before paint.

After fit-up, I primed all the metal with self-etching primer, and top coated everything with Rustoleum satin black. I let the paint dry for about four hours before final installation. I'm pretty happy with how it turned out. The boss was happy with it as well, but now she wants me to replace all the deck railing! Here's the final installed pics:


IMG_20140413_162036_411_zpsiqau1buh.jpg


IMG_20140413_162045_593_zpsxcb2viqi.jpg


IMG_20140413_162117_463_zps76rzusxt.jpg
[/quote]
 
To avoid these ads, REGISTER NOW!
Top Bottom