ScubaSteve
Well-known member
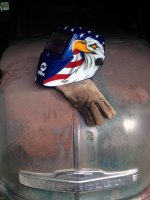
EGR system for a lawnmower? ")
There's clearly a muffler there....not sure about the manifold and stack?
There's clearly a muffler there....not sure about the manifold and stack?

It was a lawn mower.It's called a "lawn mower".
CloseSeems late in the season for a mosquito fogger so maybe a smoke machine for Halloween?
EGR system for a lawnmower?
There's clearly a muffler there....not sure about the manifold and stack?
As always, pointers are welcome.
It is a gopher eradication machine, The manifold has three ports, the customer will thread short hydraulic lines. After that will be longer black plastic irrigation lines, 1/2 inch. The bell, welded to the muffler is for oil, it's a small drip method to fog the gopher runs.
Apparently the customer purchased a new hay-bind, and wants to keep it that way.
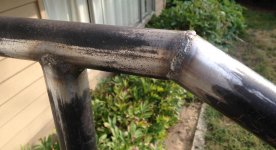
Installing a railing system for my mother.
Using sched. 40 gas pipe.
I'm no welder, and it shows.
Structurally they'll do the job, but too much time in cleaning them up.
As always, pointers are welcome.
Grinder has to work to remove the welds, don't think a scaler would even touch it.
The sched. 40 pipe is much softer than the welds so I have to be careful not to touch the pipe with the grinder.

Turn the current down or the wire up. Slow down. Get some gas if you want nicer. FCAW is messy but it can be managed.
PS, I wonder if you have the leads hooked up right. DCEN.
Looking at your middle pic, dimples; your knock the slag off? (Scaler)
Have you tried 60 grit disks for cleaning up? Move diagonal instead of horizontal that leaves flat spots that are noticeable.
Nice finished results, as well as the PIC of the PU


Rob, how does the RaceDeck hold up to your welding and grinding?

How did you drill the holes?
Day 1 of learning to Tig weld.... After watching hours of tig videos from Jody at weldingtipsandtricks and reading welding for dummies, I thought it would be easy....
Whole new respect for you Tig guys. Long way to go before posting a completed project here.
Congrats on getting started! Keep at it and you will get better. Just looking at the photo, you have a shielding gas coverage or contamination issue with all the brown soot. Use 100% argon shielding gas and set the flow rate at 10-15 CFH. Make sure you grind all the mill scale off to bright shiny metal. Keep the distance between the tungsten and the work down to about 1/4". One of the tendencies I see in new students is to pull the torch away from the work or angle it too much to see the puddle better. Keep the torch angle at 90 degrees to the work or no more than about 15 degrees away from the direction of travel. Also, slow down the travel speed and keep the puddle as round as you can. Keep watching Jody and check out the Youtube videos for weld.com.
No pics, but I was making a cup holder for my fancy new 600 dollar truck out of some scrap I had on hand. Angle iron and rebar. The rebar melted pretty easy, had the heat up a bit high at first. The second setting on my hobart 140, with .030 flux core wire(don't have gas), wire speed may have been a bit low too. By roughly the time I figure this out and turn it down I ran out of wire. Gonna get or order some this weekend. May just grind off that rebar and use some small square tubing I have. But I think the rebar would look better.


 , it's just what I had on hand. Thanks for the comment, been a while since I've cut 1".
Looks good! Nice looking shovel, too.2 into 1 Harley exhaust pipes and hanger. Headers assembled from used pipes, 1.75/2" collector and hanger built from scratch.
That is one crazy thick gusset and a really good ******** cutting it

a really good ********
There are defiantly some pros and cons to racedeck. I've had mine for about 7 months now and plan to write a review for those considering installing the product that actually work in there garage and not just use it for parking.
grinding is no problem. Running the mig welder is another story. The spatter will actually melt small holes in the tiles. it's not too noticeable, as i didn't even see it until i finished my project, but i guess you need to expect it considering the tiles are made of some form of plastic. i have a couple larger melted spots as well. If your TIG welding your going to be fine obviously. but don't even think about stick welding on the stuff. if your considering installing and you work in your garage PM me and i'll give you a list of problems I've incountered with RD.
umm...
.


 iron gate by Fyrme, on Flickr
 Iron and Wood Gate by Fyrme, on Flickr
 Iron and Wood Gate Front Side by Fyrme, on Flickr
 Iron and Wood Gate Back Side by Fyrme, on Flickr
 Iron And Wood Gate Short by Fyrme, on Flickr
 Iron And Wood Gate Short by Fyrme, on Flickr