To avoid these ads, REGISTER NOW!

Show us your welding projects

Mustang67ford

Well-known member
Joined
Apr 8, 2012
Messages
87
Out of curiosity, what is the majority of this welding done with, tig?

I have an arc welder and a a set of torches. I can never get that good of results with the arc not can I weld thin stuff.

With the torches, I can weld thin stuff but most of the time, like with bolts, the metal is so junky, my welds don't hold. If it doesing hold, then I result to the brazing rods.
 
To avoid these ads, REGISTER NOW!

Case IH

Well-known member
Joined
Dec 31, 2010
Messages
904
Location
Green Bay WI
I don't have any pictures of projects, but I have my vertical up MIG certification plate.

24256b096a8d1df97ed9c57cac269093.jpg


bc75a692b54f52d46492814e84995d16.jpg

Is it just the pic. or is the joint not fully filled in/capped?
 

welder4956

Well-known member
Joined
Apr 8, 2010
Messages
3,053
Location
Birmingham, AL USA
X-ray. Next week I'm doing a stainless and aluminum TIG cert. it will be 1F and 6G pipe.

Sorry to hear that. Ask your instructor if x-ray is permitted for GMAW short circuiting mode under AWS D1.1 or ASME Section IX and see what he has to say. Hint: It is not permitted for GMAW-SC. I asked because they have about a 75% failure rate on bend tests, but will pass x-ray because the lack of fusion areas are so hard to detect.

Your technique looks great though. The main thing on vertical is to hold the sides long enough to get good penetration and keep the wire on the leading edge of the puddle.
 
Last edited:

Nerdcore

Member
Joined
May 26, 2012
Messages
17
Sorry to hear that. Ask your instructor if x-ray is permitted for GMAW short circuiting mode under AWS D1.1 or ASME Section IX and see what he has to say. Hint: It is not permitted for GMAW-SC. I asked because they have about a 75% failure rate on bend tests, but will pass x-ray because the lack of fusion areas are so hard to detect.

Your technique looks great though. The main thing on vertical is to hold the sides long enough to get good penetration and keep the wire on the leading edge of the puddle.

I'll have to ask. I haven't gotten my papers yet but I was told I passed. I assumed it was X-ray by the way they talked about it. But nothing was really laid out there about it.
 

ImLow78

Active member
Joined
Sep 23, 2012
Messages
28
Location
in a state of confusion.
I too am a huge fan of the Dynastys, I used one at school last year but am stuck with a POS EconoTig at work....bummer

Yes, the Dynasty will spoil ya!

I don't have any pictures of projects, but I have my vertical up MIG certification plate.

Nice looking vert. What matiral was yours on? 1/4" or 3/8? Here is one of mine on 1"x4" plate (Yep, I still need to work on mine).

IMAG0058.jpg


Shannon
 
Last edited:

sberry

Banned
Joined
Jun 18, 2005
Messages
35,747
Location
Brethren, Michigan
These are just demo to show how to carry the heat, hey are not poster perfect. The third one here is a girl after about 45 minutes wrk on the machine, was trying to get her to lay this big fattie in a single pass while washing the root in. In 4th pic she got consistant but hi in the center, needed to flatten it out.
 

Attachments

  • hob hot.JPG
    hob hot.JPG
    39.5 KB · Views: 616
  • Hot vert 2.JPG
    Hot vert 2.JPG
    35.4 KB · Views: 646
  • hob vert 30a1.JPG
    hob vert 30a1.JPG
    42.2 KB · Views: 687
  • Hob vert wire 1.JPG
    Hob vert wire 1.JPG
    51.9 KB · Views: 694
  • Peach'e beads.JPG
    Peach'e beads.JPG
    50.2 KB · Views: 645
  • peach walk..JPG
    peach walk..JPG
    43.5 KB · Views: 751
  • Peach welds.JPG
    Peach welds.JPG
    51 KB · Views: 675
Last edited:

Cobra4B

Well-known member
Joined
Feb 26, 2006
Messages
1,200
Location
Virginia Beach, VA
I'm a noob at welding, but it's something I've always wanted to learn how to do. I'm rebuilding my father's Panoz racecar and stripped it down to the bare chassis to get it powdercoated gloss white. Decided to fill up all the random holes that had accumulated over the years as a patched and band-aided ex-driving school car. The old heat shielding was riveted on panels. I'm upgrading to DEI floor/tunnel shield so all the holes got filled. I also did some basic updates like a new dash panel, a proper harness bar, and new brackets for the cut-off switch and fire bottle pulls.

http://sphotos-b.**.fbcdn.net/hphotos-snc7/3170_4259837585415_1778662496_n.jpg
http://sphotos-b.**.fbcdn.net/hphotos-ash3/541215_4260748728193_2027274839_n.jpg
http://sphotos-a.**.fbcdn.net/hphotos-snc6/189244_4259839425461_1395068919_n.jpg
http://sphotos-a.**.fbcdn.net/hphotos-snc7/304310_4259841465512_411815032_n.jpg
http://sphotos-b.**.fbcdn.net/hphotos-ash4/399755_4259845545614_467462349_n.jpg
http://sphotos-b.**.fbcdn.net/hphotos-snc6/249506_4259843105553_231536658_n.jpg
http://sphotos-a.**.fbcdn.net/hphotos-ash3/524997_4325485626575_971733046_n.jpg
http://sphotos-b.**.fbcdn.net/hphotos-ash3/523027_4325489346668_884811927_n.jpg
http://sphotos-b.**.fbcdn.net/hphotos-snc7/598725_4364896531823_1523633123_n.jpg
http://sphotos-b.**.fbcdn.net/hphotos-prn1/61669_4451141247887_345499830_n.jpg
http://sphotos-b.**.fbcdn.net/hphotos-snc7/3676_4451142407916_1343323581_n.jpg
http://sphotos-b.**.fbcdn.net/hphotos-ash3/525544_4453332582669_885349853_n.jpg
http://sphotos-a.**.fbcdn.net/hphotos-prn1/552379_4453336102757_1753378977_n.jpg
http://sphotos-a.**.fbcdn.net/hphotos-snc7/378409_4484767088512_1162705992_n.jpg
http://sphotos-b.**.fbcdn.net/hphotos-prn1/542629_4484765528473_891891807_n.jpg
http://sphotos-b.**.fbcdn.net/hphotos-ash4/395029_4490150783101_634876986_n.jpg
http://sphotos-a.**.fbcdn.net/hphotos-ash3/154304_4490150263088_516085970_n.jpg
http://sphotos-b.**.fbcdn.net/hphotos-prn1/63833_4490150463093_1162598004_n.jpg
http://sphotos-a.**.fbcdn.net/hphotos-ash4/306082_4490151143110_1700884350_n.jpg
http://sphotos-a.**.fbcdn.net/hphotos-ash3/526123_4496667506015_2078075452_n.jpg
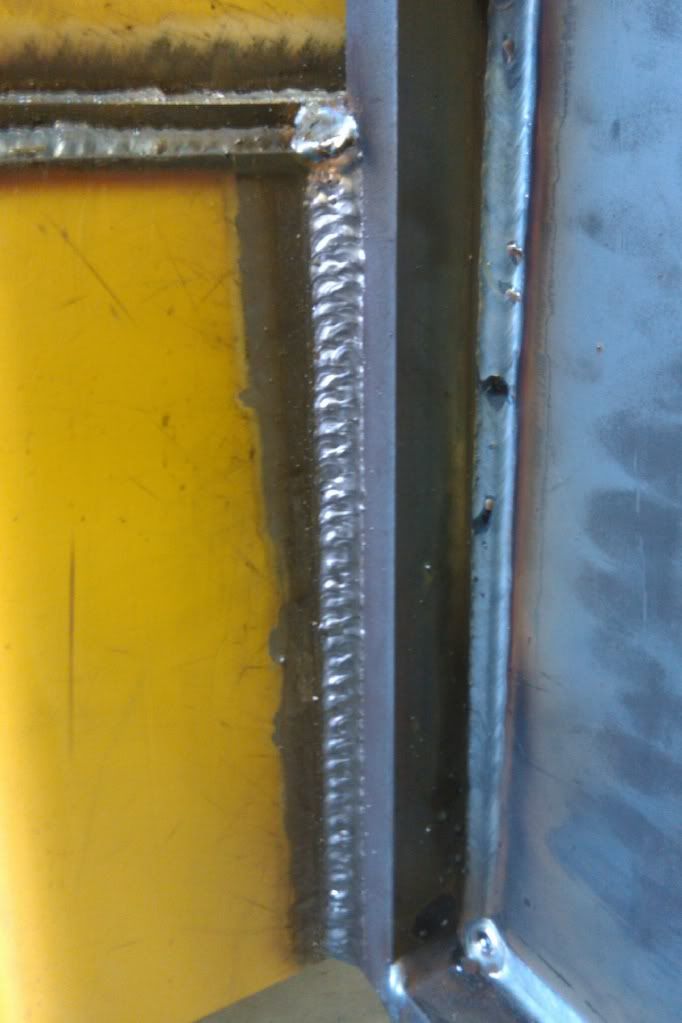
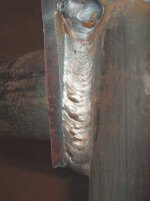
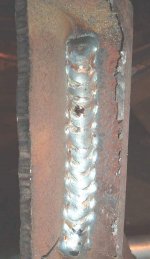
:beer:
 

Nerdcore

Member
Joined
May 26, 2012
Messages
17
Yes, the Dynasty will spoil ya!


Nice looking vert. What matiral was yours on? 1/4" or 3/8? Here is one of mine on 1"x4" plate (Yep, I still need to work on mine).

IMAG0058.jpg


Shannon

You're moving up too high. You should be doing a Z pattern. Go across and then up across and up. Don't move the wire out of the puddle either. Mine was 3/8 plate.
 

Nerdcore

Member
Joined
May 26, 2012
Messages
17
These are just demo to show how to carry the heat, hey are not poster perfect. The third one here is a girl after about 45 minutes wrk on the machine, was trying to get her to lay this big fattie in a single pass while washing the root in. In 4th pic she got consistant but hi in the center, needed to flatten it out.

That last picture. I know it can't be. But that looks a LOT like globular. Need to hold the sides more.
 

zmotorsports

ALLIANCE MEMBER
Joined
Oct 20, 2009
Messages
21,311
Location
Northern Utah
Had a small welding job come through the door last night. A guy had two brackets that he needed an inch cut out of to shorten them up. Not a big job but I haven't MIG welded in a while so I thought I would throw up a few pictures.

Mike.

Here is what the bracket looked like before cutting it down.
rcsrbq.jpg


Here is 1" removed from the overall height.
1zc2w06.jpg


Notched and pressed back together.
2cnk0tg.jpg


Underside ready to weld. Prior to pressing back together I took a Roloc disc and ran it over the metal to remove the galvanizing.
345lu80.jpg


Welding completed.
f0n5le.jpg

2s8pwdv.jpg


Completed with removed section. All that was done prior to customer picking it up was I bead blasted the part and sprayed it with some cold galvanizing.
4q4qdf.jpg
 

TimeWarpF100

Well-known member
Joined
Aug 21, 2010
Messages
6,784
Location
not here
Will have to dig up more pics but here is a set of Headers I built for a Cobra.

No fancy cutting table or plasma so had to cut the flanges out freehand with torch. Best part was it gained 100HP on chassis dyno compared to what was on it. ALso a pic of what it looks like today. SOme may recognize the car.

How about 1500+ HP? (Total in the 3)

Best part is Boyd Coddington had about ZIP to do with this car other than wanted his name on it. I did end up making another set of headers for a Cammer Cobra Project for Boyd before his passing. Dont remember the Dyno numbers but it was HUGE gain in power.

Edit add: I just read through the kitcarmag article. About 2% of what they say is true! Total bogus story. The chassis as pictured when I did headers was DONE, The pipes were powdercoated etc before Don Borders even saw the car. Complete rolling chassis was done prior. Only thing they did was body and paint along with assy. The chassis is a Contemporary as is Body. They also used it at B-J Auction as a display car.

They never touched engine etc

Prior to exhaust the vacuum was way down and forget the actual gain at idle but think it was around 7" of vacuum with just the exhaust mod. They were that restrictive, sounds like they tried to take credit for exhaust too.

http://www.kitcarmag.com/featuredvehicles/98898_shelby_mustang_cobra_replica/viewall.html

DSC00285_zps6f52ee33.jpg

DSC00068_zpseab5533e.jpg
 
Last edited:

Ben Iv

Well-known member
Joined
Jul 23, 2010
Messages
212
Location
Oklahoma
Here are a few I did for the garage at home first my bench grinder stand 1 1/4" plate for the base with a 3x1/4 tube. Then my vise stand which has a 2" plate with another 3x1/4 tube. My table is just tube and channel with a 1/4" plate on top would have rather had somthing thicker but it was free. my welder cart is made of 3/4 by 16ga square tube with wheels from a dead lincoln plaslma cutter for a more store bought look...lol zero dollars spent except on paint and a pice of chain to hold my bottle. which was also free, being the foreman at steel fabrication shop has its perks.
 

Attachments

  • IMG_20121207_155341.jpg
    IMG_20121207_155341.jpg
    133.4 KB · Views: 407
  • IMG_20121207_155219.jpg
    IMG_20121207_155219.jpg
    128.3 KB · Views: 428
  • IMG_20121207_155240.jpg
    IMG_20121207_155240.jpg
    129.6 KB · Views: 417
  • IMG_20121207_155314.jpg
    IMG_20121207_155314.jpg
    124.8 KB · Views: 474

Ben Iv

Well-known member
Joined
Jul 23, 2010
Messages
212
Location
Oklahoma
It was a little slow at the shop so I had the time to make a few improvements. a set of fork extensions for one of the forklifts. Then I built a new set of rollers for our bandsaw. I made the extensions from a pice of 4x6x3/8 tube split it down the middle and taperd the ends, cut it with a track torch nice clean straight cuts. To try and keep the seprate halves from bowing badly I made multiple cuts leaving tabs between on both sides then after it cooled i came back with a hand torch and cut the tabs. You can actually watch the cuts expand and then go back as it cools. I didnt get any progress pics of the rollers but they are made of 3x5 channel and square and rect tubing. the shop is way too clean in that pic so the last one is what it is suposed to look like...lol
 

Attachments

  • IMG_20120929_084126.jpg
    IMG_20120929_084126.jpg
    136.5 KB · Views: 456
  • IMG_20121206_083642.jpg
    IMG_20121206_083642.jpg
    139.9 KB · Views: 447
  • IMG_20121204_093121.jpg
    IMG_20121204_093121.jpg
    138.2 KB · Views: 486
  • IMG_20121204_071930.jpg
    IMG_20121204_071930.jpg
    138.6 KB · Views: 461
  • IMG_20121204_071924.jpg
    IMG_20121204_071924.jpg
    138.6 KB · Views: 496
To avoid these ads, REGISTER NOW!

AL-DIABLO

New member
Joined
Dec 4, 2012
Messages
3
My pops wanted a hook to drag along a lake bed to see what he could find. I whipped this up for him-
 

Attachments

  • DSCN3011.jpg
    DSCN3011.jpg
    146.4 KB · Views: 340

AL-DIABLO

New member
Joined
Dec 4, 2012
Messages
3
Here is a set of stainless z-bars. I coped the ends instead of the normal 90 degree miters. Capped the ends and sanded smooth. I hate seeing those open tube handlebars-
 

Attachments

  • DSCN2721.jpg
    DSCN2721.jpg
    144.3 KB · Views: 304
  • DSCN2720.jpg
    DSCN2720.jpg
    137.9 KB · Views: 255
  • DSCN2718.jpg
    DSCN2718.jpg
    141.2 KB · Views: 308

bryna

Well-known member
Joined
May 19, 2009
Messages
81
Location
North Central Iowa
Not the best pic... I welded up a new welding table. Got a 4 X 8 X 3/8 sheet of steel from a local scrap yard, cut it to size, welded two sheets together for the top and bought square tubing for legs. I also put two receiver ends on the table which I use for temporary attachment of a standard and pipe vise.
 

Attachments

  • 2012-11-19_16-04-53_179.jpg
    2012-11-19_16-04-53_179.jpg
    142.8 KB · Views: 525
Last edited:

Capstone

Well-known member
Joined
Aug 19, 2012
Messages
111
Location
Northern VA, DC Area
Here is a set of stainless z-bars. I coped the ends instead of the normal 90 degree miters. Capped the ends and sanded smooth. I hate seeing those open tube handlebars-

These are just a whole other level of welding that most can barely hope to achieve. Nevermind the fact that its TIG, but just figuring out the angles and cuts on this makes my head swim. Thanks for sharing.
 

srmofo

Well-known member
Joined
Oct 15, 2009
Messages
6,161
Location
SW ohio
These are just a whole other level of welding that most can barely hope to achieve. Nevermind the fact that its TIG, but just figuring out the angles and cuts on this makes my head swim. Thanks for sharing.

Someone please forgive my if Im wrong, but a tube notcher does a hell of a job for coping objects to round objects.
 

AL-DIABLO

New member
Joined
Dec 4, 2012
Messages
3
someone please forgive my if im wrong, but a tube notcher does a hell of a job for coping objects to round objects.
yeah, a tube notcher is one of my favorite tools. I guess i just like using the term "coped" joint.
 

zmotorsports

ALLIANCE MEMBER
Joined
Oct 20, 2009
Messages
21,311
Location
Northern Utah
Weekends project was a swing away spare tire carrier for my son's new to him Jeep LJ. We added one of our custom tire carriers to the Expedition One rear bumper. I didn't see much sense in fabricating one of our bumpers as the Ex. One was a well built piece so we just added to it.

Mike.

Plates cut and drilled from 3/16" P&O for the spare tire mount and the third brake light mount.
folny9.jpg


Brackets prepped and ready to be tacked in place for test fit.
28b4sbc.jpg


Mocked up after spindle has been welded into the bumper for the pivot point.
2ms4u1g.jpg


Here are a few closeups of the welds. I have also posted these in the "MIG Welding Technique" thread.
wc1sn4.jpg

35hiut3.jpg

2euo801.jpg

288s6fs.jpg

9896qo.jpg


On the bench completing the welding.
90agqq.jpg


Final welding completed and mocked into place one last time. Now ready to blow apart and send off to powder coater.
24b13wp.jpg


Tramp stamp fabricated and mocked into position. This will hide the unsightly rear HVAC ventilation exhaust. It will be spaced out approx. 3/4" with machined spacers and will be powder coated black to match all of the other components that we fabricated.
300aeiv.jpg
 

gbsmithy08

Well-known member
Joined
Mar 2, 2012
Messages
62
Here is a work project I just finished.
It is out of SS and copper tubing using silicon bronze TIG welding. Used my PLASMA cutter for the letters then heat colored it.
 

Attachments

  • Picture 001.jpg
    Picture 001.jpg
    112.5 KB · Views: 244
  • Picture 002.jpg
    Picture 002.jpg
    146.3 KB · Views: 230
  • Picture 003.jpg
    Picture 003.jpg
    95.5 KB · Views: 211
  • Picture 004.jpg
    Picture 004.jpg
    71.9 KB · Views: 210
  • Picture 005.jpg
    Picture 005.jpg
    103.6 KB · Views: 190

zmotorsports

ALLIANCE MEMBER
Joined
Oct 20, 2009
Messages
21,311
Location
Northern Utah
Nice ZM. Your welding keeps improving all the time. Your heat seems just right to me.
You must be getting pointers from Paul. ; - )


Thanks. I don't think I am in the same league as Paul (ZTFab) but thanks for the compliments. I will admit I have admired his work for several years now and seem to always have images of his work in my head and try to use that as a target or goal. He truly is an artist with a welder and seems to be very willing to give advice. The biggest issue I see is those he tries to help either don't take his advice or think there is some other tricks that he is not sharing. I have been welding for many years and feel very comfortable behind a welding helmet but over the past several years as my motorsports business has taken off it seems more and more clients are wanting that distinct/defined ripple or stack of dimes look. I have been trying to develope that technique and actually really like the finished result when done properly.

No tricks just lots and lots of practice and dedication. I hopefully will be that good some day but until then I had better get back to practicing.

Mike.
 

TimeWarpF100

Well-known member
Joined
Aug 21, 2010
Messages
6,784
Location
not here
So a neighbor asks "Can you weld Aluminum?" I can, what do you need welded?

Neighbor: A body panel for my dune buggy.
Me: I normally do not like to do projects now because I have so much of my own to do but . . .

Neighbor, Ok.. How much would you charge to do a few welds?

Me: Really depends on how much welding there is to do but I need *** amt to cover my expenses of running the welder and *** for my time.

I was probably to expensive at half of what I should have said. Did not hear anything for a week then a couple days ago he stops by with this mess he had someone do it for CHEAPER! LOFLOL Now wonders why it will cost more to do than before? I think I will just tell him to take it elsewhere. What would everyone else here do in this case? I was trying to do a favor but at this point pretty much lost interest especially as he was supposed to show up 2x to help and never showed. I do not want my name anywhere near this mess.
The $$ just went way up . . . Does not matter how I try to repair it will never match the other side without starting over. Note how a piece was screwed on as it was cut too short, side edge was also cobbled on as cut too short etc

DSC01615_zps88934346.jpg

DSC01624_zps9c6d1d96.jpg

DSC01623_zpsbc98a48b.jpg

DSC01622_zpse158161e.jpg

DSC01621_zpsba4a8159.jpg

DSC01620_zps020f04ea.jpg

DSC01616_zps2806b9f8.jpg

DSC01614_zps863f8d9e.jpg
 
To avoid these ads, REGISTER NOW!
Top Bottom