Adam McLaughlin
Well-known member
What is it? An early TIG box or a Stick machine?
Adam
Adam

What is it? An early TIG box or a Stick machine?
Adam
Miller 330 A/BP, 300+amp AC/DC hi frequency, sine wave tig machine, of course can run stick process as well. A bit dated in this day and age but can still do good work. They are a very solid machine.
What is it? An early TIG box or a Stick machine?
Adam
Miller 330 A/BP, 300+amp AC/DC hi frequency, sine wave tig machine, of course can run stick process as well. A bit dated in this day and age but can still do good work. They are a very solid machine.
Yes a bit dated, but that model, and its badge engineered cousin, the Airco Heliwelder, truly deserve top billing in the welder hall of fame. Great machines.
Yes, that is correct. After talking to several Miller dealers, they all pretty much agreed, the older welders are built way better than the new ones. The only draw back is the size.
 And power input and weight and features and parts availability. Don't get me wrong they are great for the home shop, but there are good reasons why they are being phased out of industrial settings.
long term project here:
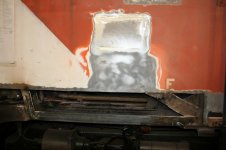
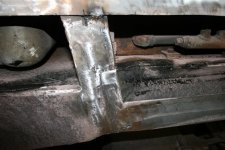
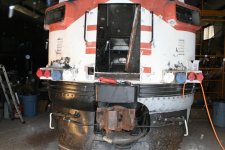
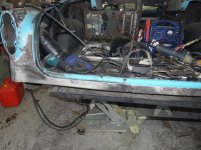
restoration of a former New Haven Railroad FL9 diesel locomtoive.
Lots of rust removal and new steel being cut and welded in.
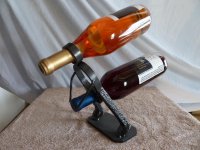
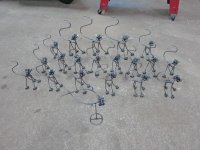
I made some silverware art, knights, and a field hockey player for the neighbor .
A few wine holders an a horseshoe napkin holder.


Nice job. I guess you don't have much odd ball shaped scrap you hang on to, or is it in a different place? I have some arched 2" square tube left over from a gate I built for a lady. I've kept the pieces knowing I'll use them some day, but they have been a pain in my **** to store ever since. LOL!
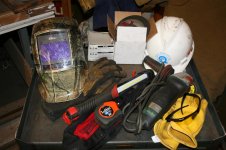
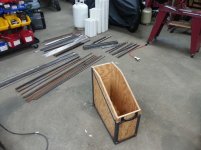
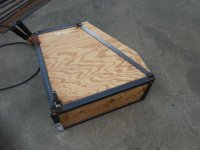
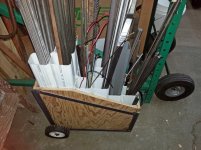
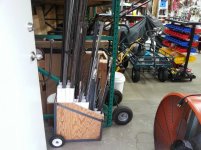
My through-together wooden stock box finally failed yesterday (the bottom pulled loose). So, I spent the afternoon reinforcing it. In the background of the first photo, you can see the plastic rain guttering I use to segregate the pieces by size and type. The close ups show a down and dirty “cheater’s miter”. I think the Harbor Freight wire splatters worse than the Hobart but it only costs half as much. Not sure if I’ll use any more after this roll. I only have to weld a cross strip across the bottom, reinstall the wheels and load the material back in and I’m ready to go for 300 pounds. I will post more photos on completion.
Very nice looking stock box. I would like to make something similar.
I use the HF flux core wire sometimes, but it does have a lot of spatter and smoke.
The best deals I have found on mig wire are at USAWeld
2 10 lb Rolls ER70S-6 .035" Mild Steel MIG Welding Wire Ships Free
US $35.90
2 10lb .035" HTP Flux Cored E71T-GS Gasless Steel Mig Wire core Ships Free
US $78.40
I have used several rolls of this ER70S-6 and I like it a lot. I'm going to order the flux core soon, as it is about half the price of some of the others.


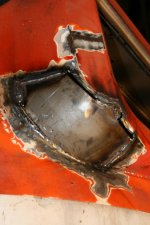
Question for MP&C. How would something like this be planished? There is no access to the back.
Here's the "zoo" thus far. I'm working on a dozen more donkeys. I usually just give them away to friends, neighbors, family etc.
Question for MP&C. How would something like this be planished? There is no access to the back.


Here's a little 4 ton press I just finished. Couldn't justify a large press as I am very limited on floor space and I didn't like any of the Chinese options. It stands 29" tall, there's 16" of work space between the uprights and with the bed resting on the legs there's 10" between the top of the bed and the bottom of the horizontal upper bars. The guide bars for the jack are some CAD plated round stock that I threaded to accept 8mm bolts top and bottom. I had to photograph it outside to show the correct color. The paint is rattle can Rust-Oleum "Hammered Rosemary." With the arbor plates it weighs 61.5 lbs. I intend to use it to press small items and as a break for small brackets and miscellaneous pieces.
I welded the female end of a 1/2" extension to the jack plate so I can attach an extension and socket... this is convenient as it will hold the tooling to drive bearing and seals. I can attach what ever socket I need to match the work.The pins to hold the work bench are hitch pins that I extended so the bed sits safely. There is a continuous piece of 2 x 3/16" thick strap that is welded to the underside of the top pieces to reinforce the load bearing areas.
I found a nice piece of tubing to replace the flimsy handle that came with the bottle jack. The other end has a smaller diameter tube with the end crushed to be used as the jack release. That tube is pressed into the handle. I will find a plug for the open end for a more finished look and will attach a clip to the press itself to store the jack handle. In this pic you can see how I attached the jack to the base. At the rear I pressed a roll pin into the base to act as a guide and at the front I tapped a 6mm hole into the base and bolted through the jack base.


Another option is to eliminate the need for that weld seam by using a hammer form to make the trunk opening detail part of the new patch. One could bend the top fold, then clamp in a pipe of said size, and hammer the inside detail around the pipe. Once that is done, bend the bottom fold. Then it becomes a drill out the spot welds, add some plug welds to hold in the new piece, and you're done..
But Dave's got some nice fit up and welds there, shouldn't be too much clean up as it is...
@stinkity stoink, those are some nice spot welds. Do that over and over and you won't have to beat on it and won't have a lot of grinding to do.
Here's a little 4 ton press I just finished. Couldn't justify a large press as I am very limited on floor space and I didn't like any of the Chinese options. It stands 29" tall, there's 16" of work space between the uprights and with the bed resting on the legs there's 10" between the top of the bed and the bottom of the horizontal upper bars. The guide bars for the jack are some CAD plated round stock that I threaded to accept 8mm bolts top and bottom. I had to photograph it outside to show the correct color. The paint is rattle can Rust-Oleum "Hammered Rosemary." With the arbor plates it weighs 61.5 lbs. I intend to use it to press small items and as a break for small brackets and miscellaneous pieces.
I welded the female end of a 1/2" extension to the jack plate so I can attach an extension and socket... this is convenient as it will hold the tooling to drive bearing and seals. I can attach what ever socket I need to match the work.The pins to hold the work bench are hitch pins that I extended so the bed sits safely. There is a continuous piece of 2 x 3/16" thick strap that is welded to the underside of the top pieces to reinforce the load bearing areas.
I found a nice piece of tubing to replace the flimsy handle that came with the bottle jack. The other end has a smaller diameter tube with the end crushed to be used as the jack release. That tube is pressed into the handle. I will find a plug for the open end for a more finished look and will attach a clip to the press itself to store the jack handle. In this pic you can see how I attached the jack to the base. At the rear I pressed a roll pin into the base to act as a guide and at the front I tapped a 6mm hole into the base and bolted through the jack base.
Thanks!Very cool, Louie!
Thanks. I am wondering the same thing about the stress that the ram will create. My plan to is to monitor the welds by looking for cracks in the paint finish and deflection. I will add strength as needed. The two horizontal bars midway are only there to locate the vertical guides. The length of the jack is set so the jack base stops short of them so they are never stressed.Great looking press Louie. I noticed a couple things. First is that I'm wondering if you will need added gusseting in the corners. Even 4tons is gonna put a lot of stress in those areas.
And are the two horizontal members there for strength? I assume the post passes between them?
I built my 20ton press years ago and it gets about as much use as a treadmill in a fat chicks basement. BUT! when I need it, I'm sure glad I have it. I sometimes wish I had a big arbor press for the small jobs.