To avoid these ads, REGISTER NOW!

Show us your welding projects

youngnstudly

Well-known member
Joined
Apr 20, 2007
Messages
79
Location
The "Whine" country, CA
These are just a few simple projects I've done over the years.

A portable band saw stand made from "odds and ends" that were laying around, including some scrap EMT conduit:
 

Attachments

  • portable bandsaw stand1.jpg
    portable bandsaw stand1.jpg
    89.2 KB · Views: 281
  • portable bandsaw stand2.jpg
    portable bandsaw stand2.jpg
    98.5 KB · Views: 280
  • portable bandsaw stand.jpg
    portable bandsaw stand.jpg
    97.3 KB · Views: 332
  • portable bandsaw stand3.jpg
    portable bandsaw stand3.jpg
    122.9 KB · Views: 317
  • welding stand.jpg
    welding stand.jpg
    144.7 KB · Views: 332
To avoid these ads, REGISTER NOW!

youngnstudly

Well-known member
Joined
Apr 20, 2007
Messages
79
Location
The "Whine" country, CA
UPS destroyed parts of the Atlas 618 lathe I bought off Ebay, including the cast iron access cover for the head stock internals. Someone on another site told me that UPS stands for United Parcel Smashers.....I fully agree!

I used some cast iron stick welding rod for this to avoid mail ordering specific tig filler. Worked pretty good (flux removed), along with multiple passes and pre/post heat:
 

Attachments

  • broken lathe cover3.jpg
    broken lathe cover3.jpg
    111.4 KB · Views: 176
  • broken lathe cover2.jpg
    broken lathe cover2.jpg
    79.7 KB · Views: 197
  • broken lathe cover1.jpg
    broken lathe cover1.jpg
    59.3 KB · Views: 177
  • weld repair.jpg
    weld repair.jpg
    140.6 KB · Views: 201
  • broken lathe cover.jpg
    broken lathe cover.jpg
    58.2 KB · Views: 177

youngnstudly

Well-known member
Joined
Apr 20, 2007
Messages
79
Location
The "Whine" country, CA
My dad was thinking of throwing a nice 16ga shelving system out, but was hesitant, so I helped him decide to donate it to the "needy" (me) so I could modify it for a welding cart.:D

The rear bottle holder was made from scraps of 1.5"x.065" square tubing, EMT conduit scraps, and 1"x1"x.065" square tube. The doors are 20ga sheet that my former employer let me form up. Sorry I don't have a pic of all the doors installed....I'll have to snap one next time I get the chance.

Andy
 

Attachments

  • welding cart mine7.jpg
    welding cart mine7.jpg
    80.9 KB · Views: 196
  • welding cart mine6.jpg
    welding cart mine6.jpg
    57.7 KB · Views: 151
  • welding cart mine4.jpg
    welding cart mine4.jpg
    75.6 KB · Views: 174
  • welding cart mine2.jpg
    welding cart mine2.jpg
    113.3 KB · Views: 158
  • welding cart mine1.jpg
    welding cart mine1.jpg
    86 KB · Views: 179
  • welding cart mine.jpg
    welding cart mine.jpg
    77.9 KB · Views: 166

tick

New member
Joined
Jan 15, 2013
Messages
2
Done with Christmas gifts.

d3058769cd652cf4103c22559ea96609.jpg

My daughter would love those. What did you use for the main body, or did you fabricate it from scratch?
 

fred d

Well-known member
Joined
Dec 31, 2008
Messages
916
Location
Metro Houston Area
Maybe someone can help me find something on this site: a couple of pictures were posted recently of a mount for an angle grinder stand for a bench vise. Pair of 1/4 hoops that run from side bolts on grinder to flat top at grinder face.

Like this one
 

Attachments

  • image.jpg
    image.jpg
    126 KB · Views: 454

fred d

Well-known member
Joined
Dec 31, 2008
Messages
916
Location
Metro Houston Area
Maybe someone can help me find something on this site: a couple of pictures were posted recently of a mount for an angle grinder stand for a bench vise. Pair of 1/4 hoops that run from side bolts on grinder to flat top at grinder face.

Second pic
 

Attachments

  • image.jpg
    image.jpg
    120.4 KB · Views: 488

youngnstudly

Well-known member
Joined
Apr 20, 2007
Messages
79
Location
The "Whine" country, CA
How do the dikes with the extensions work. Thanks

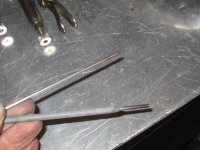
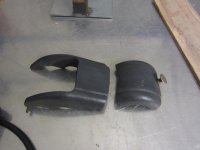
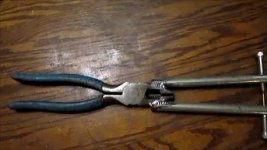
Those pliers use to be a common tool that was used in the sheet metal trade (like 60+ years ago) when doing layout work on expensive materials, and (from what I've been told) they called them "transfer point pliers." They are sort of outdated nowadays.

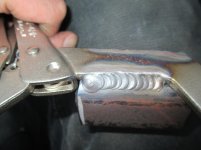
Basically, instead of laying out scribe lines on your work piece from the backside and *****-punching so you have marks to follow when cutting or forming the material from the top side, you simply layout the backside, place the threaded points directly on your brake or cut mark, squeeze the pliers handles together, twist them back and forth, and "voila"....your marks are instantly transferred onto the good side of the material fast and easy w/o scratch marks or dimples.

I used them a lot when working with stainless, colored metal, or copper in the sheet metal shop. High end stainless countertops and kitchen hoods (for example) can't have nicks, dents, and scratches when finished, but it's hard to get marks that won't show up otherwise when you're finished with the project.

Now I use them for mostly patch panel and car related repairs where you might have to drill something from the backside (but there's no reference mark), or make a locator mark on a compound curve, etc.

Andy
 

ndr1968

Well-known member
Joined
Apr 18, 2012
Messages
207
Location
Oklahoma

Attachments

  • 20141214_095655.jpg
    20141214_095655.jpg
    136 KB · Views: 469
  • 20141214_095619.jpg
    20141214_095619.jpg
    132.5 KB · Views: 445
  • 20141214_095552.jpg
    20141214_095552.jpg
    137.4 KB · Views: 464
  • 20141209_162413.jpg
    20141209_162413.jpg
    140.9 KB · Views: 396

ndr1968

Well-known member
Joined
Apr 18, 2012
Messages
207
Location
Oklahoma
Second pic

I don't know about that one but I finished this one not long ago:

BTW this isn't my idea. I got it from here:
I couldn't locate the page he refers to for the "plans" but there are 3 quick shots of the dimensions towards the end. Just hit the "Print Screen" key when they come up and save the images in whatever photo editor you are using (in case these attachments aren't usable). The drawing calls for 2cm sq tube but I just used 14gauge x 1 inch.
 

Attachments

  • grinder handle 001.jpg
    grinder handle 001.jpg
    135.8 KB · Views: 162
  • grinder handle 002.jpg
    grinder handle 002.jpg
    121.1 KB · Views: 146
  • grinder handle 003.jpg
    grinder handle 003.jpg
    123.9 KB · Views: 149
Last edited:

WakonTonka

Well-known member
Joined
Feb 20, 2012
Messages
118
Location
The BORG ship
Rolling table for welding and general use: 72"L x 30" deep. Plywood top pops off. Left side of the lower shelf is raised to allow my HogLift to fit under there. Vise support is a piece of 4" x 6"-1/4" angle iron as used for lintels. (support above a window when you are bricking). Each locking caster swivels and can support 330# each. Clamp tube is 3/4" square and the magnet collector is 1/8" plate.

View media item 46588
View media item 46589
View media item 46590
View media item 46591
View media item 46592
 

Aquaticbob

Well-known member
Joined
Dec 3, 2013
Messages
488
Location
Seattle
f8fcceb2e956f5d39c88ae7954f4753d.jpg
29d0c0fa250f7bb55435c30fa861db9b.jpg
daedfb27444b54cd71857bacec41cfe3.jpg


Repurposed an old lift arm into an oil filter crusher. Have a few more kinks to work out, but it works really well inside my 20 ton press. Best part, didn't cost like a grand
 

Will S.

Well-known member
Joined
Apr 15, 2010
Messages
446
Location
The First State
WakonTonka,

Nice table build. What thickness steel plate is under that plywood top? Can you provide any add'l pics or details re materials used for the legs and cross-braces?
 

Seiler

Well-known member
Joined
Feb 8, 2013
Messages
81
Location
Colorado
Follow up from Post # 2838.

Had a chance to spend some more time on the axle. Few pictures to share.

I ran the roots with 6010 since the inside was so dirty. Followed that with a TIG hot pass.


DSC_4405
by The Color Orange, on Flickr

I took a break in-between passes so I could allow the axle to cool. Here are a few shots of the cover welds.


DSC_4424
by The Color Orange, on Flickr


DSC_4431
by The Color Orange, on Flickr


DSC_4452
by The Color Orange, on Flickr

Hope everyone had a safe and fun new years. :beer:

Scott
 

ADSR

Well-known member
Joined
Jan 12, 2013
Messages
10,713
Follow up from Post # 2838.

Had a chance to spend some more time on the axle. Few pictures to share.

I ran the roots with 6010 since the inside was so dirty. Followed that with a TIG hot pass.


DSC_4405
by The Color Orange, on Flickr

I took a break in-between passes so I could allow the axle to cool. Here are a few shots of the cover welds.


DSC_4424
by The Color Orange, on Flickr


DSC_4431
by The Color Orange, on Flickr


DSC_4452
by The Color Orange, on Flickr

Hope everyone had a safe and fun new years. :beer:

Scott

Wow, Scott! You run that TIG like a laser beam!! Nice welds!!!:rocker:
 
To avoid these ads, REGISTER NOW!

welder4956

Well-known member
Joined
Apr 8, 2010
Messages
3,059
Location
Birmingham, AL USA
Follow up from Post # 2838.

Had a chance to spend some more time on the axle. Few pictures to share.

I ran the roots with 6010 since the inside was so dirty. Followed that with a TIG hot pass.

I took a break in-between passes so I could allow the axle to cool. Here are a few shots of the cover welds.

Hope everyone had a safe and fun new years. :beer:

Scott

Nice work Scott. Looks like you've done some TIG welding before!
 

Seiler

Well-known member
Joined
Feb 8, 2013
Messages
81
Location
Colorado
Wow, Scott! You run that TIG like a laser beam!! Nice welds!!!:rocker:

Nice work Scott. Looks like you've done some TIG welding before!

Nice welding!

Very nice Scott!!

Thank you all for your kind words. I "practice" 40 hours a week at work which allows me to keep myself fresh in the process, and I love to do it.

What kind of rod is that? Any special source or just the local metal supply?

If this question was directed at me, I used 1/16" ER70S-6 that I purchased at my local welding supply store.

Scott
 

Bruce4310TX

Well-known member
Joined
Nov 4, 2009
Messages
507
Location
Forth-Worth, TX
I tried HF Flux Core wire. It was absolute ****, I didn't even finish the spool before tossing it out.

Nothing wrong with HF wire i have used at least 40 rolls 10 lb spools solid and flux wire in lincolns and miller, not a problelm with a single roll i suspect your setup is off.
 

Perrorojo

Well-known member
Joined
Jun 8, 2012
Messages
1,762
Location
Northern IN
I tried HF Flux Core wire. It was absolute ****, I didn't even finish the spool before tossing it out.
Don't quote me but I think flux core runs a lot hotter than solid. That may not be the proper term but it never worked well for me on panels or thin material.
 

Robert Hall

Well-known member
Joined
Jan 17, 2011
Messages
414
Location
Utah
A couple of quick racks to hold a little steel...
 

Attachments

  • uploadfromtaptalk1420427876102.jpg
    uploadfromtaptalk1420427876102.jpg
    123.1 KB · Views: 243
Joined
Jun 30, 2011
Messages
1,080
Location
AZ
Rolling table for welding and general use: 72"L x 30" deep. Plywood top pops off. Left side of the lower shelf is raised to allow my HogLift to fit under there. Vise support is a piece of 4" x 6"-1/4" angle iron as used for lintels. (support above a window when you are bricking). Each locking caster swivels and can support 330# each. Clamp tube is 3/4" square and the magnet collector is 1/8" plate.

View media item 46588
View media item 46589
View media item 46590
View media item 46591
View media item 46592

Welding table with plywood top and shelf?
 

WakonTonka

Well-known member
Joined
Feb 20, 2012
Messages
118
Location
The BORG ship
For Will S: all angle is 2"x2"x 1/8". Top is 1/8" HRS. MIG welded with .023 wire & 75 Ar/25 CO2. Under the top- 3 angle braces, equally spaced. I notched the cross braces so that the upper structure and the braces were flush to the top.

OK guys, to prevent (preempt) any more less-than-constructive comments about my rolling workbench.... I did not drill the 1/8" steel top for clamps as I am a hobby welder & magnets allow the positioning/fixturing I require for the kind of projects I weld. In fact, I have welded two projects on the new table so far (TIG welder cart which is posted in the welding cart thread & a vertical addition to my air compressor, again a mod to gain space in my garage) and have checked the lower shelf for any evidence of burning- nada. So a 3/4" plywood shelf below is not a fire hazard for welding on top of the table. Thank you DarkMohohue for pointing out what a few earlier posters did not notice. My issue is space. That is why it rolls, and that is why it has the ability to have a plywood top. Oh, the top is ONLY 1/8" thick, surely a thicker top would be nice? Indeed it would, but I welded 3 equally spaced 2x2x 1/8" angle iron cross braces under the top-for my purposes, it is supremely strong. And the weight with 4 swivel casters is manageable. And I was able to lift the top onto the table without needing help. I think it would be better to resist the passive aggressive (smug) tone in some posts. This should be a forum of enthusiasts that support each other, & it usually is-THANKS !!
 

wagzilla

Well-known member
Joined
Dec 11, 2012
Messages
604
Location
Arizona
I was grinding and caught my sweat shirt on fire 7 inch round hole I thought it was getting kinda warm, the bad thing is I have a leather jacket for welding and grinding

Don't forget to wear your safety gear, and I did really like that sweat shirt too!!!

James
 

WakonTonka

Well-known member
Joined
Feb 20, 2012
Messages
118
Location
The BORG ship
Another "Taking it into the Vertical" MOD. Once again space is precious in my garage workshop so I modded my air compressor vertically to incorporate a retractable hose reel, a couple of shelves for accessories and to upgrade the (weak) OEM filter/dryer setup. That's a prefilter, oil coalescing, & dryer group with shutoff valve. With the valve closed & air purged from the coiled hose-the desiccant should last longer... I oil the air tools directly so that the hose is uncontaminated for painting, etc.

View media item 47016
View media item 47018
View media item 47015
View media item 47017
OEM:
View media item 47011
 
Last edited:
To avoid these ads, REGISTER NOW!
Top Bottom