You are using an out of date browser. It may not display this or other websites correctly.
You should upgrade or use an alternative browser.
You should upgrade or use an alternative browser.
Show us your welding projects
- Thread starter neonnblack
- Start date

BD1
Well-known member
Farmall450
Well-known member
Bore some holes in a couple and hang them like the others. Tape some paper over the back side of the hole.. shooting at the paper through the hole will either improve your grouping or frustrate the **** out of you
That's what my shop teacher said. Seems like a real waste though to build a stand for tiny targets...maybe a partial one that slips on a fencpost, or hangs on the side of that one

Thanks
mdbeck1
Well-known member
...
Any ideas on how to utilize a few other smaller pieces of that 5/8" plate? maybe 6x4 or so. Kinda small to hang like this but I'm cutting some out of a scrap piece.
The local range has some smaller metal targets on the pistol range. There's a frame (similar to yours) and three or four small (6"?) targets hung on it. It's placed at about 15-20 yards.
Lots of fun with a 22 pistol. My 38 sends them all over the place.
Farmall450
Well-known member
The local range has some smaller metal targets on the pistol range. There's a frame (similar to yours) and three or four small (6"?) targets hung on it. It's placed at about 15-20 yards.
Lots of fun with a 22 pistol. My 38 sends them all over the place.
That might do. It's 5/8 plate lol.
Griff93
Well-known member
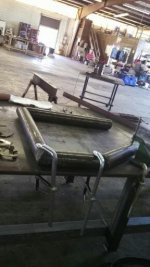
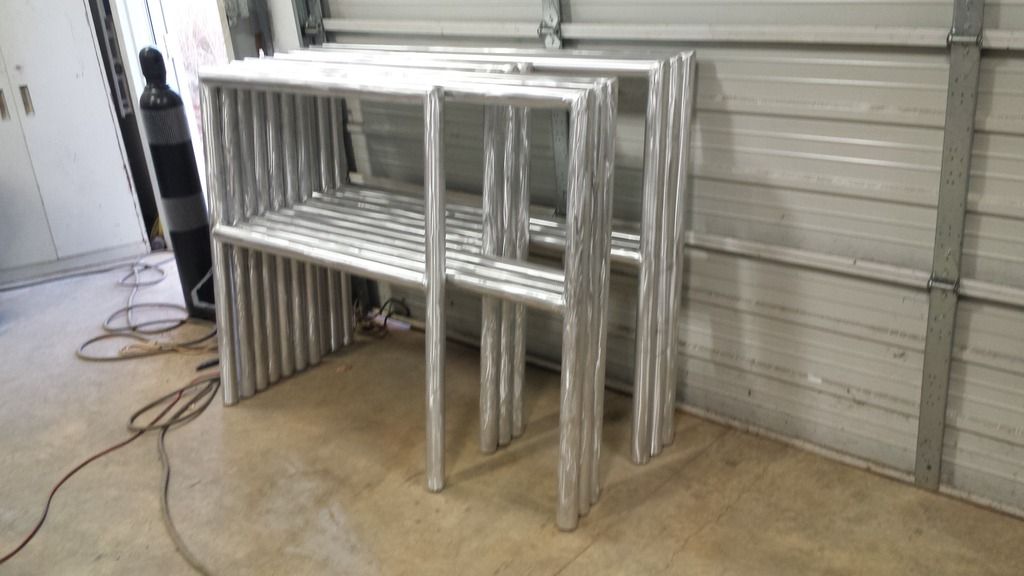
I'm building an air table for my CNC plasma. So far I've managed to build the two fume hoods that will be mounted below the slats. These are roughly 50"x57" for size reference. I really need to buy or build a big welding table. Working in the floor is getting old.


steel 35
Well-known member
The slats on the table your building work pretty well!
Mike.ASC
Well-known member
Beautiful
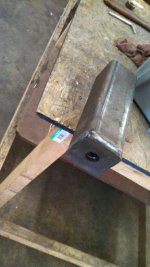
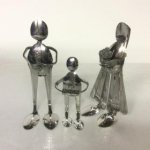
What do you do with a trashed block and extra parts....?
Hire someone to dust it?
I apologize! I couldn't resist!
You could probably get a good price for that from the local Ford franchise though!
shortykorte
Well-known member
Gives new meaning to Found On Roadside Dead.
Nicely done!
Nicely done!
sierradmax
Well-known member
Here's a time consuming project I took on. My company built a HINO dealer and tried shopping for a reasonably priced railing system. Glass was WAY too expensive and stainless was up there too. I took on the challenge however, as you can see, finishes were installed (i.e. flooring, painted walls, ceiling). Project took more time with setup of smoke heaters, burn blankets, etc. Most of the railing assemblies were shop fabricated. Overall, the look blends with the theme of the building and the owner is satisfied.


Completed Project:

Second Floor had a Catwalk. I used diamond plate as a toe-kick.


Completed Project:

Second Floor had a Catwalk. I used diamond plate as a toe-kick.

What do you do with a trashed block and extra parts....?

I'm predicting more than one banged up shin on the end of those headers! :S
trialrun
Well-known member
What do you do with a trashed block and extra parts....?
Your "junk" sure looks nicer than most of my engine bays, great job!
Robert Hall
Well-known member
Here's a time consuming project I took on. My company built a HINO dealer and tried shopping for a reasonably priced railing system. Glass was WAY too expensive and stainless was up there too. I took on the challenge however, as you can see, finishes were installed (i.e. flooring, painted walls, ceiling). Project took more time with setup of smoke heaters, burn blankets, etc. Most of the railing assemblies were shop fabricated. Overall, the look blends with the theme of the building and the owner is satisfied.
Completed Project:
Second Floor had a Catwalk. I used diamond plate as a toe-kick.
Super nice work. I'm just finishing one up today too.
Sent from my iPhone using Tapatalk
1953mercury
Well-known member
Nice job on the railings. Mike
Griff93
Well-known member
Those railings look great.
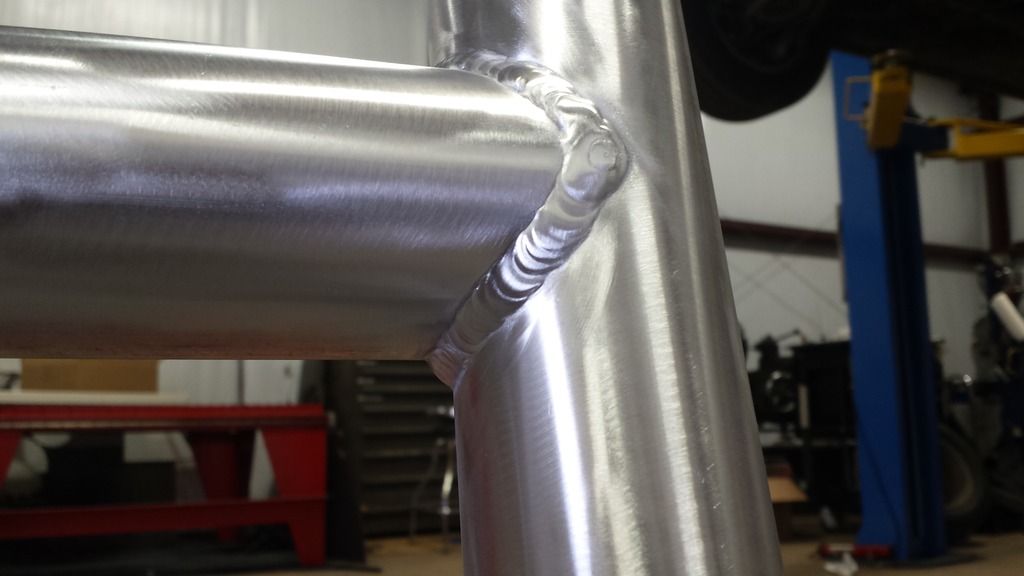
I recently did some railings myself but didn't do the install work.
The gap on the corner joint is not nearly as bad as it looks in the picture. All the weld joints were beveled as this is 0.150" wall. Have I mentioned I really badly need a big table?


I recently did some railings myself but didn't do the install work.

The gap on the corner joint is not nearly as bad as it looks in the picture. All the weld joints were beveled as this is 0.150" wall. Have I mentioned I really badly need a big table?


saceone
Well-known member
^^ I am willing to trade my table for your welding skills !
zmotorsports
ALLIANCE MEMBER
Those railings look great.
I recently did some railings myself but didn't do the install work.
The gap on the corner joint is not nearly as bad as it looks in the picture. All the weld joints were beveled as this is 0.150" wall. Have I mentioned I really badly need a big table?
Nice looking rails and nice looking beads.
Mike.
sierradmax
Well-known member
Nice. What do you use for your fish mouths?
E12-535iTurbo
Well-known member
That ***** having to do that on the ground. Still you did a great job but I can imagine it was quite a work-out.
Griff93
Well-known member
Yeah I'm past ready for a table. I'm thinking real seriously about buying a buildpro 4x8. It's a lot of money but every time I turn around fixturing the job would have been much easier and quicker with one. I have an upcoming job that is going to be very difficult to do without it or a jig. I can build the jig but it's several hundred in materials that I'll have to eat as part of the job. Then when I'm done I'll have to cut it back apart or throw it in storage.
I'm using a holesaw in a bridgeport for the notches. It works really well as trimming just a little bit off of it is easy with how ridgid the mill is. The OD on this stuff is 2 3/8" so I'd rather not hang onto a hand drill either. I had a notcher but never used it due to having the bridgeport. Want to turn a holesaw at 150 rpm? No problem.
I'm using a holesaw in a bridgeport for the notches. It works really well as trimming just a little bit off of it is easy with how ridgid the mill is. The OD on this stuff is 2 3/8" so I'd rather not hang onto a hand drill either. I had a notcher but never used it due to having the bridgeport. Want to turn a holesaw at 150 rpm? No problem.
bmxdad
Well-known member
Anyone make a better stand for the HF band saw? The stock one is sheet metal and mine is old and bent. I was looking for some ideas on a new stand ....
ilovevocs
Well-known member
Anyone make a better stand for the HF band saw? The stock one is sheet metal and mine is old and bent. I was looking for some ideas on a new stand ....
http://weldingweb.com/showthread.php?354591-4x6-metal-bandsaw-stand-base-and-mods
google search:
4x6 bandsaw "X"
X=stands, plans, ect.
Roberts210
Well-known member
This is DAMM NICE WORK!
maverick3316
Well-known member
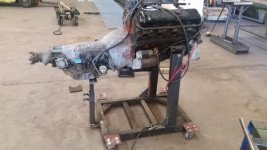
Built this engine stand a while ago for a 350 Chevy that I needed to be able to start and run on the stand. That motors long gone, so I fit my 454 Chevy and turbo 400 transmission onto it today. I'm gonna do a few more things to it. Put some expanded metal in the bottom, fit a radiator onto it, maybe a battery.
Attachments
bmxdad
Well-known member
http://weldingweb.com/showthread.php?354591-4x6-metal-bandsaw-stand-base-and-mods
google search:
4x6 bandsaw "X"
X=stands, plans, ect.
Yea, got it .... looking for ideas from GJ. Thanks though
Griff93
Well-known member
I worked on fixing my skid steer's radiator and hydraulic cooler today. It had seen lots of abuse due to the constant beating of being in a skid steer. One side of each had broken off. I started by cleaning all the **** off in the parts washer. Once clean, I clamped up the first one to be fixed. This whole side cracked and fell off. This part is $1200 for a replacement so I decided to fix it.

Welded it up.

Grabbed another piece of 5356 filler rod and started on the other end. Everything went to ****. Someone had put one piece of stainless filler rod in with my 5356. Took me a couple of WTF tries to figure out what was going on.

Ground it all back out so I could weld it with aluminum filler rod this time.

Much better

That was the hydraulic cooler. More on the radiator later.
jimgood
Well-known member
I don't know what he's using, but if you want to save some money and do it faster than with a hole saw, watch this video:Nice. What do you use for your fish mouths?
This guy builds beautiful cages and does not use any kind of dedicated notcher.
Griff93
Well-known member
I'm using a bridgeport and a holesaw. I bought a notcher but got rid of it as the bridgeport does a better job. I've tried notching it like in the video. It's a good way to do it if you don't have a notcher or the piece is to big. It is no where near as quick though on 90s. It literally took me 1 minute of cutting to notch each of these. I did 20 in an hour including cleaning them up. His practice is right out of a pipe fitters book. You can use a wrap around for this. We had to notch some 6" the other day. I don't have a 6" holesaw and the pieces were 10ft long anyway. We laid it out like that but in 45 degree rotations instead of 90. Cut it out with the plasma cutter. It was close enough they took less than 5 minutes of grind time ea. Most of it was knocking off the slag from cutting.
Here's a great tube coping calculator for printing out wraps. http://www.metalgeek.com/static/cope.pcgi
Here's a great tube coping calculator for printing out wraps. http://www.metalgeek.com/static/cope.pcgi
Griff93
Well-known member
The skid steer radiator had a broken off side as well as a couple of other problems. One was a bolt had almost rubbed through the tank.

Got it built back up. Just a note, I've found when dealing with stuff like this it's really hard to get the contaminates out of the weld area due to all the little tiny craters, etc. I light up on it and run the torch over the whole area without putting any filler. I use just enough heat to barely start a puddle. This will get most of the contaminates to float to the surface where you can get them with a stainless wire brush.

This nastiness is where the shroud rubbed a hole in the tubes. They normally don't touch but the broken side let them contact.

I wire brushed it as good as I cold but there was still some stuff I couldn't get to right next to the tubes. I decided I'd try to clean it off some with a propane torch. Remember that parts washer I mentioned earlier? Apparently even though I had let them dry for hours and blown them out with an airhose the stuff stuck between the fins had soaked up some of the parts washer solution. It lit up like a big candle.

I didn't want to shock the already hot aluminum so I just took it outside and let it burn off.
ilovevocs
Well-known member
Yea, got it .... looking for ideas from GJ. Thanks though
I did allot of searching a few years back and surprisingly didn't find much if anything on garage journal. Search also did reveal much when HF or harbor freight were used as search criteria. I did manage to find a one complete set of plans online for a nice rolling base with built in coolant tray using the search criteria I posted.
I get sense from your post that you thought I was being an ***. I wasn't. I was simply sharing what yielded results in my search since I had spend a fair amount of time looking myself.
spike99250
Well-known member
This is DAMM NICE WORK!
Really nice work.
I have to ask, did this pass an inspection yet? The only reason I ask is the bottom projection on the rail would fail on most jobs I have been on.
They would need to be return back to the railing either horizontally or vertically down and then back. The theory is that a strap from a purse, backpack or briefcase could get snagged and cause an accident.
I just had to redo a wood handrail last week because the inspector failed it for no returns and not being continuous. I didn't do the first one, but did make the no return mistake last year. Luckily on that one I made a small mitre box and cut them in place.
Like I said, incredible work, I just don't want to see you have to redo anything.
Turned some Vise-Grips and key stock

into heater/radiator hose clamps


into heater/radiator hose clamps

Redlunn
Well-known member
Simple little mount for a few angle grinders and supplies.


maverick3316
Well-known member
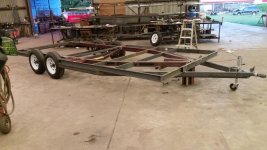
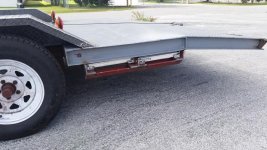
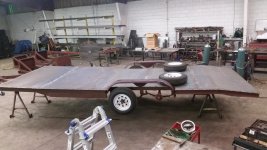
I built a car hauler a few months ago... Still gotta finish wiring the side lights, but complete for the most part.
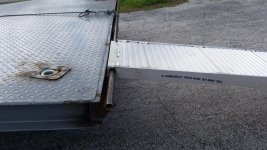
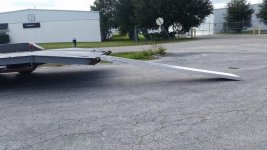
I started with a boat trailer, and later learned it would have been easier to just build from scratch. Oh well, you live, you learn. It only has 3500 lb. axles on it as of right now, but I will be upgrading those soon. It is 8' wide, 20' overall. 17' flat, with a 3' dovetail. Brakes on the front axle. Aluminum ramps 7'-10" long, that get stored under the rear of the trailer when not in use. I have a reciever welded onto the front, that I can attach anything I want to. Right now I have a little 2500lb. winch mounted to a hitch so I can pull cars and such. Tie downs in each corner. All the lights are LED. I also put reverse lights in the rear, cause how many times are you backing up at night, and cannot see where you are going? Well they make a world of difference.
Any questions, please feel free to ask.
Attachments


maverick3316
Well-known member
Some more pics
Attachments


maverick3316
Well-known member
Some more pics.
Attachments


maverick3316
Well-known member
I built an english wheel using the harbor freight die and anvil. One day ill be able to afford replacing them with better quality.
I just realized I don't have a finished pic. Ill get that in a few days.
I just realized I don't have a finished pic. Ill get that in a few days.