To avoid these ads, REGISTER NOW!

Show us your welding projects

To avoid these ads, REGISTER NOW!

Blue Chips

Well-known member
Joined
Jan 25, 2012
Messages
199
Location
Maine
Nice rig!
@Blue Chips that’s the most creative use of steel angle ever. I really love the caster outriggers, that just looks so great. Love this cart!
@Blue Chips AWESOME job on the TIG cart. Very well done.

Thanks all. :)

I'm not a fast worker; I generally just plug away at things until I'm happy with the results. The TIG cart has been working well for me. As mentioned, my shop is pretty small, so the maneuverability of the cart has proven to be its best feature. It gets parked in a lot of different spots, depending on where I need to make room for working on something. My shop is basically half of a double garage, plus some tool storage on the other side, leaving just enough room to accommodate the spousal transport unit and allow her to open the car doors. If I ever get the shop cleaned up, I'll post a photo or two. I also have a couple of shipping containers full of projects/tools/car, etc., but they're not set up for working...just storage.

More welding project posts coming when I have a moment.
 

Blue Chips

Well-known member
Joined
Jan 25, 2012
Messages
199
Location
Maine
I just finished a rotisserie for use in 1965-66 Ford truck restoration mostly.
That's a great rotisserie. Very versatile design, and it looks very well crafted. If I had room for something like that, it would move up several notches on my 'to-do' list. I've been picking away...very slowly...at the restoration of a 1954 Dodge M37, and a rotisserie would make a lot of tasks easier.
 

kyrbz

Well-known member
Joined
Jan 30, 2012
Messages
1,305
Location
midwest US
A privacy screen my wife and I designed and built for a client several years ago. My wife used to be a textile designer and is very good at putting patterns into repeat, so to simplify the design, the screen is comprised of 6 identical panels in a repeat pattern.

ff13.JPG

ff1.JPG ff2.JPG ff3.JPG ff4.JPG ff5.JPG ff6.JPG ff7.JPG
 

VR6ix

Well-known member
Joined
Mar 24, 2013
Messages
355
Location
Onterrible, Canuckistan
Very nice work and workspace kyrbz! Was that a side-hustle job or your own business?
I designed a "tapping arm" for the Talon stud welded at work for production runs. Seems to work great, but I just drove the desk, didn't do any fab work myself lol as that's not my role. I have a photo somewhere...
 

Blue Chips

Well-known member
Joined
Jan 25, 2012
Messages
199
Location
Maine
I'm gradually getting caught up in posting some welding projects. Here's another one that I posted on another site a couple of years ago.

I bought an antique Peter Wright blacksmith leg vise, cleaned it up, and fabricated a stand for it. I can’t find a “before” picture of the vise, but here is an “after” photo. It was in pretty good overall condition when I bought it and only had a light 'patina' of surface rust, grease, and dirt, so the cleanup work was primarily cosmetic, other than a very minor bit of truing of the jaw faces and adjustments to the pivot bolt. I disassembled it, cleaned it with solvent, and gave some parts a light grit blasting before applying a thin coat of high-temperature BBQ paint, which has held up well so far.

vise-left-side-1.jpg

Fortunately, the threads and box were still in very good shape.

vise-threads-1.jpg

Because of my small shop size, I wanted the vise to be moveable, so instead of mounting the vise on a workbench, I built a stand that I could roll out into the driveway when I wanted to play with my forges.

I've never built a stand like this one, so it's an experimental design.

leg-vise-stand-in-progress-a.jpg

leg-vise-stand-in-progress-b.jpg

The bottom plate is 1/2-inch steel, and I added two adjustable feet for leveling it if the ground happens to be a bit uneven. It does not rest on the casters until you tip it back onto them. The idea with the bottom plate is that you would stand on the plate when using the vise to provide more stability. I added a mid-point support for the leg, not because it really needed it, but I’ve seen a number of these old leg vises that had a kink in the leg, possibly from using the vise for cold-bending long, heavy items. I certainly wouldn’t abuse the vise like that, but I succumbed to my tendency to over-engineer things and added the support anyway. I placed some spacers under the mounting plate to allow for a future 3/8” steel working surface that I might add at some point. The brackets on the side are for hanging hammers, tongs, etc. If I were to build this again, I'd use larger casters, placed farther apart.

vise-stand-without-vise-1.jpg

vise-stand-with-vise-1.jpg

vise-stand-with-vise-2-with-callouts.jpg

My standard disclaimer: I do not guarantee the safety, efficacy, or applicability of any of my designs or ideas that I have described here in this thread. Any use of my designs or ideas is entirely at your own risk.

I'm always open to suggestions for changes or improvements. :)
 

Blue Chips

Well-known member
Joined
Jan 25, 2012
Messages
199
Location
Maine
Beautiful workmanship
Thanks, y'sguy. I just finished looking through your toolbox restoration thread, and I must say that's the most extensive toolbox restoration that I've ever seen. Beautiful job! (y)

By the way, I see you have a really nice T-Bird. I had a '57 T-Bird when I was in college. 312 with wire wheels and all of the options except for the Continental kit. That was a LONG time ago. I think I paid something like $1,350 for it and sold it a couple of years later (I think it was in 1970) for about $2,500. That was one of at least half a dozen cars I wish I had hung on to, but hindsight is 20-20. Oh, well... :dunno:

My current off-and-on automobile restoration project is a 1954 Dodge M37. I'm about 3/4 done, but I've been sidetracked for a number of years while restoring a Federal Period center-chimney cape house in Maine.
 

MP&C

Well-known member
Joined
Oct 21, 2009
Messages
4,398
Location
Leonardtown, MD
Working on a little side project. I welded up this 2 1/2” x 1/4” tube to this 1/4” plate. The plate warped slightly. This was a trial run, so I just used the flux core wire I had in my welder. Will make welds prettier next time. I did a small stitch on each side to hold it in place and square, then welded each face.

Question is how can I prevent the 1/4” plate from warping? Clamp closer to the tube?

AC9B1F87-7DA6-4052-8ADC-C9E4B0B0D736.jpeg

62C76205-D63A-4D37-A6AE-246C38D1B11C.jpeg


Good weld penetration? I would have expected that once the fillet welds cooled and shrunk it would have pulled up the other direction.
 

kyrbz

Well-known member
Joined
Jan 30, 2012
Messages
1,305
Location
midwest US
My shop is getting too cramped so I've been thinking about building mobile work tables for my various motorcycle and scooter restoration projects. That way I could put each one on it's own work table and push the tables together to save space. Then I could just pull out the one I want to work on. Kind of a filing system for bikes. This is the first one I built. It has a drop out for rear wheels and lots of holes in the frame for future accessories. I often like to hang the frames when I first begin reassembling a bike, so bolt on structures for hanging frames is a future planned accessory. I bought the front wheel vise on this first one but maybe I'll make future ones.

mtab9.JPG

mtab1.JPG mtab2.JPG mtab3.JPG mtab4.JPG mtab5.JPG mtab7.JPG mtab8.JPG
 

jblnut

ALLIANCE MEMBER
Joined
Jan 17, 2015
Messages
6,975
Location
In the Middle of MN
I purchased a new "pickup" to use on the farm and the previous owner had ramps.on the back to load a rock crawler and they had to go .....
KIMG1424.JPG

Once they were taken off I started to cannibalize them for their iron ....
KIMG1453.JPG

A chunk of the tubing became leveling blocks of sorts .....
KIMG1454.JPG

The longer pieces became the new side rails. I ended up purchasing some 2x5x3/16 tubing to finish as I didn't have enough just laying around lol. It looks better already !! The plan is to put the same 3/16" diamond plate on top that is on the rest of the bed and use some 1/8" diamond plate to skirt the bed and drop from the flatbed to the bumper. I'm pumped to get this done so I can use this beaut !!
KIMG1457.JPG
 
To avoid these ads, REGISTER NOW!

G-ManBart

Well-known member
Joined
Jan 24, 2015
Messages
2,059
Location
Michigan
Like most folks, I probably worried about learning how to weld big stuff at first....now I'm working on small stuff. This is a practice joint on stainless with .035" filler wire.

IMG_0029.jpg

A friend wanted a cantilever rack system for storing good lumber and this is what I came up with before paint and after installation. The right side doesn't have the lower arms because a bench is going to fill that space. The rack is anchored to concrete behind the drywall and I tested them all by hanging on the longer arms :)

IMG_2848.JPGIMG_3347.JPG
 

sqznby

Well-known member
Joined
Oct 26, 2013
Messages
981
Location
Coastal NC
My technique for making a low profile leveler feet on tables or benches that don't have a traditional straight tube legs

lev9.jpg

lev1.JPG lev2.JPG lev3.JPG lev4.JPG lev5.JPG lev6.JPG lev7.JPG lev8.JPG
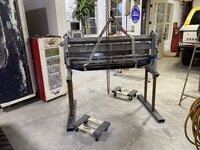
Very nice, love working with square tubing so fun. You make it look too easy :)
Is that a Ducati in the background?
 

Blue Chips

Well-known member
Joined
Jan 25, 2012
Messages
199
Location
Maine
Here's another of my older welding projects:

I have a 2002 model Toro Wheel Horse 522xi, which is a small, but heavy-duty garden tractor. It's been going strong since I bought it in 2008, and it will be ready for some cosmetic updating soon.

One of the things I use Wheel Horse for is repositioning our flat-bed trailer on our property. I fabricated a trailer hitch receiver (see below) that bolts onto the back of the tractor and is easily removable, although I haven't had occasion to remove it yet.

garden-tractor-hitch-receiver-1-smaller-image.jpg

garden-tractor-hitch-receiver-3-smaller-image.jpg

I should add that the trailer I move with the tractor does not put much tongue weight on the hitch.

My standard disclaimer: I do not guarantee the safety, efficacy, or applicability of any of my designs or ideas that I have described here in this thread. Any use of my designs or ideas is entirely at your own risk.
 
Last edited:

Kenstone1

Well-known member
Joined
Oct 2, 2015
Messages
734
Here's another of my older welding projects:

I have a 2002 model Toro Wheel Horse 522xi, which is a small, but heavy-duty garden tractor. It's been going strong since I bought it in 2008, and it will be ready for some cosmetic updating soon.

One of the things I use Wheel Horse for is repositioning our flat-bed trailer on our property. I fabricated a trailer hitch receiver (see below) that bolts onto the back of the tractor and is easily removable, although I haven't had occasion to remove it yet.

garden-tractor-hitch-receiver-1-smaller-image.jpg

garden-tractor-hitch-receiver-3-smaller-image.jpg
Nice Fab.
That far back from the axle, it could become a potential "wheely-bar" with the added tongue weight of the trailer.
I hope that is not the case though.
.
 
Last edited:

Blue Chips

Well-known member
Joined
Jan 25, 2012
Messages
199
Location
Maine
Nice job.
That far back from the axle, it could become a potential "wheely-bar" with the added tongue weight of the trailer.
I hope that is not the case though.
Thanks, @Kenstone1, fair comment about tongue weight, but it's not a problem for how I use the hitch. In fact, it's almost the opposite situation, since the trailer that I move around is used for moving and launching our floating dock. The dock extends out past the end of the trailer, so the trailer tongue actually has negative weight when loaded, and I have to add about a hundred pounds on the tongue to keep it down. And when the trailer is empty, the tongue doesn't put much weight on the hitch anyway.

The reason the hitch extends out a bit is to allow me to make very sharp turns with the tractor without hitting the trailer tongue, so that I can pivot the trailer on its wheels to get it in and out of some tight places in the yard.

To launch our floating dock, I back the trailer into the water (using my truck, not the garden tractor) until the dock floats off of it, just like launching a boat. The trailer has waterproof LED lights, double grease seals on the hubs, waterproof marine grease, and the hub caps are sealed. I never back the trailer into the water with warm hubs, either (which could cause negative pressure in the hubs when they cool, and possibly **** water in). The boat 'ramp' that I use is on a neighbor's property that's located only two houses downstream from us, so the hubs never have a chance to get warmed up. I've opened up the hubs a couple of times just to check, and there's never been a drop of water in them.

Here's a photo of the trailer behind my truck with the dock loaded, ready to take over to our neighbor's place for launching.

dock-on-trailer-april.jpg

And a photo of the dock in the river. It's a tidal river, so the 'stiff-arm/strut' dock system that I fabricated is designed to accommodate the 4- to 6-foot tidal changes. We have to pull the dock out of the water each year before the river freezes over.

dock-looking-downstream.jpg

The dock fabrication involved some welding when making the posts and hinges that are set into the bedrock shoreline, so I may post some of that project here when I have some time.

Edit: I should mention that I had the aluminum gangway built to my specs by a local company, but I fabbed up the rest of the dock system myself, including the floating dock, struts, cross bracing, shore post/pivot system, shore platform, etc. Photos coming later.
 
Last edited:

jblnut

ALLIANCE MEMBER
Joined
Jan 17, 2015
Messages
6,975
Location
In the Middle of MN
Flatbed addition is progressing !!
KIMG1548.JPG

First project to really stretch the legs of the welding table. Sure glad to have this thing !!
KIMG1551.JPG

This is going to be an adventure......
KIMG1555.JPG

The little Ryobi jig saw actually did very well with that 3/16" diamond plate and I had all the pieces I needed cut in under a half hour. Not bad really :dunno:
KIMG1560.JPG

Time for a rear skirt. This was cut from a piece of diamond plate that has been bouncing around for years just waiting for a purpose. Twas a bit rusty because of it !!
KIMG1564.JPG

I think I'm going to bolt it on with some Gr8 button heads. Might look nice ..... Who knows.
KIMG1566.JPG
 
Joined
Feb 15, 2023
Messages
7
Didn't find a topic like this where everyone could share pictures of their good (or bad) welding/fab projects and maybe get pointers from other people. I'm hoping this doesnt turn into a **** fest if someone disagrees with someone elses procedures. So please, keep negative comments to yourself but share constructive criticism.

Nothing specific, ill start, even with me being embarrassed a bit about it. On with the pictures :eek:

Im a very begginer welder/fab person. I took metals in high school then dropped my motivation to continue it as a hobby, and maybe one day a career. I just started back up a few weeks ago and this was one of my first "projects".

Just a little square i made one day for practice:
2011-10-15153046.jpg


2011-10-17180119.jpg


2011-10-17180135.jpg

This one had a large hole in the corner of it, and was one of the worse welds i did on the whole thing.
2011-10-17180206.jpg

I never cleaned the welds either... oops.

I know not the greatest, but i dont plan on anything structural till i get a better welding unit so i figure its ok for now.

Now the welder i used, and you guys will hate me for this but...... It's a harbor freight http://www.harborfreight.com/welding/mig-flux-welders/90-amp-flux-wire-welder-98871.html

I have had it for about 4 or 5 years now. Using fluxcore wire... and its on about a 75 foot extension cord... I know i know it could change but it seems to be ok for now.

I use my HF 41/2 angle grinder to cut up the metal. Btw any suggestions on cutting and grinding disks?

Thanks for looking, post up your welding projects and gear.
 
Joined
Feb 15, 2023
Messages
7
Can’t go wrong with a stick welder.
 

Attachments

  • F2DD5CCD-851B-4879-B5B1-A4175B2F3000.jpeg
    F2DD5CCD-851B-4879-B5B1-A4175B2F3000.jpeg
    815.6 KB · Views: 72
  • 6163681F-CBEF-4B78-853E-6AF45043930D.jpeg
    6163681F-CBEF-4B78-853E-6AF45043930D.jpeg
    830.1 KB · Views: 82
  • A86528FF-DC1B-4A3D-B044-C934D27CFB13.jpeg
    A86528FF-DC1B-4A3D-B044-C934D27CFB13.jpeg
    638.3 KB · Views: 87
  • B0C33E4F-B2C5-49B8-A567-3D1C14D354E5.jpeg
    B0C33E4F-B2C5-49B8-A567-3D1C14D354E5.jpeg
    679.4 KB · Views: 88
  • 01B6632D-1D42-4541-A8CA-F106F3FD412D.jpeg
    01B6632D-1D42-4541-A8CA-F106F3FD412D.jpeg
    928.9 KB · Views: 84
  • 89D2F7E1-729E-4D28-BF38-C45B2104813A.jpeg
    89D2F7E1-729E-4D28-BF38-C45B2104813A.jpeg
    870.7 KB · Views: 88

bigmaq

Well-known member
Joined
Jul 31, 2019
Messages
65
Location
New York
Here's another of my older welding projects:

I have a 2002 model Toro Wheel Horse 522xi, which is a small, but heavy-duty garden tractor. It's been going strong since I bought it in 2008, and it will be ready for some cosmetic updating soon.

One of the things I use Wheel Horse for is repositioning our flat-bed trailer on our property. I fabricated a trailer hitch receiver (see below) that bolts onto the back of the tractor and is easily removable, although I haven't had occasion to remove it yet.

garden-tractor-hitch-receiver-1-smaller-image.jpg

garden-tractor-hitch-receiver-3-smaller-image.jpg

I should add that the trailer I move with the tractor does not put much tongue weight on the hitch.

My standard disclaimer: I do not guarantee the safety, efficacy, or applicability of any of my designs or ideas that I have described here in this thread. Any use of my designs or ideas is entirely at your own risk.
Very nice fab; looks commercially-made. How did you get that crisp corner from the top plate to the side plates? Was that bent or welded from three pieces then ground/chamfered?
 

Blue Chips

Well-known member
Joined
Jan 25, 2012
Messages
199
Location
Maine
Very nice fab; looks commercially-made. How did you get that crisp corner from the top plate to the side plates? Was that bent or welded from three pieces then ground/chamfered?
Thank you. It's just welded on both sides of the seam(s) and then ground by hand with a 4-1/2" angle grinder, which is one of my most-used tools. It's a common approach that I've used for making clean corners and edges on many projects, such as this one: https://www.garagejournal.com/forum/threads/show-us-your-welding-projects.121477/post-9950927
 

jblnut

ALLIANCE MEMBER
Joined
Jan 17, 2015
Messages
6,975
Location
In the Middle of MN
3 d printed end cap for the plug!
Now I have a reason to buy a 3D printer and start reading that thread :lol_hitti

That's what I was just thinking when I looked at that.
I have a few cheesy plastic inserts that would fit but eh. Something custom printed would look better ....

I’d cut it at a 45 and weld a cap on it.
To use stuff I have in hand I was thinking this as well. Cut a piece out to cover the hole and angle it so it meets the bottom of the skirt.

That brings up another question of how to mate the side skirts up to the rear skirt but that can be older Mikes problem. He'll figure something out :lol:
 

Blue Chips

Well-known member
Joined
Jan 25, 2012
Messages
199
Location
Maine
Here's another of my past welding projects. I fabricated this fire pit/fire box from 1/4" hot-rolled steel plate. It's very heavy, to say the least. After welding and grinding, I blasted it with coal slag using my pressure washer and a grit-blasting attachment, which removed every speck of mill scale and prepped the surface for the high-temperature paint. It has stood up very well. After about 8 years, there is still no rust on the box, other than in a few scratches where I brushed against it with the mowing deck, so the box has never needed to be repainted. I do touch up the paint on the screen once every couple of years. The grate inside the box is smaller than the inner dimensions of the fire box and raised up a few inches above the firebricks that are set into the bottom of the box, which allows good air circulation down around and up through the fire. I keep a small handle with a hook stashed under the fire box for lifting the screen off. I was going to weld a handle onto the screen, but I decided that I wanted to keep the clean lines uncluttered.

fire-pit-close-up.jpg

fire-pit-back-yard-reduced.jpg

It gets used year around, even in the winter. Photo below, just getting a fire started while having a hot drink (buttered rum, if I recall) on a winter solstice evening.

back-yard-fire-pit-smaller-image.jpg

Cheers!
 

phred

Well-known member
Joined
Apr 23, 2009
Messages
525
Location
NC
Finally whipped up a stand for my new to me shear, press brake, slip roll combo.
 

Attachments

  • DD90E17F-46B9-40ED-80C8-4FB1CDC32851.jpeg
    DD90E17F-46B9-40ED-80C8-4FB1CDC32851.jpeg
    970.6 KB · Views: 95
  • 93A0EF33-B6A1-485C-B3ED-124BCB311FE6.jpeg
    93A0EF33-B6A1-485C-B3ED-124BCB311FE6.jpeg
    942 KB · Views: 64
  • DE737211-3D1B-4132-9556-098664882313.jpeg
    DE737211-3D1B-4132-9556-098664882313.jpeg
    951.8 KB · Views: 57
  • 74E0956A-AF8B-4D61-B228-1177F350B1B6.jpeg
    74E0956A-AF8B-4D61-B228-1177F350B1B6.jpeg
    1 MB · Views: 66
  • 7EB15E25-B88A-42FB-9048-98F72A161595.jpeg
    7EB15E25-B88A-42FB-9048-98F72A161595.jpeg
    916.2 KB · Views: 76

LG63

Well-known member
Joined
Sep 7, 2012
Messages
1,003
Here's another of my past welding projects. I fabricated this fire pit/fire box from 1/4" hot-rolled steel plate. It's very heavy, to say the least. After welding and grinding, I blasted it with coal slag using my pressure washer and a grit-blasting attachment, which removed every speck of mill scale and prepped the surface for the high-temperature paint. It has stood up very well. After about 8 years, there is still no rust on the box, other than in a few scratches where I brushed against it with the mowing deck, so the box has never needed to be repainted. I do touch up the paint on the screen once every couple of years. The grate inside the box is smaller than the inner dimensions of the fire box and raised up a few inches above the firebricks that are set into the bottom of the box, which allows good air circulation down around and up through the fire. I keep a small handle with a hook stashed under the fire box for lifting the screen off. I was going to weld a handle onto the screen, but I decided that I wanted to keep the clean lines uncluttered.

fire-pit-close-up.jpg

fire-pit-back-yard-reduced.jpg

It gets used year around, even in the winter. Photo below, just getting a fire started while having a hot drink (buttered rum, if I recall) on a winter solstice evening.

back-yard-fire-pit-smaller-image.jpg

Cheers!
Very nice. More details on the pressure washer grit blasting attachment please. Looking for alternatives to flap wheel.
 
To avoid these ads, REGISTER NOW!
Top Bottom