I want to start out by saying I have been a lurker on this site for some time and have learned a great deal from others experiences. An absolute treasure trove of information.
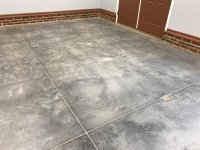
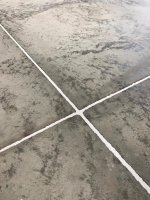
I am in the process of building a 4000 sq. ft. metal building. The building has been erected and just a few days ago I completed painting the slab with 2 coats of epoxy. The slab was poured 3 months ago. It is 6 inches thick with #4 rebar at 18" O.C. both ways and 4000 psi concrete was used. This building will be primarily used as a machine shop. I am to the point of wanting to fill the saw cut expansion joints and my plan was to use backer rod followed by sikaflex. I have read on this site of several individuals experience and plan to tape off both sides of the joint prior to installing the sikaflex. My question really pertains to the chips that have occurred along the saw cut joints. Some of them extend 3/8" beyond the edge of the saw cut. I know the sikaflex will not match the epoxy paint (light gray in color) so I would like the joints to be smooth and even. For those that have done this how did you mask off the control joints when dealing with the chips?
Thanks.....
")