
7th Kahuna
Well-known member
It is with thanks to those who have posted solutions previously, that I now share with you my own design.

In all seriousness, inspired by some of the other solutions I've seen here, I took a look to see what I had available and this is what I came up with. It's simple and worked surprisingly well. Variations are welcome and encouraged.
-
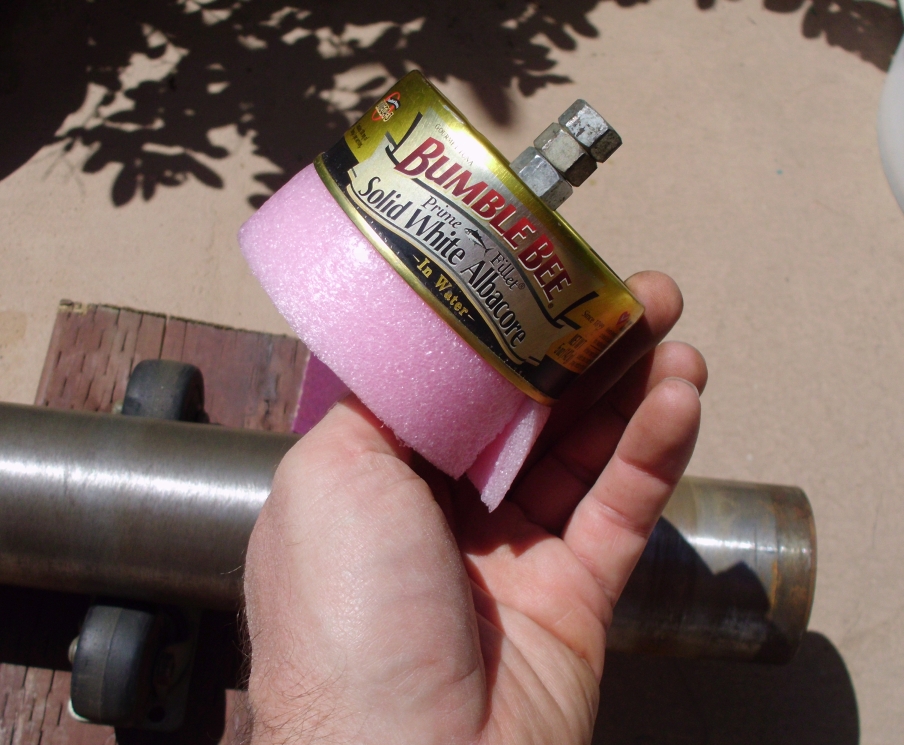
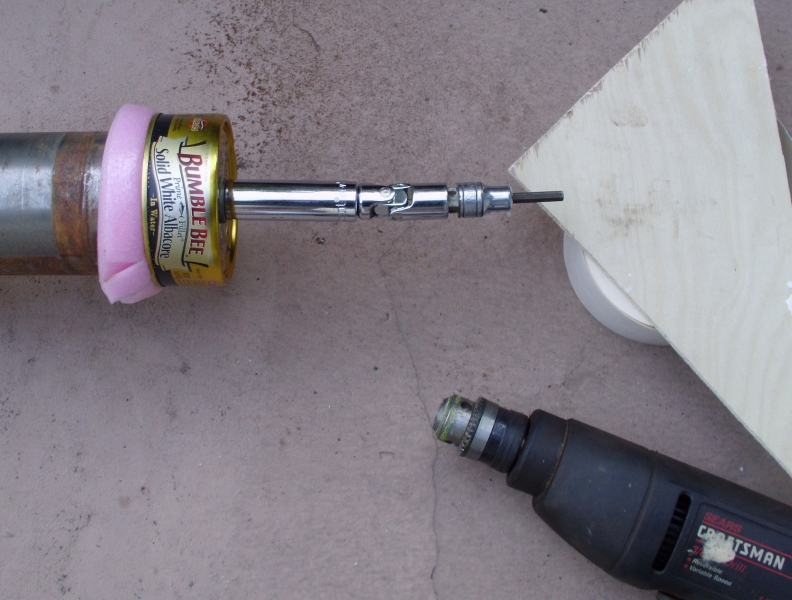
As you can see from the photos the compression chuck is simply a tuna can and some packing foam. I don't think I need to go into a lot of detail here but I will share my thoughts and a few things I learned along the way.
The column in question belongs to a Craftsman Model 100 Floor Standing Drill Press, exterior dimension 2-3/4".
<b>Supplies:</b>
Tuna Can
Packing Foam
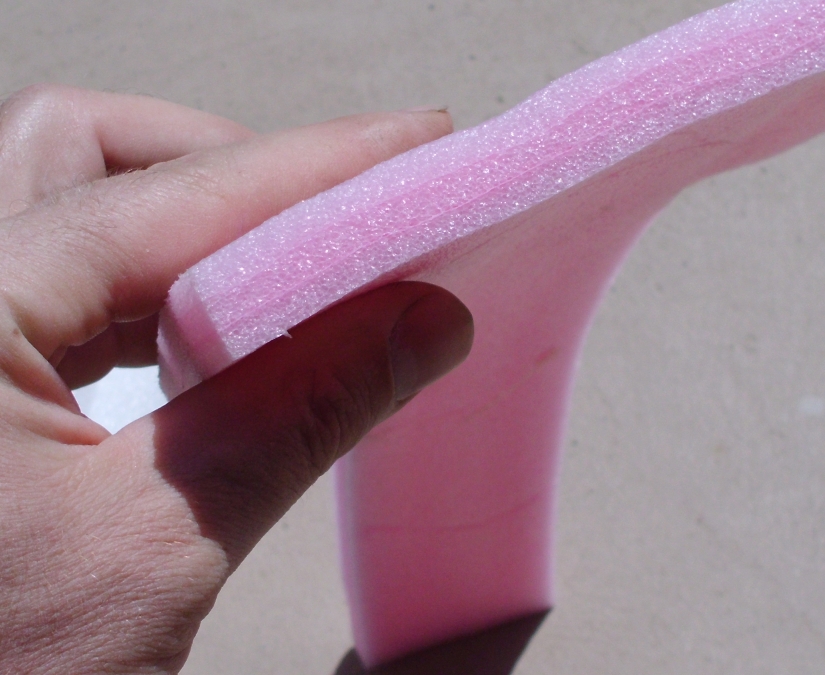
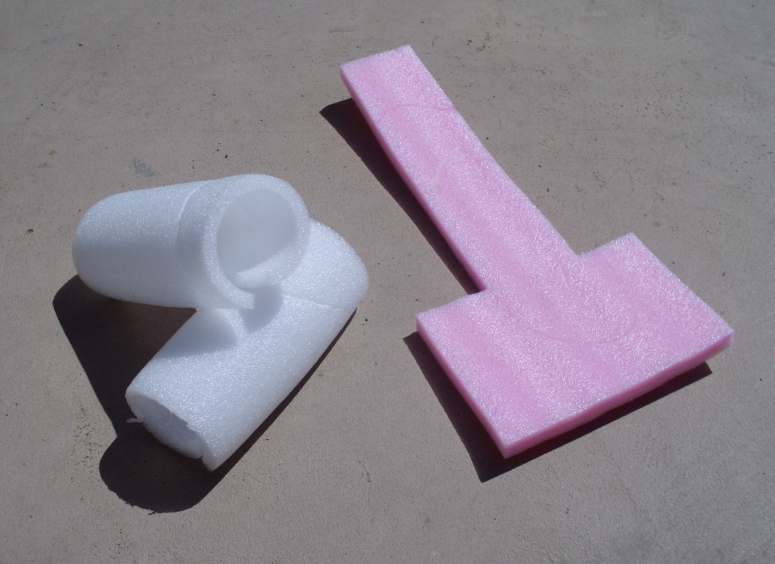
> I happened to have some thicker foam but if you look closely, it is just 3 layers of the thinner stuff fused together. The thin stuff is fairly common, just make sure that whatever you use has some density. The white foam pieces in the photo came from a local bicycle shop and had been used for packing bike frames. They throw them away by the dozens. Alternatively, anti-skid drawer liner might work well. For that matter, you might even be able to jam it full of Styrofoam peanuts.
Hardware (nuts, bolt, washers)
> Any bolt will work as long as it is fully threaded. A hex head bolt is easier to tighten down. Two washers would have done the job but I used three to maximize the core pressure on the bottom of the can. More about this later. I started out with one nut, ended up with three, again more later.
Wood & Casters
> Ideally two fixed and two swivel, one each paired.
Variable Speed Power Source
OPTIONAL: Appropriate Deep Socket, Wobble, and other parts as needed
<b>Operation:</b>
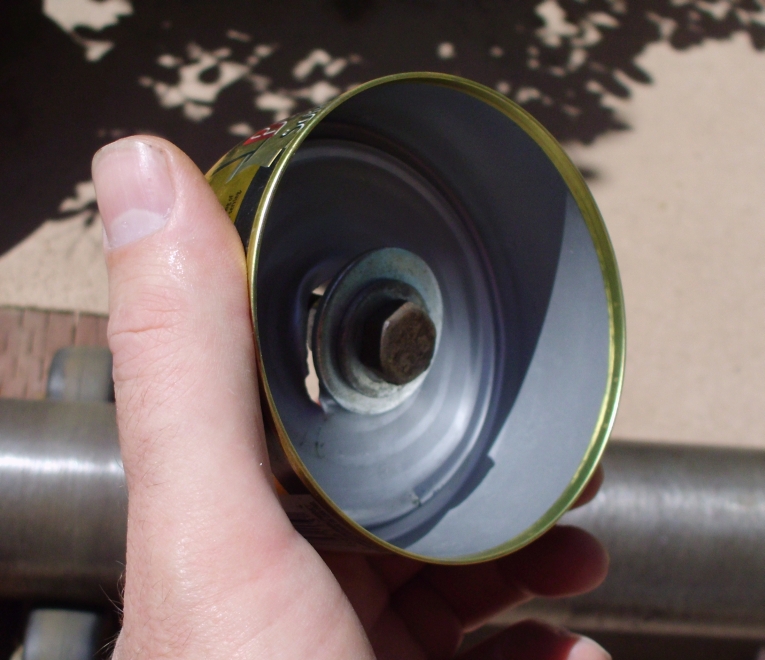
I punched and drilled the bottom of the can slightly undersized so that it would thread onto the bolt. I'm not sure if it improved the hold or not. Absolute center is not critical, I just eyed it. The column's position in the foam will be slightly uneven as well.
I recommend using a substantially larger washer inside so that if the can does tear apart, the sharp edge will hopefully be retained within the column and not turn into a jagged little saw spinning across your work space. Of course, if you have got this whole assembly clamped down to a workbench or sawhorses (which I would recommend) the likelihood of such a little disaster should be substantially reduced. Do as I say, not as I do . . .")
I used a second washer on the inside (same size as on the outside) to back up the larger washer and assure the cleanest transfer of pressure between nut and bolt. Overkill? Perhaps, but it was sitting there. I had no issues with it slipping.
So, bolt, small washer, large washer, can, small washer, nut . . .
I cut the foam wider than the can is deep. This made slipping it all together easier. I also cut the ends at roughly 45° so they would overlap and provide even pressure inside the can. You'll need to cut the foam slightly longer than appears necessary. It shortens as it is compressed. I placed the foam inside the can and then pressed the chuck over the pipe column.
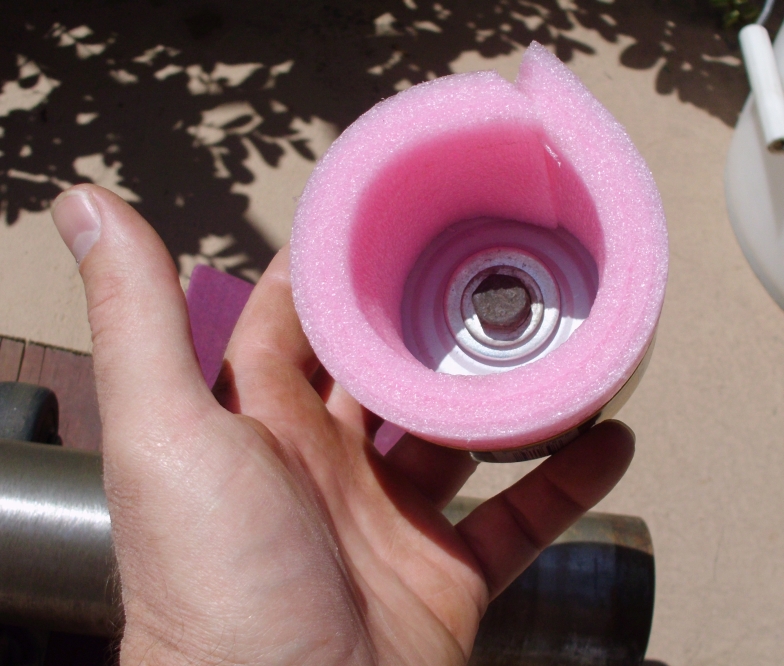
Make sure the foam doesn't slip into the bottom of the chuck and that the column is fully seated. Depending upon the material you use, applying the foam to the column may work better. >TIP> If fitting the chuck over the column is easy, you need for foam. (But it doesn't need to be especially hard either.)
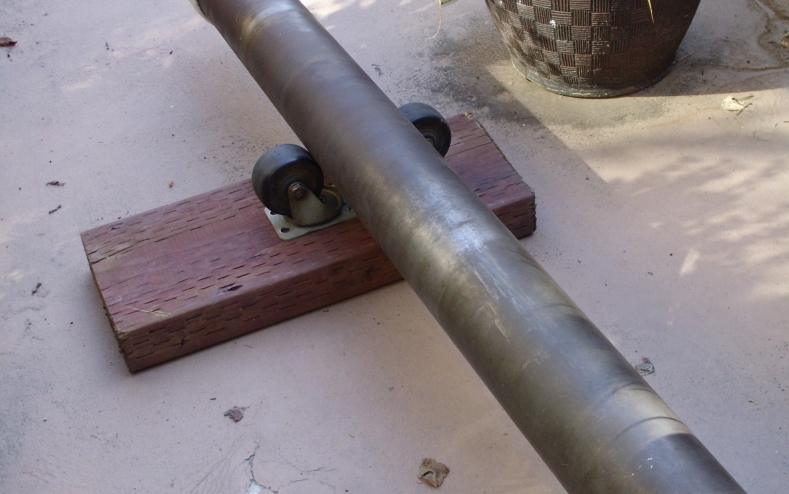
( ^^^ This photo shows the column 'before'.)
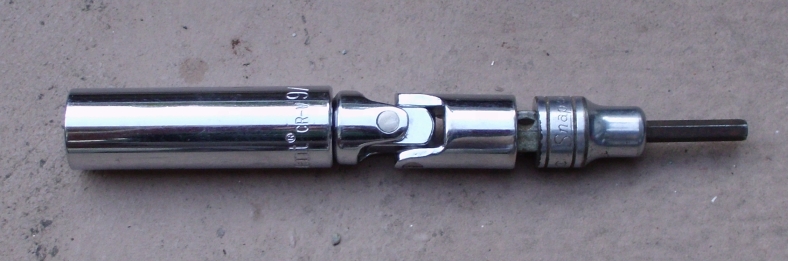
At first I just planned to chuck the bolt into the drill, and in fact I ran it that way initially, but it was bouncing around a bit. (Clamp it down to the workbench?! :tard: Maybe next time. ) After the drill's chuck slipped loose the first time I came up with this solution. I'm sure there is an easier way to make it happen but this is what I had at hand. I added the two additional nuts to the bolt and slipped the deep socket over it. Chucked the Allen key into the drill and I was off to the races . . . . . . Wait for it
  . . .
. . .
until the pipe ran toward the drill motor and trapped it against a cabinet. Disaster. Warning, this rig is capable of sending a socket flying. I have the bruise on my shin to prove it. (Duct tape straight jacket? For me?) Ultimately, directly chucking the bolt may work better for you.
I used pairs of swivel casters because that was what I had and it seemed like that would simplify the alignment but it didn't quite work out that way. As the blocks under the casters bounced around they would skew which in turn caused the column to feed laterally in one direction or the other. Ideally I think a fixed caster paired with a swivel caster would be an optimal solution. Then again if I had had the wood blocks clamped down it might not have been an issue at all. That said, what I did, generally worked. Had the cabinet not been there, I would have only needed to reset the column.
If anyone asks, it was a test of the large washer. Hey look, it worked.
I would specifically recommend against locking the trigger on the drill motor unless <u>everything</u> is positively secured. With that wobble on there, you have a nice little weapon capable of launching projectiles places you really don't want them to go. I would also suggest a drill motor with a smoothly operating variable speed control. The Craftsman I was using wasn't well suited. It was too jumpy. With everything properly secured, a clamp could be employed to lock the trigger in a position other than full on.
Speed is not your friend, start slow. In this setup, I had no way to restrain the drill motor mechanically, I was supporting it (on a small platform) and operating the trigger manually. This worked ok but meant that I had to stop, flip the pipe around and rechuck it in order to reach the full length of the column. Actually not a big deal at all. What an awesome sight watching the rust fall away.
Second try, post disaster, tapered salmon can. (Just say NO.)
The concept was the same and I thought maybe the taper and increased depth would improve the bite but I wasn't impressed. I will be going back to the tuna can next time. The uneven pressure between the wall of the can and the wall of the pipe allowed the chuck to wobble. It was bad enough I shut the operation down earlier than I would have liked. In any case, I got the worst of the rust and grime off the column and that was the goal. This was a practice run.
<b>Final Notes:</b>
If you had a lot of these to do, or needed to run it for an extended time, it might be worth investing in an appropriately sized PVC slip cap. To get one large enough you may need to visit an irrigation or plumbing supply. I'm not sure when or if metal fatigue may become an issue.
If you need to walk away for a while, you'll want to remove the chuck. The foam will not maintain it's pressure if left compressed for too long. That is to say, my foam didn't. Results may vary.
And a final note: Bumble Bee neither endorses nor contributed to this post in any way (but made a darn good sandwich).
Be safe my friends.
In all seriousness, inspired by some of the other solutions I've seen here, I took a look to see what I had available and this is what I came up with. It's simple and worked surprisingly well. Variations are welcome and encouraged.
-
As you can see from the photos the compression chuck is simply a tuna can and some packing foam. I don't think I need to go into a lot of detail here but I will share my thoughts and a few things I learned along the way.
The column in question belongs to a Craftsman Model 100 Floor Standing Drill Press, exterior dimension 2-3/4".
<b>Supplies:</b>
Tuna Can
Packing Foam
> I happened to have some thicker foam but if you look closely, it is just 3 layers of the thinner stuff fused together. The thin stuff is fairly common, just make sure that whatever you use has some density. The white foam pieces in the photo came from a local bicycle shop and had been used for packing bike frames. They throw them away by the dozens. Alternatively, anti-skid drawer liner might work well. For that matter, you might even be able to jam it full of Styrofoam peanuts.
Hardware (nuts, bolt, washers)
> Any bolt will work as long as it is fully threaded. A hex head bolt is easier to tighten down. Two washers would have done the job but I used three to maximize the core pressure on the bottom of the can. More about this later. I started out with one nut, ended up with three, again more later.
Wood & Casters
> Ideally two fixed and two swivel, one each paired.
Variable Speed Power Source
OPTIONAL: Appropriate Deep Socket, Wobble, and other parts as needed
<b>Operation:</b>
I punched and drilled the bottom of the can slightly undersized so that it would thread onto the bolt. I'm not sure if it improved the hold or not. Absolute center is not critical, I just eyed it. The column's position in the foam will be slightly uneven as well.
I recommend using a substantially larger washer inside so that if the can does tear apart, the sharp edge will hopefully be retained within the column and not turn into a jagged little saw spinning across your work space. Of course, if you have got this whole assembly clamped down to a workbench or sawhorses (which I would recommend) the likelihood of such a little disaster should be substantially reduced. Do as I say, not as I do . . .
I used a second washer on the inside (same size as on the outside) to back up the larger washer and assure the cleanest transfer of pressure between nut and bolt. Overkill? Perhaps, but it was sitting there. I had no issues with it slipping.
So, bolt, small washer, large washer, can, small washer, nut . . .
I cut the foam wider than the can is deep. This made slipping it all together easier. I also cut the ends at roughly 45° so they would overlap and provide even pressure inside the can. You'll need to cut the foam slightly longer than appears necessary. It shortens as it is compressed. I placed the foam inside the can and then pressed the chuck over the pipe column.
Make sure the foam doesn't slip into the bottom of the chuck and that the column is fully seated. Depending upon the material you use, applying the foam to the column may work better. >TIP> If fitting the chuck over the column is easy, you need for foam.
(But it doesn't need to be especially hard either.)
( ^^^ This photo shows the column 'before'.)
At first I just planned to chuck the bolt into the drill, and in fact I ran it that way initially, but it was bouncing around a bit. (Clamp it down to the workbench?! :tard: Maybe next time.
) After the drill's chuck slipped loose the first time I came up with this solution. I'm sure there is an easier way to make it happen but this is what I had at hand. I added the two additional nuts to the bolt and slipped the deep socket over it. Chucked the Allen key into the drill and I was off to the races . . . . . . Wait for it . . .
until the pipe ran toward the drill motor and trapped it against a cabinet. Disaster. Warning, this rig is capable of sending a socket flying. I have the bruise on my shin to prove it. (Duct tape straight jacket? For me?) Ultimately, directly chucking the bolt may work better for you.
I used pairs of swivel casters because that was what I had and it seemed like that would simplify the alignment but it didn't quite work out that way. As the blocks under the casters bounced around they would skew which in turn caused the column to feed laterally in one direction or the other. Ideally I think a fixed caster paired with a swivel caster would be an optimal solution. Then again if I had had the wood blocks clamped down it might not have been an issue at all. That said, what I did, generally worked. Had the cabinet not been there, I would have only needed to reset the column.
If anyone asks, it was a test of the large washer. Hey look, it worked.
I would specifically recommend against locking the trigger on the drill motor unless <u>everything</u> is positively secured. With that wobble on there, you have a nice little weapon capable of launching projectiles places you really don't want them to go. I would also suggest a drill motor with a smoothly operating variable speed control. The Craftsman I was using wasn't well suited. It was too jumpy. With everything properly secured, a clamp could be employed to lock the trigger in a position other than full on.
Speed is not your friend, start slow. In this setup, I had no way to restrain the drill motor mechanically, I was supporting it (on a small platform) and operating the trigger manually. This worked ok but meant that I had to stop, flip the pipe around and rechuck it in order to reach the full length of the column. Actually not a big deal at all. What an awesome sight watching the rust fall away.
Second try, post disaster, tapered salmon can. (Just say NO.)
The concept was the same and I thought maybe the taper and increased depth would improve the bite but I wasn't impressed. I will be going back to the tuna can next time. The uneven pressure between the wall of the can and the wall of the pipe allowed the chuck to wobble. It was bad enough I shut the operation down earlier than I would have liked. In any case, I got the worst of the rust and grime off the column and that was the goal. This was a practice run.
<b>Final Notes:</b>
If you had a lot of these to do, or needed to run it for an extended time, it might be worth investing in an appropriately sized PVC slip cap. To get one large enough you may need to visit an irrigation or plumbing supply. I'm not sure when or if metal fatigue may become an issue.
If you need to walk away for a while, you'll want to remove the chuck. The foam will not maintain it's pressure if left compressed for too long. That is to say, my foam didn't. Results may vary.
And a final note: Bumble Bee neither endorses nor contributed to this post in any way (but made a darn good sandwich).
Be safe my friends.

