To avoid these ads, REGISTER NOW!

Single Door to Sectional Door Install/Prep

breaker1369

Member
Joined
Apr 25, 2024
Messages
15
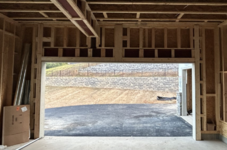
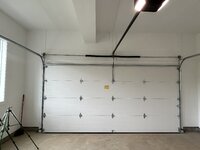
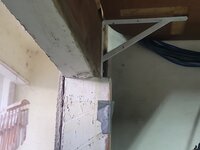
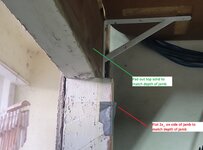
good afternoon...im wanting to replace my single piece garage door to a sectional and I the installation methods between the two are different, I've found info on how to install sectional but couldn't find anything to help as far as what to do when converting from one to another....as you see currently I have the current door hardware mounted onto the the 2x6 verticle jambs but to install the sectional it calls for a flush wall installation side and top....but my top jamb is not flush with vertical jambs....do I trim off side jambs to be flush with top jamb and then place 2x6s against it and on top or is there another way of doing this I hope this makes sense....
 

Attachments

  • 20240425_184001.jpg
    20240425_184001.jpg
    441.8 KB · Views: 17
  • 20240425_183957.jpg
    20240425_183957.jpg
    345 KB · Views: 13
  • 20240425_200034.jpg
    20240425_200034.jpg
    487.6 KB · Views: 11
  • 20240425_200046.jpg
    20240425_200046.jpg
    334.1 KB · Views: 11
  • 20240425_200051.jpg
    20240425_200051.jpg
    376.6 KB · Views: 11
  • 20240425_200101.jpg
    20240425_200101.jpg
    368.2 KB · Views: 12
To avoid these ads, REGISTER NOW!

The Cobbler

Super Moderator
Staff member
Joined
Oct 24, 2013
Messages
26,302
Location
Niagara Region, Ontario, Canada
2x4's on the flat inside the garage for the track mounting hardware to fasten to, as well as the hardware to mount the spring & tube . extend that above the door height and a pc along the head of the door .
a 2x6 or 2x8 for the spring bracket to attach to, location to be determined.
finish the exterior jambs as required.
install weatherstrip to jambs
 
OP
B

breaker1369

Member
Joined
Apr 25, 2024
Messages
15
so 2x4s ls over the existing 2x4s up against the 2x6 verticle door jambs? doing so there's still like 1/4" difference...
don't know what you mean "a pc along the head of the door"
and what do you mean finish the exterior jambs?
and got the weatherstrip ready for jambs...
 

larry4406

Well-known member
Joined
Jan 27, 2006
Messages
20,366
Location
Northern Virginia
Here is a picture of the framing of new construction for a sectional garage door. It is similar to what @The Cobbler has described.

On the sides, we nail a 2x6 flat from slab to ceiling. At the header, we install a flat 2x10 from header to ceiling with flat 2x6's each side of the 2x10 aligned to the bottom of the header. The jambs are trimmed flush with the inside 2x members. Your door rough opening (prior to trim) should be one inch wider and one inch taller than your sectional door (RTM). After the sectional door is installed, then the seals are installed on the jambs snug to the door.

The garage door tracks bolt to the uprights. The center 2x10 supports the torsion spring mount and the garage door motor trolley anchor point.

1714125661149.png
 
OP
B

breaker1369

Member
Joined
Apr 25, 2024
Messages
15
thanks for the input and I'm aware of how the install is as you've described, my thing is how do I approach my current door jamb to end up as how you've deacribed?....do i leave as is but add verticle 2x6s over 2x4s right up against current 2x6(photos with black lines representing 2x6) verticle door jamb(but doing so new verticle 2x6 will be 1/4"shy of being flush with current 2x6 jamb as shown in photo) or should I trim current verticle 2x6 side jambs to be flush with current top jamb which will aslo be flush with verticle 2x4s and then put new 2x6 verticles flat against trimmed jambs and 2x6 top (photo with blue lines representing 2x6s.....if that makes sense....
 

Attachments

  • 20240425_200051.jpg
    20240425_200051.jpg
    322 KB · Views: 7
  • 20240425_200101.jpg
    20240425_200101.jpg
    286.1 KB · Views: 6
  • 20240426_031844.jpg
    20240426_031844.jpg
    372.7 KB · Views: 4
  • 20240425_200034.jpg
    20240425_200034.jpg
    462.6 KB · Views: 4
OP
B

breaker1369

Member
Joined
Apr 25, 2024
Messages
15
Here is a picture of the framing of new construction for a sectional garage door. It is similar to what @The Cobbler has described.

On the sides, we nail a 2x6 flat from slab to ceiling. At the header, we install a flat 2x10 from header to ceiling with flat 2x6's each side of the 2x10 aligned to the bottom of the header. The jambs are trimmed flush with the inside 2x members. Your door rough opening (prior to trim) should be one inch wider and one inch taller than your sectional door (RTM). After the sectional door is installed, then the seals are installed on the jambs snug to the door.

The garage door tracks bolt to the uprights. The center 2x10 supports the torsion spring mount and the garage door motor trolley anchor point.

1714125661149.pngthere's no trim in my current door frame other than the exterior trim that's on the outside end of the 2x6 jambs


there's no trim in my current door frame other than the exterior trim that's on the outside end of the 2x6 jambs
 

Attachments

  • 20240425_183952.jpg
    20240425_183952.jpg
    420.1 KB · Views: 7

larry4406

Well-known member
Joined
Jan 27, 2006
Messages
20,366
Location
Northern Virginia
there's no trim in my current door frame other than the exterior trim that's on the outside end of the 2x6 jambs
If you add the flat 2x members like in my picture and like @The Cobbler described, you wind up extending the jambs and there will be an exposed vertical seam where the old and extended jamb meet. You will need to cover this with something.

Wrapping the jamb with trim shrinks the opening. Thus why I mentioned making sure your rough opening was +1" each way or what your sectional door manual says. One option is to wrap the jamb with metal coil stock if you can't accommodate shrinking the opening by the thickness of the trim (typically 1/2 - 5/8").

At my existing home built in 1987, they roughed the 16x8' garage door opening exactly to finished dimensions! I found out that what looks like painted trim is actually painted framing members! Fooled me! Apparently that was quite common in this area back then.
 
OP
B

breaker1369

Member
Joined
Apr 25, 2024
Messages
15
If you add the flat 2x members like in my picture and like @The Cobbler described, you wind up extending the jambs and there will be an exposed vertical seam where the old and extended jamb meet. You will need to cover this with something.

Wrapping the jamb with trim shrinks the opening. Thus why I mentioned making sure your rough opening was +1" each way or what your sectional door manual says. One option is to wrap the jamb with metal coil stock if you can't accommodate shrinking the opening by the thickness of the trim (typically 1/2 - 5/8").

At my existing home built in 1987, they roughed the 16x8' garage door opening exactly to finished dimensions! I found out that what looks like painted trim is actually painted framing members! Fooled me! Apparently that was quite common in this area back then.
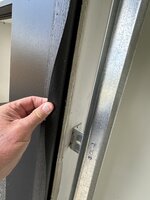
gotcha...yeah there's no trim other than what I described the rest is painted jambs...ok I understand adding the 2x vertical members on the sides but do you mean like in this photo? (which as you've said thered be a verticle seam where old meets new) which i would of ran a bead of caulking and sand flush before painting but then the weatherstripping would cover that up anyways....
 

Attachments

  • 20240426_040451.jpg
    20240426_040451.jpg
    251.5 KB · Views: 7

larry4406

Well-known member
Joined
Jan 27, 2006
Messages
20,366
Location
Northern Virginia
Yes - you flat frame (pad out) the perimeter like your hand held piece shows and my picture shows.

If your existing framing were completely solid at the sides and header, you could just bolt to that. I did that at my prior shop as I did not like the look of the flat 2x members in a finished space. Finished picture below (12' ceiling, 9' tall doors, high lift kits, and jackshaft operators). Sorry no picture of the blocking that was placed to mimic what the flat framed 2x's does.
1714133081623.jpeg
 
OP
B

breaker1369

Member
Joined
Apr 25, 2024
Messages
15
Yes - you flat frame (pad out) the perimeter like your hand held piece shows and my picture shows.

If your existing framing were completely solid at the sides and header, you could just bolt to that. I did that at my prior shop as I did not like the look of the flat 2x members in a finished space. Finished picture below (12' ceiling, 9' tall doors, high lift kits, and jackshaft operators). Sorry no picture of the blocking that was placed to mimic what the flat framed 2x's does.
1714133081623.jpeg
ok and what about the void behind apart from the inch and a half it's secured to up and down.....also now that the verticle jambs is extended another 1-1/2".... what of the top jamb? current top jamb is not flush with current side jambs...
 

Attachments

  • 20240425_183957.jpg
    20240425_183957.jpg
    345 KB · Views: 5

larry4406

Well-known member
Joined
Jan 27, 2006
Messages
20,366
Location
Northern Virginia
All jambs are extended to flush out with the 2x’s if you go that route. Left, right, and top. All jambs are the same depth.

Below are pictures of the same garage in Post 4 in the finish.

If you have adequate blocking within the framed wall, you can forgo the flat 2x’s like is shown in the other reply. In this case, your jambs should flush to the interior of your interior finished wall surface (drywall, plywood, etc).
 

Attachments

  • IMG_5374.jpeg
    IMG_5374.jpeg
    482.2 KB · Views: 5
  • IMG_5373.jpeg
    IMG_5373.jpeg
    479.1 KB · Views: 3
  • IMG_5372.jpeg
    IMG_5372.jpeg
    325.4 KB · Views: 3
  • IMG_5371.jpeg
    IMG_5371.jpeg
    267 KB · Views: 3
  • IMG_5370.jpeg
    IMG_5370.jpeg
    721 KB · Views: 3
  • IMG_5369.jpeg
    IMG_5369.jpeg
    874.6 KB · Views: 3
  • IMG_5368.jpeg
    IMG_5368.jpeg
    734.3 KB · Views: 3
  • IMG_5367.jpeg
    IMG_5367.jpeg
    623.5 KB · Views: 3
OP
B

breaker1369

Member
Joined
Apr 25, 2024
Messages
15
All jambs are extended to flush out with the 2x’s if you go that route. Left, right, and top. All jambs are the same depth.

Below are pictures of the same garage in Post 4 in the finish.

If you have adequate blocking within the framed wall, you can forgo the flat 2x’s like is shown in the other reply. In this case, your jambs should flush to the interior of your interior finished wall surface (drywall, plywood, etc).
my top and side jambs aren't the same depth
 
To avoid these ads, REGISTER NOW!
OP
B

breaker1369

Member
Joined
Apr 25, 2024
Messages
15
All jambs are extended to flush out with the 2x’s if you go that route. Left, right, and top. All jambs are the same depth.

Below are pictures of the same garage in Post 4 in the finish.

If you have adequate blocking within the framed wall, you can forgo the flat 2x’s like is shown in the other reply. In this case, your jambs should flush to the interior of your interior finished wall surface (drywall, plywood, etc).
 

Attachments

  • 20240425_183957.jpg
    20240425_183957.jpg
    345 KB · Views: 7
OP
B

breaker1369

Member
Joined
Apr 25, 2024
Messages
15
All garage door installations I have been involved with are sectional.

All of them, the jambs are all the same depth and all in the same vertical plane. I think you need to make yours all match.
oh right yeah I get what you were trying to say but what I was implying was since mine aren't currently same depth and then when I were to put the two side jambs as discussed before the current top jamb gap will increase....now say I put a 2x6 against the header I still won't be flush with the side jambs
 
OP
B

breaker1369

Member
Joined
Apr 25, 2024
Messages
15
All garage door installations I have been involved with are sectional.

All of them, the jambs are all the same depth and all in the same vertical plane. I think you need to make yours all match.
that's why I mentioned about trimming the current side jambs to be flush with the top and then put 2x6s flat against it and top then I'll be squared away...the latter I'd prob have to double up on wood on top to come out flush with the side jambs...I kid you not before creating this thread I had 5 different local companies come out just for a quote and asked for a detailed list of what's to be done but they all didn't include or share with me what'd they have to do on the door jamb prep for new door....so that's what led me to create this thread
 

larry4406

Well-known member
Joined
Jan 27, 2006
Messages
20,366
Location
Northern Virginia
oh right yeah I get what you were trying to say but what I was implying was since mine aren't currently same depth and then when I were to put the two side jambs as discussed before the current top jamb gap will increase....now say I put a 2x6 against the header I still won't be flush with the side jambs
Sounds like you have some weird framing going on.

You might need to invest in a table saw/ planer to adjust the thickness of your 2x’s (left, right, top) so in the end, they are all in the same vertical plane on the interior side. If that makes for unequal jambs it doesn’t matter.

Sorry I really can’t help any further.
 
OP
B

breaker1369

Member
Joined
Apr 25, 2024
Messages
15
Sounds like you have some weird framing going on.

You might need to invest in a table saw/ planer to adjust the thickness of your 2x’s (left, right, top) so in the end, they are all in the same vertical plane on the interior side. If that makes for unequal jambs it doesn’t matter.

Sorry I really can’t help any further.
it's all good I appreciate any input....I guess when old style garage door setup is like mine as in photo mounting installation method differs to the modern garage door setups....
 

Attachments

  • 17141473441587822631581166324050.jpg
    17141473441587822631581166324050.jpg
    485.4 KB · Views: 10
OP
B

breaker1369

Member
Joined
Apr 25, 2024
Messages
15
Sounds like you have some weird framing going on.

You might need to invest in a table saw/ planer to adjust the thickness of your 2x’s (left, right, top) so in the end, they are all in the same vertical plane on the interior side. If that makes for unequal jambs it doesn’t matter.

Sorry I really can’t help any further.
hey Larry I took the door off and took some pictures so you can get a better understanding of what i was trying to describe how my current jambs are....the shelf unit above jambs will be taken down before I proceed with door installation...
 

Attachments

  • IMG_20240426_190559.jpg
    IMG_20240426_190559.jpg
    431 KB · Views: 8
  • IMG_20240426_190612.jpg
    IMG_20240426_190612.jpg
    282.2 KB · Views: 6
  • IMG_20240426_190700.jpg
    IMG_20240426_190700.jpg
    469.5 KB · Views: 8

larry4406

Well-known member
Joined
Jan 27, 2006
Messages
20,366
Location
Northern Virginia
Here is what I would do.

1. Remove your side and top jamb trim piece.
2. Add flat 2x6 uprights to the sides, flush with the rough framing assuming your rough opening is correct for the sectional door you want. Shown in Red below.
3. Add the flat 2x10 upright in the middle at the top. Shown in Blue below
4. Add flat 2x6 across the header opening extending left and right to the upright 2x6's added in Step2. Shown in Green. Normally we run the blue 2x10 first to the rough opening then add the green 2x6's to fill in.
5. Install new trim at jambs. On the inside, extend this to the full depth of the 2x_'s. On the outside, make it match your brick mold or whatever trim you have there.

Now it looks just like the pictures I posted and any competent garage door guy can install your sectional door.

Alternately, if you don't want to replace your jambs, then cut the existing side jambs flush to the framing so it then matches the top. You will then need to add framing/blocking within the existing framing flush with the existing framing so that the tracks, torsion spring mount, and motor operator track can be properly secured.

At the end of the day, you need everything flush in a single vertical plane and solid on the sides, top, and top middle.

Hope this helps.
Overall.jpgHeader.jpgSides.jpg
 
OP
B

breaker1369

Member
Joined
Apr 25, 2024
Messages
15
great minds think alike..... lol.... that's exactly how i've been tackling this all night...except for the 2x10 pad foe the spring....went with 2 2x8x20s side by side making it a 16"x20" pad.....middle of the night and home depot was opened so I improvised....
 
OP
B

breaker1369

Member
Joined
Apr 25, 2024
Messages
15
Here is what I would do.

1. Remove your side and top jamb trim piece.
2. Add flat 2x6 uprights to the sides, flush with the rough framing assuming your rough opening is correct for the sectional door you want. Shown in Red below.
3. Add the flat 2x10 upright in the middle at the top. Shown in Blue below
4. Add flat 2x6 across the header opening extending left and right to the upright 2x6's added in Step2. Shown in Green. Normally we run the blue 2x10 first to the rough opening then add the green 2x6's to fill in.
5. Install new trim at jambs. On the inside, extend this to the full depth of the 2x_'s. On the outside, make it match your brick mold or whatever trim you have there.

Now it looks just like the pictures I posted and any competent garage door guy can install your sectional door.

Alternately, if you don't want to replace your jambs, then cut the existing side jambs flush to the framing so it then matches the top. You will then need to add framing/blocking within the existing framing flush with the existing framing so that the tracks, torsion spring mount, and motor operator track can be properly secured.

At the end of the day, you need everything flush in a single vertical plane and solid on the sides, top, and top middle.

Hope this helps.
Overall.jpgHeader.jpgSides.jpg
and yeah the opening width is 7ft...which is exactly the same width of the door....
 

CraigStu

Well-known member
Joined
May 22, 2014
Messages
4,101
Location
Blacksburg, Va
As long as you are at it, I'd be wondering through HD or L to find some thin pvc trim boards. Nail them on to the surfaces of your existing trim so you never need to paint again. There will be no problem w/ your opening being 1" narrower (1/2" pvc on each side) than the door
 
OP
B

breaker1369

Member
Joined
Apr 25, 2024
Messages
15
As long as you are at it, I'd be wondering through HD or L to find some thin pvc trim boards. Nail them on to the surfaces of your existing trim so you never need to paint again. There will be no problem w/ your opening being 1" narrower (1/2" pvc on each side) than the no
not a bad idea but already painted....while I had everything off i first removed the external trim pieces that was on the end of the jambs thst sits flush with exterior wall....applied that citric smelling paint removal gel while the gel did its thing I started removing old paint off the jambs with a metal putty knife then i sanded off any remaining paint i couldnt get off and by then enough time has passed for the gel to soften paint on trim pieces and easily was able to scrape/wipe off paint with a plastic putty knife...wiped trim clean and waited for it to dry...after all was good I mounted trim pieces back and painted them and jambs....just waiting for paint to dry to start door install....
 
To avoid these ads, REGISTER NOW!
Top Bottom