To avoid these ads, REGISTER NOW!

Single Shot 40x56 Build Thread - Central IA

shelbyz28

Well-known member
Joined
Dec 27, 2012
Messages
71
Location
Central Iowa
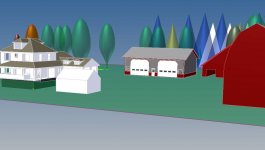
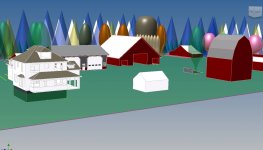
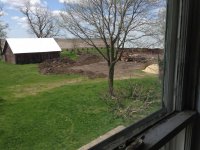
Hello everyone; like many I've done more reading than posting and thought after all the reading and gleaning I've done, its time for me to contribute some to the site. Last year I bought the "home place" where my dad grew up; a classic farmstead in central Iowa built for my great grandfather by his dad. As I understand it, it went something like "son, if you make it back from the war [WWI] I'll put a set of buildings up on the 'Parrot' place."

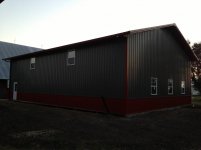
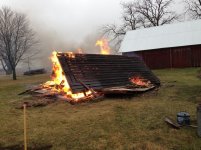
Its about 5 acres, most of the structures built in 1923/24 including a classic 4 square house and a half dozen outbuildings. My grandpa had set up an old shop in one side of the old barn in the 70's after they stopped feeding cattle that he used until he moved off the place at 86 years old when I moved in. Initially I had considered upgrading the barn further and turning the center into a new shop, but as I compared it and better understood the challenges dealing with an old structure, decided a new building was probably the way to go.

I credit my neighbor (cousin, family farm tenant) with 'pushing me over the edge' on the project. His advice was something like, "build it while you're young; don't wait until you're old like me and your dad and don't want to go out and work in it anymore. Get it built so you can enjoy it."

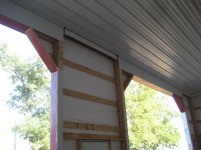
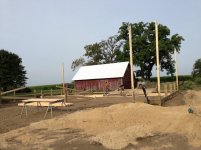
So, this spring I bought the building spot on a construction loan, the house porch needed to be structurally rebuilt, it was badly in need of a paint job, I was going to build a new shop, and I also had this "40 hr/wk" thing 45 miles away to keep going as well; so this is going to be a bit of a look back. I'm amazed at the guys who can do daily updates on their build threads.

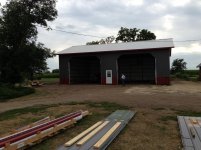
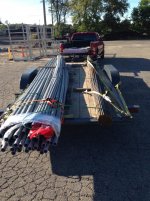
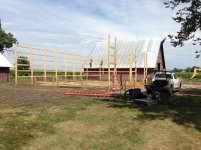
So, without further ado, I'll start posting pictures of my summer.

Oh, and I'm also experimenting with posting pictures, so sorry if this starts out a little rough.
 

Attachments

  • bimage004.jpg
    bimage004.jpg
    16.2 KB · Views: 249
  • aimage008.jpg
    aimage008.jpg
    49.4 KB · Views: 106
  • aimage009.jpg
    aimage009.jpg
    58.3 KB · Views: 117
  • aimage007.jpg
    aimage007.jpg
    61.6 KB · Views: 114
  • bimage002.jpg
    bimage002.jpg
    49.8 KB · Views: 125
  • bimage001.jpg
    bimage001.jpg
    69.5 KB · Views: 144
  • bimage003.jpg
    bimage003.jpg
    44.6 KB · Views: 149
To avoid these ads, REGISTER NOW!

hemibee69

Well-known member
Joined
Jan 15, 2011
Messages
92
Location
VA
Looking forward to watching the build! Cool to be back on the family property.
 
OP
S

shelbyz28

Well-known member
Joined
Dec 27, 2012
Messages
71
Location
Central Iowa
First thing's first, right? Buy things to put in the building that isn't built yet. Pallet racking and craigslist styrofoam. Gotta get when the getin's good. Fortunately I could make room in the center of the old barn to store things until I needed them.

There was also some destruction debris that needed to be eliminated. Makin' room for progress.

Then I peeled off topsoil, leveled the area and started digging my drainage. I added tile for sub-grade downspout drainage, floor drains and perforated tile with and without a sock so basically I have a french drain moat all around the building. The area I was building it was slightly low to begin with and had a rock field driveway running through it, so we took care of that too.

It was all probably overkill, but my posts should stay nice and dry. The big open top french drain is also the main water diversion for half of the old barn roof that sheds towards the new building.


And apparently its time to upload to a picture sharing program or resize files or something.
 

Attachments

  • IMG_0258.jpg
    IMG_0258.jpg
    126.3 KB · Views: 110
OP
S

shelbyz28

Well-known member
Joined
Dec 27, 2012
Messages
71
Location
Central Iowa
Ok, now we're cooking with gas, sort of...
 

Attachments

  • IMG_0482.jpg
    IMG_0482.jpg
    144 KB · Views: 185
  • IMG_0457.jpg
    IMG_0457.jpg
    144 KB · Views: 179
  • IMG_0412.jpg
    IMG_0412.jpg
    147.9 KB · Views: 172
  • IMG_0289.jpg
    IMG_0289.jpg
    146.7 KB · Views: 219
  • IMG_0241.jpg
    IMG_0241.jpg
    143.9 KB · Views: 188
OP
S

shelbyz28

Well-known member
Joined
Dec 27, 2012
Messages
71
Location
Central Iowa
And then the rain came. I don't recall how much there was, but it was several inches in a few days.

I learned the importance of covering tile well , especially if I haven't completed the trench outlet.

I had a moat. With a black corrugated sea monster.

Six weeks later it was dry enough to prepare the grade. 16 truck loads of railroad ballast later, I had a raised flat surface to work from.
 
OP
S

shelbyz28

Well-known member
Joined
Dec 27, 2012
Messages
71
Location
Central Iowa
A lesson in the buoyant forces of unperforated corrugated tile.
 

Attachments

  • IMG_0799.jpg
    IMG_0799.jpg
    148.7 KB · Views: 119
  • IMG_0772.jpg
    IMG_0772.jpg
    144.2 KB · Views: 115
  • IMG_0601.jpg
    IMG_0601.jpg
    149.1 KB · Views: 132
  • IMG_0500.jpg
    IMG_0500.jpg
    144.7 KB · Views: 135
  • IMG_0602.jpg
    IMG_0602.jpg
    142.6 KB · Views: 122
  • IMG_0489.jpg
    IMG_0489.jpg
    109.7 KB · Views: 118
OP
S

shelbyz28

Well-known member
Joined
Dec 27, 2012
Messages
71
Location
Central Iowa
The wet building site allowed be to start work on the house porch that had some, uh, structural shortcomings.

I removed the old 'footings' which were clay tile with the 90 year old mortar crumbling and non-frost depth footings. I jacked up the roof that was also sagging and rebuilt everything except the back portion of the floor, the roof and a few of the studs.
 

Attachments

  • IMG_0507.jpg
    IMG_0507.jpg
    101.5 KB · Views: 178
  • IMG_0592.jpg
    IMG_0592.jpg
    148.6 KB · Views: 181
  • IMG_0801.jpg
    IMG_0801.jpg
    146 KB · Views: 203
OP
S

shelbyz28

Well-known member
Joined
Dec 27, 2012
Messages
71
Location
Central Iowa
So the local antique farming show was featuring Massey Ferguson, of which we have a few. Here they are getting ready to go the 12 miles, but first practicing parking inside the new shop. In the background, you'll notice the house is indecent; in the buff so to speak. I have no idea the man hours in the house paint, but essentially all of the siding was scraped down to bare cedar.

Day 1 of the pole building going up. NuMark Buildings from Pella, IA built the shell for me; overall I was pleased with their work. Here they're drilling the holes; I was happy at the level of compaction as they were drilling, especially after all of the sheepsfoot packing and back and forth over the top few inches with other heavy equipment.

I know I heard them speaking in 1/16th of an inch, and maybe someone said 32nd. I was impressed with the precision and squareness of the building. We work with weldments at work and hand layout to .030" so with all that wood on dirt, I was very impressed. :bowdown:

They had all of the posts set and the skirt board up the first day. 6 bags of quick-crete in the sidewall holes topped with gravel, hand tamped. I'm using my 'forklift' (converted loader with hog carrier for a man basket) to pack the dirt around the edges from the holes.

Day 2, the structure will go up.

:rocker:
 

Attachments

  • IMG_0885.jpg
    IMG_0885.jpg
    147.9 KB · Views: 187
  • IMG_0880.jpg
    IMG_0880.jpg
    154.5 KB · Views: 173
  • IMG_0877.jpg
    IMG_0877.jpg
    140.8 KB · Views: 179
  • IMG_0869.jpg
    IMG_0869.jpg
    143.9 KB · Views: 254

Neighbor

Well-known member
Joined
Feb 23, 2010
Messages
137
congrats on getting the family place. If I recall correctly less that 10% of family farms are occupied by third generation family. I too live on the family farm near Reinbeck, IA. where in central Ia are you?
The old tractors look good.
Keep up the good work.
 
OP
S

shelbyz28

Well-known member
Joined
Dec 27, 2012
Messages
71
Location
Central Iowa
I'm down SW of Marshalltown a bit. Our family still owns the farm ground on three sides of my lot, and the cousins who are tenants farm the fourth side, across the road. Technically the farm ground is a "Century Farm" but since I don't have 40 acres, my lot doesn't qualify. Nevertheless, it's still neat family history.

So, I should explain the build thread title a bit. Single shot refers to the fact that I only plan to build this one shop. It's much bigger than what I need right now, but that was an attempt to "future proof" the project. Basically anything that was very difficult to update or change in the future was done to the very best I could afford now, which I think any of us do. Thanks to this site, I've been able to consider and research many ideas and improvements I wouldn't come up with on my own (which will show up in future pictures). I also talked to neighbors, uncles, my dad and anyone else who would sit still for me to ask their opinion and ideas. I knew that with 28 years on this ball of mud there was no way I could figure out everything I would want on my own.

Basically, my design criteria was tall enough anything going down the road could fit in (14' high doors), and as I was getting close to big enough, I grew it a bit so we could fit our converted school bus flatbed device and my dad's motorhome. The doors are 18' wide so we can take trucks in at an angle, or wider equipment etc. Also, I specifically didn't want a narrow deep shop because I sometimes get multiple projects going and one blocks the other in. It wasn't the most cost effective way to enclose the area, but it gives me multiple
project bays and flexibility. In addition, the shop will be my heated garage for my daily drivers until i put an addition on the house (depicted in the first post 3D models).

At any rate, on with the show; framing up the structure. And feel free to ask any questions as we go, of course.

Below are the second and third days; day 2 was main structure, day 3 was the roof.
 

Attachments

  • IMG_0886.jpg
    IMG_0886.jpg
    143.6 KB · Views: 186
  • IMG_0890.jpg
    IMG_0890.jpg
    147.4 KB · Views: 212
  • IMG_0894.jpg
    IMG_0894.jpg
    140.8 KB · Views: 192
  • IMG_0897.jpg
    IMG_0897.jpg
    147.3 KB · Views: 156
  • IMG_0898.jpg
    IMG_0898.jpg
    140.9 KB · Views: 188

madosta

Well-known member
Joined
Sep 4, 2012
Messages
807
Location
Michigan
Nice Oliver!

Nice barn too... I like the design and size, I think I might be doing something like that now... darn you.
 
OP
S

shelbyz28

Well-known member
Joined
Dec 27, 2012
Messages
71
Location
Central Iowa
Nice Oliver!

Nice barn too... I like the design and size, I think I might be doing something like that now... darn you.

Thanks; I picked it up kind of as-is; an Oliver collector kind of budget restored it maybe 10 years ago or more. He passed away and his son was selling of his more common pieces, which is where I came up with it. I gave it a tune up and a quick polish. I love the art-deco styling and the inline six purr; it was great pulling the sheepsfoot with it. :) Most of the problems with those old tractors can be reduced by exercising them every now and then.

The other one here is a Massey 65 Diesel I use to mow the yard with. Gotta love that Perkins fuel efficiency and almost 50 hp on tap with that utility size. :D

The old tractors is one of the reasons for the shop, besides, well, everything else we all like to use them for (including a staging area for the house addition when that happens.) :eyecrazy:
 

Attachments

  • IMG_0213.jpg
    IMG_0213.jpg
    152.9 KB · Views: 74
  • IMAG0646.jpg
    IMAG0646.jpg
    155.1 KB · Views: 75

smschriefer

Well-known member
Joined
May 28, 2009
Messages
842
Location
Yorktown, VA
When I saw the Massey, I thought for sure it was a Massey Harris 50. We had one as a kid and it looked much like your 65. Fond memories of learning to drive with it, but I really didn't enjoy it after I was shown how to mow our lower acreage. I believe it was around 80 acres.

You porch looks great and the house will look nice once properly dressed. Nice start on a huge outbuilding!
 
To avoid these ads, REGISTER NOW!

bartz32tt

Well-known member
Joined
Aug 23, 2012
Messages
88
Location
Iowa's capital
Fellow Iowan checking in, watching with interest. What're your plans for insulation? You should consider blown in cellulose into the walls. About 1/3 the cost of fiberglass and better r-value.
 
OP
S

shelbyz28

Well-known member
Joined
Dec 27, 2012
Messages
71
Location
Central Iowa
Why did the builders set short posts and then scab onto them (looks that way, at least)?

They have several reasons for building that way. First, I believe is cost. Only the bottom portion of the column needs to be pressure treated, which done properly, is not cheap. Secondly, the way they best like to build it to send a crew out ahead to do the "t-set" (timber set, or bottom of the posts) and skirt board (the first day of my actual building build). From there, the skirt board serves as a concrete form and they can do the concrete and come back and put up the building. Thirdly, they don't have to be precise in their post depth; they're all a bit long when they place them. The crew then runs a laser line around the building, sets nails and go around to each stub post with a jig and cuts them to height. Then their in-shop built glue-lam columns are pre-made to length and it saves time on the job site.

"Doesn't the splice make the column weaker?"

Well, not if it's done properly. With some research, I found this study:
http://www1.fpl.fs.fed.us/fplrp503.pdf
Basically, if the different laminated portions of the column are far enough apart, the splice is negligible. Since NuMark's standard column was a "12-12" splice, I asked them to use construction adhesive when assembling the top of the columns to the bottom of the columns. In addition, I went around and added metal connector plates to each column where I could from the inside. (those spiky plates they use to build trusses and rafters) If I were to go back and do it again, I would have used the next size up. According to that study, they really wanted a "24-24" splice, but "12-12" was acceptable with metal connector plates or adhesive (or both, I don't exactly recall).
 

Attachments

  • IMG_1018.jpg
    IMG_1018.jpg
    111.6 KB · Views: 171
  • IMG_1033.jpg
    IMG_1033.jpg
    117.9 KB · Views: 178
OP
S

shelbyz28

Well-known member
Joined
Dec 27, 2012
Messages
71
Location
Central Iowa
Fellow Iowan checking in, watching with interest. What're your plans for insulation? You should consider blown in cellulose into the walls. About 1/3 the cost of fiberglass and better r-value.

I found some used 2.5" thick styrofoam (EPS - "bead board") on Craigslist and figured I could do the building for slightly more than fiberglass (see pickup/trailer load picture in first post; did that twice in two nights and the pallet rack the day before.:willy_nil
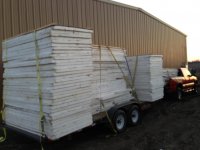
) Between that and cans of great stuff I called it "poor man's spray foam." Yeah, it could be pretty nasty if it ever burned, but I hope I don't have to sleep out there... too much.:headscrat:D

That's the plan anyway; stay tuned to see how that all worked out….
 

Attachments

  • IMG_0264.jpg
    IMG_0264.jpg
    140.8 KB · Views: 72
OP
S

shelbyz28

Well-known member
Joined
Dec 27, 2012
Messages
71
Location
Central Iowa
Once the roof was on, the side tin went on. I tried to do a few things to reduce the apparent height of the building to keep it from imposing on the yard too much as it is closer to the house than any of the other farm buildings and kind of dwarfs the big old barn. Wainscoting was the first "trick" I used, along with taller windows, raising the windows on the south wall a bit, and adding the "dutch vee's" to the corner of the garage doors; I called them "dog ears". They're larger than what NuMark typically does, but the standard 18" or 24" didn't scale well with the building. Those are 30", which they went out of their way to get special order flat stock to finish the inside. The windows went in later because we had a communication hiccup and I wanted grids in the windows and the ones they brought didn't have them, so the building was sans windows for a bit.

Outside, you can see where I connected the downspouts to the tile line. I'm not sure how well this connection method will work; I still have some fine tuning to do. There is a grate that goes over the white opening to keep debris out.

The way they package their building, and since I wasn't doing bookshelf girts, I had to install a rim board for the ceiling to be installed on. Handily enough, I had my bucket truck out and about from working on the house and between my dad in that and myself on the ladder, we got 16' and 20' boards put up one night after they left.
 

Attachments

  • IMG_0999.jpg
    IMG_0999.jpg
    155.9 KB · Views: 209
  • IMG_0995.jpg
    IMG_0995.jpg
    101 KB · Views: 213
  • IMG_0916.jpg
    IMG_0916.jpg
    135.7 KB · Views: 336
  • IMG_0915.jpg
    IMG_0915.jpg
    143.2 KB · Views: 223
  • IMG_0910.jpg
    IMG_0910.jpg
    152.4 KB · Views: 232

mobilus

Well-known member
Joined
Feb 15, 2011
Messages
58
Location
North Texas
Awesome progress! Makes me kind of wish I'd went that route instead of all steel. Thanks for the reply...good info to have.

Hey, the bucket truck is great! Do you run the hydraulics off a pto powered pump, or do you have a hyd power pack in there? "I gotta get me one of these" fits my thinking right now.
 
OP
S

shelbyz28

Well-known member
Joined
Dec 27, 2012
Messages
71
Location
Central Iowa
Do you run the hydraulics off a pto powered pump, or do you have a hyd power pack in there?

The bucket truck is kind of funny; I was planning to drop $10k in one, keep it for a few years and sell it, possibly for a loss. The plan was to paint the house with it, as well as the buildings and building roofs another year. Renting just wasn't fiscally reasonable for the long time period it would take me to do the house alone, let alone the buildings. I was searching all over Craigslist within a few hundred miles, went and looked at a few, then I saw one sitting in the neighbor's salvage yard. "Hey, what's the deal with that bucket truck?" "Motors blowed up in it; I own the truck, the electrician still owns the lift in the back." Oooookay…….

The lift itself is completely self contained. It basically runs off two 12V batteries and uses starter motors to run the hydraulic pumps. I called the electrician, came to terms on the lift thinking I would bolt it into one of our trucks, but then it'd tie up the truck. Ok, maybe I can find another 350 to throw in this truck, or run the one in there enough for around the yard.

Or, maybe I can make a trailer out of it….. Made a deal with the neighbor, then told him my plan. Turns out he bought the truck for the low mileage, relatively rust free front end sheet metal to use on local farmer's grain trucks. :drool:


Now we're getting somewhere. We reworked the deal so he kept the engine and front end sheet metal, I paid him less for the truck, still bought the lift from the electrician and the kicker? He pulled the cab, sheet metal and drive line and delivered it. For less money! :bounce:

So, now I have a mobile toolbox and a lift that can be used without leaving an engine running inside for less than renting a lift for the amount of time I would have needed it for. I did add outriggers since I cut off the front half of the truck. I did some calculations before I tried it the first time too. I don't like falling, or ladders.
 

Attachments

  • IMG_0178.jpg
    IMG_0178.jpg
    140.3 KB · Views: 108
  • IMG_0200.jpg
    IMG_0200.jpg
    146.2 KB · Views: 111
  • IMG_0447.jpg
    IMG_0447.jpg
    139.9 KB · Views: 124
  • IMG_0858.jpg
    IMG_0858.jpg
    142.3 KB · Views: 125
OP
S

shelbyz28

Well-known member
Joined
Dec 27, 2012
Messages
71
Location
Central Iowa
Alright, back on track (not that I mind a tangent.) Here are the garage doors going in, sub-grade insulation and windows! :D

I can now confirm the ground was well compacted. I'm positive because I hand dug the entire insulation trench (150 linear feet or so). It was so dry and hard in there, I ended up using one of those garden soaker hoses where I planned to dig next so I could get the spade in. I used various EPS and XPS to make up the thickness around the skirt board (why waste concrete there?) and then ran 2" XPS 24" below floor level. I also ran some EPS across in front of the doors just outside (might have a picture later.) That wasn't hand dug.
 

Attachments

  • IMG_1030.jpg
    IMG_1030.jpg
    135 KB · Views: 145
  • IMG_1032.jpg
    IMG_1032.jpg
    104.9 KB · Views: 133
  • IMG_3927.jpg
    IMG_3927.jpg
    132 KB · Views: 141
  • IMG_3874.jpg
    IMG_3874.jpg
    135.8 KB · Views: 142
  • IMG_1042.jpg
    IMG_1042.jpg
    145.1 KB · Views: 179
  • IMG_1043.jpg
    IMG_1043.jpg
    110.2 KB · Views: 117
OP
S

shelbyz28

Well-known member
Joined
Dec 27, 2012
Messages
71
Location
Central Iowa
So fortunately I was able to make everything align so I could hook my new shop up to the four year old septic system, which was sized for the house with the future addition (i.e. HUGE!). I used 4" pipe so I could get away with a 1/8" per foot of slope and have enough elevation change between the existing sewer line and the building. It's pretty shallow, but so is the one from the house and it hasn't frozen. :eek: The logic is there is enough warm water flowing through the system that it doesn't freeze up. Unfortunately, I won't have daily warm showers in the shop, so we'll see how that works; the boiler condensation down the sewer line for over a month and so far, so good! :thumbup:

The floor drains running to a separate drainage field. The mini-excavator came in real handy when it was time to do the smaller trenches. I had been using the 3-pt mounted unit with a 24" bucket for the bigger trenches, which was a bit short on power, but had an idiot stick beat six ways to Sunday! The last picture with the floor drains shows why you don't want to dig in hard dry compacted soil with power equipment, or at all for that matter. It just plain made a mess; I should have let the soaker hose run over the area for a bit like I did with the edges but I was soooo excited to use the powerful little ******. It'd move dirt, but it sure made a mess when it came time for back filling...:sad:

Oh well. The first drain (a "Fat Max" I believe, from Menards) feeds into the second drain, a pit that'll let the sediment settle out and allow for an oil slick. I haven't yet, but I just realized I should look into a "reverse P trap" to allow some oil to set on top of the water without going down the drain line.
 

Attachments

  • IMG_1094.jpg
    IMG_1094.jpg
    131.1 KB · Views: 92
  • IMG_1070.jpg
    IMG_1070.jpg
    137.5 KB · Views: 76
  • IMG_1031.jpg
    IMG_1031.jpg
    101 KB · Views: 72
  • IMG_1007.jpg
    IMG_1007.jpg
    111.9 KB · Views: 71
  • IMG_1005.jpg
    IMG_1005.jpg
    112.4 KB · Views: 66
  • IMG_1002.jpg
    IMG_1002.jpg
    143.2 KB · Views: 82

rixtrix1

Well-known member
Joined
Aug 25, 2013
Messages
3,010
Location
Chandler, AZ (from west NE)
(I used various EPS and XPS to make up the thickness around the skirt board (why waste concrete there?)

I think you're missing the boat by not running the concrete all the way to the skirt boards. It seals the bottom of the building better and adds rigidity to the poles.

Did you install double "cleanout Y's" just outside the building in both your drain lines, just in case you need to run a snake through to clear a future blockage? Cheap insurance, IMO.

Like the big "dog ears" on the doors! They really add some style to the building.

Keep the pics coming as you continue,please.
 
Last edited:
OP
S

shelbyz28

Well-known member
Joined
Dec 27, 2012
Messages
71
Location
Central Iowa
Hmmm, hadn't thought of the pole rigidity factor with the concrete. If I had poured to the skirt boards I would have had concrete on 3 sides instead of 1 plus, but I don't have my warm concrete loosing heat to the poles as much. theres about R35 between my concrete and the dirt just around the building:bounce:

I do have various clean outs and floor drains strategically located in the drain line; including one just outside the building that can be used to empty an RV if necessary. :thumbup: (sure beats what grandpa used to do; "just drive out into the field a ways and pull the valve" :eyecrazy: eh, good fertilizer, right?)
 
OP
S

shelbyz28

Well-known member
Joined
Dec 27, 2012
Messages
71
Location
Central Iowa
Sorry for the delay guys, been pushing to get things ship shape for a re-finance appraisal.

Meanwhile, back to our story on the building project…..

I had my subterranian downspout drains in place and I didn't really like sending them right into a tile, so I have an adapter set up so if it freezes up below ground, I can take off the second elbow and send it out on the surface. There's a grate that goes on top of the white PVC to keep debris out. I haven't decided if I like it yet or not, but there it is.

CONDUIT AND REBAR!!! :rocker:

More floor drain work (and a debris pit)

And conduit rough in of under floor conduit (as much as I could imagine ever needing). I am pulling a main 200a feed from my meter to the new shop, and from there, I'll power the barn and machine shed, so there are some extra lines in for that.

I dug the trench with a handy little mini-excavator. The trench has water, gas, electric, data and a couple spare conduits (all with proper separation). Something I don't see mentioned enough is to keep the data and electric line apart from each other (6" min I believe) to avoid noise from the power line messing up the data feed.

I also ran a new conduit to the house to eliminate the old arial lines in the future. I also ran a sub-feed to the detached garage since all the trenches necessary were open and all it cost me was material and glueing time.

And finally, I got my load center hung.
 

Attachments

  • IMG_1151.jpg
    IMG_1151.jpg
    138.6 KB · Views: 84
  • IMG_1143.jpg
    IMG_1143.jpg
    112.7 KB · Views: 87
  • IMG_1092.jpg
    IMG_1092.jpg
    118.5 KB · Views: 83
  • IMG_1091.jpg
    IMG_1091.jpg
    141.6 KB · Views: 76
  • IMG_0998.jpg
    IMG_0998.jpg
    120.5 KB · Views: 72
  • IMG_1187.jpg
    IMG_1187.jpg
    126.4 KB · Views: 81
  • IMG_1204.jpg
    IMG_1204.jpg
    95.1 KB · Views: 96
To avoid these ads, REGISTER NOW!
Top Bottom