To avoid these ads, REGISTER NOW!

Sistering Floor Joists with LVL

The Tool Tyrant

ALLIANCE MEMBER
Joined
Dec 19, 2011
Messages
2,182
Location
Bonita, Ca. (San Diego)
BTW, I didn't see that has been mentioned, but over the years your 2x10's have most likely shrunk down more than you may realize. Verify their height dimensions before you get too far into sistering.

Another option to carry a flush beam at the garage door end would be to frame an additional wall against your header wall with a new header to carry the flush beam. Of course it would require re-configuring your garage door, but it's another option.
 
To avoid these ads, REGISTER NOW!
OP
F

frankd

Well-known member
Joined
Aug 5, 2014
Messages
677
Location
Long Island, NY
http://www.awc.org/codes-standards/calculators-software/spancalc


Is a good source. Live load and dead load are key. At 12" on center, 19'1" is acceptable for a 2x10. Sagging says that dead load probably exceeds 15psf.

Thanks, I actually found this a few days ago and came to the same conclusion that you did. My concern is the same as ishiboo's comment below. I think that the dead load did exceed 15fps with the prior owner because he was a pack-rat that collected/fixed cars and had a TON of car parts in the attic. He put fluorescent lights in the attic and there was a small corridor in the middle, with isles of boxes stacked to the rafters...mostly full of car parts. The rooms were also packed with ****. it was very neatly and meticulously done...but there was still a TON of stuff in that house. all of the $hit in the house is part of the reason that I didn't notice the sag in the floor above the garage. I just noticed a sagging issue in the den

I fired up Forte to look at the center beam too. Not too practical in the x10 depth either. The beefed up joists are probably the best way. A beam solution would need some steel to fit in the depth.

Thanks for looking into that. I really appreciate it.

I've leveled a lot of floors... and one thing I've found is that you're often better off removing what's currently there.

As you mentioned, the joists having sagged makes them pre-loaded in the direction you don't want to be. Jack them up, install your new floor joists level which are rated for the span, remove the jacks and all that pre-load actually bows your NEW floor. So you need to over-size the joists to counteract that versus what the span tables indicate.

Not only that, but the bow if you cut it in the center to install a beam remains, and causes the floor to take a "W" shape if you jack the center, because they are curved on their length.

Just my .02...

This is what I'm afraid of. Over the 60 years that the house has been around, I'm afraid that the current floor joists will have some "memory" and work against the new joists. That's why I wanted to sister them with LVL. According to the span calculator above I'd be ok with just sistering with new 2x10"s
 
OP
F

frankd

Well-known member
Joined
Aug 5, 2014
Messages
677
Location
Long Island, NY
BTW, I didn't see that has been mentioned, but over the years your 2x10's have most likely shrunk down more than you may realize. Verify their height dimensions before you get too far into sistering.

Another option to carry a flush beam at the garage door end would be to frame an additional wall against your header wall with a new header to carry the flush beam. Of course it would require re-configuring your garage door, but it's another option.

Thanks. At this point I've only poked some holes in the garage ceiling. in the next week or so I plan on tearing down all of the drywall and insulation. Hopefully I don't run into any surprises but I'm sure I will. Once I know for sure what I'm dealing with, I'll size the lumber appropriately.

Regarding the flush beam. I don't think I quite understand. The current joists run parallel to the garage door. If I run a concealed beam/header it would have to run perpendicular to the door meaning that I would have a support column in the middle of my garage which would not allow the door to open....OR I would have to install the header above the header that spans above the garage door...which wouldn't really be possible either
 
To avoid these ads, REGISTER NOW!

Radix2

Well-known member
Joined
May 28, 2014
Messages
1,853
Location
the thumb!, MI
Any chance at all of replacing the flooring from above? If it is just plywood underlayment, the net work to just cut it out, sister, and replace it will probably be less than all the messing around underneath and you will get a better job. No jacking, so that all of the strength will go to keep the floor level. Just sister your straight stock to the curved, put down new t&g plywood or osb. Floor will be dead level and strong. Put your carpet back.
 

sreeb

Well-known member
Joined
Jul 29, 2009
Messages
460
Location
SoCal
Assuming that you are just trying to deal with the floor above, can you just level the floor?

Rip off the ceiling. Use jacks to push the floor boards up free of the exiting joists. Add sisters to support the floor.

If you don't have nice hardwood floors, rip out the floors and put sisters in from above.
 

ddawg16

Well-known member
Joined
Jul 11, 2008
Messages
21,005
Location
S. California
My house was built in the 50's as well. The longest span is 14' between footings....and I have 2x8's 16" OC. Yup....bouncy. But that was the standard back then.
When I did my 2-story addition, upstairs is 2x12" 12" OC Grade 1 Lumber....with 1 1/8" T&G plywood....max span at any one point is 15'. It's about as stiff as walking on concrete.

If it was me.....

Tear out the ceiling drywall. If it's 12" OC....getting a sistered joist up there is going to be an issue. You may have to trim the ends a little until you have enough wiggle room to get it into the joist bay. Not a big deal though. You are not depending on the sister'd joist to hold the weight at the ends....you want it to stiff'n up the middle.

I had to rebuild my bathroom floor....10'x14' section. I was able to get the new floor joist in place flat then beat the ***** with a sledge hammer up into vert position.

If the sledge hammer proves too difficult....notch the bottom of the new joist 3/4" the width of your top plate. This will let you put it up into position real easy. Then use a jack to push it up and slide a shim made of 1x2 (actual dim 3/4" x 1.5") under the new joist. It should now be flush with the old joist.

Use a jack and push up the middle of both joists. Use clamps to hold them tight together....then start nailing or screwing the joists together. Personally, I'd use 1/4" bolts backed up with construction screws.

If you want to improve stiffness, use LVL's.

I used a similar method in my bathroom under the bathtub to take out a 1" drop.

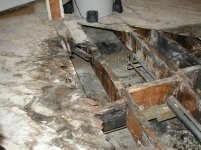
This is what my rebuilt bathroom floor looked like...as you can see from one photo, the water damage was pretty bad.
 

Attachments

  • P8280001.jpg
    P8280001.jpg
    144 KB · Views: 30
  • P8240018.jpg
    P8240018.jpg
    108 KB · Views: 28
  • P8110006.jpg
    P8110006.jpg
    158.3 KB · Views: 28
To avoid these ads, REGISTER NOW!
Top Bottom