To avoid these ads, REGISTER NOW!

Slab Prep (To Much?)

Chennig

Active member
Joined
May 14, 2019
Messages
35
Location
Central MN
Slab Prep

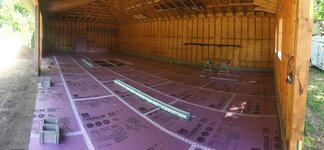
Last weekend I got to prepping for the slab.

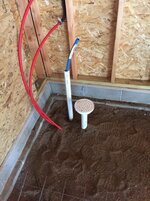
Short backstory, 28'x48' detached garage in MN with plans for radiant heat. The garage "shell" is currently 75% complete/ dried in. ( No windows or doors yet) Its currently sitting on a frost wall/footings.

After hauling out about 3" of to much backfill that my foundation contractor brought in, we are sitting at the perfect height for the slab insulation.

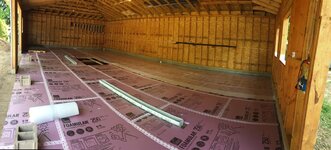
After what seemed like hours driving the compactor around in circles and checking as much as we could with a laser level we decided to call it good and start laying down the insulation. As night fell and some possible high winds coming through, I taped all the seems and put some bricks around the edges to make sure my hard word was not lost.

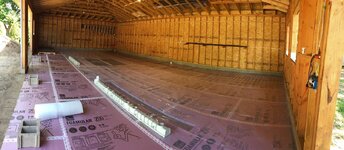
The next day I went around with a clear head and started walking around and noticed a few high spots. These spots cause a few small dips that create a gap between the base and the insulation until you step on them and put weight on the panels.

Some tell me that will be fine and the weight of the slab will hold it down. I on the other hand tend to always try to always overbuild and I am debating pulling up a few parts of foam to level off the best I can. Then the realistic part of me says to leave it be and it will be fine... I'm a year into the garage build and I don't want to cut corners but need to make forward progress.

Is this something to worry about or continue on forward?
 
Last edited:
To avoid these ads, REGISTER NOW!

purediesel

Well-known member
Joined
Apr 17, 2016
Messages
193
Location
Ada Oh
I'll just say your crazy to pull up that insulation and relevel. Your putting thousands of pounds on top of that foam..it'll conform just fine. You'll just use a bit more concrete in the lower spots. More important in my eyes would be how high are the high spots? I wouldn't want my slab to be too thin. It also sounds like you didn't install a vapor barrier?? That's something I wouldn't skip over.
 
OP
C

Chennig

Active member
Joined
May 14, 2019
Messages
35
Location
Central MN
In the high spots, I will have ~3.5" of slab so it's cutting it close. Edit: Good point... I assumed I have high spots and not just low spots causing the dips.. I will measure it tonight.

I am planning to do my Vapor Barrier on top of the 2" XPS. I've read a ton over the last week on where to put the Vapor Barrier, or if it is truly needed if you tape the seams. The vapor barrier is a whole other conversation in itself. And some say that it's not needed when taped....
 
Last edited:

purediesel

Well-known member
Joined
Apr 17, 2016
Messages
193
Location
Ada Oh
Use the vapor barrier. The tape will not hold if and when the foam moves. This happened to me and my floor was pretty darn level. It was within +/- 1/4" and the foam still moved. I guess the main question for the vapor barrier is where are you putting the tubing? I'm assuming that you are planning to zip tie it to the rebar since your putting the vapor barrier on the top.
 
OP
C

Chennig

Active member
Joined
May 14, 2019
Messages
35
Location
Central MN
Use the vapor barrier. The tape will not hold if and when the foam moves. This happened to me and my floor was pretty darn level. It was within +/- 1/4" and the foam still moved. I guess the main question for the vapor barrier is where are you putting the tubing? I'm assuming that you are planning to zip tie it to the rebar since your putting the vapor barrier on the top.


Interesting to hear your foam moved, even without the tape I wouldn't think the foam is going to move too much being it is confined by the block around the perimeter. Even now that its taped I it's pretty solid. But I will take your word for it as I have not poured my slab yet!

The original thought (due to local majority vote of neighbors and friends) was to compact base, lay down 2" foam, staple tubing to foam and pour.

I am now finding that may be acceptable but is more of a cheap way of doing it.

I've read that even putting down a vapor barrier on top of the XPS and stapling the pex through the barrier to the insulation is also acceptable as the barrier will still be ~98% effective (2% being lost to all the punctures)

As of now, I will plan to put the barrier on top, after that, I'm still having an internal debate on what to do.

I am learning to do mesh or rebar, then zip the tubing 12" on center to that. Still need to figure out whats the best way to lift the mesh/rebar off the foam that will withstand the weight of walking on it during the pour.
 

benwah

Well-known member
Joined
May 21, 2014
Messages
980
Location
Crested Butte, Colorado
I've always laid "vapor barriers" underneath the 2" XPS. Never seen it done on top before..

We lay vapor barrier, 2" XPS, mesh, PEX gets tied to the mesh, then rebar in a grid right on top of the PEX, tie rebar to mesh.
cc8e8d1e93a3b0a7d466f6e44ee9fe11.jpg

View attachment 1021690
 
Last edited:
OP
C

Chennig

Active member
Joined
May 14, 2019
Messages
35
Location
Central MN
Here is a picture, because who doesn’t like pictures? e922b13e31935bbd60272a01da600b1a.jpg

For those wondering, 2 channel drains that local code allows to drain to daylight (out the rear of the garage) 1 drain in the corner (needs to be cut down yet) If I decide to bring running water to garage or get a condensing boiler.

I had some spare pex that was to short to use for the slab, so used it to run around all the underground drains in the event they freeze up.

Big opening in the middle is for the lovely Atlas lift (thank you GJ for the threads on that)


Sent from my iPhone using Garage Journal
 

Attachments

  • e922b13e31935bbd60272a01da600b1a.jpg
    e922b13e31935bbd60272a01da600b1a.jpg
    171.3 KB · Views: 4

purediesel

Well-known member
Joined
Apr 17, 2016
Messages
193
Location
Ada Oh
So what I did and many others have done is put the barrier down first, foamboard next with the tubing stapled to it followed by 1/2" rebar sitting on 2.5" rebar chairs. The rebar is at 24" o.c. and 12" o.c. under my 24"x24" pads for the 2 post lifts. I poured my entire floor at 6" mainly because that's what I wanted for working on heavy equipment. For my vapor barrier I used a Viper 10 mil class A vapor barrier from ISI Building products and their Viper vapor tape with 12" overlapping seams. There stuff was local and it ended up being some amazing products. I figure you only have one shot at whats under your slab so make it count. Whats your base under that foam?
 

Felines4231

Member
Joined
Jun 7, 2018
Messages
8
Location
New Orleans
Interesting to hear your foam moved, even without the tape I wouldn't think the foam is going to move too much being it is confined by the block around the perimeter. Even now that its taped I it's pretty solid. But I will take your word for it as I have not poured my slab yet!


The original thought (due to local majority vote of neighbors and friends) was to compact base, lay down 2" foam, staple tubing to foam and pour.


I am now finding that may be acceptable but is more of a cheap way of doing it.


I've read that even putting down a vapor barrier on top of the XPS and stapling the pex through the barrier to the insulation is also acceptable as the barrier will still be ~98% effective (2% being lost to all the punctures)


As of now, I will plan to put the barrier on top, after that, I'm still having an internal debate on what to do.


I am learning to do mesh or rebar, then zip the tubing 12" on center to that. Still need to figure out whats the best way to lift the mesh/rebar off the foam that will withstand the weight of walking on it during the pour.


Use rebar bolsters or chairs to hold the rebar up off the insulation. The type I like are made of wire. They are essentially a 5 foot long triangle that rebar is tied to. They are available is many different heights depending on where you want the bar in the slab. It’s not letting me post the product link
 
To avoid these ads, REGISTER NOW!
OP
C

Chennig

Active member
Joined
May 14, 2019
Messages
35
Location
Central MN
So what I did and many others have done is put the barrier down first, foamboard next with the tubing stapled to it followed by 1/2" rebar sitting on 2.5" rebar chairs. The rebar is at 24" o.c. and 12" o.c. under my 24"x24" pads for the 2 post lifts. I poured my entire floor at 6" mainly because that's what I wanted for working on heavy equipment. For my vapor barrier I used a Viper 10 mil class A vapor barrier from ISI Building products and their Viper vapor tape with 12" overlapping seams. There stuff was local and it ended up being some amazing products. I figure you only have one shot at whats under your slab so make it count. Whats your base under that foam?


Contractor brought in some sand that was spread out. Most of the garage has about 6” of fill. Along the back wall it’s closer to 18” of fill as the grade drops off. Base under the sand is solid and for the most part dry and untouched.


Sent from my iPhone using Garage Journal
 

coyotehunter

Active member
Joined
Jan 31, 2018
Messages
29
Location
South central Pennsylvania
+1 on what benwah said. We also used a reflective bubble wrap on top of our foam before the rebar. Did you install any foam board vertically around the edge of your slab area to make a thermal break? It is to help mitigate any incoming cold through the edge of the slab.
 
OP
C

Chennig

Active member
Joined
May 14, 2019
Messages
35
Location
Central MN
Re: Slab Prep

This weekend's progress.

Put down my VB (10 Mill 20'x100') and mesh. It was a windy day so I fought a little bit with the plastic. For the most part, the plastic was heavy enough to stay put after I put it down. The 10 mill was plenty thick over the foam although I did puncture it in 2 places with the ends of the mesh when I was moving a little to fast. I got mesh tied together with some 6" wire ties. I may put some more down depending on where the PEX gets tied.

I need to cut and wrap the VB around the pits and under the drains yet. I plan to get the PEX this week and get that installed over the weekend. When that's all wrapped up I will get my mesh chairs installed to lift the mesh/pex 1-1/2" off the foam. I also need to get foam around the edges of the slab, but I can see the light at the end of the tunnel!

I finally picked my concrete contactor after having 5 different people look at it. Amazes me the opinions on how things should be done or how the guys quoted their figures. I took the advice from GJ to ask your contractor questions, and if you have any doubts about his responses find someone new.

The contractor mentioned he uses zip strips for his joints. Does anyone have any tips for keeping these strait as can be?

Since I took the advice of the first contractor to have a flat base(current contractor likes a sloped base), we also are going to start with ~5" of slab thickness in the back to slope down to ~4" at the drains. He is going to try to come out this week and snap some chalk likes so I can get the drains set to the right height.

Right now I am hoping to have the pits poured next week, and the rest of the floor done the following week.

My last debate is using wire ties vs mesh clips to attach the PEX to the grid. I read one user had a good point of the possibility of the wire tie slowly eating away at the PEX pipe over time if you have a lot of temperature changes. My thought was to not tie them so tight or just use the PEX clips. Seems that wire ties are the norm if you're not stapling directly to the foam.

Few progress pictures.

7cacaa019359119c9338cfed2f5398f6.jpg
d80ad2737b131b992cf669d1372bc24a.jpg
9f651275a28a701ef6d308ec45b7cf0c.jpg


Sent from my iPhone using Garage Journal
 

Attachments

  • 9f651275a28a701ef6d308ec45b7cf0c.jpg
    9f651275a28a701ef6d308ec45b7cf0c.jpg
    209.6 KB · Views: 3
  • 7cacaa019359119c9338cfed2f5398f6.jpg
    7cacaa019359119c9338cfed2f5398f6.jpg
    191.3 KB · Views: 2
  • d80ad2737b131b992cf669d1372bc24a.jpg
    d80ad2737b131b992cf669d1372bc24a.jpg
    186.1 KB · Views: 2
Last edited:
OP
C

Chennig

Active member
Joined
May 14, 2019
Messages
35
Location
Central MN
Re: Slab Prep

Last item before I am ready for the Pour.

I am planning to do foam around the perimeter of the slab with the topside cut at an angle. Question is should I cut the foam height to the floor thickness or cut it back 1/2” as to not be in the way of the finisher? I am trying to keep a decent thermal break, but don’t want to make it harder for my contractor to finish. Concrete contactor is out of town till Monday and don’t want to bother him.


Sent from my iPhone using Garage Journal
 
OP
C

Chennig

Active member
Joined
May 14, 2019
Messages
35
Location
Central MN
Re: Slab Prep

Figured I would follow up with my results.

Garage has been poured, and garage is now sealed in.

I will start a build log but here is the finished product of the floor.


Close to up of the corner where all the utilities go.

Got a floor drain for a wash sink/boiler to drop into. White PVC is a chase to get a PEX water line in.(pipe goes down below the foundation/frost line). Still need to trench it to the house. I also got some free chunks of PEX. They where only about 150’ so it was to short to use for the floor. So I decided to make a short loop under all my drain plumbing in the event I have issues with freezing.
3502d4fe08f03184e66c6f3ae24d6f31.jpg


Manifold for the in floor heat. 5-300’ loops for floor, and 1-150’ “just in case” loop for the drains. I got the PEX sweep from supplyhouse.com. For how cheap it was, it really provides a clean look now that the floor is poured.
07eb7f41f68f7f046dc6e4dca8bbcd26.jpg

Got all the pex attached to
My 6x6 metal grid.

ca42532e4e50b666b4c710be4c70c3be.jpg

Night before the pour.
I have rebar and forms for the car lift in the far stall. I used some mesh-ups to get the metal grid and PEX pipe to the middle of the slab. For the amount of work i put into the prep, I did not trust the contractors to lift up and eye ball as they poured.


b2e35594320c507a26f03e6e6de92fe6.jpg


Finished product, pour went well snd excited to have a floor. I ended up going with zip-strips instead of cutting control joints. I now have some hairline cracks from the zip strips. Overall they are fairly strait, but mostly Unnoticeable unless you really look for them.

e6f0ab273f41d5706066a0d0f2b079d5.jpg


Fast forward 3 months- i finished the rest of the exterior. I got the brick up (that took about 2 months worth of weekends) and garage doors in just before winter. Excited to get back working on the shed (after I finish house remodel) and get the inside finished.

f2aa5176e4ce4ec0ca4f6c3492333bbb.jpg


Sent from my iPhone using Garage Journal
 

Attachments

  • e6f0ab273f41d5706066a0d0f2b079d5.jpg
    e6f0ab273f41d5706066a0d0f2b079d5.jpg
    132.1 KB · Views: 2
  • b2e35594320c507a26f03e6e6de92fe6.jpg
    b2e35594320c507a26f03e6e6de92fe6.jpg
    236.6 KB · Views: 1
  • ca42532e4e50b666b4c710be4c70c3be.jpg
    ca42532e4e50b666b4c710be4c70c3be.jpg
    80 KB · Views: 1
  • 07eb7f41f68f7f046dc6e4dca8bbcd26.jpg
    07eb7f41f68f7f046dc6e4dca8bbcd26.jpg
    116 KB · Views: 1
  • 3502d4fe08f03184e66c6f3ae24d6f31.jpg
    3502d4fe08f03184e66c6f3ae24d6f31.jpg
    126.8 KB · Views: 1
  • f2aa5176e4ce4ec0ca4f6c3492333bbb.jpg
    f2aa5176e4ce4ec0ca4f6c3492333bbb.jpg
    81.8 KB · Views: 2
OP
C

Chennig

Active member
Joined
May 14, 2019
Messages
35
Location
Central MN
Looks nice. What size pvc chase did you use for what size pex? Were you able to fish the pex through 90's?


I used 2 45s to make the bend easier. I also did a test fish before I covered it as I don’t have the water line trenched to the house yet. The pipe goes down under the frost footing and stubs to the outside of the foundation, so it’s a short run. 3/4” pex in 1-1/2” pipe.


Sent from my iPhone using Garage Journal
 
To avoid these ads, REGISTER NOW!
Top Bottom