To avoid these ads, REGISTER NOW!

Sliding beam trammel

royce

Well-known member
Joined
Jun 22, 2014
Messages
3,111
Location
fairbanks ak
I've had a couple trammel points with out a beam for years and thought I would make a sliding beam for them.
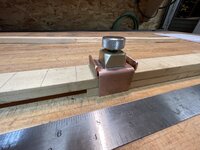
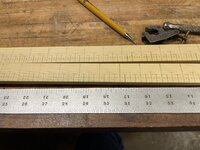
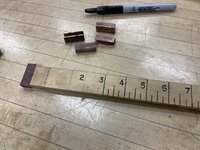
Started with a mock up to practice scribing and inking the graduations as well as stamping the numbers.
Also formed some copper end caps and milled the end of the mock up, so the cap fits up flush.
 

Attachments

  • IMG_6516.jpeg
    IMG_6516.jpeg
    866 KB · Views: 267
  • IMG_6512.jpeg
    IMG_6512.jpeg
    726.1 KB · Views: 215
To avoid these ads, REGISTER NOW!

KMScott

Well-known member
Joined
Feb 14, 2012
Messages
4,643
Location
Daufuskie Island, South Carolina
It’s great to see you using yourJig Bore Royce. Cutting wood seems easy with a milling cutter but it takes a different approach then cutting steel. Have fun with your project.
 
OP
R

royce

Well-known member
Joined
Jun 22, 2014
Messages
3,111
Location
fairbanks ak
Thanks Kevin,
Still trying to figure it all out.
The copper end caps were also tricky to mill the flanges even, without bending them.

Royce
 

Oregon rock crusher

Well-known member
Joined
Jun 28, 2016
Messages
1,913
Location
West of Salem
That is a good range of use on your sliding beam Royce. I have a circle cutter for the torch but on larger radiuses I find myself looking for a piece of string. Your solution is much more elegant. Ed.
 

tarbellb

Well-known member
Joined
Apr 17, 2011
Messages
5,776
Location
Oregon
Looking good, bummer about the split wood.

Couple of quick things that may help on the next go around:

Blunt the tips of those screws to keep splits at bay
Stagger if possible in the grain
Smaller screws ;)
 
OP
R

royce

Well-known member
Joined
Jun 22, 2014
Messages
3,111
Location
fairbanks ak
Looking good, bummer about the split wood.

Couple of quick things that may help on the next go around:

Blunt the tips of those screws to keep splits at bay
Stagger if possible in the grain
Smaller screws ;)
Thanks Tarbellb,
Yes, smaller screws would have been a benefit or at least drill the holes a touch bigger!

Royce
 
OP
R

royce

Well-known member
Joined
Jun 22, 2014
Messages
3,111
Location
fairbanks ak
Not too much progress today, started laying out increment lines.

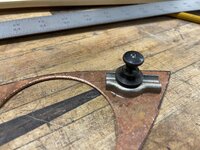
The trammel points are brass and the pencil holder is plated cast iron.
With no way to mechanically fasten the two together, I'll silver braze a copper backing plate to to the cast iron, then soft solder the copper to the brass trammel.
That will keep from distorting the brass trammel body.

Royce
 

Attachments

  • IMG_6549.jpeg
    IMG_6549.jpeg
    835.1 KB · Views: 80
  • IMG_6548.jpeg
    IMG_6548.jpeg
    891 KB · Views: 103

Monza Harry

Well-known member
Joined
Dec 29, 2018
Messages
1,433
Location
Windsor ON
Lookin' Good Royce! Now for the question everyone wants to know: Where the #€!! did you get that "Kant Twist" clamp? That clamp looks smaller than my functional keychain version! And since we are off the rails, I'd like to know, is that mechanical pencil something special, or a less spectacular version [clearly from the pic "she's a beaut(y) Clark" *]? As stated by others, and I'll add my "Thanks for Sharing" to the list! Harry
*Christmas Vacation reference there for everyone's amusement.
 
OP
R

royce

Well-known member
Joined
Jun 22, 2014
Messages
3,111
Location
fairbanks ak
Lookin' Good Royce! Now for the question everyone wants to know: Where the #€!! did you get that "Kant Twist" clamp? That clamp looks smaller than my functional keychain version! And since we are off the rails, I'd like to know, is that mechanical pencil something special, or a less spectacular version [clearly from the pic "she's a beaut(y) Clark" *]? As stated by others, and I'll add my "Thanks for Sharing" to the list! Harry
*Christmas Vacation reference there for everyone's amusement.
Thanks Harry,
The clamp came from a good buddy and the pencil is just a pencil.
 
OP
R

royce

Well-known member
Joined
Jun 22, 2014
Messages
3,111
Location
fairbanks ak
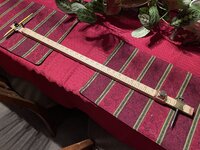
Got the pencil holder brazed and soldered, lines scribed, numbers stamped and inked.
One beam swings 26", both beams 53"
Still need to put a couple copper sleeves in, to hang it on the wall.

Royce
 

Attachments

  • IMG_6574.jpeg
    IMG_6574.jpeg
    983 KB · Views: 74
  • IMG_6576.jpeg
    IMG_6576.jpeg
    1.2 MB · Views: 72
  • IMG_6579.jpeg
    IMG_6579.jpeg
    1.1 MB · Views: 106
To avoid these ads, REGISTER NOW!
OP
R

royce

Well-known member
Joined
Jun 22, 2014
Messages
3,111
Location
fairbanks ak
Scott,
Not as much for circles, as for bisecting angles, swinging arcs, and picking up points or transferring dimensions.
Fastest, easiest way to get accurate perpendicular lines on the shop floor or bench top to start any project.
I don't CAD, so I find them essential for design and layout work.

Royce
 
OP
R

royce

Well-known member
Joined
Jun 22, 2014
Messages
3,111
Location
fairbanks ak
Ok then, got the copper sleeves pressed in and oiled the whole thing, so can call it complete.

Some would say this could be done with a string or couple nails driven through a board and they would be partially correct.
I look at it as a chance to get all the features I feel would be beneficial in a tool.

The telescoping trammel indexes off the end of the beam and the single beam indexes off the edge of the trammel point.
Having graduated beams is a treat to use for quick setting and or adjustment.
The point's locking screws bear on a leaf spring and a coil spring for the pencil holder, making for smooth adjusting on both.
While somewhat crude, it functions nice and smooth.
I'll never get voted into the toolmakers hall of fame but sure enjoy tinkering on things like this.

Thanks to all for the kind words

Royce
 

Attachments

  • IMG_6594.jpeg
    IMG_6594.jpeg
    1.1 MB · Views: 82
  • IMG_6586.jpeg
    IMG_6586.jpeg
    1.1 MB · Views: 112

MoonRise

Well-known member
Joined
Nov 5, 2010
Messages
4,031
Location
NJ
What, no rosewood or mahogany with brass hardware? No inlaid wire markers for the major distance marks? :lol:

Numbers are hand stamped, right?

And you do use CAD. Cardboard Aided Design aka CAD. :lol_hitti

Looks nice Royce. :thumbup:
 
OP
R

royce

Well-known member
Joined
Jun 22, 2014
Messages
3,111
Location
fairbanks ak
What, no rosewood or mahogany with brass hardware? No inlaid wire markers for the major distance marks? :lol:

Numbers are hand stamped, right?

And you do use CAD. Cardboard Aided Design aka CAD. :lol_hitti

Looks nice Royce. :thumbup:
Thanks Moon,
Not the the best choice for wood, but I had the yellow cedar on hand.
Yes, hand stamped numbers.

Royce
 
OP
R

royce

Well-known member
Joined
Jun 22, 2014
Messages
3,111
Location
fairbanks ak
How do you keep the numbers so straight? Whenever I stamp something it looks like I was suffering from hypothermia and the DT's at the same time.
Clamped a bar to it to rest the punch against.
Took a little practice to find the right hammer weight and number of strikes, so not to break the fibers too much.

Royce
 

Muckin_Slusher

Well-known member
Joined
Apr 1, 2017
Messages
465
Location
Abitibi
I can't tell, is there a fine adjustment that tilts or otherwise moves one of the points?

I've got one at home that does that, and it's a really nice feature.

Edit: Forgot to say, great work as always.
Wish you'd post more stuff more often!
 
OP
R

royce

Well-known member
Joined
Jun 22, 2014
Messages
3,111
Location
fairbanks ak
I can't tell, is there a fine adjustment that tilts or otherwise moves one of the points?

I've got one at home that does that, and it's a really nice feature.

Edit: Forgot to say, great work as always.
Wish you'd post more stuff more often!
Thanks Muck,
No fine adjustment on this one.
I've accumulated quite a few trammels over the years trying to find the perfect one.
If I get time today, I'll post some pics of some fine examples.


Royce
 

Monza Harry

Well-known member
Joined
Dec 29, 2018
Messages
1,433
Location
Windsor ON
PD if I might offer some additional unsolicited advice on to Royce's spot on advice. I use a straight edge as well when possible, but I also stamp from right to left to give me a better view, I'm right handed and hold the stamp with my left hand [so adjust to fit your conditions]. Try using masking tape as a guide to set the edge of the letter on as some stamp sets aren't exactly centered. Also if using a solid straight edge be careful as I did this to 12" Mitutoyo scale from my combination square set! I don't want to replacement cost for this customized piece. Harry
1703273989102.png
 

Attachments

  • 20231221_191729.jpg
    20231221_191729.jpg
    346.4 KB · Views: 51
Last edited:
To avoid these ads, REGISTER NOW!
Top Bottom