To avoid these ads, REGISTER NOW!

Small 14x20 One Car Garage / Future Auto Shop

warnd

Member
Joined
Jul 16, 2016
Messages
23
Well this build certainly wont be as exciting or awesome as some of the other very impressive builds here, but I plan to do this best with what I have. My brother and I recently bought our first house, and after spending the entire first year completely renovating the entire interior and exterior, I am ready to focus my attention on what I really cared about all along. A garage that I can finally call my own.

The main reason for building this garage, like many of you here, is my passion for working on cars. Like everyone else, I started working on cars outside on jackstands, and I am more than thrilled to have a shop that I can pull a car into. Unfortunately the inside dimensions aren't huge at 14'W x 20'D, but it should be enough room to pull in my project LS1 swapped 1992 z28 Camaro. Some people will call me crazy, but my end game plan is to fit some sort of lift in there when its all said and done. Luckily this website is amazing and filled with examples of people who have made awesome work spaces with similar dimensions. The two main posts that served as inspiration for this build were:

These garage builds are just really awesome. Excellent use of space:

http://www.garagejournal.com/forum/showthread.php?t=263351 (Woody's Garage)

http://www.garagejournal.com/forum/showthread.php?t=182142 (Dubber's Single)

and various 1 car garages: http://www.garagejournal.com/forum/showthread.php?t=162541

Enough talking though, here are some pics of what I started with and where I am right now.

Outside of the garage:

20160723_154201 by Stephen Digiorgio, on Flickr

This is what it looked like before I started. I seriously regret not making the previous owner completely clean out the garage. We were way too eager to move in. Lesson learned for the future:

20160706_171529 by Stephen Digiorgio, on Flickr

20160706_171531 by Stephen Digiorgio, on Flickr

Decided I was going to need a dumpster to clean this out the right way. Had a bunch of stuff to throw out in the house too. 20 yarder did the trick perfect. Filled this thing to the brim by the time I was done:

20160708_184242 by Stephen Digiorgio, on Flickr

Ahhhh almost there. A lot of this stuff will no longer reside in the garage once it is completely functioning as a car shop, but for right now some of it is staying during the work:

20160717_162117 by Stephen Digiorgio, on Flickr

Future Plans for the Garage:

-Install roll up garage door (so the garage door is no longer above the car)
-Paint inside walls with a nice durable ultra bright white (to lighten it up)
-Re-support ridge beam so I can delete the rafter ties.
-Dig a trench to run electric out to the garage
-Get some nice lights in there (I want to be able to perform surgery in here)
-Figure out car lift (This will require cutting my slab and putting in new footings. This concrete is **** unfortunately.)

There are a million other things I would like to do to this garage. Far too much to put in a list, but the above is what I am worried about first and foremost. Once all of this is done, I can worry about fine tuning everything.

Here are pics of what will rest inside when I am done. I know these cars arent really a fan favorite, but I love it:

20140927_171731 by Stephen Digiorgio, on Flickr

20140926_161334 by Stephen Digiorgio, on Flickr
 
Last edited:
To avoid these ads, REGISTER NOW!
OP
W

warnd

Member
Joined
Jul 16, 2016
Messages
23
First order of business was to bust out the pressure washer and blast the 50 years of dust and cobwebs out of this thing so I could get it ready for paint. I dont plan on doing anything with the concrete right now because it is in terrible shape, but I figured it wouldnt hurt to throw some concrete stripper on there and see what happens. This is what it looked like after scrubbing in concrete stripper and the pressure washer. Still looks like **** :lol::lol:

20160729_162904 by Stephen Digiorgio, on Flickr

20160729_171239 by Stephen Digiorgio, on Flickr


Currently have fans in there drying everything out. Next things on the list are to patch up some small holes in the walls and get ready for painting. I have a Graco airless sprayer on the way that came highly recommended on this board. Should make painting the concrete block a breeze.

Let me know what you think! I am open to any and all suggestions. I am a pretty young guy and could use some guidance and expert advice from the veterans that have been doing this for years.

Thanks for looking!
 

BiTurbo228

Well-known member
Joined
Jun 13, 2016
Messages
252
Location
South of England
Looking forward to this :) I like the smaller builds as people have to get really creative with space.

Plus, as mine's 11'x23' it's very close in size :)

Also, I've never quite got why those Camaros don't get more love. Dirt cheap RWD V8 sounds like a very nice combo whatever it is, and with the LS in yours it must be quick!
 
OP
W

warnd

Member
Joined
Jul 16, 2016
Messages
23
BBChevro Thanks for looking! I hope to keep the progress coming in the beginning so people have something to read.

I absolutely love what Denwood did with his storage cabinets in his garage. To be completely honest, I do not have all that much stuff that needs to be stored in the garage. Building these cabinets is not on the priority list right now, but I would definitely like to see it as part of my final build. Right now I am most concerned about maximizing space for my future lift.

BiTurbo Thanks for checking out my thread! I agree, I do like to watch the smaller builds too. I guess because thats what we have to work with so thats what we like to watch.

Thanks for the comments about the car. Unfortunately, I have never driven it yet! Haha...it has been a complete ground up rebuild and has taken the better part of 4 years. It is taking me so long because I was finishing up graduate school and working on buying this house. I have a build thread for the camaro, but the main specs are LS1 with 18,000 original miles, converted from auto to a t-56 manual, and a ford 9 inch rear. Car should be done by this summer and hopefully I will know just how fast it is really soon!
 

M-technik-3

Well-known member
Joined
Feb 16, 2008
Messages
1,789
Location
Western Mass
What's very cool about your small garage is the that you could easily jack up your roof for some more height for a lift. The bad is will it be wide enough. Great job of cleaning it up.
 

BiTurbo228

Well-known member
Joined
Jun 13, 2016
Messages
252
Location
South of England
It's a similar situation with my Spitfire. I've been working on it for 3 years now, inbetween countless other projects and I've yet to drive one!

I've even bought two more for future projects without ever having turned a wheel :S
 

Zzzzz

Member
Joined
Jun 23, 2008
Messages
8
Looking forward to seeing the progress on this one. Also an LS fan - I want to tackle the same project you're doing, but I don't have the guts to get started!
 
OP
W

warnd

Member
Joined
Jul 16, 2016
Messages
23
M-technik-3 You are not the first person to suggest that, and it is a very good idea, but im afraid it is a little bit out of my skill level/comfort zone. Is this easier than I think it is? I would assume I would have to reinforce the roof and tie it together before jacking it up, but then how would I even jack it up all the way up there? Even if I got all the logistics sorted out, the town that I live in is really lame about height restrictions and permits and all of that. I am sure I have room within the town limit to make it a little higher, but I am not exactly sure how much higher. This idea is not out of the question, but I am leaning towards solving the problem the same way denwood did by re supporting the ridge beam and taking out the lower ties.


captain14 Haha I wish I could agree that it was huge, but I think I will be able to make it work out with what I need it for.

There was once electric out there at one point, but it is some of the shoddiest wiring I have ever seen in my life and it no longer works. There is no panel and the wiring running into the garage from the floor looks like an extension cord (its not but its definitely not the right type of wire to be buried under ground). I am a firm believer of wiping the slate clean and starting over again the right way. There used to be a deck in the backyard that was removed before we moved in. My guess is the garage wiring was tied into the deck wiring somehow and when the deck got ripped out the garage power went with it. That is just my best guess. I honestly have no idea what happened, but I do know that nothing in that garage is getting power. Maybe it deteriorated underground?:dunno:


BiTurbo228 LOL you and I would get along really well. It is nice to hear someone else is in my shoes too! I have the same problem of picking up new projects before Im done with others...see example below:
IMG_20140504_101256 by Stephen Digiorgio, on Flickr


Zzzzz You should definitely do it! The amount of information on www.thirdgen.org is staggering. Everyone else already figured out all of the hard stuff. It is basically just following instructions if you do all of the proper research. I have a very long build thread over there on that website if anyone wants to put themselves to sleep once or twice haha : http://www.thirdgen.org/forums/ltx-lsx/680409-watch-rookie-learn-how.html
 
OP
W

warnd

Member
Joined
Jul 16, 2016
Messages
23
Made a small amount of progress but nothing exciting. I patched all of the holes in the garage walls and started to blend them in so they will be less noticeable when I paint. No doubt in my mind that I will be able to see some of the patches through the paint, but I couldnt live with all of the holes everywhere. Some of them were really big *** chunks from the previous owner nailing stuff into the walls. I will admit I got a little carried away with the patches lol:

20160802_173029 by Stephen Digiorgio, on Flickr

20160731_133840 by Stephen Digiorgio, on Flickr

Also scored a nice freebie the other day from my neighbor. He is moving to Florida to retire and said he had no use for his tools and tool chest anymore. I offered to pay him some money but he just wanted me to take them. It is nothing spectacular, and I already have a decent set of tools, but I cant turn down free stuff...especially tools haha:

20160802_173116 by Stephen Digiorgio, on Flickr

20160802_173133 by Stephen Digiorgio, on Flickr

20160802_173144 by Stephen Digiorgio, on Flickr
 

M-technik-3

Well-known member
Joined
Feb 16, 2008
Messages
1,789
Location
Western Mass
Being it's cinder block you also need to be concerned about sweating so you might need some form of de-humidifier out there.

Lifting the roof of that nature is not that complex.
 
OP
W

warnd

Member
Joined
Jul 16, 2016
Messages
23
Ok and now is the first time that I am really looking for some help and advice from you guys (get used to that hahah).

I had originally planned to leave the floor of the garage alone for the time being because quite frankly, I just didnt want to bother with it right now. I was going to cut footings for my lift when the time came and just pour new concrete in the footings and be done with it. Just live with the rest of the floor being crappy. Well my pops came over today and like he usually does, he had me rethinking this and suggested that I redo the floor right now while I have everything out and have the chance to. His main reason for doing this is because the whole garage is sloped to the back left corner which is obviously not ideal. When there is a lot of snow and it melts all of the water runs back into the garage and sits in that back corner. The driveway is also pitched towards the garage too which is obviously not a good thing either, but I definitely do not have the money to get that redone right now. My dad suggested either ripping out this concrete and starting fresh, or pouring a coat of cement on top of this one to fix the pitch and build it up a little higher so the water couldnt flow back in.

I really do not know what to do here. Obviously having a new concrete floor would be awesome, and I would epoxy coat it right away. Now is definitely the time to do it. Especially if I was going to cut the footings for the lift...now I can just solve all of that in one shot. I am worried about just pouring concrete over the top of this slab because this one is cracked to high hell. Would that make the new slab prone to cracking in the same places? I would be pissed if I did all new concrete work only to have it crack like it was before. How would you guys go about this? Would you even bother at all? This is money that I didnt want to spend right now, but hey isnt that always how these things go? haha

Here is the best pic I have of the floor right now...if you look closely you can see it cracked all along the left and right wall and there are a few cracks that go through the center of the slab too:

20160729_171239 by Stephen Digiorgio, on Flickr

Would really appreciate some advice here on what you guys would do with the floor if you were in my shoes. Thanks for looking!
 

Jo Diesel

Well-known member
Joined
Aug 26, 2015
Messages
402
Location
St. Johns MI
By the time you cut out and repour for your hoist, recoat and level the rest it would be way better to just rent a Wacker and tear the hole thing out and replace it.
3.5 Yd concrete at $100 yd is $350 Throw a little color hardener in http://stores.ebay.com/ContractorSource1/Color-hardener-/_i.html?_fsub=10459656
$_57.JPG
and make it what ever color you want.
You will never be happy with what you have now
 
OP
W

warnd

Member
Joined
Jul 16, 2016
Messages
23
By the time you cut out and repour for your hoist, recoat and level the rest it would be way better to just rent a Wacker and tear the hole thing out and replace it.
3.5 Yd concrete at $100 yd is $350 Throw a little color hardener in and make it what ever color you want.

You will never be happy with what you have now

I think that I would have to agree with you on this one, and it is definitely the way I am leaning on this. I have a really good friend who owns a asphalt and brick laying company, so I can definitely borrow the necessary tools to make the job go smoothly. I really don't like to ask people for favors, but I am sure he would come over and supervise if I asked him to.

How would I go about deal with the edges by the walls? Would I need to cut a line around by the walls and break everything up from there? I am nervous about getting too close to the edge with a jackhammer. I really do not want to disturb the foundation or footing. I am not even sure what is going on under this slab to begin with.

Small update...my paint gun should be here on Thursday, which means I should be done painting by Friday. Would still appreciate some more advice on how to remove the old slab if that is the route I am going down.

Stay tuned for more pics!
 

Jo Diesel

Well-known member
Joined
Aug 26, 2015
Messages
402
Location
St. Johns MI
You are going to have to look close at the edges of the concrete. Is the crack going down the wall at the edge of the concrete or does it look like they poured the floor and then laid block on top of it. If they poured up to the wall you can just break it out. If they poured the floor and then put the wall on top you need to saw cut like a foot away from the wall and then drill and put re-rod into it to tie it to new floor.
I bet your concrete is less than 3" thick the way it is cracking or they poured really weak concrete mix.
We use Wackers at work. Would take less than an hour to bust your floor out
Dsc7yZ5fEBI

 
OP
W

warnd

Member
Joined
Jul 16, 2016
Messages
23
You are going to have to look close at the edges of the concrete. Is the crack going down the wall at the edge of the concrete or does it look like they poured the floor and then laid block on top of it. If they poured up to the wall you can just break it out. If they poured the floor and then put the wall on top you need to saw cut like a foot away from the wall and then drill and put re-rod into it to tie it to new floor.
I bet your concrete is less than 3" thick the way it is cracking or they poured really weak concrete mix.
We use Wackers at work. Would take less than an hour to bust your floor out
Dsc7yZ5fEBI


I am going to take some closer pictures today to post up here for your opinion if you dont mind. I am not too sure but I think that they poured the pad and then started building on top of that. The only reason I say that is because they way it is cracking around the sides makes it look like it is cracking from the weight of the cement blocks and roof pushing down on it over the years because it cracked all the way down both side walls in pretty much a straight line. I have no doubt that this pad is less than 3" thick because everything that I have touched in this house has been **** construction so far.

I have my friend coming over to take a look at the slab today and give me his opinion on how to proceed. At this point, I am 100 percent with you guys though that the whole thing needs to come out. When I do tear everything out, do you recommend pouring like a 6" slab all the way around? That would give me the depth for the lift, and I would not have to worry about special footings for the lift. Or are the footings just a good idea and should be done anyway...maybe like a foot deep?

Thanks for your input Jo, it is very helpful to get advice from someone who is in the business. Much appreciated! Paint gun should get here on the UPS truck tonight. Expect pictures of a painted garage by Friday.
 

Jo Diesel

Well-known member
Joined
Aug 26, 2015
Messages
402
Location
St. Johns MI
The spec from Bend-Pack is 4" which is thick enough for your shop. Your car balances on the lift. There is not as much tipping load as you think. I would make it like 6" in a 4' wide strip across where your hoist is. Spend the money on at least 3500psi concrete and either wire mesh or re-rod.
 
To avoid these ads, REGISTER NOW!
OP
W

warnd

Member
Joined
Jul 16, 2016
Messages
23
Ok little bit of an update to share with you guys. I have been busy trying to get stuff done whenever I have the spare time at night or on the weekends. First thing was that my Graco airless paint gun came when expected...except that the UPS man delivered it to a house 3 blocks away from mine with a house number and street name that was no where even close to similar.... Needless to say, thank god for nice people because as I was on the phone with UPS to ***** at them for a package that was marked delivered that I did not have, a nice couple came and dropped the missing package off at my house.

Anyways, I was happy with the performance of the paint gun, but so far I only shot one coat and the cinder block walls really soaked up the paint, so I wont take pictures of those to show you until I am more proud of them haha. Definitely think the gun was good for throwing up a nice base coat, but I will finish it off with a 1/2 inch nap roller to really push the paint into all the tiny holes of the block, but I wont do the final coat until after the new slab is poured. Here is the unit I purchased from gleempaint.com. No affiliation here, but I highly recommend them after seeing other people on garage journal buy from them:

20160805_140810[1] by Stephen Digiorgio, on Flickr

Next, I was able to borrow this from a friend of mine. I know its a chipping gun and not really a suitable tool for the job, but it was what I could get for free with no time frame so I figured it was worth a shot:

20160806_132908[1] by Stephen Digiorgio, on Flickr

Needless to say, it is definitely not the right tool for the job, but I was able to make a decent amount of progress with it in a few hours by myself after work:

20160810_173949[1] by Stephen Digiorgio, on Flickr

I was able to get my hands on a different tool instead of the dewalt. This one is a Hilti and it seems to have much more power. I think I will be able to bang out the rest of the garage with another solid night or two after work.

However, I do have a question for you guys about how to proceed for the edges of the slab. I took some pictures to show you guys what is happening and I do not want to mess anything up without a little guidance before I keep going.

I found out that the garage was not actually just built on top of the slab, but rather has what seems like a pretty decent footing. I dug down next to the garage about 2 feet and I didnt even get to the bottom of the concrete. I will keep going next time I am out there to see how deep it is, but here is what I have seen so far....this is from the outside of the garage where the new power will come in. In this picture you can see 20 inches of the footing, and I am not even at the bottom yet:

20160810_192346[1] by Stephen Digiorgio, on Flickr

Here are the cracks that are running along both side walls that I need your help with:

20160810_173919[1] by Stephen Digiorgio, on Flickr

20160810_173933[1] by Stephen Digiorgio, on Flickr

These used to worry me, but now that I know there is a footing, should I be worried anymore? Seems like it should be pretty solid if it is sitting on top of all that concrete. I know that you guys recommended drilling into the side and inserting rebar, so I will be doing that, but I just want to make sure I am safe to go by that crack with the hammer. Also any advice on an expansion joint for in here?
 
OP
W

warnd

Member
Joined
Jul 16, 2016
Messages
23
That was all of the info for the new floor project, but I also decided to take a break from that and take a look at the electrical aspect of this build. Had an electrician come over and help me plan out how we were going to go about everything. He had some good ideas. Anyways, I decided to start digging my trench, but before I could do that I had to do a ton of yardwork to even be able to dig the trench. We have been nonstop working on renovating the inside of the house for the past year, so our backyard has suffered greatly as a result. Here I am to post my shame for all the internet to see haha. Ill get to it, but the garage is more important right now. Electrician said the trench had to be 24 inches deep. I remember it needing to be 18 inches at my last house, but whatever 24 inches it is. The trench is about 80 percent done. Just need to finish getting the depth right in a few spots before I can lay the conduit.

Where the power will come from the back of the house:

20160807_161926[1] by Stephen Digiorgio, on Flickr

The bend that it makes around the back patio (if you can even call it that...just another ****** concrete slab haha):

20160807_161941[1] by Stephen Digiorgio, on Flickr

Where it is going to enter the side of the garage:

20160807_161918[1] by Stephen Digiorgio, on Flickr

Also want to ask what you think about the price the electrician gave me to do the work here. He wants 1650 for the whole job. That would include:

-The wire feed from the house panel to the garage
-all the conduit necessary for the run
-6 outlets in the garage (2 on each wall done in pipe because it is on the concrete block)
-2 switches... one to control 4 LED shop lights, and one to control 2 motion detectors one on the front of the garage and one on the side
-One outside outlet

To be honest, this price seems high to me, but it is an all inclusive deal. All fixtures and work included. I would not have to do anything as far as electric is concerned. He did the work in my house for our new kitchen, and I know he does very quality work and he does everything up to code. Good work is not cheap, especially in the area of New York that I live in, but I do not know if I have all of that money in the budget right now. He is willing to work with me and modify the estimate with any subtractions I think are unecessary. I am thinking that I am going to ditch the outside outlet and one of the motion lights. Also, I might look into buying my own LED fixtures to make sure I get ones that I want.

Is this a job that you think I should try to tackle myself? I honestly do not think I can do the whole job myself because I just dont know enough about all the rules for code and everything. However, is there something that I should try to do myself to save a little money before the electrician comes in? Or should I just **** it up and pay the 1650 for the original estimate? Could definitely use some advice here too. Also, only 4 LED shop lights? I feel like I might want a little more...even though its a small *** garage lol.

Thanks for looking....all help and advice is greatly appreciated!
 

Jo Diesel

Well-known member
Joined
Aug 26, 2015
Messages
402
Location
St. Johns MI
Don't rebar to the foundation. Only if wall was poured on floor.
Not enough outlets by workbench. Where is power for air compressor and welder?
His price is probably not to bad for NY
 
OP
W

warnd

Member
Joined
Jul 16, 2016
Messages
23
Don't rebar to the foundation. Only if wall was poured on floor.
Not enough outlets by workbench. Where is power for air compressor and welder?
His price is probably not to bad for NY

Ahh ok only rebar to the foundation if the concrete blocks were only on top of the slab and not a footing. Each outlet will be a 4 socket box. I don't even know where I am going to put my workbench yet haha. I would like to put it on the back wall to keep the sides clean, but since it is only 20 feet deep, I do not think I can get away with that. Will make it too tight to pull cars in. I do not have an air compressor for this shop yet, but will buy one down the road so I can wire that in when the time comes. I do not know how to weld unfortunately (even though this is something that I have wanted to learn all my life), it would solve so many problems working on cars, but I wasnt planning on having a welder in my shop right now. Definitely in the future, but right now I have my attention focused elsewhere.

I figure that I can run any additional electric work that I might need in the future, but right now I just want to get the shop lit up and workable. The wire that he is burying for me is a really thick gauge and will support whatever I am going to wire in for the future.

Any advice about what to do with those cracks that are running completely down both walls? Am I just safe to break everything out now that I know the garage is on a footing? Any general advice to prepare everything before I pour the concrete? I have 2 friends that do all of the concrete work for New York city tunnels and subway systems, but I have to prep everything for them before they get here. They are just coming to help with the pour and the finishing work.
 

Jo Diesel

Well-known member
Joined
Aug 26, 2015
Messages
402
Location
St. Johns MI
In that small of a shop you will want every thing on wheels. I would still put a 30A 220 somewhere. Might want to use a floor polisher or have some one come over with a welder or stumble across a 220 bench grinder. Will cost very little when the sparky is there. Will cost more than you can believe later and waste tons of time
You are lucky to have friends that know what they are doing for the pour. It should come out great.
 

trust

Well-known member
Joined
Sep 15, 2006
Messages
55
Location
Northern New Mexico
I agree with Jo Diesel, get all the wiring and then some done now, I would have him just get it into the garage and MAYBE do the outlets but leave the lights and the finishing until I had a better idea of how I want my work space laid out then run the interior cable runs myself. Not sure about NY but here in New Mexico a homeowner can do alot of the work himself, especially interior work. Just because he runs 'heavy gauge' wire doesnt mean you can use 220 for a welder later, that needs to be separate service from the 110v outlets and lights.

I'm looking forward to following your project, my garage is a toxic waste dump and totally unusable so Im living vicariously through yall
 
OP
W

warnd

Member
Joined
Jul 16, 2016
Messages
23
I agree with Jo Diesel, get all the wiring and then some done now, I would have him just get it into the garage and MAYBE do the outlets but leave the lights and the finishing until I had a better idea of how I want my work space laid out then run the interior cable runs myself. Not sure about NY but here in New Mexico a homeowner can do alot of the work himself, especially interior work. Just because he runs 'heavy gauge' wire doesnt mean you can use 220 for a welder later, that needs to be separate service from the 110v outlets and lights.

I'm looking forward to following your project, my garage is a toxic waste dump and totally unusable so Im living vicariously through yall

Thanks for the idea, I will probably break the wiring down into smaller jobs to make it easier to pay for. I would like this guy to do the electrical because I know his work and I know I will not be disappointed when he is done.

I guess I also forgot to mention that the price included a new panel in the garage that is attached to the house panel. I can run whatever dedicated circuits I need from the garage panel. That is why I mentioned the heavy gauge because that is what the panel will get its power from.
 
OP
W

warnd

Member
Joined
Jul 16, 2016
Messages
23
Ok so I have not posted an update in a while because I wanted to wait for something worth posting. I have a new floor!!! :D:D

Pictures are pretty self explanatory so I will just post a few pictures that document the majority of the progress. Feel free to ask any questions:

Was able to borrow a different hammer to break out the concrete...much more power in this one:

20160810_174003[1] by Stephen Digiorgio, on Flickr

Friend came over to give me a little advice. He laughed at me and told me to un-pinch the concrete. After he explained what that meant, it made a lot of sense. Needless to say, the next day the concrete came out in big chunks:

20160813_132328[1] by Stephen Digiorgio, on Flickr

20160813_140007[1] by Stephen Digiorgio, on Flickr

Cleaned it up:

20160815_181539[1] by Stephen Digiorgio, on Flickr

Figuring out the grade and making all of the dirt level. I will admit we didnt have a perfect 6 inches everywhere, but we were damn close to it all around. We also figured out the pitch here. We raised the floor two inches higher at the back wall of the garage than the front of the garage to give us the necessary slope. I forget what it worked out to exactly.

20160815_190851[1] by Stephen Digiorgio, on Flickr

Form for the front:

20160819_150427[1] by Stephen Digiorgio, on Flickr

Decided to dig under the footing of the garage to run the conduit instead of trying to drill through it. Just seemed like a safe option. The footing goes down about 32 inches...in this spot at least:

20160819_122103[1] by Stephen Digiorgio, on Flickr

Was able to borrow this tamper from another friend. Tamped the ever living **** out of the garage floor making numerous passes to make sure it was good. We added material as needed to bring everything up to grade:

20160820_064207[1] by Stephen Digiorgio, on Flickr

Scored some left over wire mesh rebar type stuff for free. I love free. Only putting this under where the future lift will be:

20160820_064229[1] by Stephen Digiorgio, on Flickr

This brings us up to about 8pm friday night. I was really scrambling to get everything done before saturday when we were set to pour. I was locked in to that date a week ahead of time for ordering the concrete and I was determined to make that mark. It was a scramble, but I got it done. I ran all the conduit in here somewhere too, but just forgot to take pictures of that because I was getting a lot done.
 
Last edited:
OP
W

warnd

Member
Joined
Jul 16, 2016
Messages
23
Well, everything was ready for 8am this morning when the concrete truck was set to come. Thankfully the truck was right on time and we were able to start work right at 8:

28498925474_8c2d9f9686_b.jpg20160820_074849[1] by Stephen Digiorgio, on Flickr

I wish I had more pictures of the overall process, but as many of you know, when you are moving concrete you do not have time to stop and take pictures. After calculating that we were going to need 6.25 yards of concrete, we ordered an even 7 yards of 4000 psi concrete to make sure we had enough. We did not want to be short. Waiting on another truck on a saturday when everyone is trying to do side jobs was not an option. Plus the concrete guys said they would take back the extra so no problem.

The night before the pour, my friends were talking smack about how miserable it was going to be to wheelbarrow all the concrete back and forth. To be honest, I was dreading it. However, with me and my brother on two wheelbarrows, and two people finishing in the garage, we moved all of the concrete in under and hour and a half. I was completely shocked. It took my friends another 2 and a half hours to do all the finishing work, and by the time we cleaned up and were done for the day it was only 12:30. Not a bad day of work at all. Anyway, here are some pics...pretty self explanatory:

28501746143_34e06527fa_b.jpg20160820_084048[1] by Stephen Digiorgio, on Flickr

29120779115_c268dec3df_b.jpg20160820_084043[1] by Stephen Digiorgio, on Flickr

29043708381_4bab5c7eb5_b.jpg20160820_091045[1] by Stephen Digiorgio, on Flickr

29015289912_6345b209c1_b.jpg20160820_091053[1] by Stephen Digiorgio, on Flickr

28498948584_de3d5cd24d_b.jpg20160820_101458[1] by Stephen Digiorgio, on Flickr

29120822625_58aec6a8eb_b.jpg20160820_171209 by Stephen Digiorgio, on Flickr

29120822875_9223935c21_b.jpg20160820_171137 by Stephen Digiorgio, on Flickr

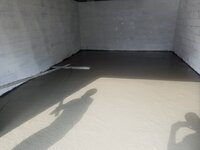
I am extremely happy with how it came out. These guys did a really nice job finishing the concrete. After wetting it down tonight after it was hard it was like an ice skating rink out there. The finish is incredibly smooth and even. I claim no responsibility for these skills haha. I was just one of the guys moving the concrete. Big shout out to my two friends for busting their *** today to do a really nice job. They told me to keep wetting it down every two hours or so, so that is exactly what I have been doing. It is rock solid right now...here is to praying that I dont get cracks.

Now I need to figure out what I am going to do to finish this floor. I was originally going to wait the 30 days and then do a 100% solids epoxy floor coating from one of the sponsors on this website. However, now I kind of just want to seal it with something clear because I really like the finish. Any suggestions here? It is going to be a damn shame to have to take a grinder to this to do an epoxy finish, but it is what it is if thats what is required.

Also trying to figure out the lighting situation. Does anyone recommend LED shop lights? I was going to go this route because it seems like the way everything is going, but lately I have just been tempted to throw some flourescents in there. Like some H.O. t5s or something. I love how bright those things get, and the fixtures arent too expensive.

Let me know what you guys think! Thats it for right now. Will probably be another week or so till the next update. Need to do some yard work, and I want to build a small shed to keep my mower, edger, and various garden tools. I want to keep all of that **** out of my garage. I am not moving anything back in there that is not car related.
 

Jo Diesel

Well-known member
Joined
Aug 26, 2015
Messages
402
Location
St. Johns MI
OP
W

warnd

Member
Joined
Jul 16, 2016
Messages
23
We bought a few of these and put them in my and my daughters garage and they are every bit as bright as my 8'ho fluorescents.
http://www.samsclub.com/sams/4ft-le...00000486689&adid=22222222627000016569&veh=sem
http://scene7.samsclub.com/is/image/samsclub/0075527781403_D?
img_size_380x380$
Why not colored floor sealer. Kill two birds with one stone
http://www.directcolors.com/tinted-concrete-sealers/
images

Thanks for the LED suggestion jo. I will have to look into that further. Seems a lot cheaper than what I have been seeing in HD or Lowes.

To be honest, I have never heard of or seen colored floor sealer, but it looks really nice. Is the process similar to an epoxy coating? Would I have to grind the floor before using this? Ahh ill do some research before I hammer you with questions haha. Thanks for looking Jo, I think your the only one still watching lol.
 

dubber

Well-known member
Joined
Dec 31, 2012
Messages
5,326
Location
Canada's Capital
Good luck with your project. Your off to a great start. I have fond memories of my single and how it truly forces you to be creative in maximizing your storage.
 

prokilloh

New member
Joined
Aug 24, 2016
Messages
2
Garage looks awesome dude!! Wish I could've been up there to give you a hand with all that. I would've loved to help, even with slugging the concrete back and forth. I did it for a long time with my dad growing up, he's been a mason his entire life. Anyways progress looks awesome. Glad I found this build thread to keep up with your work.

+1 on the LED's. More light output and less $$ to National Grid, or whoever you guys have in your neck of the woods. I'd also get the 110 and 220 wired in at the same time. I'm big on doing work once and doing it all right the first time. Hell thats why you're grinding to put the 9" in the Camaro and not that crappy stock rear, haha.
 
To avoid these ads, REGISTER NOW!
Top Bottom