To avoid these ads, REGISTER NOW!

Small project halfway through- various questions

Reborn

Well-known member
Joined
Dec 31, 2017
Messages
113
Location
SoCal
We have a closet that goes under a spiral staircase; I am adding a recessed light fixture. The closet wall that would take the switch for this light fixture is shared with the kitchen. The builder had no lighting in here at all. The previous owners did the following:

Drill 3 holes into electrical box supplying an outlet to the kitchen. Run NM-b from this electrical box to a surface mount box which housed a switch; surface mount conduit down to another box that had outlets; plug in lights that were glued to the header above the closet door.

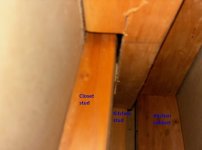
Here is a photo after all of this was removed by me. There is also new wire that I ran visible in this photo, but I'll discuss that later.
 

Attachments

  • old job.jpeg
    old job.jpeg
    67.3 KB · Views: 66
  • box.jpeg
    box.jpeg
    34.1 KB · Views: 59
To avoid these ads, REGISTER NOW!
OP
R

Reborn

Well-known member
Joined
Dec 31, 2017
Messages
113
Location
SoCal
I then cut a 4.25" hole in the closet ceiling for my recessed led fixture. I made an access cut in the closet wall that is shared with the kitchen, just below the closet ceiling. I also opened up the pre-existing switch hole a bit to accommodate a standard old work electrical box with wing tabs. I've included a couple of photos (taken before I ran the new nm-b) to give a better idea of what's going on in the wall and ceiling. I snapped a photo from the switch hole, and one from the ceiling hole. The kitchen wall / closet wall is deep because the studs for the closet wall are not shared with the studs for the kitchen wall. As a result of this, and the fact that the ceiling space is similar to attic space because I'm below the stairs, I was able to run the nm-b without drilling through any wood. Last photo shows the new nm-b wire running through my access cut. It runs down the 'kitchen wall' stud and next to the 'closet wall' stud.
 

Attachments

  • progress.jpeg
    progress.jpeg
    37.6 KB · Views: 57
  • wall info.jpg
    wall info.jpg
    52.3 KB · Views: 45
  • ceiling info.jpg
    ceiling info.jpg
    104.1 KB · Views: 43
  • nmb run.jpeg
    nmb run.jpeg
    91.1 KB · Views: 51
Last edited:
OP
R

Reborn

Well-known member
Joined
Dec 31, 2017
Messages
113
Location
SoCal
So now for the questions.

1.) For an old work job, is this wire run kosher? Obviously, if someone were to drill the drywall, there are risks. I have space with my holes, should I do any stapling?

2.) My old work electrical box will go back-to-back with the kitchen wall's electrical box. There is space because of the deep wall. To power the new circuit, I am going to draw from the same box the previous owners did. I will have a short run of nm-b entering each box from the bottom side, effectively being a U shape or loop. Are there any guidelines or best practices for the length of this loop? And is this kosher? I have read about 24" horizontal requirements for fire walls, which this is not.

3.) What, if anything, should I do about the 3 holes that are in the pre-existing electrical box. I can cover over it with electrical tape, something else?, or do nothing? Since I'm going back to back with the old work box, the holes should be essentially covered by the old work box.
 
Last edited:

mm08822

Well-known member
Joined
Jan 13, 2012
Messages
5,854
Location
NJ
So now for the questions.

1.) For an old work job, is this wire run kosher? Obviously, if someone were to drill the drywall, there are risks. I have space with my holes, should I do any stapling?

2.) My old work electrical box will go back-to-back with the kitchen wall's electrical box. There is space because of the deep wall. To power the new circuit, I am going to draw from the same box the previous owners did. I will have a short run of nm-b entering each box from the bottom side, effectively being a U shape or loop. Are there any guidelines or best practices for the length of this loop? And is this kosher? I have read about 24" horizontal requirements for fire walls, which this is not.

3.) What, if anything, should I do about the 3 holes that are in the pre-existing electrical box. I can cover over it with electrical tape, something else?, or do nothing? Since I'm going back to back with the old work box, the holes should be essentially covered by the old work box.
1. Cables are fished into the wall/ceiling like that all of the time. Usually there is no stapling done (or required) b/c where it would sense to staple can't be reached, staple held to hammer it and even get a hammer into the stud/joist bay. And you'd likely drop your hammer into the deep dark abyss.

2. Bring a length of romex out the bottom of the existing box long enough to drape it into the bottom or top of the new old work box. Be generous - 2' - 3'. Too short just becomes a PIA. Bring the cable from the fixture into the same top or bottom of the new old work box. Life is easier when you can pivot the new old work box into the wall opening when only either top or bottom has cables entering into it. 24" offset doesn't apply here.

3. Don't worry about the 3 holes. Tape it from the backside if it lets you sleep better. (Electrons aren't that frisky.) As long as there is enough depth in the wall cavity there should be no issue with the new old work box fitting.

Hopefully you cut the switch box hole tight/close fitting, level and square. If it is is a sloppy fit/broken edges, make sure it is good enough to let the box wings catch the drywall and box clamps tight to it. In 1 pic it looks fine and in another it looks rough. Worst case, secure a different box to the stud.

Either way, there's a little drywall to repair but that's not uncommon.
 

reader2580

Well-known member
Joined
Dec 31, 2014
Messages
14,514
Location
Minneapolis, MN
I’ve cut a hole in the drywall above a box when necessary to make things easier. It adds a bit of work to patch the drywall, but makes the electrical much easier.
 
OP
R

Reborn

Well-known member
Joined
Dec 31, 2017
Messages
113
Location
SoCal
1. Cables are fished into the wall/ceiling like that all of the time. Usually there is no stapling done (or required) b/c where it would sense to staple can't be reached, staple held to hammer it and even get a hammer into the stud/joist bay. And you'd likely drop your hammer into the deep dark abyss.

2. Bring a length of romex out the bottom of the existing box long enough to drape it into the bottom or top of the new old work box. Be generous - 2' - 3'. Too short just becomes a PIA. Bring the cable from the fixture into the same top or bottom of the new old work box. Life is easier when you can pivot the new old work box into the wall opening when only either top or bottom has cables entering into it. 24" offset doesn't apply here.

3. Don't worry about the 3 holes. Tape it from the backside if it lets you sleep better. (Electrons aren't that frisky.) As long as there is enough depth in the wall cavity there should be no issue with the new old work box fitting.

Hopefully you cut the switch box hole tight/close fitting, level and square. If it is is a sloppy fit/broken edges, make sure it is good enough to let the box wings catch the drywall and box clamps tight to it. In 1 pic it looks fine and in another it looks rough. Worst case, secure a different box to the stud.

Either way, there's a little drywall to repair but that's not uncommon.

1. Awesome. I knew this, but it eases my mind to confirm.
2. Thank you for this. I hadn't considered only entering from top or bottom (I was planning to do one from each). This is a great tip and makes perfect sense why it would make my life easier. I've got a ~3-4 ft length ready for the loop that should land at 2-3 ft when it's all said and done.
3. I went ahead and taped it, but I wasn't particularly concerned (power has been on with the holes/drywall open for a few days). It will help me sleep better :)

The switch box is a tight fit, but it's pretty rough on the back side on the bottom left corner. I hit it 3 times trying to eyeball taking just enough off for the box to fit, and started getting hasty and breaking remnants on the backside with my fingers. The wing should grab since it's a nice, tight fit, but we'll see. It is level and tight, at least.

All that's left is to run nm-b into the live box, fit the old work box in, and wire up the switch. And patch the large hole.

Thanks a ton for your response!
 
OP
R

Reborn

Well-known member
Joined
Dec 31, 2017
Messages
113
Location
SoCal
Finished product. Not a great patch job, but it'll do. I'll eventually swap the ivory cover (all I had on hand) with a white one.

Any tips on how to get the switch cover to sit more flush? The wall is curved, but I don't think that's the main reason as it's off on both sides. I think the culprit is that my old work box sits on top of the drywall instead of recessed slightly like a new work box would; should I keep cranking on the wings to embed the box a little deeper into the wall? I worry about snapping the little wings (I don't want to create more work for myself).
 

Attachments

  • IMG_3333.jpeg
    IMG_3333.jpeg
    49.1 KB · Views: 21
  • IMG_3335.jpeg
    IMG_3335.jpeg
    41.8 KB · Views: 24
  • IMG_3336.jpeg
    IMG_3336.jpeg
    54.4 KB · Views: 23

dave*99

Well-known member
Joined
May 5, 2009
Messages
4,248
Location
Coastal NJ
Finished product. Not a great patch job, but it'll do. I'll eventually swap the ivory cover (all I had on hand) with a white one.

Any tips on how to get the switch cover to sit more flush? The wall is curved, but I don't think that's the main reason as it's off on both sides. I think the culprit is that my old work box sits on top of the drywall instead of recessed slightly like a new work box would; should I keep cranking on the wings to embed the box a little deeper into the wall? I worry about snapping the little wings (I don't want to create more work for myself).
Try a midsize cover plate.


mm08822

Well-known member
Joined
Jan 13, 2012
Messages
5,854
Location
NJ
You may need to scrape the texture from under the box top and bottom flanges after you loosen the ears.

Also, did you cut the 4 little "washers" from the switch yoke? If not, these can create a gap as the yolk cant nest in between the flanges.....also depends on the plate mold profile.

Say "NO" to goof plates.
 
To avoid these ads, REGISTER NOW!
OP
R

Reborn

Well-known member
Joined
Dec 31, 2017
Messages
113
Location
SoCal
You may need to scrape the texture from under the box top and bottom flanges after you loosen the ears.

Also, did you cut the 4 little "washers" from the switch yoke? If not, these can create a gap as the yolk cant nest in between the flanges.....also depends on the plate mold profile.

Say "NO" to goof plates.

I agree, I don't like the look of the larger (goof) plates, but I can use one here as a last resort. For scraping the texture down behind the box top, should I just use sand paper, or is there an easier way?

I attached a pic of the backside of the switch. I'm not seeing anything worth removing or that could cause any issues.
 

Attachments

  • IMG_3339.jpeg
    IMG_3339.jpeg
    35.1 KB · Views: 16

mm08822

Well-known member
Joined
Jan 13, 2012
Messages
5,854
Location
NJ
Take a pic of the box w/o the plate on. With or w/o switch installed.

This is what to trim on the switch....
Unscrew it from the box first.
1767799684881.png
 

larry4406

Well-known member
Joined
Jan 27, 2006
Messages
19,024
Location
Northern Virginia
Take a pic of the box w/o the plate on. With or w/o switch installed.

This is what to trim on the switch....
Unscrew it from the box first.
1767799684881.png
What exactly are those ears/tabs called and when does one decide to snap them off? At the day job, they are left fully intact.


Day job uses Carlon blue nail on PVC boxes.
 
Last edited:

dscheidt

Well-known member
Joined
Apr 26, 2017
Messages
2,881
What exactly are those ears/tabs called and when does one decide to snap them off? At the day job, they are left fully intact.


Day job uses Carlon blue nail on PVC boxes.
Leviton calls them 'plaster ears', they're intended to bear against the wall and can be bent to get the device flat if the box or wall are wonky. I've only ever called ears, often with rude words from someone who has a bunch of them to mount in exposed conduit.
 
OP
R

Reborn

Well-known member
Joined
Dec 31, 2017
Messages
113
Location
SoCal
Oh wow, amazing. I learned something new here. I had no idea about these 'ears' and their function. Makes a lot of sense.

I'll see what's what and snap some pics and provide an update by the end of the weekend. Thanks everyone!
 
OP
R

Reborn

Well-known member
Joined
Dec 31, 2017
Messages
113
Location
SoCal
I was delighted to take the cover off and see lots of interference with the ears. They were bending, so I was hopeful. Snapped them off easily, and while there was some interference remaining, it seemed better. Unfortunately, it looks like I really am interfering on the blue box.

I could probably notch some stuff off the switch or box to get it flush, or just sand down the drywall in the 4 contact patches for the blue box. I'll probably do the sanding, seems easiest.
 

Attachments

  • IMG_3372.jpeg
    IMG_3372.jpeg
    66.2 KB · Views: 7
  • IMG_3374.jpeg
    IMG_3374.jpeg
    71.2 KB · Views: 7
  • IMG_3375.jpeg
    IMG_3375.jpeg
    28.7 KB · Views: 6
  • IMG_3376.jpeg
    IMG_3376.jpeg
    29.2 KB · Views: 8

mm08822

Well-known member
Joined
Jan 13, 2012
Messages
5,854
Location
NJ
As I said before, sand or scrape the texture from under the box flanges.

Normally cutting the ears off is enough for the switch. Not this time. I would remove it and do a minor adjustment to the yoke with a hand grinder.
1768188455140.png
 
OP
R

Reborn

Well-known member
Joined
Dec 31, 2017
Messages
113
Location
SoCal
Yea, I've got a box of these switches, so I'll modify one and swap it in. While I'm at it, I'll sand down the wall a bit for posterity. Thanks, again, for all your input!
 
To avoid these ads, REGISTER NOW!
Top Bottom