To avoid these ads, REGISTER NOW!

Small Shop Welding Table

GeoTracker90

Active member
Joined
Oct 7, 2007
Messages
36
Hey ther guys! I just wanted to share the welding table that I've put together. Here are the photos:


Table1.jpg


Table2.jpg


Table3.jpg


Table4.jpg


Table5.jpg


Table6.jpg


Enjoy!

Mike
 
To avoid these ads, REGISTER NOW!
OP
G

GeoTracker90

Active member
Joined
Oct 7, 2007
Messages
36
The table top is 1/2" thick and it was all laser cut, including the slots in the table top. The table is very stable as it sits right now. Once I have the lower shelf in place it will hold the bench vice and bench grinder when they are not in use, adding a little more weight down low. That said I have no hesitation about using it in its current state.

Thanks for the compliments guys!

Mike
 

mayday0017

Well-known member
Joined
Oct 20, 2010
Messages
1,715
Location
Houston Texas
Simple and functional... Totally dig this table, really want want setup exactly like it now. Thanks again garage journal for making me want 1 more thing that will set me back afew pennys!
 

bad_idea

Well-known member
Joined
Jun 11, 2011
Messages
4,331
Location
Pasquotank, NC
Simple and well crafted. Love it. I assume you work in some sort of fabrication industry? Most joe-blow homeowner types wouldn't build something so nice looking. Most home weld tables look something like mine.... damn.

I would consider more weight down low to counter wrenching and heaving of large items on the table. Make a tray under the shelf about 3-4" deep and fill that with concrete. It will be under the shelf, so no one will be the wiser.
 

V-10 Killer

Well-known member
Joined
Feb 11, 2007
Messages
1,011
Location
Midland, MI
That's a nice table, good job man.
I see you're using the drop in reciever idea. I was wondering where people put items that fit in there when not in use. Will they still store easily anywhere?

I've been trying to figure out what I need in a small welding table too.
Seems so many I see look like they're about 5 tons and made from bridge I-beams lol.
I just need something to weld exhaust tubing and smaller square stock type projects, and it looks like that's a good size.
 
OP
G

GeoTracker90

Active member
Joined
Oct 7, 2007
Messages
36
Ohhh, yeah... the steel plate cutting laser... yeah, I think I got one of those back there under the bench somewhere... forgot all about it. lol!

Nice clean work.

Thanks man. Oh, and steel plate cutting lasers are only one .dxf file and an email away. I love it when technology and the real worl combine to provide us with cool tools.

Mike
 
OP
G

GeoTracker90

Active member
Joined
Oct 7, 2007
Messages
36
Have you considered putting wheels under it?

Nope, for this table I wanted to be able to keep it in a fixed location. If I need to move it I'll just get one of the boys to help me with it. Besides if I were to add wheels to it they would be on some sort of pivot so that when they weren't needed I could lower the table back down onto the feet. That would just get a lot messier than what I wanted for this project. Then again it just may be a design challenge that needs to be addressed....

Mike
 
OP
G

GeoTracker90

Active member
Joined
Oct 7, 2007
Messages
36
Simple and well crafted. Love it. I assume you work in some sort of fabrication industry? Most joe-blow homeowner types wouldn't build something so nice looking. Most home weld tables look something like mine.... damn.

I would consider more weight down low to counter wrenching and heaving of large items on the table. Make a tray under the shelf about 3-4" deep and fill that with concrete. It will be under the shelf, so no one will be the wiser.

Thanks for the compliments. And good guess on the fabrication industry.

I actually work in sales for a company that builds automated welding equipment that we sell worldwide. Our customers range from small mom and pop fab shops to customers in the nuclear, energy, defense, and aerospace industries and everything in between.

Thanks for the suggestion about adding weight down low, but this table will mostly be used for fixtured welding and I don't anticipate doing a lot wrenching or heaving for this table. I have another table for that kind of work.

Mike
 
OP
G

GeoTracker90

Active member
Joined
Oct 7, 2007
Messages
36
Very nice! What are the dimensions of the table?

36" x 20" - The slots are 1/2" wide by 14" long and the three corners have a 2" radius. The angle iron support that the table top is welded to is made up of 2" x 3" angle iron. This gives me a 3" lip around the perimeter of the table for using C-clamps and bar-clamps to hold items in place to be welded.

The table substructure is made of 1.5" square tube. I hope that helps.

Mike
 
OP
G

GeoTracker90

Active member
Joined
Oct 7, 2007
Messages
36
That's a nice table, good job man.
I see you're using the drop in reciever idea. I was wondering where people put items that fit in there when not in use. Will they still store easily anywhere?

I've been trying to figure out what I need in a small welding table too.
Seems so many I see look like they're about 5 tons and made from bridge I-beams lol.
I just need something to weld exhaust tubing and smaller square stock type projects, and it looks like that's a good size.

My intention is to build a shelf along the lower portion of the table substructure. I'll add some 2" square holes in the shel to accept the square tubing of the tools that will be stored down there when not in use.

Good luck with comming up with a design that will work for your needs. Trust me I know how much time can be spent doing the research before committing to a design.

Mike
 

V-10 Killer

Well-known member
Joined
Feb 11, 2007
Messages
1,011
Location
Midland, MI
My intention is to build a shelf along the lower portion of the table substructure. I'll add some 2" square holes in the shel to accept the square tubing of the tools that will be stored down there when not in use.

Good luck with comming up with a design that will work for your needs. Trust me I know how much time can be spent doing the research before committing to a design.

Mike

Yeah, I've gone over a few designs already, but I keep coming back to Strong Hands portable Nomad table just because when I'm not using it, I can put it away and conserve floor space. Still not 100% sold yet, but I always try to keep floorspace as a consideration.
 

skyking

Well-known member
Joined
Jun 26, 2012
Messages
1,856
Location
Dallas & Tulsa
Beautiful work. Mine looks like heck and is welded to the steel girter behind it.
I couldn't use one that would move.
 
To avoid these ads, REGISTER NOW!

illmatyk

Well-known member
Joined
Sep 6, 2009
Messages
778
Location
Yigo, Guam
36" x 20" - The slots are 1/2" wide by 14" long and the three corners have a 2" radius. The angle iron support that the table top is welded to is made up of 2" x 3" angle iron. This gives me a 3" lip around the perimeter of the table for using C-clamps and bar-clamps to hold items in place to be welded.

The table substructure is made of 1.5" square tube. I hope that helps.

Mike


Thanks! I want to have a welding table of that size once I pick up my welder.:beer:
 

csp

Well-known member
Joined
Mar 23, 2010
Messages
5,719
Location
Franktown, CO
That's a nice table, good job man.
I see you're using the drop in reciever idea. I was wondering where people put items that fit in there when not in use. Will they still store easily anywhere?

I'm building a tool stand out of a bus brake drum and am using the same drop in idea. I was just thinking the other night about where I will store tools that aren't on the stand and haven't come up with a decent solution for off-stand storage. So far I have mounts built for my vise, Beverly shear, a pipe vise, and my portaband.
 
OP
G

GeoTracker90

Active member
Joined
Oct 7, 2007
Messages
36
Just for the record I checked with my supplier on what alloy of steel they cut the table top plate from. Here is his response:

Hello Mike --- we use prime A36 plate out of the SSAB North America strip mill plant (Iowa). This material is 100% melted and manufactured in the USA. It is the most consistent material for laser processing that we have ever used. Mike I am happy to hear you recognize the effort we put into supplying a top quality product to our customers. Thank you for the feed back!
Scott


The shop that cut the plate for me is Metalvision out of Smithfield, Utah. They do top notch work for those of us that are in the region.

Mike
 

bad_idea

Well-known member
Joined
Jun 11, 2011
Messages
4,331
Location
Pasquotank, NC
A36 is pretty much the basic, standard steel we use in the ship repair industry. Nice to hear it is American made steel. Correct me if I'm wrong, I do believe A36 is the most commonly used steel.

Lemme ask what the laser cutting service cost? I assume you supplied the file?
 
OP
G

GeoTracker90

Active member
Joined
Oct 7, 2007
Messages
36
I'm not sure about what the most common plate steel is; most of my home fabrication involves the use of HREW square and rectange tubing and some hot roll and cold roll sheet metals and solids.

As you suspected I did provide them with the .dxf file, they provided the material and performed the cutting for me. It's been a little while but I think that the table top cost me right around $108. I was able to get it shipped to me for free because I was able to time my order to parallel my order with an order that we had from work with the same shop. :thumbup:

Mike
 
OP
G

GeoTracker90

Active member
Joined
Oct 7, 2007
Messages
36
I was working in the shop for a while today and had an opportunity to make the weld / Fabrication table a little more useful. In the shop I have a few sections of rail road track that I use for helping me beat, bend, mold and otherwise shape the things I work on. In the past I've been at the mercy of the rail as it would move as if it had a mind of its own. Today was the perfect time to tame the unruly rail.

Step1) Drill a 3/4" hole through the web of a 4" long section of rail.

Step 2) Fire up the lathe and turn a 3/4" bolt into a spool.

Step 3) Use a couple of eye bolts (5/16" shank) and T-nuts to secure the rail to the table top.

Step 4) Enjoy the fact that the rail is now secured and ready for action.

Mike


DSCF1329.jpg


DSCF1328.jpg


DSCF1327.jpg
 
OP
G

GeoTracker90

Active member
Joined
Oct 7, 2007
Messages
36
Nice. You might want to tack the eyelet to keep it from slowly opening on you when you crank it down.
Just my 2 cents worth.

I was actually thinking about that last night because I did notice that it felt like there was a bit of give in the bolts as I tightened them down. I went back out to the shed today and took a look at them and to my surprise the problem wasn't from opening up but instead pulling the eyelet into an oblong shape.

I will probably have to bum some mill time at work and remake the "spool" piece to do away with the eye bolts. I think I'll take a piece of 3/4" stock and machine a flat on the top. This would then be drilled through to accept a pair of 7/16" socket head cap screws that could be threaded from the top into the T-nuts below.

I guess I need to sit down and figure out if there will be enough "meat" left in the 3/4" stock to hold the rail secure after the machining is complete.

Mike
 

gbsmithy08

Well-known member
Joined
Mar 2, 2012
Messages
62
Another way of attaching the RR iron would be to weld a piece of 1/2"x4" keystock to the inner web of the RR iron. this would run length ways. Then you could drill and tap 2 each 3/8" threaded hole's into the keystock and RR iron and bolt it from underneath the table. The holes would be about 3" on centers. This would give way more holding strength and still versatile for moving it around.
By the way nice table. A nice simple table and easy to move, and add to if need be.
 
Last edited:
OP
G

GeoTracker90

Active member
Joined
Oct 7, 2007
Messages
36
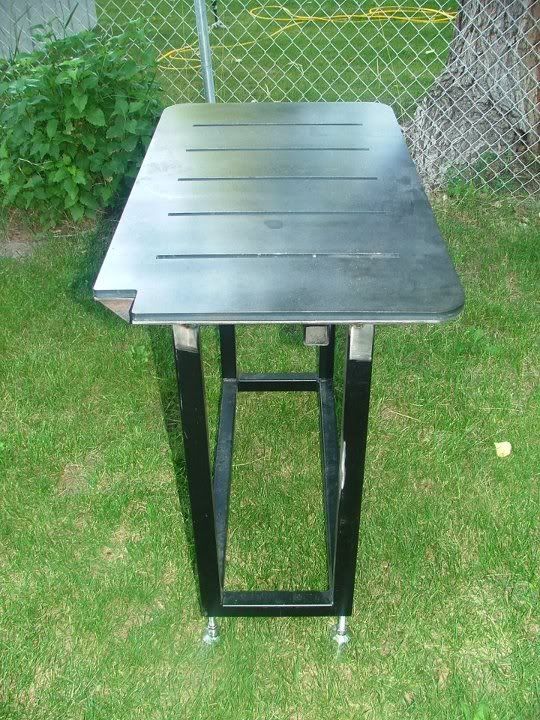
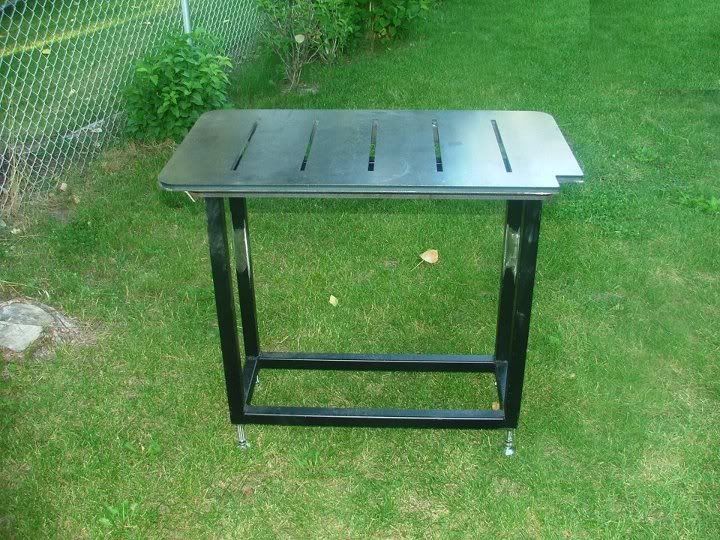
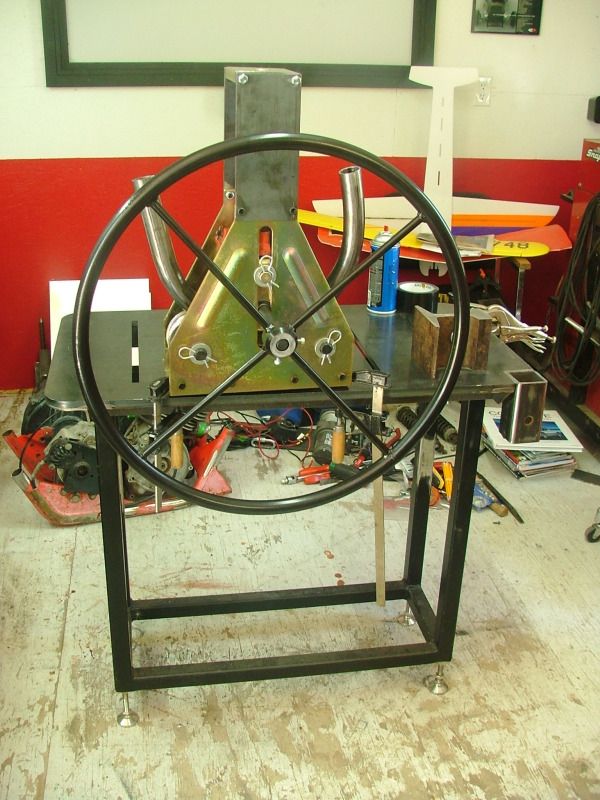
Well guys I was out in the shed over the last couple days and put the welding / fab table to use.

DSCF1590.jpg


DSCF1591.jpg


DSCF1596.jpg


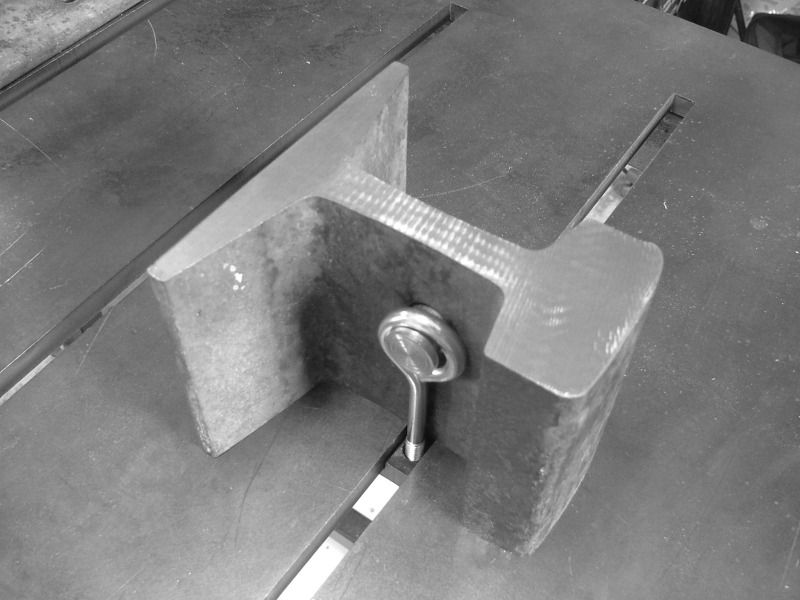
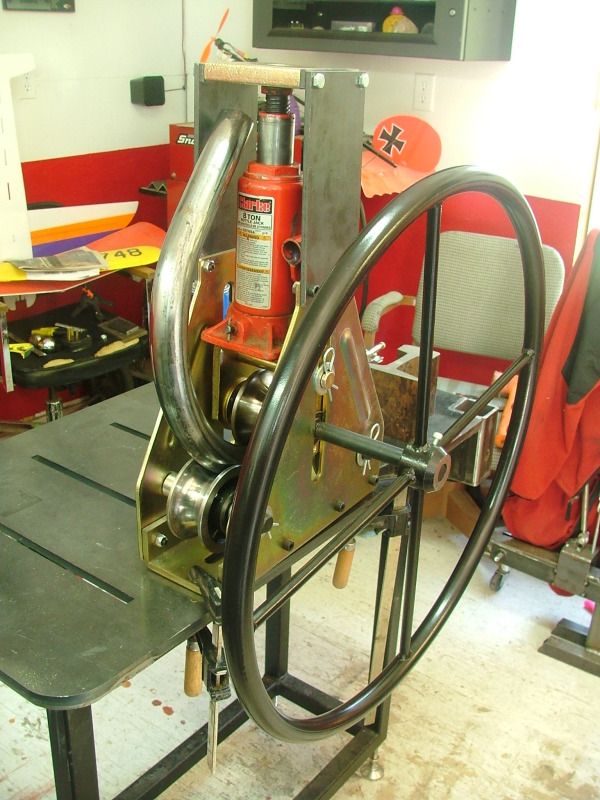
A couple bar clamps allowed me to give my new Harbor Freight Tubing Roller a test run. The steel tube is 1-1/2" OD with a 0.120" wall thickness. At first I tried it with the stock pressure screw and after a couple goes of that I decided that a bottlejack conversion was in order.

Performing the conversion was a simple matter of drilling 12 holes in some 1/4" plate and bolting everyhting up. I still need to add return springs but ran out of time today.

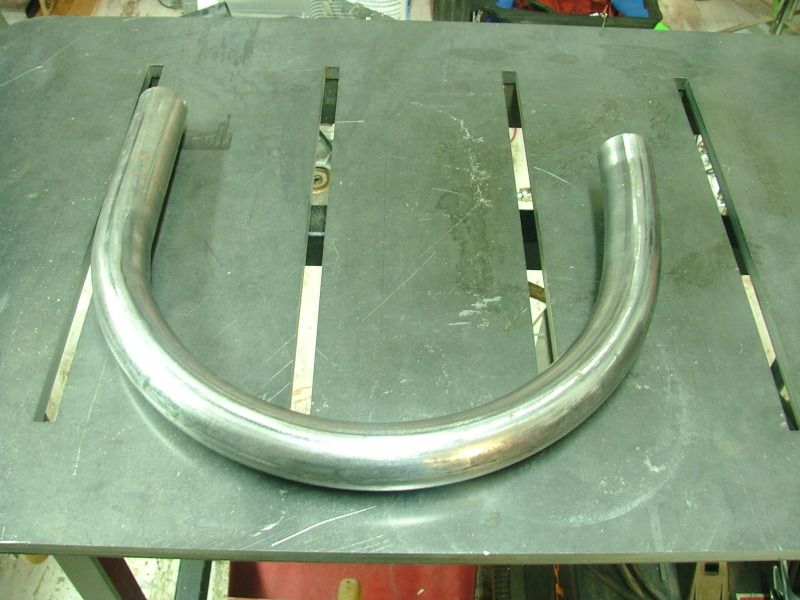
With the conversion done I kept running the tube through the roller and when I stopped the two legs of the tube were 14-1/2" from each other.


DSCF1593.jpg

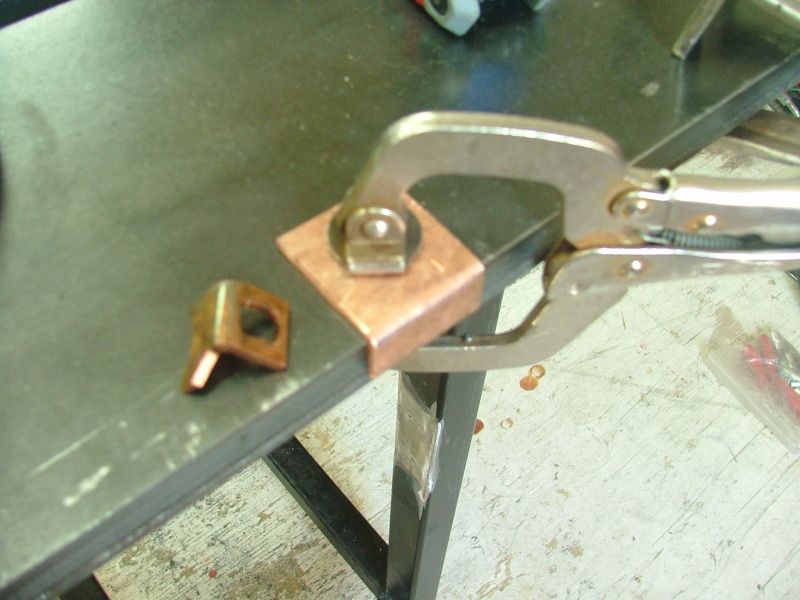
I also used the edge of the table to help form some copper as I attempted to make some replacement starter contacts for the family van. Using the edge of the table worked out quite well.


DSCF1595.jpg


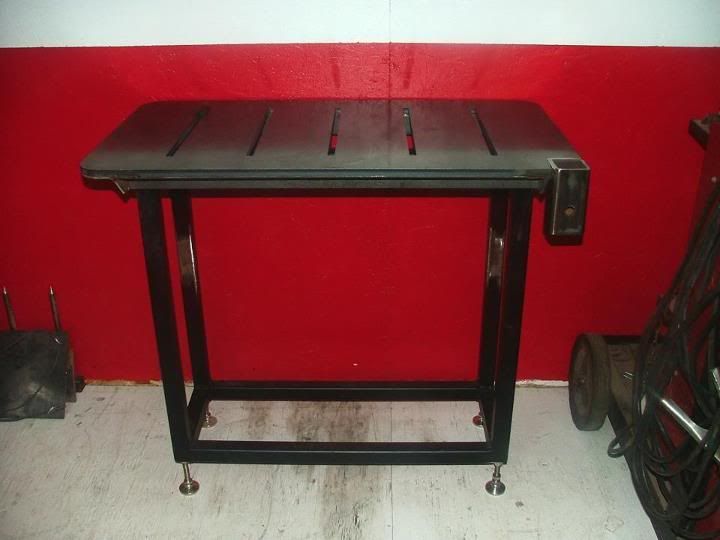
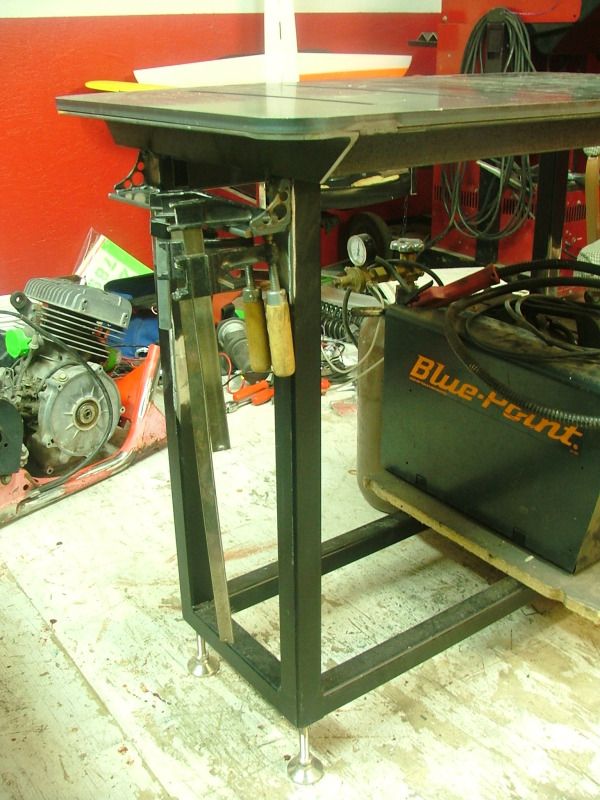
Lastly I added a piece of 2" x 1/4" flat bar along the one side to hold a few bar clamps when I'm not using them. It seems like a nice addition so far. But, time will tell if I leave it there or move it to another location.

I'm still loving the canvenience of having this little welding table. It makes a lot of the work and little jobs that I do just that much easier. I should have done this a long time ago.

Mike
 

slow50

Well-known member
Joined
Mar 20, 2011
Messages
104
nice welding table. i really need to make one welding on the floor *****. if you dont mind how much did the top cost you? thats the only part holding me back.
 

64Trvlr

Well-known member
Joined
Sep 7, 2012
Messages
420
Location
Northern AZ
As you suspected I did provide them with the .dxf file, they provided the material and performed the cutting for me. It's been a little while but I think that the table top cost me right around $108. I was able to get it shipped to me for free because I was able to time my order to parallel my order with an order that we had from work with the same shop. :thumbup:

Mike

nice welding table. i really need to make one welding on the floor *****. if you dont mind how much did the top cost you? thats the only part holding me back.

Here you go. :D
 

2CRUZ

Well-known member
Joined
Jul 25, 2011
Messages
526
Location
Southern Illinois
You know what. I loned my Steel Plate Cutting Laser to my neighbor
Mr. Goldfinger a few years ago and he never brought it back. I think I'll give him a call tonight and see if he still has it and tell him I want ti back.
 

cnc-me

Well-known member
Joined
Jan 6, 2010
Messages
1,183
Location
MI
Nice! Do you have any accessories that fit into the square tube?
What is that two-stroke single on the floor?
 
OP
G

GeoTracker90

Active member
Joined
Oct 7, 2007
Messages
36
Nice! Do you have any accessories that fit into the square tube?
What is that two-stroke single on the floor?

My bench vise and bench grinder will both be put on bases to go into the reciever tube. I'm just too cheap to go out and buy the metal to bolt them on to. I have a friend checking his farm to see if he has a couple chunks of 1/2'' plate to mount them on.

Oh, and the two-stroke is a 1985 Polaris 250 from a POlaris Cyclone four-wheeler. My 12 year old son bought it from a guy I work with and we are working on turning it into a go-kart for him. The neat thing is that in the cradle, what's left of the frame, we've got the motor, the variable belt drive transmission as well as a gear box that will allow forward, neutral, and reverse. We're in the process of taking the four-wheeler's front suspension and widening it a foot from 36" to 48" wide. This should be a good project and a good excuse to use the welding table. :D

Mike
 
OP
G

GeoTracker90

Active member
Joined
Oct 7, 2007
Messages
36
You know what. I loned my Steel Plate Cutting Laser to my neighbor
Mr. Goldfinger a few years ago and he never brought it back. I think I'll give him a call tonight and see if he still has it and tell him I want ti back.

Let me know when you get it back. I'll shoot over some .dwg or .dxf files for you to cut out for me. Would you give me a good price of the parts were for my son's go-kart?

Mike
 

cpl

Well-known member
Joined
Apr 30, 2012
Messages
136
Location
Brazil
nice table and tube bender !!

i'm thinking about the tube bender i will make... your pics helped me out ;)
 
OP
G

GeoTracker90

Active member
Joined
Oct 7, 2007
Messages
36
nice table and tube bender !!

i'm thinking about the tube bender i will make... your pics helped me out ;)

Thank you for the compliments.

Remember that this is a tubing roller:

DSCF1590.jpg

These are used to form large radius curves in longer lengths of tubing. If you continue running the length of tubing through the roller you will eventually have a tighter and tighter radius. The down side of using a tubing roller to form a tight radius is that you end up with a fair bit of waste on either side of the radius as there are "tails" that don't follow the same radius.Additionally the transition from the tails to the radius actually has a slight step to it that is formed when you adjust the pressure wheel.


Now with that said here is a picture of a typical tubing bender:

Pro-Tools105.jpg


I have one of the Pro-Tools 105 benders like the one shown in this picture. These will make a bend with a defined radius almost anywhere you desire along the length of the tube. These tubing benders require a seperate set of dies for each diameter of tubing that you want to work and the dies are also offered in a number of radiuses. For example Pro-Tools offers bender dies for 1-1/2" diameter round tubing in a 5", 6" or a 7" centerline radius. Each set of tubing bender dies runs between $235 and $305 depending on the radius selected and also the degree of bend that you want to be able perform. They have dies capable of 90 degree bends and also others capable of 180 degree bends.

So in more simple terms the tubing roller is intended for making large variable radius curves along the length metal tubing. In contrast the tubing bender is intended for making bends with a specific radius at a specific point in the metal tubing.

I hope this helps define the difference between the two tools. It seems that there can be a fair amount of confusion between the two and hopefully I didn't just add to that confusion.

Mike
 
To avoid these ads, REGISTER NOW!
Top Bottom