
You are using an out of date browser. It may not display this or other websites correctly.
You should upgrade or use an alternative browser.
You should upgrade or use an alternative browser.
Small Two Car Operation
- Thread starter HSpencer
- Start date
taumac
Well-known member
Oh I agree with speed of set up and I get frustrated with my stuff cause of time it takes to get everything out. The workmate comments where more aimed at stability with that particular model of workmate. My neighbor has one while its good for tasks I was thinking a 225 model might be more stable with saw cause the wider base. I'm a big fan of the workmate and had a few and given a couple extra away. I only have 1 now and its the 79-001.
Have a good one, Gerard
Florida GJers ( FGJ)
http://www.garagejournal.com/forum/group.php?groupid=117
The 5 Stitches Garage
http://www.garagejournal.com/forum/showthread.php?t=211899
Have a good one, Gerard
Florida GJers ( FGJ)
http://www.garagejournal.com/forum/group.php?groupid=117
The 5 Stitches Garage
http://www.garagejournal.com/forum/showthread.php?t=211899
@Gerard
"Oh I agree with speed of set up and I get frustrated with my stuff cause of time it takes to get everything out. " (So true!!!)
Yep, that is the reason for this drill I am going through. The wood stuff just don't work in the garage unless you have an actual "wood shop", and that's it. The time taken to back out the car, plastic off everything you don't want full of sawdust, stretch out the cords and air lines, haul in the lumber, etc is not worth it. Then there is the clean up. Sweep and dust. Sweep under the benches, dust off your tool boxes, and the air is still full of dust that will take overnight to settle. Air filters or not.
Well, Herb Spencer has set himself out to beat this thing. LOL---now ask me in January if I am still working out behind the shed!!!! Probably just propped up in the garage watching the snow fly.
Best Regards
Herb
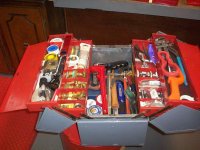
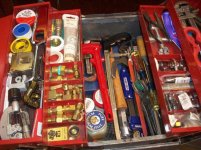
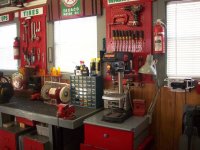
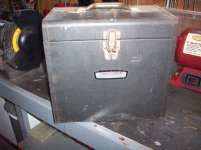
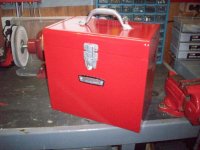
Here is the repainted Craftsman Cantilever box. It did make a great plumbing tool box. All the box needed was paint, and I used a gray as it was gray in original fashion. I think I know why they quit making these----filled, they weigh about 60 pounds. I would hate to carry this puppy in and out of houses all day!!
Best Regards
Herb Spencer
Best Regards
Herb Spencer
Attachments


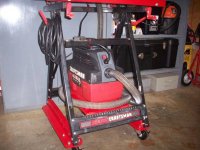
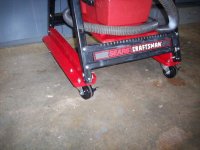
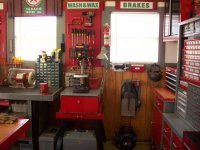
Changed my mind on this miter saw. Since it is a compound miter saw, I want to keep it in the garage with my larger table saw. My other miter saw and table saw will do duty in the shop shed for carpenter work. These two saws in the garage have high end (very expensive) fine finish blades on them.
I added casters to the miter saw, and a dedicated tool vac. The table saw has a vac as well that will control most of that dust, so these two tools will not be a problem on dust. I also got a roller stand that is adjustable for use with either saw. I will keep both these tools in the garage and they seem to fit just right, as in the photo here. Ready for use if I want them, but not in the way of other matters.
Now, back to the shed shop--------------
Best Regards
Herb Spencer
Attachments


Last edited:
1/2 Cup
Member Emeritus
Herb,
A job well done, i really like the mobility aspect.
The chair looks great as well.
Regards
A job well done, i really like the mobility aspect.
The chair looks great as well.
Regards
In all my swapping around to set up the shed shop, I came up with this stand left over. I had been wanting to get my 8 inch drill press off my workbench, so I made this into a drill press stand. I added a cabinet for drills and accessories, and made it about the same height as my bench. I also added a light for the drill press. The cantilever Craftsman tool box in a previous post will now live under the drill press stand.
Best Regards
Herb Spencer
Best Regards
Herb Spencer
Attachments


taumac
Well-known member
Well done Mr Herb. Damn your shop is clean.
Have a good one, Gerard
Florida GJers ( FGJ)
http://www.garagejournal.com/forum/group.php?groupid=117
The 5 Stitches Garage
http://www.garagejournal.com/forum/showthread.php?t=211899
Have a good one, Gerard
Florida GJers ( FGJ)
http://www.garagejournal.com/forum/group.php?groupid=117
The 5 Stitches Garage
http://www.garagejournal.com/forum/showthread.php?t=211899
Lucky13driver
Well-known member
My dad gave me a saw just like that one I still use it today.
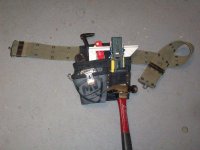
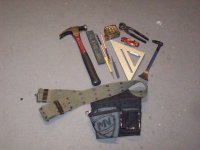
Another thing I learned from my finish carpenter friend was about wearing a tool belt. He says many carpenters wear rigs weighing upwards of 30-40 pounds. Many of them needing suspenders. He sets up and wears only the basic items he knows he will need.
He prefers the one pocket pouch w/hammer loop. It made sense to me as I have spent lots of days wearing the double pocket ones with everything I could possibly cram in it. He says there is no need to be a "Walking Tool Box".
So armed with those thoughts, I set out to rig up what I think would be all that I would need to carry. Leave everything else in your tool bag. Photos attached with tools in the pocket, and then showing what all is in there.
This whole thing is trial and error, and probably won't set too well with some old school carpenters anyway.
Attachments
1/2 Cup
Member Emeritus
I have to agree with you Herb, there is no need to be a walking tool box at all.
With my tool belt its hammer and tape measure, that's it, period then I will layout the rest that I need on or adjacent to my work area or mobile bench.
Your shop looks great and well organised as usual.
Regards.
PS that has prompted me to give mine its weekly clean..
With my tool belt its hammer and tape measure, that's it, period then I will layout the rest that I need on or adjacent to my work area or mobile bench.
Your shop looks great and well organised as usual.
Regards.
PS that has prompted me to give mine its weekly clean..
Well done Mr Herb. Damn your shop is clean.
Have a good one, Gerard
Florida GJers ( FGJ)
http://www.garagejournal.com/forum/group.php?groupid=117
The 5 Stitches Garage
http://www.garagejournal.com/forum/showthread.php?t=211899
Thanks Gerard
I was wondering what to do with that stand, and all of a sudden a little bird landed on my shoulder and suggested the drill press.
Best Regards
Herb
taumac
Well-known member
LMFAO.... I don't know why the birdie told you that. LOL, its not like the conversation of drill press table/ bases have been discussed lately or nothing. LOL.Thanks Gerard
I was wondering what to do with that stand, and all of a sudden a little bird landed on my shoulder and suggested the drill press.
Best Regards
Herb
Have a good one, Gerard
Florida GJers ( FGJ)
http://www.garagejournal.com/forum/group.php?groupid=117
The 5 Stitches Garage
http://www.garagejournal.com/forum/showthread.php?t=211899
Last edited:
I have to agree with you Herb, there is no need to be a walking tool box at all.
With my tool belt its hammer and tape measure, that's it, period then I will layout the rest that I need on or adjacent to my work area or mobile bench.
Your shop looks great and well organised as usual.
Regards.
PS that has prompted me to give mine its weekly clean..
Thanks 1/2 cup. I am also taking some pointers from your set ups.
Best Regards
Herb
LMFAO.... I don't know why the birdie told you that. LOL, its not like the conversation of drill press table/ bases have been discussed lately or nothing. LOL.
Have a good one, Gerard
Florida GJers ( FGJ)
http://www.garagejournal.com/forum/group.php?groupid=117
The 5 Stitches Garage
http://www.garagejournal.com/forum/showthread.php?t=211899
Yep Gerard, your right. I was motivated by your work on your drill press stand. I like having the DP on it's own bench, and moveable if need be.
Best Regards
Herb
taumac
Well-known member
Thanks Herb im humbled.
Have a good one, Gerard
Florida GJers ( FGJ)
http://www.garagejournal.com/forum/group.php?groupid=117
The 5 Stitches Garage
http://www.garagejournal.com/forum/showthread.php?t=211899
Have a good one, Gerard
Florida GJers ( FGJ)
http://www.garagejournal.com/forum/group.php?groupid=117
The 5 Stitches Garage
http://www.garagejournal.com/forum/showthread.php?t=211899
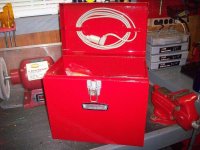
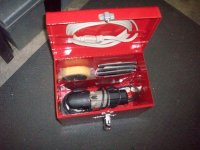
My next project. I got this Craftsman Sander Box for $1.00. It is my favorite Craftsman era which is the mid to late 60s. In those days things were made very well. I plan a restore of it, and I will keep my Porter Cable 6 inch disc sander/polisher in it, and all the accessories. I also like the cord winder in the lid for having an extra extension cord along.
Best Regards
Herb Spencer
Best Regards
Herb Spencer
Attachments


don long
Well-known member
Herb
I've been gone for a week playing on the Colorado river in Parker Arizona
But I see you have hitting it pretty hard.
That is a very nice stand you created for your saw with its own vac attached
And the score for a buck on the craftsman box will also fit nicely in your shop
Now you have made me want to go clean my shop and find a place for my bench drill press.
Things are looking great as expected
Thanks for sharing
Don
Last edited:
Herb
I've been gone for a week playing on the Colorado river in Parker Arizona
But I see you have hitting it pretty hard.
That is a very nice stand you created for your saw with its own vac attached
And the score for a buck on the craftsman box will also fit nicely in your shop
Now you have made me want to go clean my shop and find a place for my bench drill press.
Things are looking great as expected
Thanks for sharing
Don
Don, nice to hear from you again. I hope you enjoyed your outing and I appreciate your visit again. When one does "one" thing in the shop, it always brings along more changes to make. Tomorrow I will have the $1 Craftsman sander box painted and ready to hold my own sander. Then, I am going to begin using my "quick set up" carpenter bench, as I have promised wife and daughter to make them each a little planter they saw in a recent magazine. This will give me a good chance to "test" my set up. I will also be posting photos of my system of working on wood outside using it. No doubt there will be some tweaking, but I am anxious to try it out. I have a very large pear tree in the back of the garage, and I watched it today, happy to see my selected spot never loses shade all day.
Again, thanks for the visit!! I appreciate your interest and warm comments!
Best Regards
Herb

1/2 Cup
Member Emeritus
Herb,
I am really keen to see just how working out doors goes for you with your new setup, looking forward to your feed back on that score.
The sander box has come up trumps, well done.
Regards..
I am really keen to see just how working out doors goes for you with your new setup, looking forward to your feed back on that score.
The sander box has come up trumps, well done.
Regards..
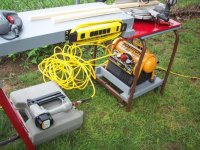
I effected a divorce between woodworking and my garage. Here is my quick set up. It can be done in 20 minutes and ready to work. I am using two 20A circuits on GFCI protected receptacles. The little compressor has it's own circuit. That way it won't jump on if I am using another tool. Everything about this bolts together and uses wing nuts for speed up set up and take down. It is nice and cool under the shade of my big pear tree. 71 degrees today!!!
It seems to work well so far.
Best Regards
Herb Spencer
It seems to work well so far.
Best Regards
Herb Spencer
Attachments
-
 Quick_Set_Up_007.jpg137.5 KB · Views: 150
 -
 Quick_Set_Up_006.jpg125.4 KB · Views: 164
 -
 Quick_Set_Up_005.jpg147.4 KB · Views: 148
 -
 Quick_Set_Up_004.jpg147.4 KB · Views: 147
 -
 Quick_Set_Up_003.jpg147.2 KB · Views: 182
 -
 Quick_Set_Up_002.jpg146.4 KB · Views: 176
 -
 Quick_Set_Up_001.jpg146.8 KB · Views: 176
Last edited:
Herb,
I am really keen to see just how working out doors goes for you with your new setup, looking forward to your feed back on that score.
The sander box has come up trumps, well done.
Regards..
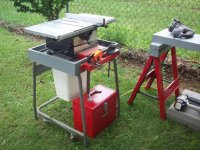
Hey 1/2 Cup. I just got through with a few hours of working out with my set up, and it really does the trick! Everything was pleasant and easy to use. I will have to admit several steps back and forth to the shed shop for this and that, but I now know what to put in my rolling cart to avoid some of that. One thing I made today was a set of blocks for "being level" out on the lawn.
I have my outrigger to the chop saw set up for "dead" level with the saw, but the dynamics change on grass. So these little blocks I made take care of that and no further problems. I just "love" the violent scream of a router in the morning!!! LOL
Best Regards
Herb
WilltheEngineer
Well-known member
I effected a divorce between woodworking and my garage.
HSpencer, you probably already thought of this, but I just put everything on casters, wheel it to the driveway, or close to garage door..then leaf blow everything out side...
HSpencer, you probably already thought of this, but I just put everything on casters, wheel it to the driveway, or close to garage door..then leaf blow everything out side...
HI WilltheEngineer
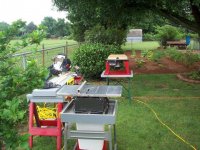
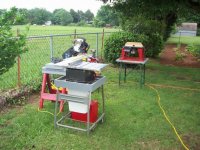
I have another set up just as you describe in the garage. This set up is very light weight, and designed to be used outside on the grass, or loaded up easy into the back of my truck and transported to a job if I am doing something away from the house. I wanted it to set up and break down very fast. I chose lightweight stands (the chopsaw stand and tablesaw stand does have casters) and it is easy moved. Sets up anywhere in 20 minutes or less! The main design of it is for use under a shade tree.
Thanks so much for your visit and comments. I appreciate them!!
Best Regards
Herb Spencer
metalhead140
Well-known member
Nice work! Setup looks great and I'm glad to hear that it worked well for you.
1/2 Cup
Member Emeritus
Its great to hear things have worked out well, Herb
Working outdoors has a heap of benefits.
1. Firstly the dust factor.
2. Provides a healthier work environment.
3. There is nothing better than natural light.
4. You tend to become a little more disciplined with setting up your equipment then putting it away as you have finished.
5. If its raining or too hot, I tend to reschedule my tasks around the weather anyway.
6. As I am getting older I find myself considering the ergonomic aspects as well.
Regards..
WarrenJ
Well-known member
Herb
Don't get caught by a surprise rain storm. Looking good.
Don't get caught by a surprise rain storm. Looking good.
taumac
Well-known member
Very nice to see your project came out as planned.
Have a good one, Gerard
Florida GJers ( FGJ)
http://www.garagejournal.com/forum/group.php?groupid=117
The 5 Stitches Garage
http://www.garagejournal.com/forum/showthread.php?t=211899
Have a good one, Gerard
Florida GJers ( FGJ)
http://www.garagejournal.com/forum/group.php?groupid=117
The 5 Stitches Garage
http://www.garagejournal.com/forum/showthread.php?t=211899
captain14
Well-known member
I am glad to see you working under the pear tree. The direct sunlight is brutal and would make you want to rush through the job. Now do they expect more work if you have less cleanup?
@Warren J., 1/2 Cup, Taumac, and Cpt 14. Thanks guys for following along with my outside woodshop. I am enjoying it a lot. More tweaking and I am just about where I want to be. Next step is setting up the shed shop to set this up in there, during inclement weather. I am going to take a day, remove everything from the shed, and put back a whole lot less than was in there. I should have plenty of room for inside woodwork if need be.
Thanks for all your encouragement friends!!
Best Regards
Herb Spencer
Thanks for all your encouragement friends!!
Best Regards
Herb Spencer
don long
Well-known member
Herb
It looks like you are having a picnic in the park with your tools
It looks like you are having a picnic in the park with your tools
Herb
It looks like you are having a picnic in the park with your tools
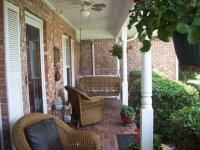
Don great to hear from you. I thought I would show you the "most important and critical" tool in my outdoor woodshop. This item makes everything else possible (1st photo).
Also, I am showing you my executive conference room (photo 2), and my accounting and planning area (photo 3). The fourth photo is a view out of our executive offices. Spencer outdoor woodwork is alive and well!!
Thanks for your comments Don, I always appreciate hearing from you!!
Best Regards
Herb
Attachments


taumac
Well-known member
Sign me up for that position. Beautiful Herb. Its amazing you get anything done when those seats are calling your ***. LOL
christopher.layton
Well-known member
Looks like you're missing a critical tool in your outdoor arsenal. A Hammock. Otherwise, it looks like the perfect place to work on whatever project is at hand.
patent pending
Well-known member
Your outdoor work working setup looks nice Herb! Very well thought out and organized. I like it!