To avoid these ads, REGISTER NOW!

Snake Pit

larrybuell

Active member
Joined
Apr 28, 2011
Messages
39
Location
North of Houston
So I saw the post about all the member's that just hide in the shadows and don't post so I figured I would try to get my name off that list and start a thread about my simple 3 car garage build. This will act as a trial run for my second garage that I plan to build if oil prices ever come back up….but that’s another story.
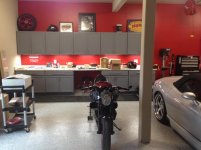
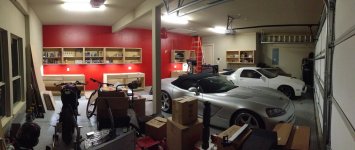
So I just moved into a new house with an attached 3 car garage. It’s a 4000 sq/ft one story sitting on one acre in a very nice secluded neighborhood on a cul de sac. I really love this place and I plan to stay here for a very long time…..hell might even retire here. The house in brand new but I didn’t design it, it was 90% complete when I found it and bought it.
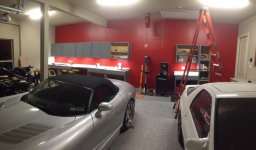
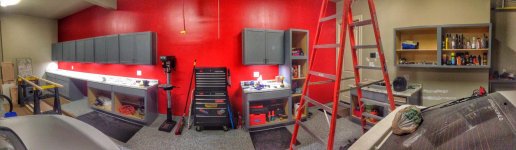
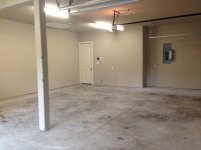
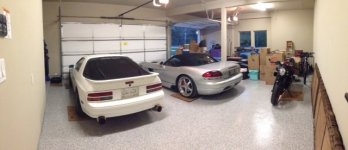
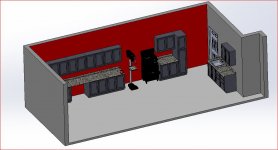
The garage is 25’ deep by 30’ long with an oversized double garage door and an oversized single garage door. Has 2 large window, pull down attic stairs and plumbing for a utility sink.
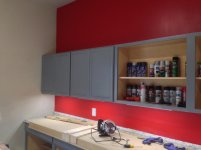
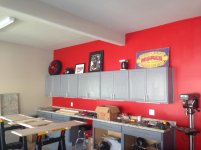
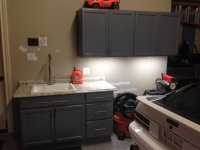
Let me catch you up with what I’ve done up to this point. I had the garage floors epoxy coated before I moved in which was a huge headache saver. Just the thought of moving in and then moving everything back out of the garage was enough to make seek psychiatric help.
 

Attachments

  • new home.jpg
    new home.jpg
    141.2 KB · Views: 255
  • garage floor before-1.jpg
    garage floor before-1.jpg
    136.2 KB · Views: 221
  • garage floor before-2.jpg
    garage floor before-2.jpg
    138.2 KB · Views: 191
  • garage floor after-1.jpg
    garage floor after-1.jpg
    147.8 KB · Views: 201
  • garage floor after-2.jpg
    garage floor after-2.jpg
    146.3 KB · Views: 228
  • garage-2.JPG
    garage-2.JPG
    118.8 KB · Views: 334
  • garage-1.JPG
    garage-1.JPG
    74 KB · Views: 307
Last edited:
To avoid these ads, REGISTER NOW!
OP
L

larrybuell

Active member
Joined
Apr 28, 2011
Messages
39
Location
North of Houston
I’ve installed Home Depot unfinished kitchen cabinets. I’ve used these before in my last garage and I liked the look, cost and the amount of customizable storage that I could design to fit my needs. I started with a 3d cad model that I only changed slightly once I started the install.
 

Attachments

  • pano, all cabinets.jpg
    pano, all cabinets.jpg
    152.7 KB · Views: 157
  • sink base.jpg
    sink base.jpg
    143.1 KB · Views: 114
  • 3d CAD model garage.JPG
    3d CAD model garage.JPG
    74.7 KB · Views: 112
  • wall cabinets.jpg
    wall cabinets.jpg
    143.9 KB · Views: 129
OP
L

larrybuell

Active member
Joined
Apr 28, 2011
Messages
39
Location
North of Houston
I installed under cabinet LED lights and that turned into a bigger job than I expected. I had to cut holes in the dining room wall to drill a hole thru the horizontal brace/fire break to pass the new wires thru. I could have done this in the garage if I would have thought about it before I hung the cabinets. I also painted the back wall red and I plan to paint all the other walls including the ceiling a light silver color (not the light gray sample…..that was to dark)

I also set up my air compressor (used hockey pucks and mounting pads) and hung a new hose reel on the ceiling. I have a Rapid air Maxline kit that I need to run over to the new hose reel.
 

Attachments

  • garage paint.jpg
    garage paint.jpg
    157.4 KB · Views: 81
  • Brembo Red.jpg
    Brembo Red.jpg
    138.9 KB · Views: 78
  • dining hole in wall-2.jpg
    dining hole in wall-2.jpg
    158.2 KB · Views: 83
  • dining hole in wall-1.jpg
    dining hole in wall-1.jpg
    153.4 KB · Views: 89
  • LED under cabinet.jpg
    LED under cabinet.jpg
    88.7 KB · Views: 80
  • red wall.jpg
    red wall.jpg
    151.5 KB · Views: 171
Last edited:

TX RamRod

Well-known member
Joined
Dec 6, 2015
Messages
51
Location
Southeast Texas
Looks great! When I saw "Snake Pit" I was thinking... Probably a cobra, but please be a Viper. And I was not disappointed haha
 
OP
L

larrybuell

Active member
Joined
Apr 28, 2011
Messages
39
Location
North of Houston
How much are you spraying? stock rotating assembly? 1/4 mile times? Dyno #'s?


Stock bottom end for now and no numbers yet. I just finished the install before I moved and haven't had the chance to get it tuned yet. So yeah it hasn't been sprayed yet. The goal is to stay under 700 whp with the stock bottom end.....this is known to the the "safe" limit on the 3rd gen Vipers.

I'll also need some new 18" rear wheels with drag radials.......I've been spending to much money and time on the new house to get all of this done right now. But soon.
 
Last edited:
OP
L

larrybuell

Active member
Joined
Apr 28, 2011
Messages
39
Location
North of Houston
This weekend I was able to get some more work done but it’s never as much as I plan; but it’s still progress never the less. I finished installing the veneer end panels, toe kicks and the associated moldings. And after caulking all the joints and seams and masking everything I didn’t plan to paint I applied 2 coats to primer. The next morning I applied the paint to the cabinet frames. I ended up changing my mind about the dark gray paint color I had originally picked for the cabinets because I was afraid it was just too dark for that space, so I went a few shades lighter and I think it works well with the red wall and the epoxy flooring. I then started painting the drawer fronts but only got one side painted…..tonight I’ll paint the other side and hopefully install them tomorrow. All this week, after work I’m going to start the tedious and time consuming process of painting the front and backs of the cabinet doors. I only have a small space to lay the cabinet doors out so it’s going to take a few days to finish. I haven’t primed the cabinets on the other wall yet (where the sink is going) I still need to open that wall up for some wiring and then I’ll paint the rest of the walls and ceiling light silver. Then I will mask the walls off and paint the remaining cabinets.
I also picked up the counter tops last weekend, although not my first choice, they are within my budget and my skill set to install. I would have rather had a solid color but none of the big box stores around me had performed laminate top available. I won’t be installing the counter tops until closer to the end.
 

Attachments

  • counter.jpg
    counter.jpg
    144.3 KB · Views: 98
  • primer-2.jpg
    primer-2.jpg
    132.3 KB · Views: 81
  • primer-1.jpg
    primer-1.jpg
    134.1 KB · Views: 84
  • paint-4.jpg
    paint-4.jpg
    147.8 KB · Views: 101
  • paint-3.jpg
    paint-3.jpg
    139.3 KB · Views: 97
  • paint-2.jpg
    paint-2.jpg
    144.2 KB · Views: 78
  • paint-1.jpg
    paint-1.jpg
    142.9 KB · Views: 85
OP
L

larrybuell

Active member
Joined
Apr 28, 2011
Messages
39
Location
North of Houston
I highly recommend these anti-fatigue rubber mats from Amazon. I have more ordered but they're on back-order. The small one by the door was $30 and the other 2 were $25ea. Those 2 are the end pieces and have interlocking "teeth".....I have more middle pieces coming so that I can make one long mat in front of the long bench.

They seem to be high quality (have some heft to them also) but not as soft as I would of liked.
 

Attachments

  • work mats, anti-fatigue.jpg
    work mats, anti-fatigue.jpg
    146.7 KB · Views: 62
OP
L

larrybuell

Active member
Joined
Apr 28, 2011
Messages
39
Location
North of Houston
Looks great!! And info on the rx7 please!!

Coming alone nicely! Love the viper! Is that a 1st gen supra?

Thanks!

Its actually a 1988 RX-7 Turbo 10th anniversary edition (which was just a cosmetic package, interior and paint), I've owned this car for over 15 years now and I have removed every single nut and bolt on this car. The interior is pretty much gutted (all but dash and door panels). It has a single alum. Kirky racing seat with 5 pt. harness and a 4 pt. cage. It has a a series 5 engine and transmission (1989+, slightly better engine & trans. design) . The trans. has an ACT 4 puck clutch and heavy duty pressure plate and alum. flywheel. The engine is a mild street port with a 60mm turbo Tial wastegate and BOV all controlled by a Microtec standalone ECM. The chassis has all delrin bushing and heim joints with Koni shocks and ground control coil overs and ground control camber/caster plates. Its currently not running but I hope to get back after it this year and have some fun with it again.
 
OP
L

larrybuell

Active member
Joined
Apr 28, 2011
Messages
39
Location
North of Houston
Wow!

Nice garage!

And welcome to the land of the living and posting. You have made a nice contribution to the forum!

Thank you.

Bill

:thumbup: Thanks. I've been lurking on this sight for many years and its given me many good ideas. I figured it was time for me to give back......even if its only a tiny bit compared to a lot of the threads on here.
 
OP
L

larrybuell

Active member
Joined
Apr 28, 2011
Messages
39
Location
North of Houston
Plans for this weekend:
1.) Finish painting the cabinet doors and install.
2.) Make a jig to cut the preformed laminate counter tops and install them. The wall is pretty wavy so its going to be a pain getting the counter top back splash to sit flush to the wall. (hand held belt sander being delivered today)
3.) Then get started on the door/drawer pull install. (being delivered today)
 
To avoid these ads, REGISTER NOW!

HemiRamOn22s

Well-known member
Joined
Feb 10, 2015
Messages
565
Location
Delaware
Plans for this weekend:
1.) Finish painting the cabinet doors and install.
2.) Make a jig to cut the preformed laminate counter tops and install them. The wall is pretty wavy so its going to be a pain getting the counter top back splash to sit flush to the wall. (hand held belt sander being delivered today)
3.) Then get started on the door/drawer pull install. (being delivered today)
With the countertop i wouldnt worry about making it sit perfectly flush to the wall you can fill in the gap with some caulk.
 
OP
L

larrybuell

Active member
Joined
Apr 28, 2011
Messages
39
Location
North of Houston
With the countertop i wouldnt worry about making it sit perfectly flush to the wall you can fill in the gap with some caulk.

Yep, I was planning to use plenty of caulk, I just want to see how good I can get it before I caulk it. Besides it gave me an excuse to buy a belt sander.:D
 
OP
L

larrybuell

Active member
Joined
Apr 28, 2011
Messages
39
Location
North of Houston
I spent most of my weekend working outside and in the garage; we had some great weather in Houston. I didn’t get as much done as I planned (never do), I would have completed more if I wouldn’t have screwed up and cut a counter top 2” to short. I also built a jig for cutting the counter tops and it works great…..if I mark the piece I’m cutting to the correct length. :wtf: 
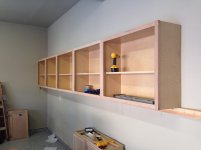
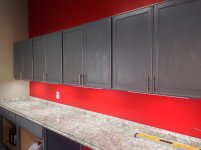
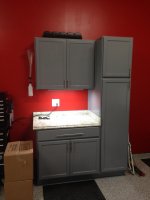
At least it was the shortest and cheapest section of counter top so I plan to pick up another on the way home today. That mistake was very frustrating and it slowed me down after that. Then I decided to focus on painting the upper cabinet doors. Priming and painting cabinet doors is so time consuming; prime one side wait, flip and prime the other side……repeat for paint. I did buy another set of saw horses so maybe now I can layout more doors at one time. I also had an uninvited guest yesterday. I was in the garage painting and I heard this buzzing noise. I walk outside to the driveway, where I had all my “toys” sitting, and saw a quad copter hovering over my house and driveway (I’d say about 200’ up. I should have taken a pic but I had paint on my fingers). I could see he was panning around and scoping out everything. I was wishing I had a slingshot. :mad: It stayed at that height and then just flew off into the distance. I watched it until I couldn’t see it anymore. I was impressed how far someone was able to pilot it from such a distance away.
I also received the cabinet door and drawer pull hardware…..so it’s all starting to come together. I was tempted to mount a few of the handles but decided I better wait and do them all at the same time.
Here are a few updated pictures…..doesn’t look like much but overall I’m happy with what I accomplished. What I’m not showing in these pics is the wall on the right. I have more cabinets over there and that’s where the utility sink is being installed. I have the sink faucet and all the required plumbing hardware. I also cut that counter top to the correct length and I installed some more under cabinet lights on a separate switch. I still need to cut a couple more holes in that wall near the door to locate a volume control for the in ceiling speakers that I’ve yet to buy. Once all the holes have been patched then I will start painting all the other walls a very light silver color.
 

Attachments

  • 4 sets of doors installed...still wet.jpg
    4 sets of doors installed...still wet.jpg
    131.5 KB · Views: 84
  • 2 sets of cabinet doors installed.jpg
    2 sets of cabinet doors installed.jpg
    111.4 KB · Views: 92
  • 36in counter top installed.jpg
    36in counter top installed.jpg
    123.1 KB · Views: 78
  • almost finished the upper doors....pano.jpg
    almost finished the upper doors....pano.jpg
    144.1 KB · Views: 90
OP
L

larrybuell

Active member
Joined
Apr 28, 2011
Messages
39
Location
North of Houston
This week I cut the new section of counter top to replace the section that I cut short and finished up the install. It turned out pretty good......could of been just a bit better but I'm happy with it. I painted some more cabinet doors and started installing the door pulls. I also painted the base frames and wall frames of the cabinets by the sink area. I cut the sink counter top to length but haven't mounted it to the cabinet base yet. I want to get the wall painted before I push the counter top back splash up to the wall and mount it permanently. Its really taking starting to take shape now. can't wait to get finished and start organizing.
 

Attachments

  • door pulls.jpg
    door pulls.jpg
    115.9 KB · Views: 43
  • door pulls-1.jpg
    door pulls-1.jpg
    131.9 KB · Views: 48
  • pano door pulls.jpg
    pano door pulls.jpg
    149.8 KB · Views: 66
  • pano door pulls-1.jpg
    pano door pulls-1.jpg
    156.1 KB · Views: 44

95riosnake

Well-known member
Joined
Oct 26, 2013
Messages
394
Location
Pittsburgh, PA
I agree the red accent wall looks killer and the use of the unfinished stock cabinets is a great idea. I'm going to be in the market for some wall cabinets for my garage soon so I'm going to have to look into those.
 
OP
L

larrybuell

Active member
Joined
Apr 28, 2011
Messages
39
Location
North of Houston
Thanks, it's a time consuming job to finish all the cabinets but to be honest......I like being out in the garage with a project to work on. I need to take some measurements and start planning for a 4-post lift.
 
OP
L

larrybuell

Active member
Joined
Apr 28, 2011
Messages
39
Location
North of Houston
Well dang. I wanted to install the drawer pulls tonight to see how they look.....the mounting screws are to short.
 

Attachments

  • image.jpg
    image.jpg
    7.7 KB · Views: 28
OP
L

larrybuell

Active member
Joined
Apr 28, 2011
Messages
39
Location
North of Houston
I haven't updated anything in awhile and I really don't have much to update at this point. I was out of town 2 weekends ago; I took my 11 yr old son to Universal Studios in Florida for a surprise birthday trip. We had a great time but wow was it cold for Florida!

So after doing everything that I could to avoid painting (I hate painting) I painted 8 more cabinet doors but didn't get them hung. I'll hang those doors tonight after work and then I'll start prepping the remaining 6 cabinet doors and 3 drawer faces for paint. Cant wait till that's done!

I did get my sink installed, so that's a major accomplishment. Having a sink in the garage is so handy.

I also had to buy a new shop vac. because my 12 year old vac. finally gave up. The new one is a Ridgid with a removable leaf blower. It's a little on the loud side but it works great as a vac and as a blower. I used the new vac. to do a bunch of well needed cleaning. After cleaning I unpacked some more boxes trying to make room for one more car in the garage. It was at this point I realized I'm going to need a 4 post lift sooner than later. So I'm upping my schedule a bit and started shopping for a lift.

Here is a couple of pics with no cars in the way.
 

Attachments

  • moving junk up.jpg
    moving junk up.jpg
    131.7 KB · Views: 22
  • garage sink.jpg
    garage sink.jpg
    131.5 KB · Views: 20
  • pano garage and sink.jpg
    pano garage and sink.jpg
    150.5 KB · Views: 43
OP
L

larrybuell

Active member
Joined
Apr 28, 2011
Messages
39
Location
North of Houston
Work on the garage has slowed a bit due to lack of motivation. Times are really tough in the oil patch these days and that's bringing my mood and drive way down.

After finishing the cabinets I quickly realized that sometimes I need more vertical space to work on larger items.....the wall cabinets make this impossible. So I built this little folding work bench. It turned out better than I could of hoped for. It folds up out of the way and I used a fence gate latch to hold it securely in place and adjustable leveling feet on the legs.
 

Attachments

  • finished closed.jpg
    finished closed.jpg
    131.7 KB · Views: 23
  • finished open 2.jpg
    finished open 2.jpg
    140.9 KB · Views: 23
  • finished open.jpg
    finished open.jpg
    137.5 KB · Views: 21
  • unfinished closed.jpg
    unfinished closed.jpg
    154.7 KB · Views: 25
  • unfinished-open.jpg
    unfinished-open.jpg
    140.6 KB · Views: 20
OP
L

larrybuell

Active member
Joined
Apr 28, 2011
Messages
39
Location
North of Houston
Here are a few pics of the mostly completed space. I'm very pleased with how this turned out. I still need to run my airline to the hose reel on the ceiling and I really want to get a 4 post lift. I'm probably going to hold off on the lift for the time being until all the uncertainty at the office passes.

took these before the folding workbench.

As you can see I still have some painting to do (near the sink). I was going to paint the remaining walls and ceiling a very light gray color but decided that was to much work. :) So I finally went and got some touch up paint and I just plan to touch up those areas that need it.
 

Attachments

  • sink area.jpg
    sink area.jpg
    131 KB · Views: 21
  • small work top.jpg
    small work top.jpg
    136.7 KB · Views: 22
  • tool box & drill press.jpg
    tool box & drill press.jpg
    143.7 KB · Views: 23
  • main cabinets.jpg
    main cabinets.jpg
    135.9 KB · Views: 27
  • pano-1.jpg
    pano-1.jpg
    150.5 KB · Views: 30
Last edited:
OP
L

larrybuell

Active member
Joined
Apr 28, 2011
Messages
39
Location
North of Houston
Not exactly garage related but this took precedence over my 4 post lift (and cost is double the lift!). When we moved I tossed out my old beat up grill so now its time to upgrade. :) It should be completed this week but we are expecting to have some really bad weather this week. I hope that doesn't delay the process.

We have all the appliances and now we are waiting on the granite counter top.
I cant wait to see and use the completed kitchen!!
 

Attachments

  • side burner.jpg
    side burner.jpg
    149.4 KB · Views: 26
  • outdoor kitchen.jpg
    outdoor kitchen.jpg
    154.4 KB · Views: 31
  • fridge.jpg
    fridge.jpg
    144.2 KB · Views: 26
  • under sink access.jpg
    under sink access.jpg
    149.5 KB · Views: 29
  • Grill location.jpg
    Grill location.jpg
    148.4 KB · Views: 26
Last edited:
To avoid these ads, REGISTER NOW!
Top Bottom