To avoid these ads, REGISTER NOW!

Snap-on Craig's List Score

cgrutt

Well-known member
Joined
Mar 4, 2016
Messages
8,370
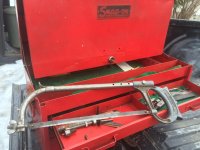
Smoking deal on an 1980's roll cabinet and tool box. $250 including the MATCO side box. Whoo Hoo!

Spent a former life in an auto detail/car wash shop so there's a bunch of surface rust, esp. on lower part of boxes. Smells like auto wax, ha, ha... Metal is solid though. Going to restore it to its former glory.

Drawers are straight but slide a little rough. Bottom drawer is just sitting in box and needs a new set of slides. Also needs new lock sets and drawer liners. Anybody know where I can get a Snap-on emblem for lower box?

Figure I'll take the rust down to bare metal, straighten anything that needs straightening, epoxy prime and top coat with Snap-on Red followed by clear coat. Will give me some good practice before working on my truck, LOL...

Looks a little rough and needs a little TLC...

tmp_16538-IMG_20160305_193404_989-1459243352_zpsmnib6etr.jpg


Bottom is solid but has surface rust. No rust through. Flash from pic actually makes it look worse than it is.

tmp_16538-IMG_20160305_191935_3801131351854_zpsstr9h5lg.jpg


Bottom drawer need slides and needs the most work.

tmp_16538-IMG_20160305_193538_450208399085_zpsgiejnjht.jpg


Condition improves as you move up...

tmp_16538-IMG_20160305_193428_5491985328697_zpsjzvixtap.jpg


Top box is in pretty good shape...

tmp_16538-IMG_20160305_193437_4851577947535_zpssxihzunw.jpg


Lower part of door on side box needs to be welded...

tmp_16538-IMG_20160305_193453_6511013176150_zpsr8dwkgyf.jpg


But drawers seem as good as they did when they rolled off the truck 36 years ago!

tmp_16538-IMG_20160305_193625_4641007664711_zpshpvhkxfs.jpg


I'll keep thread updated with progress!
 
Last edited:
To avoid these ads, REGISTER NOW!
OP
C

cgrutt

Well-known member
Joined
Mar 4, 2016
Messages
8,370
Well first up was the MATCO door and I screwed it up already, LOL. Straightened it out good enough but messed up welding the split and corner. Kept blowing through the sheet metal and instead of walking away and coming back with a cooler head I just kept at it making it worse. Wound up welding in a piece of steel behind the seam but went past it and blew through the metal again. Also put too much heat on the panel and created an "oil can" warp. Shot it with some rattle can primer and called it a day, LOL... Will get it right when cooler heads prevail!

This is what it looked like before I started.

tmp_28721-IMG_20160306_162517_2891577947535_zps4y1vatv8.jpg


Kept blowing through the sheet metal even at lowest setting on my welder :( Need to fix the holes and will block panel with body filler.


tmp_28721-IMG_20160306_183849_6871985328697_zpswoqntgjp.jpg


Wound up welding in a piece of flat steel behind the panel. Haven't ground it down yet; more work to be done...

tmp_28721-IMG_20160306_183812_8361013176150_zpsy853upgw.jpg
 

zkling

Well-known member
Joined
Jan 23, 2007
Messages
16,939
Classic setup, not sure if I would say it was a smoking deal. The top box looks pretty good as is.

For the badge on the bottom box, ebay will be your best bet. It will be the same as the one on the top box.

For that door, best to do now it cut a square patch out, making sure to cut out all the rot and then patch in with same thickness fresh sheet.
 
OP
C

cgrutt

Well-known member
Joined
Mar 4, 2016
Messages
8,370
Thanks. I've seen the top box along sell for more than I paid for the set but whatever I'm happy with it.

Yeah, I bid on that same badge today. It was in pretty bad shape and went for about $38. Wasn't sure if it was the old style or new one. Bottom box is dated '81 which I believe is last year of old logo. The paint seems like it had a square badge though I think you're right.

Good suggestion on patch panel. I'll give that a go.
 

NUTTSGT

Super Moderator
Staff member
Joined
Sep 14, 2009
Messages
51,143
Location
Northern Central Ohio
Looks like you got yourself a nice project box.

I'd consider grabbing a can of spray-in bed liner and coat the bottom of the box after it's painted. That's what I did when I repainted a bottom box, I also coated the back of the box so I didn't have to spend more on paint.
 
OP
C

cgrutt

Well-known member
Joined
Mar 4, 2016
Messages
8,370
Thanks.

Spoke with Snap-on today. Apparently they used the newer style logo on the KRA-380. Ordered a new nameplate, set of slides for the bottom drawer and new key sets for top and bottom boxes.
 

zkling

Well-known member
Joined
Jan 23, 2007
Messages
16,939
Thanks.

Spoke with Snap-on today. Apparently they used the newer style logo on the KRA-380. Ordered a new nameplate, set of slides for the bottom drawer and new key sets for top and bottom boxes.

Hate to break it to you, but that box had the older square style badge to match the top. They didn't change badge styles till 83. In my experience, most of the people at snap on know and care very little about the older boxes.
 
OP
C

cgrutt

Well-known member
Joined
Mar 4, 2016
Messages
8,370
Hate to break it to you, but that box had the older square style badge to match the top. They didn't change badge styles till 83. In my experience, most of the people at snap on know and care very little about the older boxes.

Yeah, I think you're right. I saw a 1980 catalog online which was first year of that box KRA380 and it showed older nameplate.

1980-Catalog-p017.jpg


'83 catalog had new style but the box was a KRA380A.

1983-Catalog-p033.jpg


Mine was made in 81 but paint under logo sure looks like it was the square nameplate. I called Snap-on again and they don't have the old nameplates anymore.

One in really bad shape sold on ebay yesterday for $37. Another guy has one up for sale that looks like its in great shape for $89 plus shipping. The new nameplate (newer style) from Snap-on was $17. I'm not too worried about it, not like its a '63 split-window vette, LOL...
 

zkling

Well-known member
Joined
Jan 23, 2007
Messages
16,939
O no, I completely agree $ wise, that was just more of an FYI.
 

LXCam

ALLIANCE MEMBER
Joined
Apr 23, 2013
Messages
19,204
Location
AZ
That'll be a nice box when you're finished. Get yourself a piece of brass flat stock and use it as backing where you're trying to weld the sheet metal. It'll stop all that blow thru drama and also make sure you get all the paint and rust cleaned away first. Your welds look like there is a lot of contamination.
 
OP
C

cgrutt

Well-known member
Joined
Mar 4, 2016
Messages
8,370
Thanks will try that. Metal was clean down to bare metal, it's my bad. New to welding. I'm running 024 HOBART steel wire from Tractor Supply on a 110v Lincoln Electric welder with 75%AR/25%CO2 shielding gas. Maybe could use more gas? I ordered some ESAB 023 Spoolarc EZ grind wire. I'm going to attempt a wheel arch repair on my F150 but want to get the welding down first, LOL. Definitely need more practice...
 
OP
C

cgrutt

Well-known member
Joined
Mar 4, 2016
Messages
8,370
So cut out the lower part of door

tmp_21406-IMG_20160307_161527_0221577947535_zpswkngpqqe.jpg


And fashioned a new section out of 16 GA sheet metal (that was fun without a brake, ha, ha)

tmp_21406-IMG_20160307_162335_2211007664711_zpsgtgq0t3v.jpg


Did better with the welding this time round, the pic isn't that great it came out better than it looks. A little low spot in center about 1/16" or so. Will block it out with body filler.

tmp_19729-IMG_20160307_174921_9011131351854_zpslgh4cnzo.jpg


Back is pretty clean. That double fold on edge of door was a B**** to hammer out, LOL.

tmp_21406-IMG_20160307_174859_931-1459243352_zpsa3z8yj4p.jpg


Had some help with my 10 y/o. He couldn't believe I handed him the sander. Smile ear to ear made my day (and I think his too) :)

tmp_19729-IMG_20160307_174527_382-1459243352_zpsuwy7fkr7.jpg


More tomorrow...
 

Bierisch

Well-known member
Joined
Sep 30, 2013
Messages
165
Location
San Antonio, Tx
So cut out the lower part of door

tmp_21406-IMG_20160307_161527_0221577947535_zpswkngpqqe.jpg


And fashioned a new section out of 16 GA sheet metal (that was fun without a brake, ha, ha)

tmp_21406-IMG_20160307_162335_2211007664711_zpsgtgq0t3v.jpg


Did better with the welding this time round, the pic isn't that great it came out better than it looks. A little low spot in center about 1/16" or so. Will block it out with body filler.

tmp_19729-IMG_20160307_174921_9011131351854_zpslgh4cnzo.jpg


Back is pretty clean. That double fold on edge of door was a B**** to hammer out, LOL.

tmp_21406-IMG_20160307_174859_931-1459243352_zpsa3z8yj4p.jpg


Had some help with my 10 y/o. He couldn't believe I handed him the sander. Smile ear to ear made my day (and I think his too) :)

tmp_19729-IMG_20160307_174527_382-1459243352_zpsuwy7fkr7.jpg


More tomorrow...

that's one hell of a Sander!!!
 
To avoid these ads, REGISTER NOW!

Jazz1

Well-known member
Joined
Jan 3, 2016
Messages
4,188
Location
Thunder Bay On.
Kijiji find yesterday for $15. I did not know it was snap on. Was just advertised as 3 drawer tool box. Had a few tools in it.
 

Attachments

  • IMG_2026.jpg
    IMG_2026.jpg
    139 KB · Views: 70
  • IMG_2033.jpg
    IMG_2033.jpg
    137.7 KB · Views: 65
OP
C

cgrutt

Well-known member
Joined
Mar 4, 2016
Messages
8,370
WOW that's awesome. I'll give you $30 for the emblem ;)

[EDIT] -- just bought an emblem for it. Don't need it anymore. Thanks. [EDIT]
 
Last edited:

jn50308401

Well-known member
Joined
Sep 7, 2015
Messages
315
Nice find, enjoy the process and take your time. These old boxes are a some of all the work, so metal prep, paint prep is going to eat a ton of time but once it's done it will be preserved for that little gear head

Sent from my KFSOWI using Tapatalk
 
OP
C

cgrutt

Well-known member
Joined
Mar 4, 2016
Messages
8,370
Thanks. Got the door on the side box flattened out today. Threw a coat of primer on it but still needs to be sanded out and some glazing putty. Pretty happy with the way it came out. Been a LONG time since I've fooled around with body work.

tmp_32546-IMG_20160308_211712_889-1459243352_zpslvsqaxyq.jpg


Also found an original emblem for the bottom box today.
 
OP
C

cgrutt

Well-known member
Joined
Mar 4, 2016
Messages
8,370
Thanks, no I just took the hardware off. Sanded it out and just hit it with another coat of primer from rattle can. The streaks are from the spray can, panel came out pretty flat. Will sand it down again and put final coat of primer with a gun. Just wanted to get something on it to prevent it from rusting again. Not sure when I will be able to finish it.

tmp_30776-IMG_20160309_144648_299-1459243352_zpsgmzkbijh.jpg
 

Model A Fan

Well-known member
Joined
Dec 1, 2011
Messages
1,223
Location
NW Washington
With the blow through, how do you prevent that? I am going to be welding some sheet metal into a car project, and I want to avoid blow through. Someone mentioned using brass backing behind the weld? How big of a piece of brass? Is it a sheet or do you use a large chunk?

Looking forward to seeing the progress. That $15 box is a great score!
 
OP
C

cgrutt

Well-known member
Joined
Mar 4, 2016
Messages
8,370
Thanks it seemed to be worse on the metal that was already compromised. Had a little bit on the second try where gap between sheets was a little too wide. I didn't try the brass but understand you just need a little bit behind area that is being welded. Read a copper sheet wrapped on a dolly does same thing. Thinner wire, lower voltage and holding torch at angle to work seemed to help. Recommend that you practice on some scrap to nail it down before working on car. I also ordered some EZ Grind 023 wire that is supposed to work better than straight steel on sheet metal. Going to try that on my truck. Repairing wheel arch.
 

Packard V8

Well-known member
Joined
Mar 16, 2009
Messages
7,380
Location
Spokane, WA
Both good finds. That 3-drawer is in amazingly good condition for the age.

On the OPs project - You'll have a nice set when done. The first resto is sorta fun. However, after a few, I've decided I'm a patina guy. No more box restorations, ever.

jack vines
 

dickdickey

New member
Joined
Mar 14, 2016
Messages
2
Good looking toolbox the fun comes when you start the reiteration process, I've restored several that looked about like yours and they turned out great, post pictures when your finished
 
OP
C

cgrutt

Well-known member
Joined
Mar 4, 2016
Messages
8,370
Reiteration process, ha, ha. Love it!

What paint did you use? I found a code for factory Snap-on Red but wondering if I should just use some red enamel from the hardware store.

Received new key sets, the lower drawer slide (they sent me roller slides when unit has friction slides...) and my "new" (to me) badge today...

tmp_2106-IMG_20160314_162045_2701345244735_zpsedacitrv.jpg
 

johnyg

Well-known member
Joined
Nov 11, 2015
Messages
319
Location
boca raton fl
i just finished an abused side cab with 9 drawers,rust and dents.painted with epoxy and 2k single stage red the paint store matched to one of the drawer bottoms. alot of work,money and time but it look great.now i should paint my 35 year old box it hangs on!!! good luck....
 
OP
C

cgrutt

Well-known member
Joined
Mar 4, 2016
Messages
8,370
i just finished an abused side cab with 9 drawers,rust and dents.painted with epoxy and 2k single stage red the paint store matched to one of the drawer bottoms. alot of work,money and time but it look great.now i should paint my 35 year old box it hangs on!!! good luck....

Thanks! Post a pic if you can.
 
To avoid these ads, REGISTER NOW!
Top Bottom