OP
thehorse13
Well-known member
I've been occupied at work lately, with this weekend being the last of the obnoxiously busy schedule. I meant to post some pics of my badge affixing work but haven't had the time.
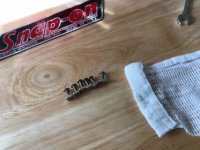
I went with my usual truss head threaded rivet technique for affixing badges on toolboxes. These little guys are 4-40s but on the older Snap-Ons you would be better served with a 6-32. You can see that I have a bag of round head 6-32s sitting on the table as well. Those are going to be used on another project though.
Grab yourself a pair of crimping pliers and thread your rivet in so that you can cut it down to size. I'm surprised at how many folks don't know about this little trick so I decided to throw it in.
Once you trim down the rivet, back it out using the nut that you threaded on before cutting. You can see my tiny Snap-On 1/4 box end along for the job. Later, all six of the trimmed down rivets will get a quick shot on the grinder to taper the ends. This ensures a nice smooth threading. No pics of that though. I like my fingers exactly where they are.
Finally, you can see how nice these little guys look on the badge. I held up one of them so that you can see how it sits on the badge face.
Once I get some time to fool around in the garage, I will post pics of the mounted badges on the stack.
I almost forgot. Some of you may wonder why I have a red Solo cup sitting on the table. It's not for booze, rather, I hold the wire cutters inside the cup so that it catches the trimmed off rivet. They make a terrible sound if you happen to lose one and your wife finds it with a vacuum. lol