To avoid these ads, REGISTER NOW!

So I guess I don’t know $#/% about framing

Wiebster

Well-known member
Joined
Jul 18, 2015
Messages
194
Location
Rapid City, Sd
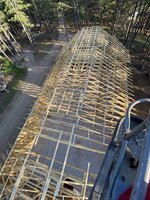
I’ve had a hammer in my hand since I was three. I thought I could build my own dream shop because I couldn’t get any local contractors to get me bids. With a lot of help from GJ and on line I built the walls and got the trusses set and braced. I thought I was on my downhill leg from there on out but I was wrong. I’m getting stumped and think I need some advice from the GJ experts. Not sure where to begin…. literally. I feel like I need to prioritize a list of the things need to be completed. I also need some technical help to get this dried in before the snow flies! My bracing is the bare minimum although the trusses have been through some major thunderstorms and wind with no problems. But I really want to get the roof sheathed and shingled. For that to happen I need the rafter tails trimmed, outlookers for gable overhangs, sub fascia, and most daunting I need to build four dormers. I also need to put the attic floor in so I have something to stand on to build the dormers.
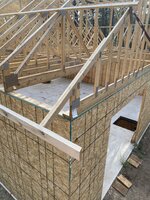
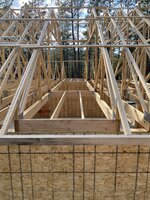
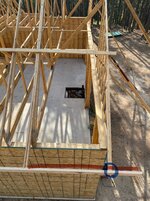
Most immediately, I need the proper order to do all of this, and then a few technical suggestions. So far I’ve trimmed the rafter tails on one eve side for a 24” soffit. I ripped a 33 degree bevel (8/12 pitch) on 2x6 for the sub fascia. I’m not exactly sure how to turn the corner and start the rake overhang. I’ve got drop chord gable trusses but I swear the drop is only 3” and not 3 1/2”. (See picture). As I add the outlookers on the rakes should I notch the top chord of the gable truss or notch the outlookers to keep the roof in plane? (both are 2x4s). There is 5’ opening between the drop chord truss and the next truss over which is a girder truss. I was planning on using 2x4 joist hangars on the girder and then span that opening with 2x4s on edge 16” oc to form the gable overhang. These 2x4 outlookers are set perpendicular to the top chord, correct? Not plumb?
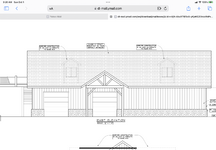
When it comes to the framing in between the girders for the dormers I’m at a total loss. Should I put a ridge beam in between the peaks and run rafters down parallel to the trusses to a header? Or run my roof supports perpendicular to the girders down the trusses and double up the header at the dormer opening?
Any other suggestions are appreciatedIMG_0687.jpegIMG_0688.jpegIMG_0689.jpegIMG_0686.jpegIMG_0557.jpegIMG_0180.pngIMG_0190.png
 
Last edited:
To avoid these ads, REGISTER NOW!

jack stand

Well-known member
Joined
Feb 29, 2012
Messages
3,353
Location
Lakes Region Maine
Hey, you've come a mighty long way and it looks good!👍
Break this down to separate jobs.
I'd put your floor down. You'll need some simple nailers in the dormer areas, then build your dormer walls. The misc. framing needed to tie in the dormer roofs with become obvious with your progress.
Little bites! From what you've shown, I have confidence in you.
Let's get that floor in and the roof framing and sheathed in.
The gable end overhang will be next.
Then at least the roofing underlayment. If necessary, it will do for the winter.
 

jack stand

Well-known member
Joined
Feb 29, 2012
Messages
3,353
Location
Lakes Region Maine
I'll assume that the skipped truss at the end wall is for a staircase?
Look for any detail (s) for this on your truss co supplied drawings, notes as to handling completion of the floor support.
 
OP
W

Wiebster

Well-known member
Joined
Jul 18, 2015
Messages
194
Location
Rapid City, Sd
I'll assume that the skipped truss at the end wall is for a staircase?
Look for any detail (s) for this on your truss co supplied drawings, notes as to handling completion of the floor support.
I should have mentioned that. The first skipped truss opening (a 5’ 9” opening) is how the truss company designed the opening for my freight elevator. The elevator platform itself is only 4’x4’ and you can see the recess in the concrete for it in that one picture. So that will need to be framed in around the elevator too.
 

35k0

Well-known member
Joined
Feb 19, 2020
Messages
621
Location
Minnesota
Glue and screw the floor boards down. I used t&g 4x8 panels in my attic space and glued and screwed them to help eliminate any squeaking.
 

Hank11

Well-known member
Joined
Aug 19, 2019
Messages
1,158
Location
Tennessee
Depending on the level of finish, you want upstairs you might look at some heavy tongue and groove lumber instead of plywood. You can have decking and the finish floor all at once. I’d do the floor next, then deck the roof. I’d think about decking the roof and leaving the dormer areas open so you can frame them out with the rest of the building real stiff and stable. Then deck the dormers.
 
OP
W

Wiebster

Well-known member
Joined
Jul 18, 2015
Messages
194
Location
Rapid City, Sd
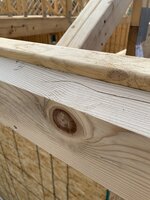
Ok, that’s what I thought, perpendicular. The supposed 3 1/2” drop is what is so frustrating. I mocked one up and realized it really wasn’t landing completely square on the gable drop chord truss. As I slid it down to my subfascia, which is flush with the top of the rafter tails, I see that it’s at least 1/2 or 5/8” taller (see that one picture of my subfascia with the outlander sitting proud) I don’t understand how that is even possible. When the trusses were delivered strapped tightly together, the drop chord looked exactly 3 1/2” smaller. The only thing I can gather is the rafter tails have warped downward. I had to scab on my own tail for the gable truss, maybe I didn’t get it in plane. Both ends are like that. I’m hoping as I move up the rake, that they start falling in plane. But I don’t know what to do with the bottom of the rake. Do I notch them or just leave them 5/8” high. I’m starting that next so I need to figure it out quickly! Also I’m not sure about where to start my first outlander placement. Do I measure up 4’ from my finished fascia and have the sheathing break right on that outlander? Or is there more to consider than just that? They’ll be 16”oc all the way up the rake.
 
OP
W

Wiebster

Well-known member
Joined
Jul 18, 2015
Messages
194
Location
Rapid City, Sd
Hey, you've come a mighty long way and it looks good!👍
Break this down to separate jobs.
I'd put your floor down. You'll need some simple nailers in the dormer areas, then build your dormer walls. The misc. framing needed to tie in the dormer roofs with become obvious with your progress.
Little bites! From what you've shown, I have confidence in you.
Let's get that floor in and the roof framing and sheathed in.
The gable end overhang will be next.
Then at least the roofing underlayment. If necessary, it will do for the winter.
Thanks Jack Stand, I appreciate it. I just seem to be losing my momentum.
 
OP
W

Wiebster

Well-known member
Joined
Jul 18, 2015
Messages
194
Location
Rapid City, Sd
Depending on the level of finish, you want upstairs you might look at some heavy tongue and groove lumber instead of plywood. You can have decking and the finish floor all at once. I’d do the floor next, then deck the roof. I’d think about decking the roof and leaving the dormer areas open so you can frame them out with the rest of the building real stiff and stable. Then deck the dormers.
It’s mostly storage upstairs. I’m limited to 30lbs sq ft so I am conscious about even the flooring weight. I was planning on using Advantech osb because it seems stiff for the thickness and at the rate I’m getting this done, it’s water resistant too. I do like the finished floor idea though too. I thought about skipping the dormers until the roof was sheathed but I don’t want to “unframe” anything in the dormer bays. Any suggestions on how to get roof sheathing supports in between the girder trusses that won’t have to be torn out later?
 

Professor Fate

Well-known member
Joined
May 18, 2020
Messages
178
Location
Gainesville FL
Your sub-facia detail on the drop gable is wrong. The 2x4 connecting the sub-facia to the drop gable should be on top of the top chord, not along side it which should cure your dimension issue. I bet if you eyeball the facia it drops at the end. The bevel cut on the sub-facia is nice, but not really necessary. Finish all the roof framing details including the dormers and start sheeting. We generally leave the hole for the dormer and build it on top of the sheeting. If you need something to stand on for the dormers lay down some temporary flooring of some type. The rake should be done with 2x4's perpendicular to the trusses extending from the first truss in, over the drop gable to the dimension of your gable overhang minus 1 1/2". The rake sub-facia attaches to these.

Do the floor after the roof is dried in.
 

NUTTSGT

Super Moderator
Staff member
Joined
Sep 14, 2009
Messages
51,098
Location
Northern Central Ohio
If all my trusses were plumb and square, I would do my bracing first.

Next, I would probably start with the bottom courses of roof sheathing on both sides to prevent any future racking and add more bracing. As you get to the gables, fab up your eaves. Granted, I would lay it out however it needs to fall to get a close to full sheet for the first course at the eaves.
 
OP
W

Wiebster

Well-known member
Joined
Jul 18, 2015
Messages
194
Location
Rapid City, Sd
Your sub-facia detail on the drop gable is wrong. The 2x4 connecting the sub-facia to the drop gable should be on top of the top chord, not along side it which should cure your dimension issue. I bet if you eyeball the facia it drops at the end. The bevel cut on the sub-facia is nice, but not really necessary. Finish all the roof framing details including the dormers and start sheeting. We generally leave the hole for the dormer and build it on top of the sheeting. If you need something to stand on for the dormers lay down some temporary flooring of some type. The rake should be done with 2x4's perpendicular to the trusses extending from the first truss in, over the drop gable to the dimension of your gable overhang minus 1 1/2". The rake sub-facia attaches to these.

Do the floor after the roof is dried in.
Thanks professor. I’m not sure how to photograph my issue with the drop chord. I do know that the outlander goes on top of the drop chord. I only slid it down until it touched my subfascia to highlight the height difference that exists and I don’t understand why. My subfascia is level and perfectly flush with the the top of the rafter tail. I beveled the subfascia only because if I kept it square and lowered it enough to be in plane with the roof, there was literally only about 2” of rafter tail to screw it to (8/12 pitch). By beveling it I could lift it and screw into the entire end grain of the rafter tail. I’m going to install the outlanders regardless of height issue and then maybe I can either figure out what’s wrong or photograph the issue. But for now, I’m positive that the first outlander will be about 5/8” higher than my subfascia and will cause the sheathing to bow down to meet it. Sure, it will be 16” away from the subfascia but something is not right.
 
OP
W

Wiebster

Well-known member
Joined
Jul 18, 2015
Messages
194
Location
Rapid City, Sd
If all my trusses were plumb and square, I would do my bracing first.

Next, I would probably start with the bottom courses of roof sheathing on both sides to prevent any future racking and add more bracing. As you get to the gables, fab up your eaves. Granted, I would lay it out however it needs to fall to get a close to full sheet for the first course at the eaves.
I think I have the trusses pretty braced enough for the sheathing to go on. I do like the idea of getting the first couple courses on the roof to keep the trusses more solid. But I have to figure out this outlander height issue first. I’ll try to post some pictures of my issue when I install the first few outlanders.
 

NUTTSGT

Super Moderator
Staff member
Joined
Sep 14, 2009
Messages
51,098
Location
Northern Central Ohio
I think I have the trusses pretty braced enough for the sheathing to go on. I do like the idea of getting the first couple courses on the roof to keep the trusses more solid. But I have to figure out this outlander height issue first. I’ll try to post some pictures of my issue when I install the first few outlanders.
Sometimes, you have to let your hands do the thinking.

I was told this a couple of years ago and boy does it make sense. Sometimes, you get all caught up trying to overthink a project and you get brain lock.

Step back and just started working on it with your hands. It'll come to you as you are working.
 
To avoid these ads, REGISTER NOW!

billconner

Well-known member
Joined
Jul 20, 2021
Messages
6,971
Location
Thousand Islands NYS
I'll admit beyond my experience since I'm a stick builder - no trusses - but I agree with professor - I would have expected to he gable rafter tail to sit on top of truss top chord, and the outlookers to sit in same plane - so they continue and look like blocking between each outlooker. Hard to tell why it doesn't seem to line up like that in photos. I'd be trying a level and tape on a lot of pieces to see why it seems off. Measuring from top plate perfectly vertical to top of top chord.
 
OP
W

Wiebster

Well-known member
Joined
Jul 18, 2015
Messages
194
Location
Rapid City, Sd
I'll admit beyond my experience since I'm a stick builder - no trusses - but I agree with professor - I would have expected to he gable rafter tail to sit on top of truss top chord, and the outlookers to sit in same plane - so they continue and look like blocking between each outlooker. Hard to tell why it doesn't seem to line up like that in photos. I'd be trying a level and tape on a lot of pieces to see why it seems off. Measuring from top plate perfectly vertical to top of top chord.
Of course as I want to start figuring this out, it starts to rain. I do know this: measuring from the inside of the top plate, straight up to the top of the top chord I get 24” on the common truss. I get 18” when I measure the exact same place on the drop chord gable truss. 6 freakin’ inch difference in height!! To me it should be a 3 1/2” height difference. I don’t get it. Yet I throw a 2x4 on top of the drop chord truss and it’s too high. NOW, these measurements are up about 30” up from the subfascia so I do think once I get away from the eve overhang, things get back into plane. It seems like my problem is my subfascia… its level and flush with the top of the tails. And as I have mentioned, when they were delivered and perfectly stacked, the drop chord truss seamed exactly as it should have…. one 2x4 width smaller on the top chord.
 

ddurrett896

Well-known member
Joined
Mar 29, 2015
Messages
995
Location
VA
Get that thing sheathed asap. I would typically start from a gable side but with that big opening, I'd start there and work toward the gables. I'd also add 2x bracing over that large span to help support the sheathing.
 

billconner

Well-known member
Joined
Jul 20, 2021
Messages
6,971
Location
Thousand Islands NYS
Of course as I want to start figuring this out, it starts to rain. I do know this: measuring from the inside of the top plate, straight up to the top of the top chord I get 24” on the common truss. I get 18” when I measure the exact same place on the drop chord gable truss. 6 freakin’ inch difference in height!! To me it should be a 3 1/2” height difference. I don’t get it. Yet I throw a 2x4 on top of the drop chord truss and it’s too high. NOW, these measurements are up about 30” up from the subfascia so I do think once I get away from the eve overhang, things get back into plane. It seems like my problem is my subfascia… its level and flush with the top of the tails. And as I have mentioned, when they were delivered and perfectly stacked, the drop chord truss seamed exactly as it should have…. one 2x4 width smaller on the top chord.
All I can suggest is study truss drawings and measure it differently. Based on your observation of trusses on the ground, doesn't seem they were built wrong. Sorry you're too far to come peak. I kind of enjoy this kind of mystery.
 

duneslider

Well-known member
Joined
Jan 20, 2013
Messages
2,267
Location
Riverton, Utah
You need to measure the gable truss and figure out what the drop is. Measure in plane at the edge of the wall. It should be about 3 11/16" shorter for 2x4 framing.

There is a chance they didn't make the gable end with enough drop and in that case I would notch the 2x4 whatever little bit you need. If you are measuring closer to 6 inches maybe they made it for a 2x6 which would be about 5.25" In my head I would think I would want to have 2x6's for that overhang on the gable end.

1725471911194.png
 

NUTTSGT

Super Moderator
Staff member
Joined
Sep 14, 2009
Messages
51,098
Location
Northern Central Ohio
IMG_0688~2.jpeg

Granted, I am looking at a picture on my phone.

That gap looks to be about 3 1/2" between the top chord and purlin. You say it's only 3" ?
 
OP
W

Wiebster

Well-known member
Joined
Jul 18, 2015
Messages
194
Location
Rapid City, Sd
All I can suggest is study truss drawings and measure it differently. Based on your observation of trusses on the ground, doesn't seem they were built wrong. Sorry you're too far to come peak. I kind of enjoy this kind of mystery.
I would love for someone to pull my head out of my a$$ on this one. I think I’ll figure it out once I start installing some of the outlanders and see what is not aligning. Im pretty sure they’re built right. I studied those drawings and just get even more disgusted with them. Like why not use a normal scale so I can measure things with a rule. No top chord length anywhere and no way to mathematically figure it out (at least for me). Definitely no indication on how to frame the dormers or connect the girder trusses. When I called the designer, he said I don’t know, I just design them. The framer will know. I sure don’t know!😄
 

NUTTSGT

Super Moderator
Staff member
Joined
Sep 14, 2009
Messages
51,098
Location
Northern Central Ohio
I would love for someone to pull my head out of my a$$ on this one. I think I’ll figure it out once I start installing some of the outlanders and see what is not aligning. Im pretty sure they’re built right. I studied those drawings and just get even more disgusted with them. Like why not use a normal scale so I can measure things with a rule. No top chord length anywhere and no way to mathematically figure it out (at least for me). Definitely no indication on how to frame the dormers or connect the girder trusses. When I called the designer, he said I don’t know, I just design them. The framer will know. I sure don’t know!😄
This is why I said, let your hands think for you.

Step back, take a break. Grab a Snickers and a Dr Pepper. Walk around and admire what you have already accomplished.

Put the tool belt back on and just go at it.
 
OP
W

Wiebster

Well-known member
Joined
Jul 18, 2015
Messages
194
Location
Rapid City, Sd
IMG_0688~2.jpeg

Granted, I am looking at a picture on my phone.

That gap looks to be about 3 1/2" between the top chord and purlin. You say it's only 3" ?
I think once I get away from the overhang it is 3 1/2” difference. But the picture I took of the height difference was taken at the blue circle on picture. I slid the outlander (2x4 on edge) down the trusses until it was resting next to the subfascia (red line in picture). It’s 5/8” higher (it should be flush with that beveled 2x6 to be in plane) Yes, it could be my subfascia sloping down…but it’s not. Most frustrating is I can see the uneven gap where it butts up to the common truss and it’s not resting on the the drop chord flat either, it’s only resting on the left edge of the drop chord. Really no way that I can tell to level it. If it’s positioned up or down on the drop chord it will be inaccurate level reading. IMG_0687.jpegIMG_0687.jpegIMG_0686.jpeg
 

NUTTSGT

Super Moderator
Staff member
Joined
Sep 14, 2009
Messages
51,098
Location
Northern Central Ohio
Whoa whoa whoa.

If I what I think is going on is going on.... you nailed your fascia from one truss to the other...

That outer gable truss is 3.5" lower than the other trusses. Is that 2x6 fascia board sloping down ?

Shouldn't that section of fascia be put up after the outlanders are installed ?
 
OP
W

Wiebster

Well-known member
Joined
Jul 18, 2015
Messages
194
Location
Rapid City, Sd
You need to measure the gable truss and figure out what the drop is. Measure in plane at the edge of the wall. It should be about 3 11/16" shorter for 2x4 framing.

There is a chance they didn't make the gable end with enough drop and in that case I would notch the 2x4 whatever little bit you need. If you are measuring closer to 6 inches maybe they made it for a 2x6 which would be about 5.25" In my head I would think I would want to have 2x6's for that overhang on the gable end.

1725471911194.png
 
OP
W

Wiebster

Well-known member
Joined
Jul 18, 2015
Messages
194
Location
Rapid City, Sd
Whoa whoa whoa.

If I what I think is going on is going on.... you nailed your fascia from one truss to the other...

That outer gable truss is 3.5" lower than the other trusses. Is that 2x6 fascia board sloping down ?

Shouldn't that section of fascia be put up after the outlanders are installed ?
I don’t know, that’s why I’m on here asking questions. I need the subfascia on the eve so I know exactly where to put my outlanders so the sheathing breaks on them (4 ft multiples). I just ran my subfascia long. Yes, the subfascia is well above my gable truss tail. It’s supposed to be 3 1/2” higher to be exact but as the picture shows, it’s not. Just for the record: MY SUBFASCIA IS LEVEL and FLUSH WITH THE TOP OF THE RAFTER TAILS except the gable end one. I’ll get better pictures…
 

nmk_61802

Well-known member
Joined
Mar 6, 2008
Messages
965
Location
Central IL
FYI: When I did mine, Subfascia was last... I put the lookouts on 24" centers, and just cut the starting row as needed so the rest worked out. For the Subfascia, I started at one end and bent it up and down with clamps so it aligned with the tails. After everything was nailed tight a pulled I few strings to check for true. You can plane off high spots as needed. Unless something is way off it is doubtful that any adjustments will need made. Straight is more important than plumb since that is what the eye will see.

I beveled my subfascia too, as I didn't want to mess with using a straight edge and dropping it down. It just seemed easier to align a beveled top edge.

As NuttsGT said, sometimes you just need to get into it.
 
Last edited:

billconner

Well-known member
Joined
Jul 20, 2021
Messages
6,971
Location
Thousand Islands NYS
It’s supposed to be 3 1/2” higher to be exact but as the picture shows, it’s not.

You probably got this right but 3 1/2" at an angle, not vertically.

There was no rafter tail at all on gable truss, correct? I feel like the beveled fascia is throwing you off. Is it exactly parallel with top plate? If your added gable rafter tail was just a little off from rest of trusses, that would affect height.
 
OP
W

Wiebster

Well-known member
Joined
Jul 18, 2015
Messages
194
Location
Rapid City, Sd
You probably got this right but 3 1/2" at an angle, not vertically.

There was no rafter tail at all on gable truss, correct? I feel like the beveled fascia is throwing you off. Is it exactly parallel with top plate? If your added gable rafter tail was just a little off from rest of trusses, that would affect height.
Yeah, I think I beat this problem to death. I did go out in the rain to figure this out. The bevel is causing some of the “problem”. I did lift the subfascia up beyond level, found a straighter 2x4 and rechecked things. I’m now within an 1/4” to 1/8” high and that could just be a wet swollen 2x4 creating the extra height. It’s still not butting up square to the girder but maybe the girder is not perfectly plumb. I can live with this… or plane it if I have to. I’ll get the over hangs done all around, at least one row of sheathing on, and then check back with you guys on any dormer framing ideas you may have. I’m still thinking a 2x6 ridge beam between peaks, 2x6 rafters to a header, dormer opening, another double header, 2x6s down to top plate. Thanks guys!
 
OP
W

Wiebster

Well-known member
Joined
Jul 18, 2015
Messages
194
Location
Rapid City, Sd
Rechecked mine more accurately this time. At the wall it’s exactly 4” shorter then the common truss height at same location.
 

jack stand

Well-known member
Joined
Feb 29, 2012
Messages
3,353
Location
Lakes Region Maine
Thanks Jack Stand, I appreciate it. I just seem to be losing my momentum.
Standing up walls and dropping in the trusses is the fastest visual progress of any building.
Short of the siding and roofing, the rest of the process is much less impressive in terms of a big visual splash although just as much of an accomplishment.
 
To avoid these ads, REGISTER NOW!
Top Bottom