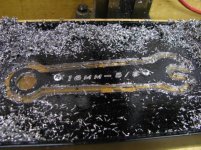
I needed a thin (about 1/8") 16mm wrench for the jam nuts that hold the change gears on my lathe. Since I wasn't sure where to buy one, and didn't want to spend the money for something I use so infrequently, I decided to make one. Took me about 20 minutes to draw up and program, and a couple hours to get set up, cut it out, and debur it. It's only aluminum (I had it already, and it's easy to machine), so I don't know if it'll last, but with light use it seems fine so far. This project was more just for fun anyhow. I'm pretty happy with how it turned out. Not bad for a ~$250 Sieg Micro Mill home-converted to CNC.

You are using an out of date browser. It may not display this or other websites correctly.
You should upgrade or use an alternative browser.
You should upgrade or use an alternative browser.
So I needed a wrench
- Thread starter sanddrag
- Start date

car99r
Well-known member
Now that is cool.
Would be more interested in seeing and hearing about your conversion on the mill. I have been thinking seriously about buying one of those Sieg's and then trying my hand at converting.
You have a thread on it or any write-ups you went off of?
Would be more interested in seeing and hearing about your conversion on the mill. I have been thinking seriously about buying one of those Sieg's and then trying my hand at converting.
You have a thread on it or any write-ups you went off of?
TRX
Active member
Mine is at www.bacomatic.org/~dw/tool/x2/x2.htm
The little mills cost a lot more than $250 nowadays...
The little mills cost a lot more than $250 nowadays...
Forgot to add a pic of it in the mill.
I don't have any thread or writeup on the mill, but I did a lot of reading on cnczone first. I used the 200 oz-in HobbyCNC kit which works well for this machine. I basically just mounted the motors in place of the handwheels. You can't cut too deep or fast on this machine. I did this .125 thick wrench in 5 depth cuts at 6 IPM. But, for the neat things you can make with it, it's really cool. I have since added the extended X and Y travel kits, and a counterweight for the head. I'll be using this little mill to make motor mounts for a small knee mill I have acquired, to swap over the CNC setup to that one.
I don't have any thread or writeup on the mill, but I did a lot of reading on cnczone first. I used the 200 oz-in HobbyCNC kit which works well for this machine. I basically just mounted the motors in place of the handwheels. You can't cut too deep or fast on this machine. I did this .125 thick wrench in 5 depth cuts at 6 IPM. But, for the neat things you can make with it, it's really cool. I have since added the extended X and Y travel kits, and a counterweight for the head. I'll be using this little mill to make motor mounts for a small knee mill I have acquired, to swap over the CNC setup to that one.
Attachments
LoneGunman
Well-known member
Now that is cool. I was thinking about converting my Linley Jig Borer which I use as a mill to CNC, someone has done it already.
Last edited:
I realize that part of the fun of this project is creating something yourself, but if you ever find yourself in the same situation in the future, consider Park Tool's line of cone wrenches.
http://www.actionvillage.com/833-517-0011
http://www.actionvillage.com/833-517-0011
car99r
Well-known member
Mine is at www.bacomatic.org/~dw/tool/x2/x2.htm
The little mills cost a lot more than $250 nowadays...
Forgot to add a pic of it in the mill.
I don't have any thread or writeup on the mill, but I did a lot of reading on cnczone first. I used the 200 oz-in HobbyCNC kit which works well for this machine. I basically just mounted the motors in place of the handwheels. You can't cut too deep or fast on this machine. I did this .125 thick wrench in 5 depth cuts at 6 IPM. But, for the neat things you can make with it, it's really cool. I have since added the extended X and Y travel kits, and a counterweight for the head. I'll be using this little mill to make motor mounts for a small knee mill I have acquired, to swap over the CNC setup to that one.
I think I am going to have to make that goal of mine for 2010! Very cool and I would love to be able to cut **** out like that. Very impressive!
Just out of curiosity. How much would you estimate it cost in extras besides the mill itself to convert?
I needed a thin (about 1/8") 16mm wrench for the jam nuts that hold the change gears on my lathe. Since I wasn't sure where to buy one, and didn't want to spend the money for something I use so infrequently, I decided to make one. Took me about 20 minutes to draw up and program, and a couple hours to get set up, cut it out, and debur it. It's only aluminum (I had it already, and it's easy to machine), so I don't know if it'll last, but with light use it seems fine so far. This project was more just for fun anyhow. I'm pretty happy with how it turned out. Not bad for a ~$250 Sieg Micro Mill home-converted to CNC.
that is very nice.... a bit of polish and buff on the rough edges and it's a $100 wrench easily!

Mine is actually the X1 Micro Mill, as opposed to the X2 Mini Mill in the link above. The X2 has some better features (larger motor and controller and R8 spindle) but the X1 is a little bit easier to CNC, and can actually have a larger table and travel than the X2, with the extended kits from LittleMachineShop.Just out of curiosity. How much would you estimate it cost in extras besides the mill itself to convert?
I really like making things out of wood on mine too. It's also very useful for quickly positioning accurately for drilling holes in a pattern and/or several identical parts.
So, to get going on this, here's how I would estimate the costs. Extended travel kits are optional, but I'd recommend it.
Harbor Freight 47158 Micro Mill - $256 after 20% Coupon
Hobby CNC Pro 3 Axis 205 oz-in complete kit - $265
Transformer and case - ~$50
LMS Extended Y travel kit - $106
LMS Extended X travel kit - $85
Material for motor mounts - ~$20
TOTAL: $782 with extended travel, $591 without.
And then you have all the tooling. To get started:
Vise - $100
3/8" Collet - $11
Drawbar - $12
Endmill Set - $19
Parallel Bars - $30
TOTAL: $172
Computer and software - Free (I use TurboCNC on DOS).
So, figure about $1000 to get you going pretty well.
And it just gets more expensive from there with boring heads, rotary tables, etc. And of course you need a lathe, and then bigger machines, and better tooling, etc....
Last edited:
car99r
Well-known member
Mine is actually the X1 Micro Mill, as opposed to the X2 Mini Mill in the link above. The X2 has some better features (larger motor and controller and R8 spindle) but the X1 is a little bit easier to CNC, and can actually have a larger table and travel than the X2, with the extended kits from LittleMachineShop.
I really like making things out of wood on mine too. It's also very useful for quickly positioning accurately for drilling holes in a pattern and/or several identical parts.
So, to get going on this, here's how I would estimate the costs. Extended travel kits are optional, but I'd recommend it.
Harbor Freight 47158 Micro Mill - $256 after 20% Coupon
Hobby CNC Pro 3 Axis 205 oz-in complete kit - $265
Transformer and case - ~$50
LMS Extended Y travel kit - $106
LMS Extended X travel kit - $85
Material for motor mounts - ~$20
TOTAL: $782 with extended travel, $591 without.
And then you have all the tooling. To get started:
Vise - $100
3/8" Collet - $11
Drawbar - $12
Endmill Set - $19
Parallel Bars - $30
TOTAL: $172
Computer and software - Free (I use TurboCNC on DOS).
So, figure about $1000 to get you going pretty well.
And it just gets more expensive from there with boring heads, rotary tables, etc. And of course you need a lathe, and then bigger machines, and better tooling, etc....
That is not too bad at all. I was expecting around 2000.00...lol
I understand more and more... I really want to do this but don't currently own a laptop. Would have to pick one of those up too. I would imagine something used and a little older would be OK if running DOS.
Will have to spend a bunch of time doing some reading up on this at cnczone. Thanks for answering my questions and when the times come I might have a bunch more.
For the computer I run a Pentium III 733Mhz Mini-ATX Dell tower I literally pulled out of a dumpster. I have a 15" LCD for the display. It's way more than adequate since it's just running FreeDOS and TurboCNC. Pretty much anything after a 486 that has a parallel port will work fine for TurboCNC. Many laptops don't have a parallel port, so keep that in mind. Also, I use a floppy disk on the "sneaker net" to get my files off my design computer in the house, and into the control computer in the shop.
A lot of people run Mach 3 software, which requires at least 1GHz and Windows XP. While this is the better software, I prefer the simpler interface of TurboCNC. However, if you run XP, you could network your machine with the house, or do the design right on it, or whatever. I wouldn't plan on doing anything else on the computer while the machine is moving though; it's risky.
For actually programming the toolpaths to cut the part, I use MasterCAM but there are a lot of different utilities out there, some even free.
One thing you may want to look into is building your own CNC router. A lot of people have done this for pretty cheap with impressive results. The large work area and high speeds are really nice to have for making plates, signs, etc. This type of machine is more suited to wood and plastic though, rather than metal.
Now that I've made this wrench, I'm curious how a stainless one would turn out. I imagine it could be buffed pretty nicely and would keep the finish, but it would probably difficult to cut, and hard on the tooling. Perhaps a 2024 or 7075 aluminum wrench?
I would make more of these, but the time it takes is kind of not worth it. It's about 23 minutes cutting time on this on the X1, not counting the setup or tool change. Once I cnc my little knee mill, I hope to cut that time in half or better.
TRX
Active member
X2 mill - $500
Xylotex motor and controller kit - $600
CNCFusion mount and ballscrew kit - $600
You can DIY the CNC stuff - cnczone.com has a lot on that - and with eBay and sweat you could do it for $200-ish instead of $1200-ish. At the time I had some extra money, and I wanted a functioning mill, not another project hanging fire.
I delayed a couple of years after first getting the bug, because the X2's 3.7 inch Y travel wouldn't do most of the things I wanted. I finally found out that it's easy to extend the Y (forward-back) travel, so I bought the mill and did the conversion.
FreeDOS/TurboCNC or Linux/EMC2 will get you going for free. Again, I had a few extra bucks at the time, and bought a Windows machine (I'm a Linux geek) and went with Mach 3 and MeshCAM so I could take advantage of the extra help from the wider user base and get up to speed faster. Now that I'm not a total raw newbie I expect I'd be just as happy with TurboCNC or EMC2.
The X2 is small. I bought it to learn on. One person can move it around, and if you unbolt the top from the bottom it's no problem at all. It's set up on a heavy-duty (2x6!) end table right beside my computer desk in the house, where it's available whenever I have a few minutes of spare time.
Yes, it is too small. The full-size manual mill out in the shop is too small. Mills and lathes are always too small, but even the least of them is better than nothing.
Eventually I'll leverage what I know from the X2 to make an informed purchase on a big mill, but I expect the X2 will still be around, sitting on a bench and making those little wotzis it's not worthwhile to do on the big machine.
car99r
Well-known member
Well, you guys have really sparked my interest. I am going to go sign up at cnczone and will be doing lots of reading!
JakeD
Well-known member
Very nice. I recently bought the X3 mill with plans to do a CNC conversion. It's amazing how much information there is on the web about this. Nice job on the wrench and thanks for posting.
TRX
Active member
It took me a few days to get out to the shop, take some pictures, and then upload them...
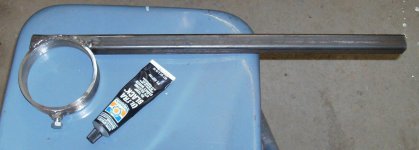
1) vise grips modified with 3/4x1/4" angle iron and leather pad, to hold ballscrews while removing their end nuts
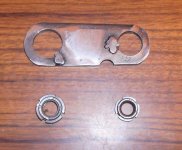
2) wrench for the fancy spline nuts used on ballscrews
3) 2-foot connecting rod wrenches. Cut-off sockets welded to quarter-inch steel flat. One is a Craftsman 7/16" wrench for weirdball Oliver rods I couldn't get a socket and the stretch gauge onto at the same time.
4) wrench for removing the center hub for a Clayton chassis dyno.
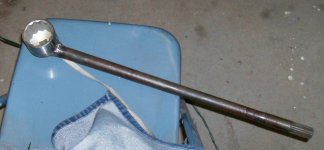
5) wrench for removing the mainshaft nut inside a Mazda truck transmission. Two inch socket with the end bored out to pass over the mainshaft, welded to a car axle for leverage.
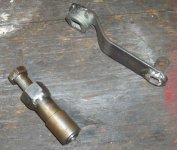
6) left: wrench for removing head studs on a Pantera, so the driver's side head can come off without having to remove the engine. With studs, the head will hit the gas tank before coming off.
right: something I made for working on the accessory belt parts of a K-car a long time ago. I forget what it for for, now.
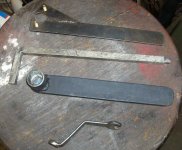
7: top: something for changing the timing belt on a Subaru Justy
top center: piece of square key stock, ground down to 12mm, to fit metric square trans and rear end drain plugs on a German-made Capri
bottom center: I don't even remember making this one! I have no idea what I made it for.
bottom: 10mm wrench made to change the water pump on a 1986 Ford ****** without having to remove accessories to get to the bolts
Somewhere I have a wrench I made for getting the Nikki carburetor off a 1984 Mazda pickup. It's made out of a 1/2" wrench, open end filed out to match the not-13, not-14mm nuts used to hold the carburetor down. It's bent up at a 45 degree angle to clear the carb linkage. The front nuts are under the (integral) float bowl, and can only be reached from the sides, except half the engine has to come apart to actually *get* to them, so I made a special wrench.
1) vise grips modified with 3/4x1/4" angle iron and leather pad, to hold ballscrews while removing their end nuts
2) wrench for the fancy spline nuts used on ballscrews
3) 2-foot connecting rod wrenches. Cut-off sockets welded to quarter-inch steel flat. One is a Craftsman 7/16" wrench for weirdball Oliver rods I couldn't get a socket and the stretch gauge onto at the same time.
4) wrench for removing the center hub for a Clayton chassis dyno.
5) wrench for removing the mainshaft nut inside a Mazda truck transmission. Two inch socket with the end bored out to pass over the mainshaft, welded to a car axle for leverage.
6) left: wrench for removing head studs on a Pantera, so the driver's side head can come off without having to remove the engine. With studs, the head will hit the gas tank before coming off.
right: something I made for working on the accessory belt parts of a K-car a long time ago. I forget what it for for, now.
7: top: something for changing the timing belt on a Subaru Justy
top center: piece of square key stock, ground down to 12mm, to fit metric square trans and rear end drain plugs on a German-made Capri
bottom center: I don't even remember making this one! I have no idea what I made it for.
bottom: 10mm wrench made to change the water pump on a 1986 Ford ****** without having to remove accessories to get to the bolts
Somewhere I have a wrench I made for getting the Nikki carburetor off a 1984 Mazda pickup. It's made out of a 1/2" wrench, open end filed out to match the not-13, not-14mm nuts used to hold the carburetor down. It's bent up at a 45 degree angle to clear the carb linkage. The front nuts are under the (integral) float bowl, and can only be reached from the sides, except half the engine has to come apart to actually *get* to them, so I made a special wrench.
Attachments


Last edited:
Ign
Well-known member
How did you do the box end? I assume you have a small radius in each corner, just used a small end mill? Filed in the corners?
bushhawg73
Well-known member
Very nice job. The wrench looks very professional.