To avoid these ads, REGISTER NOW!

So this is what a burnt up drill bit looks like!

uart

Well-known member
Joined
Nov 17, 2011
Messages
1,226
Location
Australia
First up my apologies about the lack of a "before" picture. I wasn't thinking about making a post regarding this issue at the time.

I bought a bunch of second hand drill bits from ebay, just to get a few larger sizes that I didn't have and to give me something to practice my sharpening skills with.

Anyway most of the drills were in pretty good condition, but there was a couple of "duds". The most interesting of these was a small Dormer bit (13/64" I think) that had been severely burnt up. Basically there was like a blob of metal that looked like it was welded onto the tip!

I didn't think it would be usable, but I thought it would be good sharpening practice, so I started grinding the mangled end off of it. Initially I thought the "blob" on the end was just the drill bit all mushroomed and mangled, but as I started grinding it looked more like the the blob was actually separate from (but welded to) the drill bit itself. It seemed more like the metal that was being drilled had melted and welded itself to the end of the drill bit.

Just wondering if anyone has ever seen this happen?

Anyway, just so nobody posts the "this thread is worthless without pics" thing I'll post what it looks like after the regrind. Again sorry about the lack of before grinding pics.
 

Attachments

  • burnt bit after regrind.jpg
    burnt bit after regrind.jpg
    32.6 KB · Views: 254
  • tip after regrind.jpg
    tip after regrind.jpg
    48.9 KB · Views: 253
To avoid these ads, REGISTER NOW!
OP
U

uart

Well-known member
Joined
Nov 17, 2011
Messages
1,226
Location
Australia
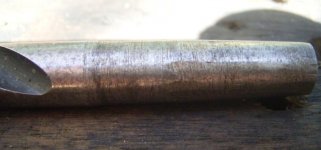
One other bit that's a bit of a dud, but interesting, is this one where it looks like someone has tried to hand grind a Morse taper onto a regular drill bit.

First picture is the taper ground bit. Second is a close up of where it was ground. Third is this bit and the above small Dormer bit together. Apart from these two oddball bits, the rest of the pack are all in pretty good condition.

BTW. The size on this one is about 3/8" or 9.5 mm, and I'm pretty sure it didn't start out it life with a Morse taper.
 

Attachments

  • hand ground morse taper.jpg
    hand ground morse taper.jpg
    64.2 KB · Views: 93
  • hand ground morse taper closeup.jpg
    hand ground morse taper closeup.jpg
    54.8 KB · Views: 100
  • two bits.jpg
    two bits.jpg
    63.2 KB · Views: 109

Fretters

Well-known member
Joined
Jan 25, 2014
Messages
4,217
Location
South Yorkshire, England
but as I started grinding it looked more like the the blob was actually separate from (but welded to) the drill bit itself. It seemed more like the metal that was being drilled had melted and welded itself to the end of the drill bit.

Just wondering if anyone has ever seen this happen?

It usually takes a fair old bit of speed and pressure to do friction welding, so they must have been having at that drill bit, (which must've been quite blunt too), with a vengeance to achieve it. :D
 
OP
U

uart

Well-known member
Joined
Nov 17, 2011
Messages
1,226
Location
Australia
It usually takes a fair old bit of speed and pressure to do friction welding, so they must have been having at that drill bit, (which must've been quite blunt too), with a vengeance to achieve it. :D

Yeah that's what I was thinking, heaps of speed and a really blunt bit. I'm really wishing that I had taken a photo of it now.

It's amazing how much abuse a drill bit can take though. After I ground the mangled end off and gave it a quick sharpen, I tested it by drilling through the head of a bolt and it breezed though without any problems. :)
 
Last edited:

mooseracing

Well-known member
Joined
Feb 10, 2010
Messages
133
BTW. The size on this one is about 3/8" or 9.5 mm, and I'm pretty sure it didn't start out it life with a Morse taper.

Stick it in a lathe and turn it straight again. Why someone would try and grind a taper on something that is soft :dunno:
 
OP
U

uart

Well-known member
Joined
Nov 17, 2011
Messages
1,226
Location
Australia
Here is the drill bit I found in my craftsman 100 drill press when I got it.
Ouch! That one looks like a stick of liquorish after someone has taken a bite from it. Did you have a go at resharpening it?

Seriously though, the little one I had was much worse. The end honestly looked like a little blob of molten metal. :)
 
OP
U

uart

Well-known member
Joined
Nov 17, 2011
Messages
1,226
Location
Australia
Stick it in a lathe and turn it straight again. Why someone would try and grind a taper on something that is soft :dunno:

Unfortunately I don't have a lath, and I'm pretty sure that anything I could do to it freehand on a grinder would only make it worse. So I think I'll just leave it as an oddity.

I've already got several drill bits in that size (3/8) anyway, so I don't really need it. Interestingly though it does still chuck up ok in my DP and run reasonably true. There's 1/2" of unground portion remaining at the top of the shank and the first 1/2" of the flutes have no margin, so if it's inserted all the way into a larger chuck it does kinda work. It's no good in my hand drills though.
 

iajonesy

Well-known member
Joined
Feb 8, 2009
Messages
2,467
Location
Iowa
UART,that sort of thing usually happens when a chip gets under the drill point and the operator doesn't clear it right away. I've seen it dozens of time in my career and have even done it a time or two. All the drills on this post so far are salvageable.

Mike
 
OP
U

uart

Well-known member
Joined
Nov 17, 2011
Messages
1,226
Location
Australia
I think the difference between them is your small one was drilling a pilot hole so as it melted it was mashed into the hole drilled so far. I think with mine it was widening a hole.
Yeah I think you're right, yours definitely looks like it was trying to widen a hole - probably at much too higher speed.

I haven't tried yet, the only thing I have to sharpen bits that big is a little craftsman attachment that grinds on the side of a bench grinder.
Sounds like a good opportunity to practice it freehand on the grinder. :)
 
To avoid these ads, REGISTER NOW!
OP
U

uart

Well-known member
Joined
Nov 17, 2011
Messages
1,226
Location
Australia
UART,that sort of thing usually happens when a chip gets under the drill point and the operator doesn't clear it right away. I've seen it dozens of time in my career and have even done it a time or two. All the drills on this post so far are salvageable.

Mike

Yeah it kind of looked like when the chips get clogged tightly and sort of bonded into the flutes, only this was like an extreme case where they got so hot that they welded themselves into the flutes and formed a molten blob.
 
OP
U

uart

Well-known member
Joined
Nov 17, 2011
Messages
1,226
Location
Australia
Yep, seems like a good bit to learn on! I've never tried before

Here's a couple of videos that explain it fairly well.


The first one is very well explained, though he does use a slightly different technique than the usual, which results in a faceted grind instead of the more common smooth radius on the clearance angle. Some people find this technique easier, but I find it quite difficult to do the secondary clearance the way he grinds it and have it stay so nicely in line with the cutting lip. This method does have the advantage of giving a very nice linear chisel point.

The guy in the second video is a bit rougher, but his technique of sliding the bit higher onto the wheel to grind the extra relief gives the more usual smooth (non faceted) grind. One thing this second guy doesn't explain so well is the importance of starting with the drill horizontal to the ground but above the centre line of the grinder (that is, above the tool rest). This is really important because that is what gives you your initial lip clearance angle of around 12 degrees. This guys drill bit is so large and grinding wheel so small that he gets that elevation happening naturally anyway.

BTW. Don't worry about trying to thin the web or make the "high tensile notch" that the guy in the first video does right at the end. It does work very well if you can pull it off, (kind of like a poor man's split point), but it's quite difficult to do without screwing up the cutting lip that you've just sharpened.
 
Last edited:

hangfirew8

Well-known member
Joined
Jul 14, 2008
Messages
879
Location
Central Maryland
It seemed more like the metal that was being drilled had melted and welded itself to the end of the drill bit.

Just wondering if anyone has ever seen this happen?

It's called Galling, the adhesive transfer of the workpiece metal to the cutter. It can be prevented by lubrication, correct cutter feed and turning speed, and of course using a sharp cutter.

Certain soft or "gummy" metals like some stainless steels are more prone to galling than others.

How many drill presses come with 5 or more speeds, and decades later, are still on the speed set at the factory?
 
OP
U

uart

Well-known member
Joined
Nov 17, 2011
Messages
1,226
Location
Australia
It's called Galling, the adhesive transfer of the workpiece metal to the cutter. It can be prevented by lubrication, correct cutter feed and turning speed, and of course using a sharp cutter.

Yeah I'm pretty sure that's what it was. Just must have been a lot faster and hotter then I've ever seen because it looked like it must have been almost a molten blob at one stage.

How many drill presses come with 5 or more speeds, and decades later, are still on the speed set at the factory?
Ha tell me about it. :) Mine has a lowest speed of 600 RPM and that's were it mostly stays. If I had a lot of very small holes to drill I'd probably take the time to move the belt up to a higher speed, but 99% of the time mine stays at 600.
 
OP
U

uart

Well-known member
Joined
Nov 17, 2011
Messages
1,226
Location
Australia
Thank you very very much. I've been looking at some videos and your commentary is really helpful.
Glad it was helpful. :)

I guess I should point out a few issues with that second video now. Although his basic technique is sound, there's definitely a few things that aren't quite right.

1. His wheel is way too coarse. You could use a coarse wheel like that to rough back a very damaged bit like the one you have, but always use the smooth wheel to finish off or to just touch up a drill that's relatively decent.

2. When he's sliding the drill bit up higher on the wheel he keeps saying "and slide it up like this, 8 to 12 degrees", but that is complete rubbish. He's going way higher than that, more like 30 to 40 degrees there. In reality the angle he is sliding up to there is not the 8 to 12 degrees, (which is meant to be the initial angle right at the front of the lip), but instead it's the trailing angle right at the heel of the drill. In other words, the clearance angle has to progressively increase, from its starting value of 8 to 12 degrees at the leading edge up to a considerably higher angle back at the heel. So what he is doing there is actually correct, it's just what he's saying while he's doing it that's wrong.

BTW. Neither video gives quantitative info on exactly how high above the rest you should start at (with the drill bit horizontal) to get that 8 to 12 degrees, but it's approximately one tenth of the diameter of the wheel. So for example with a 6" wheel it's about 0.6" and with an 8" wheel it's 0.8" and so on. This gets you right about 10 to 12 degrees purely due to the curvature of the wheel.
 
Last edited:

APEowner

Well-known member
Joined
Oct 2, 2009
Messages
4,166
Location
Sunny, New Mexico
I've blobified (<--look! a new word!) drill bits before by setting up for a production run where I'm running stuff as fast as I can without damage and then accidentally running the drill in reverse. They heat up quick when you do that!
 
OP
U

uart

Well-known member
Joined
Nov 17, 2011
Messages
1,226
Location
Australia
a production run where I'm running stuff as fast as I can without damage and then accidentally running the drill in reverse

My DP won't do reverse so I don't have that problem there. When using my cordless drill however, I sometimes forget to check the direction and wonder for a second or two why it's not cutting. :eek:
 

Fretters

Well-known member
Joined
Jan 25, 2014
Messages
4,217
Location
South Yorkshire, England
Ha tell me about it. :) Mine has a lowest speed of 600 RPM and that's were it mostly stays. If I had a lot of very small holes to drill I'd probably take the time to move the belt up to a higher speed, but 99% of the time mine stays at 600.

Mine is always on low speed too, regardless of bit size. I haven't even refitted the cone pulley on the motor side upto just. It just has a single small pulley on there. Running slow never hurts owt.
 
OP
U

uart

Well-known member
Joined
Nov 17, 2011
Messages
1,226
Location
Australia
Mine is always on low speed too, regardless of bit size.

I did screw up a center bit once by running too slow. Well it wasn't really the speed but me being stupid and applying too much pressure because I thought it wasn't cutting.

It was the first time I'd ever tried a center bit and I picked one with a ridiculously fine tip (about 0.7 mm from memory). Later when I tried calculating the "feed and speed" I realised that it would have been cutting but just the rpm and inches per rev were so low that I couldn't perceive it, and made me go too brutal on it. :eek:
 
To avoid these ads, REGISTER NOW!
Top Bottom